Attendance_System.mp4
There are two versions (Online and Offline)
| Online | Offline | |
|---|---|---|
| Training | - Only the host (me) can train new faces. | - When you clone the repo you can train new faces as you want. |
| Attend from Uploading Photo | ||
| Attend from Camera (Photo Mode) | ||
| Attend Live |
Online Version:
you can try it from here
- Clone this repo to get all the code and pre-trained model(pickle_file).
- Change current directory into the cloned repo folder.
- Install all of the libraries from environment.yml file by using these commands.
conda env create -f environment.yml
conda activate attendance
(optional step) to check if all libraries installed
conda env list
- Install all of the dependencies from packages.txt using this command.
- Linux users: cmake is a must.
sudo apt-get install cmake libgtk-3-dev freeglut3-dev
- Windows users:
You need to install visual studio community version from here and make sure that cmake is checked when installing because it is a must.
- Run this script streamlit_local_app_bussines_ready.py to try the offline version by running this code in the cloned repo directory after installing all dependencies.
streamlit run streamlit_local_app_bussines_ready.pyTo train the model on different faces, do the following:
- Get a photo that contains one person and rename it to the person's name and put it in the
dbfolder like this picture.

- Repeat that for as many faces as you want.
- Finally run the streamlit_local_app_bussines_ready.py script, and put it on Training mode, and press the
Train The Modelbutton, then you can go for testing.
- You have three modes. The best one is Live Attendance (Real case scenario)
To run it do the following:
- From the sidebar select
Attend Livemode. - Select
Attendance.csvfile, which is a file to record the arrival_time, date, penalty of every attendant. - Check
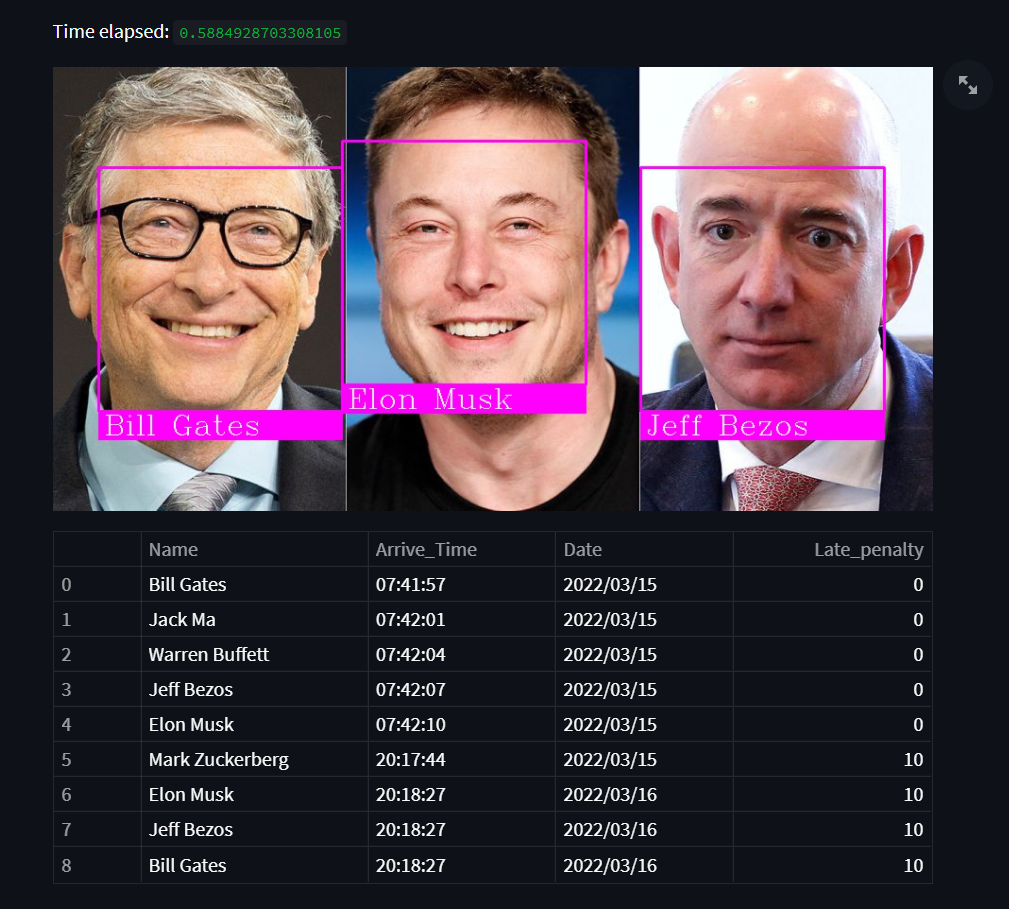
runbox to start the program then show the camera faces of people you've trained (people indbfolder)
- You can also try attending from uploading a picture of your face and it will work as well. To run it do the following:
- From the sidebar select
Attend from uploading imagemode. - Upload your image or drag & drop it and it will detect your face and make you attend just like this picture.
 Note: Of course this is for trying purposes the best model is
 Attend Livedescribed above.
- Preparing_local.py: It has all of the functions necessary for the main offline version script to work.
- Preparing_test_online.py: very similar file to the previous file with only some changes to make the online version work properly.
- Training.py: a script for training the model to memorize faces stored in
dbfolder. - encoded_faces.pickle: The output file of
Training.pyscript, It contains the encoded features of every face to compare it with new faces. - environment.yml and packages.txt : libraries and dependencies to make this project work.
- streamlit_local_app_bussines_ready.py: Attend live or from uploading photo or take a photo then attend.
- streamlit_test_app_online.py: very similar file to the previous script but without the Live Attendance Feature and it works online right from this link.
- Detecting all of the faces in the picture/video:- using HOG algorithm. This function do the work
face_recognition.face_locations. - Transform the face to make the eyes and mouth centered after finding main face landmarks using face landmark estimation.
- Encode the faces by generating 128 different measuremts per face (saving faces). This function do the training (encodings)
face_recognition.face_encodings - Recognition:- comparing new faces from photo/video with the encoded faces in our dataset. This function
face_recognition.compare_facesdo the comparing and return a list of True and False. - Make the attendance :-
markattendance()this function uses OpenCV library to annotate the faces and then add the name each detected face -based on the previous function returnface_recognition.compare_faces- to the attendance list Attendance.csv.
I have used these resources to build my project:
- medium article: - It descripe in details how face recognition is really working under the hood.
- YouTube Tutorial: - for attendance part using OpenCV and HOG. It is basically based on the previous article.
- I've written the code myself based on the video and enhanced some features like when attending live it was mainly designed to be used for one day only.
I changed the logic and make it work forever.
I've aslo added the penalty feature for people who are late to work, (they get a 10$ penalty if they came after 9:00 AM).
If you like this project, I appreciate you starring this repo.
Please feel free to fork the content and contact me on my LinkedIn account if you have any questions.
- Penalty (10$) for comming late to work (After 9:00 AM).
- Detect 3D faces only. (printed faces or rendered faces on screens shouldn't be detected).