Ordinary solution for Asterisk/FreePBX resilient branch site telephony system.
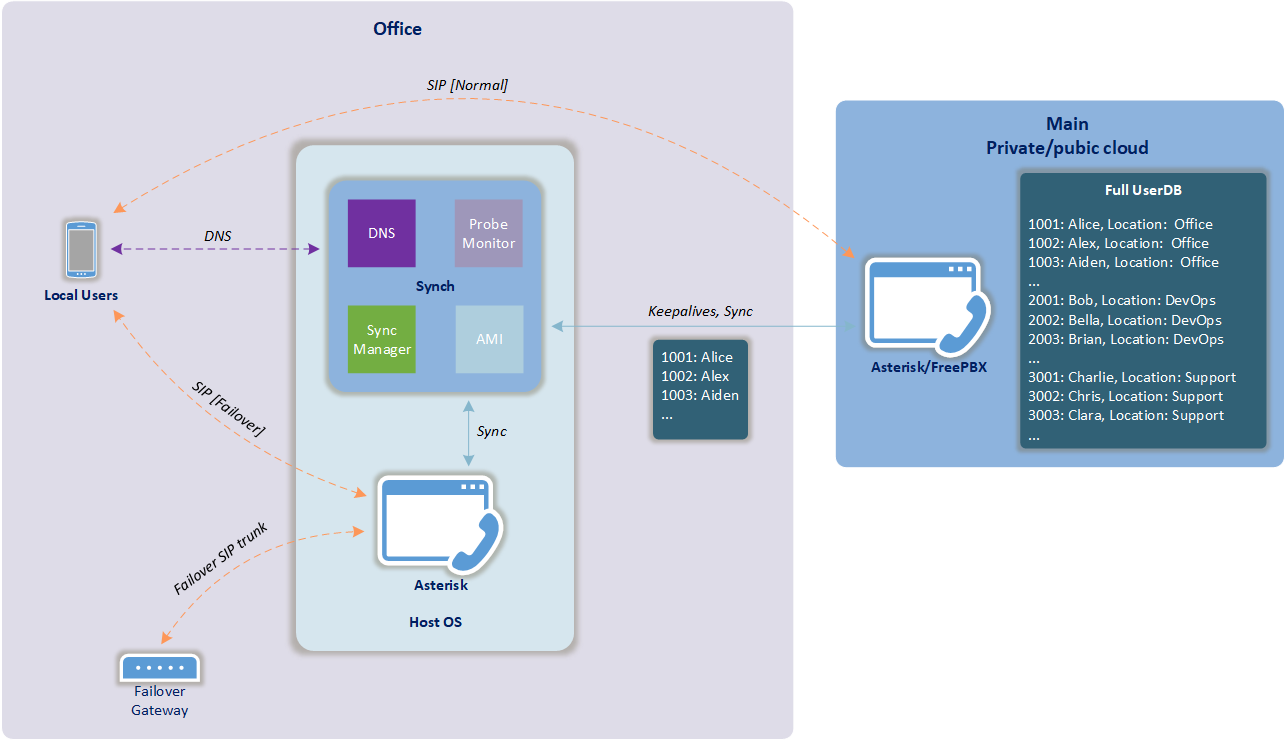
Synch addresses a few particular technical challenges that inevitably arise when one builds a central call-processing multi-site telephony system on Asterisk/FreePBX.
These challenges are:
- Provide local site call-processing resiliency during main system outage or network connection loss.
- Keep in-sync central system user accounts and configurations with remote sites.
- Automatic failover and fallback.
- Connection health monitor
- Synchronisation of user configurations between central and branch sites
- Filtering
- Embedded DNS server to handle phone registrations
- Easy remote monitoring
- Configuration changes versioning
- System service
- Context synchronisation
- Dynamic dialplan generation
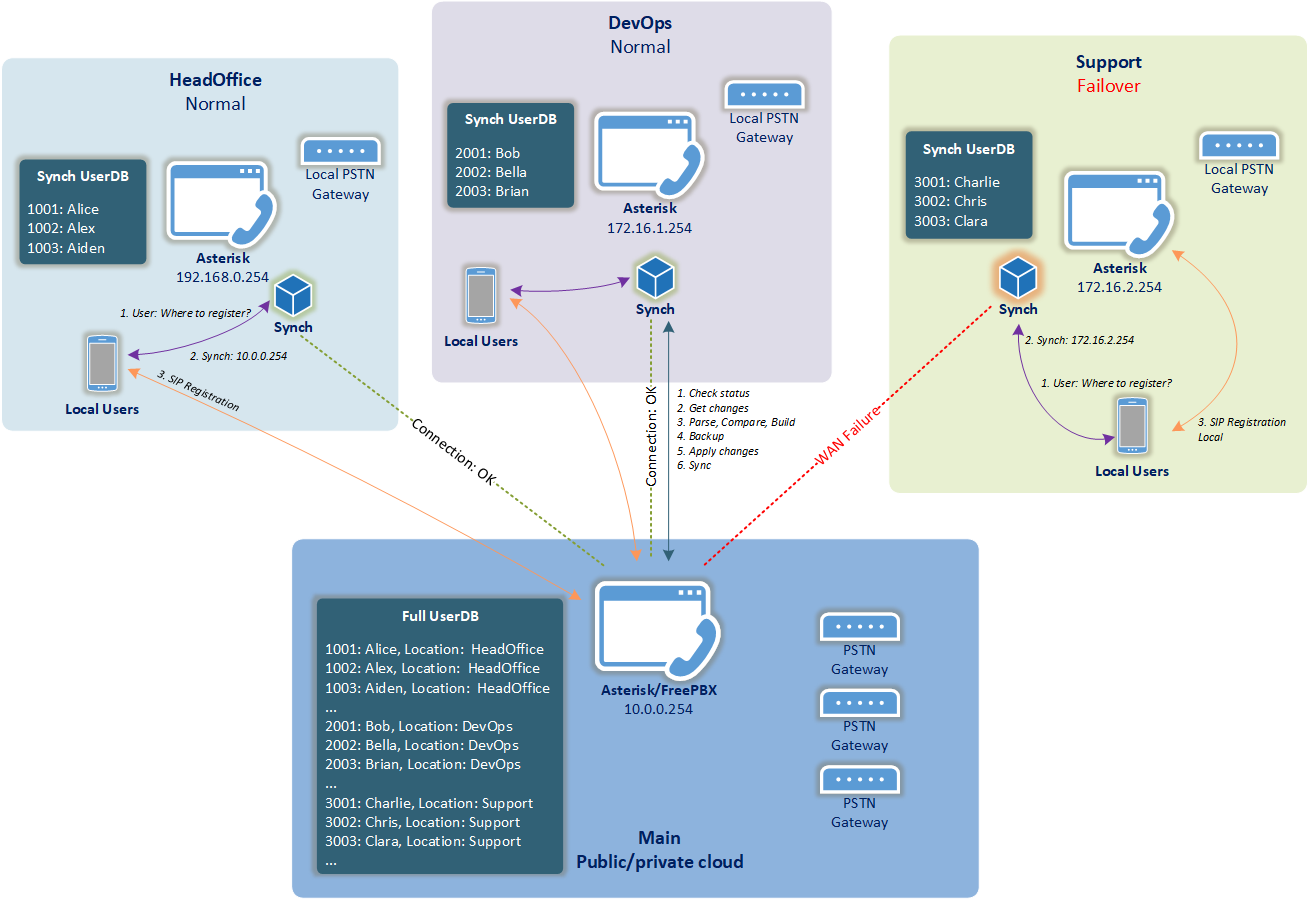
- Main Asterisk/FreePBX system is configured with all users and their features, applications, voicemails etc.
- Basic Asterisk installation is deployed on each site that requires resiliency. Depending on scale of the site, Asterisk may be installed on anything starting from Raspberry Pi and upwards.
- Synch is installed on top of each Asterisk and then integrated with the main system via Asterisk Manager Interface (AMI).
- Synch periodically checks changes and synchronises user accounts for its site. To do that you set up a filter that matches a subset of users specific to a site.
- Synch monitors connection to the main system and provides handsets failover and fallback using its embedded DNS server for this purpose.
Synch has to be downloaded and installed on each remote site that requires resiliency and local call-processing. It's recommended to install synch from same system user that runs Asterisk process on that site.
- Main site: Installed and configured instance of Asterisk/FreePBX. Users created and configured.
- Synch site: Basic installation of Asterisk deployed.
There are two options to download the application:
- Build from source files (requires .NET Core SDK 2.2+) or
- Download self-contained release packaged with essential .NET Core libraries and runtime.
sudo rpm -Uvh https://packages.microsoft.com/config/rhel/7/packages-microsoft-prod.rpm
sudo yum update
sudo yum install dotnet-sdk-2.2wget -qO- https://packages.microsoft.com/keys/microsoft.asc | gpg --dearmor > microsoft.asc.gpg
sudo mv microsoft.asc.gpg /etc/apt/trusted.gpg.d/
wget -q https://packages.microsoft.com/config/debian/9/prod.list
sudo mv prod.list /etc/apt/sources.list.d/microsoft-prod.list
sudo chown root:root /etc/apt/trusted.gpg.d/microsoft.asc.gpg
sudo chown root:root /etc/apt/sources.list.d/microsoft-prod.list
sudo apt-get install apt-transport-https
sudo apt-get update
sudo apt-get install dotnet-sdk-2.2Assuming that Asterisk system user is asterisk:
cd /home/asterisk
mkdir -p src && cd src
git clone https://github.com/xf86cfg/synch.git
cd synch
chmod +x *.sh
./build.shAssuming that Asterisk system user is asterisk:
cd /home/asterisk
mkdir -p publish && cd publish
wget https://github.com/xf86cfg/synch/releases/download/v1.0b/synch-linux-x64.tar.gz
tar -zxvf synch-linux-x64.tar.gz && cd synch-linux-x64
chmod +x *.shRegardless of what method of distribution has been chosen, installation process is exactly same:
sudo ./install.sh- Main system AMI configuration file
manager.confconfigured similar to below:
[general]
enabled = yes
port = 5038
bindaddr = 10.0.0.254
[synch]
secret = SomePasswordHere
read = all
write =
- Local AMI configuration file
manager.confconfigured similar to below:
[general]
enabled = yes
port = 5038
bindaddr = 127.0.0.1
[synch]
secret = SomePasswordHere
read = all
write = all
Assuming that Synch has been installed in default directory /opt/synch, open configiuration file /opt/synch/appsettings.json in text editor and adjust settings.
You may leave default settings as it is and adjust only specific settings for your site marked with yellow below:
{
  "loglevel": {
    "default": "information" //Accepted values: Trace, Debug, Information, Warning, Error, Critical
  },
  "probemonitor": {
    "failureTolerance": 5, //Number of consequent probes that have to fail to consider the main system as Failed and to initiate failover mode
    "aliveThreshold": 5, //Number of consequent probes that have to succeed to consider the main system as Stable and to initiate fallback mode
    "errorPenaltyPoints": 1, //Penalty points for each error on TCP/IP stack level
    "interval": 5 //Probe interval (seconds)
  },
  "amiremote": { //AMI details of the main system
    "hostname": "10.0.0.254",
    "port": 5038,
    "username": "synch",
    "password": "SomePasswordHere"
  },
  "amilocal": { //AMI details of the local site system. Hostname is not required as this is a localhost
    "port": 5038,
    "username": "synch",
    "password": "SomePasswordHere"
  },
  "syncmanager": {
    "remotefilename": "sip_additional.conf", //User accounts confguration file on the main system, sip_additional.conf is a common file that contains user accounts
    "interval": 300, //Synchronisation interval (seconds)
    "filterkey": "accountcode", //Filter key
    "filtervalue": "^HeadOffice$", //Regex filter value
    "localconfigspath": "/etc/asterisk/" //Path to local site Asterisk config directory with trailing "/"
  },
  "dnsservice": {
    "listenaddress": "192.168.0.254", //Synch DNS socket
    "domain": "example.local", //Internal zone for SIP record
    "record": "sip", //SIP record (sip.example.local)
    "recordttl": 300, //SIP record TTL (seconds)
    "targetnormal": "10.0.0.254", //Main Asterisk system IP address
    "targetfailover": "192.168.0.254", //Local site Asterisk system IP address
    "forwarder": "1.1.1.1", //Forwarder for all other DNS requests
    "refreshinterval": 300, //SOA Refresh (seconds)
    "retryinterval": 300, //SOA Retry (seconds)
    "expireinterval": 300, //SOA Expire (seconds)
    "minttl": 300, //SOA Minimum TTL (seconds)
    "ttl": 300, //SOA Default TTL (seconds)
    "defaultstate": "Failover" //Initial state when service starts up. Accepted values: Normal, Failover
  },
  "servicecontrol": { //Monitoring settings
    "token": "token1", //Authentication token. Consider making unique token for each site
    "listenaddress": "127.0.0.1", //Monitoring socket
    "port": 65038 //Monitoring port
  }
}
Assuming that main SIP configuration file on the site Asterisk system is /etc/asterisk/sip.conf:
sudo echo "#include \"sip_synch.conf\"" >> /etc/asterisk/sip.confYour local main SIP configuration file must not contain any user accounts. User accounts are synchronised from the main system to sip_synch.conf and therefore reference is required.
Though, you may use main SIP configuration file to store trunk settings, templates etc.
-
Instruct handsets to use Synch DNS socket for DNS queries. This can be achieved in many ways: DHCP, phones provisioning server, phones configuration templates or through adjusting manual settings on the phones.
-
You may or may not need to set up SIP Registration Expiry timer on the handsets to match TTL value of the SIP record
sip.example.local. Some handsets fully rely on TTL value of a SIP server DNS record and when it expires, they query DNS server and then re-register to a new IP address if it changed. Whereas some handsets re-trigger DNS query only when their registration timer expires. The general approach to this is to make a few failover/fallback tests without touching SIP Registration Expiry on the handsets. If handsets don't switchover as expected, you will need to adjust SIP Registration Expiry timer as explained above.
Synch doesn't have to synchronise all user accounts from the main system. Instead, it has to copy only a subset of users related to a site Synch looks after. To instruct Synch what particular user accounts have to be kept in-sync you need to think about a filter key and a pattern that describes those users.
Considering current example let's have a look at sip_additional.conf on the main system:
[1001]
callerid=Alice <1001>
permit=192.168.0.0/255.255.255.0
dial=SIP/1001
mailbox=1001@default
context=from-internal-headoffice
accountcode=HeadOffice
...
[1002]
callerid=Alex <1002>
permit=192.168.0.0/255.255.255.0
dial=SIP/1002
mailbox=1002@default
context=from-internal-headoffice
accountcode=HeadOffice
...
[1003]
callerid=Aiden <1003>
permit=192.168.0.0/255.255.255.0
dial=SIP/1003
mailbox=1003@default
context=from-internal-headoffice
accountcode=HeadOffice
...
[2001]
callerid=Bob <2001>
permit=172.16.1.0/255.255.255.0
dial=SIP/2001
mailbox=2001@default
context=from-internal-devops
accountcode=DevOps
...
[3001]
callerid=Charlie <3001>
permit=0.0.0.0/0.0.0.0
dial=SIP/3001
mailbox=3001@default
context=from-internal-support
accountcode=Support
...
[Dev_Trunk]
disallow=all
type=peer
nat=no
allow=alaw
context=from-trunk-sip-Dev_Trunk
...
[Prod_Trunk]
disallow=all
type=peer
nat=no
allow=alaw
context=from-trunk-sip-Prod_Trunk
...
As you may see, there are current configuration sections for users and for some trunks. Let's say for this particular site we want to synchronise just users from HeadOffice department. There are a few patterns that can help. For instance:
- Matching
accountcode. This is one of the most common ways to distinguish between different user groups. In FreePBX distro, account code can be easily assigned through GUI in Advanced settings of the extension:"syncmanager": { "filterkey": "accountcode", "filtervalue": "^HeadOffice$" }
- Matching allowed network (192.168.0.0/24):
"syncmanager": {
    "filterkey": "permit",
    "filtervalue": "^192\.168\.0\.[0-255]\/255\.255\.255\.0$"
}
- Matching
dialdestination:"syncmanager": { "filterkey": "dial", "filtervalue": "^SIP\/1[0-9][0-9][0-9]$" }
- Matching
contextif user accounts for remote sites belong to different contexts:"syncmanager": { "filterkey": "context", "filtervalue": "^from\-internal\-headoffice$" }
- You can also match section name in square brackets (e.g. [1001]) by using a reserved key
categorynameand a value:"syncmanager": { "filterkey": "categoryname", "filtervalue": "^1[0-9][0-9][0-9]$" }
Once appsettings.json is configured and saved, it's time to run the application.
- Main Asterisk/FreePBX is up and running
- Local site Asterisk is up and running
- Synch installed and configured on local site
Assuming that Synch has been installed in default directory /opt/synch:
/opt/synch/synchsudo systemctl start synchTo monitor status of the application you can connect to a monitoring socket (default 65038) and send a command in the format Command(<token>).
Currently only GetStatus() command supported.
echo "GetStatus(token1)" | nc 127.0.0.1 65038
[{"Timestamp":"20190522181925","Monitor":"Stable","Sync":"Synced","Service":"Normal"}]
Monitor - represents keepalives state. Possible values are: Init, Unstable, Failed, Stable
Sync - represents synchronisation state. Possible values are: Init, Unsynced, Synced
Service - represents failover state. Possible values are: Init, Failover, Normal
Assuming downloaded source is in /home/asterisk/src/synch:
cd /home/asterisk/src/synch
sudo ./uninstall
