- AsyncResult.md: 关于异步处理/hibernate validation/文件上传下载/拦截器等/swagger等
- QQLogin.md: OAuth2协议的介绍和社交登录
- OAuth2.md: 用Spring Security开发自己的OAuth2协议实现,自己实现服务提供商的功能,分发给其他应用access_token
- SSO(JWT).md: 基于JWT实现单点登录
- Dynamic.md:实现了完全动态的权限控制系统.以及spring security框架的大致源码解析.
- WebFlux.md: Spring Boot 2.0 + 版本特性 WebFlux异步响应式框架入门
该项目实现了许多东西.
- 基于SpringSecurity框架的表单/验证码/手机验证码登录方式.
- 基于SpringSocial的社交登录(qq和微信)
- 基于SpringSecurityOAuth2的,将自己作为认证服务器和资源服务器.并使用社交/表单/验证码/手机验证码登录方式 获取access_token.
- 将SpringSecurityOAuth2扩展为JWT(json web token),并实现对应的单点登录.
- 基于SpringSecurity的角色_权限对应的完全动态的权限控制. 例如运行时修改要拦截的url等.
- Spring Boot2版本增加的WebFlux框架..入门...简陋.
- Spring MVC异步处理的实现.
框架的源码其实并不一定有多么深(不是每个框架都和Spring Contetnxt那样的......).
看源码能搞清楚很多事情.并且可以学到写轮子的技巧.(对于实际业务开发..用那么多可扩展的设计模式是作死...)
    关于设计模式,我曾经照着一篇博客,敲打过几乎常用的所有设计模式.然后在项目中真正运用得并不多.
我还记得那个博主写的一句话,最常用的是模版方法模式.我并无他想.
    直到前些天,我开发公司的一个短信发送平台时,因为需要接入多个短信发送渠道,并且以后需要能扩展渠
道(这周就在新加一个渠道.移动的CMPP协议,贼难受).我就一直尽量在编写代码时将其设计的比较抽象,并尽
可能地消除了一些后期可能需要改动的if语句;例如使用表驱动(类似一个数组或map,使用索引或key选择实现
类)这样子的;
    刚开始时,我并没有使用其他设计模式的想法.在我按部就班地写完第一个渠道的发送方法(无非就是获取
发送参数,封装成请求参数,发送,处理同步返回值等(当然该系统还有其他比较繁琐的逻辑)),突然就顿悟了,
稍稍重构了下代码,将其重构成了模版方法.顿时后面的代码都十分简单了.然后在异步回调,短信上行的处理中
,我全部使用了模版方法.终于体会到他的强大.简单而强大.
    此外,近来我也细细想过.对于一个并无扩展需求的业务系统来说,设计模式或者说抽象的编程真的没什么
必要.就拿目前简直是行业规范的service层接口来说把,哪个业务系统会需要把整个service层的实现全部替
换了.将其抽象出接口来,简直就是给开发找麻烦.
    以我目前的理解,设计模式最好的运用场合是在写轮子的时候.将应用的逻辑进行分层,将有自定义需求的
所有逻辑抽象出来,方便以后自定义的扩展才是正解.
- 如果出现idea父模块无法导入子模块,可以在设置里面搜索maven,找到忽略的文件,去掉该子模块的勾选即可。
- 如果导入后,发现还是未解决问题,可以打开idea的maven project,选中该项目,刷新即可
- SpringMVC中RequestMapping("/")这个/不能乱加,如果controller类已经有/user这样一个前缀,
那么如果在方法上在注解上"/",访问的路径就会为/user/,使用/user将无法访问 - !!!之前遇到HttpClient发送json串请求controller方法,参数一直为null.是因为没有加@RequestBody.
- !!!spring boot 属性注入 @ConfigurationProperties 必须有getter/setter方法才能生效 血泪教训
- IDEA mavenProject窗口中无法刷新出新建的Maven项目,可尝试在Project窗口的项目上右击,选择刷新即可.
-
一直以来.我都有一个疑问.就是为什么自己配置的@ConfigurationProperties.总是无法在application.yml文件中自动提示.显示无法解析. 于是我今天特地好好研究了一番.找了另一框架中的自定义配置,反复对比我和它的差别.无意间还点进了一个文件:
META-INF/spring-configuration-metadata.json. 我以为找到了答案.但是他的配置很繁琐,不可能 每个属性都这么配置过去.而且这个文件只有在编译后才会出现..
恍然大雾...比对(我和kafkaProperties都是嵌套的属性)..将子属性类变成父属性类的静态内部类..重新编译.
在yml中出现了自动提示. Java规范的属性名是驼峰.它默认将驼峰转换为 'xx-xx'. 但手动输入原属性名.也是可以匹配上的. END -
而后,又出现一个问题.就是当我自定义属性上使用javadoc注解了中文注释时.在yml的自动提示中乱码了.
我的IDEA很早将几乎所有编码都设置成了UTF-8,在metadata.json中,也是UTF-8,并且其他所有地方都不存在乱码.
于是.海里捞针的百度..终于发现了问题
在idea目录/bin中的idea64.exe.vmoptions中,追加-Dfile.encoding=UTF-8,重启IDEA即可.
- 而后..他突然莫名其妙又提示无法解析..重新编译.重启IDEA等都试了..打开那个json文件看了下.. 果然,是文件中没有生成.于是乎..先clean.再重新编译.ok.
-
Spring Boot启动类自动扫描的包,是他当前所处的包下面所有的类.所以才会有位置的限制.也可以用@Scan啥的注解自定义
-
如下打包时,可以将所有依赖都打到jar中去运行.基于springboot
<!--spring boot专门的打包工具,将所有依赖的jar打到一个jar中直接运行-->
            <plugin>
                <groupId>org.springframework.boot</groupId>
                <artifactId>spring-boot-maven-plugin</artifactId>
                <executions>
                    <execution>
                        <goals>
                            <goal>repackage</goal>
                        </goals>
                    </execution>
                </executions>
            </plugin>
-
maven打包时,必须将自己依赖的其他子模块都先install.
-
在yml中如下配置session超时时间,单位为秒.但是如果.小于60s,默认也会转为1分钟.
server:
  session:
    timeout: 10
-
StringUtils.substringBetween() 截取字符串中,被哪两个首位字符包裹的字符串
-
ConditionalOnProperty, 根据配置的属性和属性值,判断是否启用bean
@ConditionalOnProperty(prefix = "zx.security.oauth2",//属性前缀
        name = "storeType",//属性
        havingValue = "jwt",//预期值
        matchIfMissing = true//指定属性如果没有设置,条件是否匹配,为true,则没有设置属性时,注入bean
        //注意,是属性是否设置,而不是是否是该值.如果没设置,注入该bean
)
-
PasswordEncoder类,可以直接用来加密解密
-
ServletWebRequest类,可以封装request和response.
-
如下写法,可以将spring容器中所有该类型的bean都放入map中,并以每个bean各自的name为key:
@Auwired
private Map<String,User> userMap;
- 如下写法,可以用来自定义配置bean:
写轮子的时候用,如果调用者没有配置自己的bean,才使用轮子默认的bean,除了name外,还可以使用type等
//该注解表示将在该类中使用@Bean配置bean,相当于用java代码写原先的spring.xml中的beans标签配置bean
@Configuration
public class CaptchaBeanConfig {
    @Autowired
    private SecurityProperties securityProperties;
    //当spring在容器中无法找到名字为imageCaptchaGenerator的bean的时候,才使用该方法生成bean
    @Bean
    @ConditionalOnMissingBean(name = "imageCaptchaGenerator")
    public CaptchaGenerator imageCaptchaGenerator() {
        //创建默认的图片验证码生成器
        BasicImageCaptchaGenerator imageCaptchaGenerator = new BasicImageCaptchaGenerator();
        imageCaptchaGenerator.setSecurityProperties(securityProperties);
        return imageCaptchaGenerator;
    }
}
-
实现InitializingBean,并重写方法,可以在所有bean初始化完毕时,执行某些操作
-
ServletRequestUtils工具.如下方法可以从request获取指定类型的指定key的参数值,如果取不到就用默认值:
ServletRequestUtils.getIntParameter(
                request.getRequest(),
                "width",
                securityProperties.getCaptcha().getImage().getWidth());
-
在resources目录中,新建resources目录.并写一个index.html.可以访问url/index.html直接访问到
-
ObjectMapper : springMVC在启动时自动注册的bean,用于将对象转为json,可以直接注入到代码中
-
ctrl + h ,类的继承图;
-
使用MediaType(spring的),几乎有所有常用的http请求的contentType属性的值的常量:
例如MediaType.APPLICATION_JSON_UTF8_VALUE -
使用TimeUnit.SECONDS.sleep(x);可以使用秒..暂停线程.
-
在idea的MavenProject窗口选择module,右击选择show dependencies,可以很清楚地查看依赖关系图
-
如下,可以获取classpath目录的路径(该路径为classes下的resources路径):
ClassPathResource resource = new ClassPathResource("mock/response/01.json"); resource.getFile(); -
Commons-lang包中有RandomStringUtils可以生成随机数
-
在@ControllerAdvice注解的类中的@ExceptionHandle注解的方法上,可以使用如下注解返回指定状态码:
@ResponseStatus(HttpStatus.INTERNAL_SERVER_ERROR) -
JsonPath:在github中的一个项目,可以用类似jquery选择器那样的语法,取出一个json中任意的信息。
-
在spring mvc中使用url传参时,可以指定参数的正则表达式(如下就是指定id必须为数字):
@GetMapping("/user/{id:\d+}")
注意,如果传参不符合该正则,返回的状态码将是404 -
使用如下代码,可以在不修改实体类的情况下,反射实体类的toString方法:
ReflectionToStringBuilder.toString(userQueryCondition, ToStringStyle.MULTI_LINE_STYLE);
直接sout上面的表达式即可输出; -
如果在controller中使用springDataJpa的pageable对象接收分页参数,可以用如下注解,来指定其默认值:
@PageableDefault(size = 10,page = 0,sort = "username,asc") Pageable pageable -
使用set集合,如果有排重需求,并且使用的不是java基本类型,最好 重写hashcode和equals方法.IDEA可以自动生成这两个方法.
生成时可以指定比较哪些字段进行排重.一般只比较id即可. -
decimal(20,2): 该类型表示的是18位整形和2位小数.注意..
-
使用Decimal类进行计算时.如果构造函数传入的是Double之类的类型,
一样无法保证精度.只有使用String类型的值构造(可以Double.toString). 然后进行计算才能保证精度.
- 新建项目zx-security
- 在该项目下,建立四个子模块
- app
- browser
- core
- demo
- 在zx-security该父模块下添加依赖:
<dependencyManagement>
    <dependencies>
        <!--管理spring的版本-->
        <dependency>
            <groupId>io.spring.platform</groupId>
            <artifactId>platform-bom</artifactId>
            <version>Brussels-SR4</version>
            <type>pom</type>
            <scope>import</scope>
        </dependency>
        <dependency>
            <groupId>org.springframework.cloud</groupId>
            <artifactId>spring-cloud-dependencies</artifactId>
            <version>Dalston.SR2</version>
            <type>pom</type>
            <scope>import</scope>
        </dependency>
    </dependencies>
</dependencyManagement>
和编译插件:
<build>
    <plugins>
        <plugin>
            <groupId>org.apache.maven.plugins</groupId>
            <artifactId>maven-compiler-plugin</artifactId>
            <version>2.3.2</version>
            <configuration>
                <source>1.8</source>
                <target>1.8</target>
                <encoding>UTF-8</encoding>
            </configuration>
        </plugin>
    </plugins>
</build>
- 在zx-security-core子模块中增加依赖(自行查看)
- 然后在app模块中加入core模块的依赖:
    <dependency>
        <groupId>com.zx.security</groupId>
        <artifactId>zx-security-core</artifactId>
        <version>${zx.security.version}</version>
    </dependency>
注意,该version是写在父模块中的,可直接引用 6. 在browser中加入依赖:
    <dependency>
        <groupId>com.zx.security</groupId>
        <artifactId>zx-security-core</artifactId>
        <version>${zx.security.version}</version>
    </dependency>
    <dependency>
        <groupId>org.springframework.session</groupId>
        <artifactId>spring-session</artifactId>
    </dependency>
- 在demo中依赖:
    <dependency>
        <groupId>com.zx.security</groupId>
        <artifactId>zx-security-browser</artifactId>
        <version>${zx.security.version}</version>
    </dependency>
- 在demo中新建com.zx包,然后新建DemoApplication类,并加入@SpringBootApplication注解等。
写到这的时候,我才意识到,这就是springBoot项目不依赖spring为父模块,而是依赖自定义的父模块的写法。 - 直接在该Application类上写@RestController,然后写个/test
- 新建application.yml,配置如下(如果不关闭security,默认用户名为user,密码为启动时输出的一串默认密码):
spring: datasource: driver-class-name: com.mysql.jdbc.Driver url: jdbc:mysql://127.0.0.1:3306/zx-security?useUnicode=yes&characterEncode=UTF-8 username: root password: 123456 session: store-type: none #暂时关闭spring-session的配置,不然会报错 security: basic: enabled: false #暂时关闭spring-security的配置,不然会报错
- 注意,此时如果将demo项目打包,只会是一个普通的jar,无法直接运行启动spring boot,
还需要在pom.xml中加入,才可以将它包含的依赖一起打包,以便直接用jar运行spring boot,
包名就是finalName:
<build>
    <plugins>
        <plugin>
            <groupId>org.springframework.boot</groupId>
            <artifactId>spring-boot-maven-plugin</artifactId>
            <executions>
                <execution>
                    <goals>
                        <goal>repackage</goal>
                    </goals>
                </execution>
            </executions>
        </plugin>
    </plugins>
    <finalName>Demo</finalName>
</build>
- 用URL描述资源
- 用HTTP方法描述行为
- 用HTTP状态码表示不同的结果
- 用json交互数据
- 资源表达中包含了链接信息,也就是返回的json中包含其他的api url(一般达不到该要求) 例如:
/user?name=zx GET 查名字 /user/1 GET 查id /user POST 增 /user/1 DELETE 删 /user/1 PUT 改
- 在demo项目引入依赖:
    <dependency>
        <groupId>org.springframework.boot</groupId>
        <artifactId>spring-boot-starter-test</artifactId>
    </dependency>
- 编写如下测试类即可测试controller的代码:
@SpringBootTest
@RunWith(SpringRunner.class)
public class UserControllerTest {
    //spring的web容器
    @Autowired
    private WebApplicationContext wac;

    //mvc模拟类
    private MockMvc mockMvc;

    //使用容器构建mvc模拟类
    @Before
    public void setup() {
        mockMvc = MockMvcBuilders.webAppContextSetup(wac).build();
    }

    @Test
    public void whenQuerySuccess() throws Exception {
        /**
         * 向/user发起get请求,其中header的contentType为json,参数自定义
         * 并且期望,返回的http状态码为200,
         * 并且期望,将返回的json解析后,数组长度为3
         */
        mockMvc.perform(MockMvcRequestBuilders.get("/user")
                .contentType(MediaType.APPLICATION_JSON_UTF8)
                .param("username", "zx"))
                .andExpect(MockMvcResultMatchers.status().isOk())
                .andExpect(MockMvcResultMatchers.jsonPath("$.length()").value(3));
    }
}
- 将要返回成json串的实体类,进行改造:
创建不同的视图,每个视图代表一个controller的方法,区分每个方法返回时,该对象该返回的属性和不返回的属性.
以往我的写法都是创建多个返回的dto对象,显得很_麻瓜
@Data
@AllArgsConstructor
@NoArgsConstructor
public class User {

    //用户简单视图
    public interface UserSimpleView {};

    //用户详情视图
    public interface  UserDetailView extends UserSimpleView {};

    //将该属性在简单视图展示
    @JsonView(UserSimpleView.class)
    private String username;

    //将密码属性在详情视图才展示,
    // 但是详情视图仍然会显示简单视图的属性,因为有一个继承关系
    @JsonView(UserDetailView.class)
    private String password;
}
- 在controller层的方法上增加如下注解,即可返回指定视图:
@JsonView(User.UserSimpleView.class)

- 过滤器链
- 身份验证过滤器(任意一种该过滤器通过后即可),可通过配置决定某一过滤器是否生效(其他过滤器则不行)
- UsernamePasswordAuthenticationFilter-处理表单登录
- BasicAuthenticationFilter-处理basic(最原始的弹出框)登录
- ExceptionTranslationFilter-捕获FilterSecurityInterceptor抛出的异常,作相应处理
- 最后一个过滤器(之后就是真正的方法了)
- FilterSecurityInterceptor-真正决定当前请求能否访问
- 身份验证过滤器(任意一种该过滤器通过后即可),可通过配置决定某一过滤器是否生效(其他过滤器则不行)
- 在browser模块中新建BrowserSecurityConfig,如下:
@Configuration
public class BrowserSecurityConfig extends WebSecurityConfigurerAdapter{

    @Override
    protected void configure(HttpSecurity http) throws Exception {
        http
//                .httpBasic()//最原始的弹出框登录,二选一
                .formLogin()//表单页面登录,二选一
                .and()
                .authorizeRequests()//进行验证配置
                .anyRequest()//任何请求
                .authenticated();//都需验证

    }
}
- 因为demo模块依赖了browser模块,所以此时再次启动demo模块
- 访问任何url,都会进入一个表单验证界面,需要输入帐号密码才可
-
用户信息获取
- 重写UserDetailsService接口,从数据库中加载用户信息及权限
-
处理用户逻辑
- 在UserDetailsService接口中返回的UserDetails接口对象
有几个校验方法- isAccountNonExpired()是否没有过期
- isCredentialsNonExpired()认证(密码)是否过期
- isAccountNonLocked()是否没有锁定
- isEnabled()是否可用/被删除
- 在构造User对象时,可以传入上面这些校验方法的boolean值
- 可以自定义实现UserDetails接口
- 在UserDetailsService接口中返回的UserDetails接口对象
-
处理密码加密解密
- 使用PasswordEncoder类(crypto包中的)
- encode()加密密码;该方法需要我们在存入密码时调用
- match()判断加密后密码是否匹配;security框架自行调用
- 在BrowserSecurityConfig类中配置一个bean,返回PasswordEncoder,
使用已有的BCryptPasswordEncoder类,其BCrypt加密比MD5安全,但性能稍低:
@Bean public PasswordEncoder passwordEncoder() { return new BCryptPasswordEncoder(); }- 该BCryptPasswordEncoder类极其强大,即使是相同密码,每次生成的密文都不相同,
因为每个密文中还携带了不同的盐salt;
- 使用PasswordEncoder类(crypto包中的)
- BrowserSecurityConfig类配置:
    @Override
    protected void configure(HttpSecurity http) throws Exception {
        http
//                .httpBasic()//最原始的弹出框登录,二选一
                .formLogin()//表单页面登录,二选一
                .loginPage("/login.html")//登录页面url
                .loginProcessingUrl("/login")//登录方法url,默认就是/login,用post方法

                .and()
                .authorizeRequests()//进行验证配置

                .antMatchers("/login.html")//匹配这些路径
                .permitAll()//全部允许

                .anyRequest()//任何请求
                .authenticated();//都需验证

        http.csrf().disable();//暂时关闭csrf,防止跨域请求的防护关闭
    }
- 配置BrowserSecurityController,也就是进入登录页面的方法逻辑:
   /**
     * 当访问的页面需要验证时,security会跳转到下面这个接口的登录页面,
     * 但会把真正要访问的页面,也就是跳转前的页面存到cache中
     */
    private RequestCache requestCache = new HttpSessionRequestCache();

    /**
     * 重定向策略,用于跳转请求
     */
    private RedirectStrategy redirectStrategy = new DefaultRedirectStrategy();

    @Autowired
    private SecurityProperties securityProperties;

    /**
     * 当需要身份认证时,跳转到这里
     *
     * 其需求是.如果之前访问的url不是页面,就返回异常信息;如果是页面,就跳转到登录页;
     * 此处是用访问的后缀是不是.html结尾来判断的,
     * 我觉得比较好的是,根据请求头的context-type来判断.
     * 就是这个:
     *  @RequestMapping(
     *       produces = {"text/html"}
     *   )
     * @param request
     * @return
     */
    @RequestMapping("/view/login")
    @ResponseStatus(code = HttpStatus.UNAUTHORIZED)//返回401,未授权状态码
    public SimpleResponse requiredAuthentication(HttpServletRequest request, HttpServletResponse response) throws IOException {
        //获取到跳转前的请求
        SavedRequest savedRequest = requestCache.getRequest(request, response);

        //如果请求不为空
        if (savedRequest != null) {
            //获取到请求url
            String target = savedRequest.getRedirectUrl();
            log.info("引发跳转的请求是:{}", target);
            //如果该请求是.html结尾的,跳转到登录页,否则表示不是请求的页面,返回json
            if (StringUtils.endsWithIgnoreCase(target, ".html")) {
                //跳转到登录页,从yml配置中读取登录页路径
                redirectStrategy.sendRedirect(request,response,securityProperties.getBrowser().getLoginPage());
            }
        }
        return new SimpleResponse("访问的服务需要身份认证,请引导用户到登录页");
    }
- 在core模块中添加配置属性bean-SecurityProperties,其中包括了BrowserProperties
@Data
@ConfigurationProperties(prefix = "zx.security")
public class SecurityProperties {
    private BrowserProperties browser = new BrowserProperties();
}

@Data
public class BrowserProperties {
        //登录页配置-默认值
        private String loginPage = "/login.html";
}
这样,配置在demo模块的yml中的如下就会被读取到SecurityProperties类的browser中的loginPage中
zx:
  security:
    browser:
      loginPage: /login1.html
然后再配置一个(我他妈从来没配置过?????!!!!),让上面的属性读取类生效 (然后将这个loginPage属性注入到BrowserSecurityController还有BrowserSecurityConfig中去)
@Configuration
@EnableConfigurationProperties(SecurityProperties.class)
public class SecurityCoreConfig {
}
- 修改登录成功后的处理方式: 自定义身份验证成功处理类
/**
 * author:ZhengXing
 * datetime:2017-11-24 20:40
 * 自定义身份验证成功处理器
 * security默认在验证成功后跳转到此前访问的页面,但是如果前端的登录是
 * ajax方式的,不适合跳转页面,所以需要更改成功后的处理
 */
@Component("customAuthenticationSuccessHandler")
@Slf4j
public class CustomAuthenticationSuccessHandler implements AuthenticationSuccessHandler{
    /**
     * springMVC在启动时自动注册的bean,用于将对象转为json
     */
    @Autowired
    private ObjectMapper objectMapper;
    /**
     * 当登陆成功时
     * @param request
     * @param response
     * @param authentication 封装了认证信息
     */
    @Override
    public void onAuthenticationSuccess(HttpServletRequest request, HttpServletResponse response, Authentication authentication) throws IOException, ServletException {
        log.info("登录成功");
        response.setContentType(MediaType.APPLICATION_JSON_UTF8_VALUE);
        //将authentication对象转为jsonString,返回
        response.getWriter().write(objectMapper.writeValueAsString(authentication));
    }
}
在BrowserSecurityConfig配置处理类:
.successHandler(customAuthenticationSuccessHandler)//配置验证成功处理器
如下是handler的方法中的authentication对象的一些属性:
{
authorities: [
{
authority: "admin"
}
],
details: {
remoteAddress: "127.0.0.1",
sessionId: "24AC42B2747541800EB5C4744AF2CEF0"
},
authenticated: true,
principal: {
password: null,
username: "aaa",
authorities: [
{
authority: "admin"
}
],
accountNonExpired: true,
accountNonLocked: true,
credentialsNonExpired: true,
enabled: true
},
credentials: null,
name: "aaa"
}
- 修改登录失败后的处理方式: 自定义处理器:
/**
 * author:ZhengXing
 * datetime:2017-11-24 21:03
 * 自定义身份验证失败处理器
 */
@Component("customAuthenticationFailHandler")
@Slf4j
public class CustomAuthenticationFailHandler implements AuthenticationFailureHandler {

    @Autowired
    private ObjectMapper objectMapper;

    /**
     * 在异常中,有错误消息,是关于为什么登录失败的
     *
     * 默认登录失败是跳转到一个登录失败的url,此处改了处理方式
     */
    @Override
    public void onAuthenticationFailure(HttpServletRequest request, HttpServletResponse response, AuthenticationException e) throws IOException, ServletException {
        log.info("登录失败");
        //状态码500
        response.setStatus(HttpStatus.INTERNAL_SERVER_ERROR.value());
        response.setContentType(MediaType.APPLICATION_JSON_UTF8_VALUE);
        //将authentication对象转为jsonString,返回
        response.getWriter().write(objectMapper.writeValueAsString(e));
    }
配置处理器:
.failureHandler(customAuthenticationFailHandler)//配置验证失败处理器
在处理器的异常中,有对应的失败消息
- 将使用默认的重定向还是使用自定义的json返回处理方式加入配置属性,可自定义配置
增加登录类型枚举,并在BrowserProperties属性类中增加对应属性:
public enum LoginType {
    //重定向
    REDIRECT,
    //返回json
    JSON,
    ;
}
然后在成功和失败处理器中,都将原来的实现成功失败处理接口,改为继承security默认的处理器实现类,然后重写对应方法:
根据类型选择自定义实现还是使用父类默认的方法
//如果配置的的登录方式是json,使用自定义处理器
        if(LoginType.JSON.equals(securityProperties.getBrowser().getLoginType())){
            response.setContentType(MediaType.APPLICATION_JSON_UTF8_VALUE);
            //将authentication对象转为jsonString,返回
            response.getWriter().write(objectMapper.writeValueAsString(authentication));
        }else{
            //否则使用父类处理方法,重定向
            super.onAuthenticationSuccess(request,response,authentication);
        }
如下配置即可:
zx:
  security:
    browser:
      #配置登录方式
      loginType: REDIRECT
- 点击登录,进入UsernamePasswordAuthenticationFilter类
- 在该类的attemptAuthentication()方法中获取到请求的用户名密码
- 用用户名密码构建了UsernamePasswordAuthenticationToken对象
- 该对象是Authentication接口的实现.
- ...下次有时间自己看吧
- 对于如何在多个对象间共享用户认证信息,用的是SecurityContextHolder,
其本质还是ThreadLocal
    /**
     * 获取用户信息
     */
    @GetMapping("/me")
    public Object getCurrentUser(@AuthenticationPrincipal UserDetails user) {
        //一种方法是自己获取
        //SecurityContextHolder.getContext().getAuthentication()

        //第二种方式
        //直接在方法参数中写Authentication,即可获取

        //第三种,只想获取Authentication中的UserDetails
        //在方法参数中这么写@AuthenticationPrincipal UserDetails user

        return user;
    }
- 存储在session中的SPRING_SECURITY_CONTEXT 这个key中.
- Session.SPRING_SECURITY_CONTEXT.authentication.principal.username
- 实现如下类,然后在自定义的UserDetailService中新建该类即可
- 注意,在获取时可以使用 @AuthenticationPrincipal CustomUser user, 在方法上直接使用自定义的类来接收
/**
 * author:ZhengXing
 * datetime:2017/12/12 0012 12:08
 * 自定义用户类
 */
@Data
@NoArgsConstructor
@AllArgsConstructor
public class CustomUser implements UserDetails {

	private Long id;

	private String username;

	private String password;

	private Boolean enabled;

	private Collection<? extends GrantedAuthority> authorities;

	public CustomUser(Long id, String username, String password, Boolean enabled) {
		this.id = id;
		this.username = username;
		this.password = password;
		this.enabled = enabled;
	}

	@Override
	public Collection<? extends GrantedAuthority> getAuthorities() {
		return null;
	}

	@Override
	public String getPassword() {
		return password;
	}

	@Override
	public String getUsername() {
		return username;
	}

	@Override
	public boolean isAccountNonExpired() {
		return true;
	}

	@Override
	public boolean isAccountNonLocked() {
		return true;
	}

	@Override
	public boolean isCredentialsNonExpired() {
		return true;
	}

	@Override
	public boolean isEnabled() {
		return enabled;
	}
}
-
新建Captcha类,保存验证码的图片流/code/过期时间
-
完成captchaController,生成图片并返回
-
在securityConfig配置类中,允许未登录便访问获取验证码的路径
-
自定义CaptchaFilter过滤器,并将其加入security配置中
-
重构
-
将验证码的大小/字符数/需要验证的url/生成方法都变成可配置的
-
基本原理
- 在UsernamePasswordAuthenticationFilter认证成功后,
调用RememberService的TokenRepository,将token生成并写入cookie和数据库 - 用户下次访问时,访问到RememberMeAuthenticationFilter,
读取到cookie中的token,从数据库中查询到对应token的用户名,
然后使用UserDetailsService找到用户信息,完成登录验证
- 在UsernamePasswordAuthenticationFilter认证成功后,
-
在登录页面中增加记住我的选择,使用remember-me为name:
- 在BrowserSecurityConfig类中如下配置:
Bean:
    @Autowired
    private DataSource dataSource;
    //记住我功能的配置,需要注入
    @Autowired
    private UserDetailsService customUserDetailsService;
    /**
     * 记住我功能
     * 生成用来将token写入数据库的PersistentTokenRepository类
     */
    @Bean
    public PersistentTokenRepository persistentTokenRepository() {
        JdbcTokenRepositoryImpl tokenRepository = new JdbcTokenRepositoryImpl();
        tokenRepository.setDataSource(dataSource);
        //设置在启动时,创建对应的数据库中存储token的表
        tokenRepository.setCreateTableOnStartup(true);
        return tokenRepository;
    }
配置:
.and()
   .rememberMe()//配置记住我功能
       //token仓库配置,用来将token存入数据库
       .tokenRepository(persistentTokenRepository())
       //token过期秒数配置
       .tokenValiditySeconds(securityProperties.getBrowser().getRememberMeSeconds())
       //查询用户信息的service
       .userDetailsService(customUserDetailsService)
-
启动后,会自动在数据库中创建persistent_logins表
-
然后登录,此时,该表中会多一条记录,保存了该用户的用户名/session/token/最后登陆时间;
然后我们关闭程序,重新启动程序,此时,之前登录的session应该无效了;
直接访问需要验证的url,会发现已经无需登录了
-
完成除security框架外的代码后,目前是这个架构:
- 在controller中有两个方法,分别实现图形/短信验证码
- 有图形/短信验证码生成器接口和两个实现类
- 图形验证码需要用流输出回去,短信验证码需要调用短信验证码发送器接口的方法.
-
可使用模版方法重构为如下逻辑(我真的懒得重构了(...最终还是重构了,难受))
- controller中只有一个方法,使用url传参,得到验证码类型是短信还是图形
- 定义了一个验证码处理接口和验证码处理接口抽象类
- 实现了 生成验证码 -> 存储验证码 -> 发送验证码/返回图片流 整个的模版方法,每一步不同的划分为各自的抽象方法
- 两个实现抽象类的实现类,分别完成各自不同的方法就可以了,
- 图片验证码返回流
- 短信验证码发送短信
-
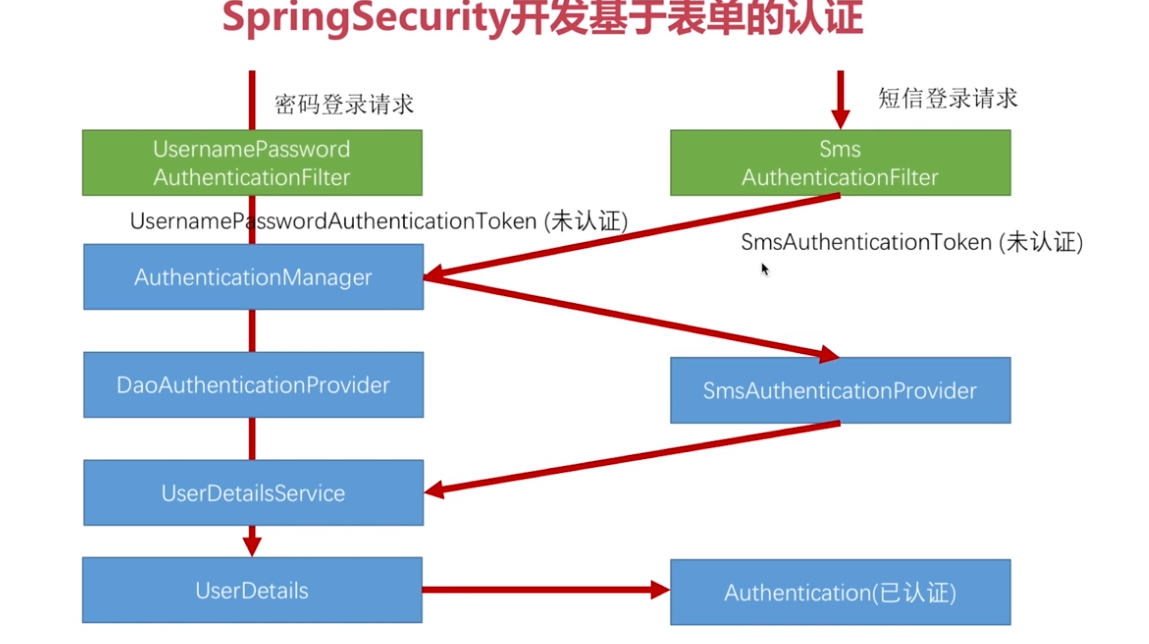
短信验证码流程

-
实现自己的SmsCaptchaAuthenticationToken类(Authentication的子类):
用于在未认证通过时存放手机号,通过时,存放用户信息 -
实现SmsCaptchaAuthenticationFilter类,
用于从请求中获取手机号,其他关于请求的详细信息,将其存入SmsCaptchaAuthenticationToken等 -
实现SmsCaptchaAuthenticationProvider类,
使用userDetailsService.loadUserByUsername验证其身份,设定自己这个Provider支持哪些Authentication,
如果身份验证通过了,将其用户信息和之前的详细信息,存到新的SmsCaptchaAuthenticationToken中,返回 -
实现SmsCaptchaFilter过滤器,来在最开始验证短信验证码是否正确,基本就复制图形验证码的过滤器,稍微改下即可
-
在core中新建SmsCaptchaAuthenticationSecurityConfig,配置上面的实现类;
并在BrowserSecurityConfig中,同样配置SmsCaptchaFilter;
并在BrowserSecurityConfig中如下配置:
.and()
    .apply(smsCaptchaAuthenticationSecurityConfig);
- 全部实现后,可重构的包括两个类似的验证码过滤器,需要相同引用的变量抽成常量,
将security配置类分为app配置/web配置/验证码配置等各个类,放到各自模块..
这些我是真的懒得打了...
- 处理session失效
在配置类中如下配置
.and()
.sessionManagement()
    .invalidSessionUrl("/session/invalid")//session失效后跳转到的路径
//  .invalidSessionStrategy(InvalidSessionStrategy)//可以自定义session失效时的策略
.and()
- 处理session并发登录
在配置类中如下配置
.and()
.sessionManagement()
    .invalidSessionUrl("/session/invalid")//session失效后跳转到的路径
    //.invalidSessionStrategy(InvalidSessionStrategy)//可以自定义session失效时的策略
    .maximumSessions(1)//同一session同一时间最大数量,一般就是1,也就是不同机器登录会被挤下线
    .maxSessionsPreventsLogin(true)//该参数表示,当session并发到达最大值后,不允许后来者再登录
    // .expiredUrl("xxx")//session被挤下线后跳转的url
    .expiredSessionStrategy(customExpiredSessionStrategy)//被挤下线后的自定义策略
.and()//这个and返回SessionManagementConfigurer
.and()//这个and才返回原配置类

自定义策略类自己看.就是返回了个json.也可以直接重定向到一个url.
最终效果就是.用户异地再登录后,前一个用户再次访问,就执行了自定义策略.

或者就是上面配置类中的,并发上限达到后,不允许后来者再登录.
- 集群时的session共享.用spring-session和redis实现 导入spring-session依赖后,如下即可.
spring:
  session:
    store-type: redis  #可使用none,暂时关闭spring-session的配置
  redis:
    host: 106.14.7.29
    password: 123456
- 注销处理
注销的默认请求路径是 /logout

注销时security的处理逻辑
    1. 使当前session失效
    2. 清除remember-me记录
    3. 清空当前的EecurityContext
    4. 重定向到登录页并携带一个logout的空参数

如下配置即可
.logout()
    .logoutUrl("/logout")//请求注销的url,默认是/logout
    .logoutSuccessUrl("/logout.html")//注销成功后跳转到的路径
//      .logoutSuccessHandler()//自定义注销成功后的处理逻辑
//       .deleteCookies("")//注销时可删除指定key的cookies
.and()