Vue源码探秘(生命周期)
Opened this issue · 0 comments
引言
在创建一个 Vue 实例的时候需要经过一系列的初始化过程,比如设置数据监听、编译模板、挂载实例到 DOM、在数据变化时更新 DOM 等。
同时在这个过程中也会运行一些叫做生命周期钩子的函数,这给了用户在不同阶段添加自己的代码的机会。
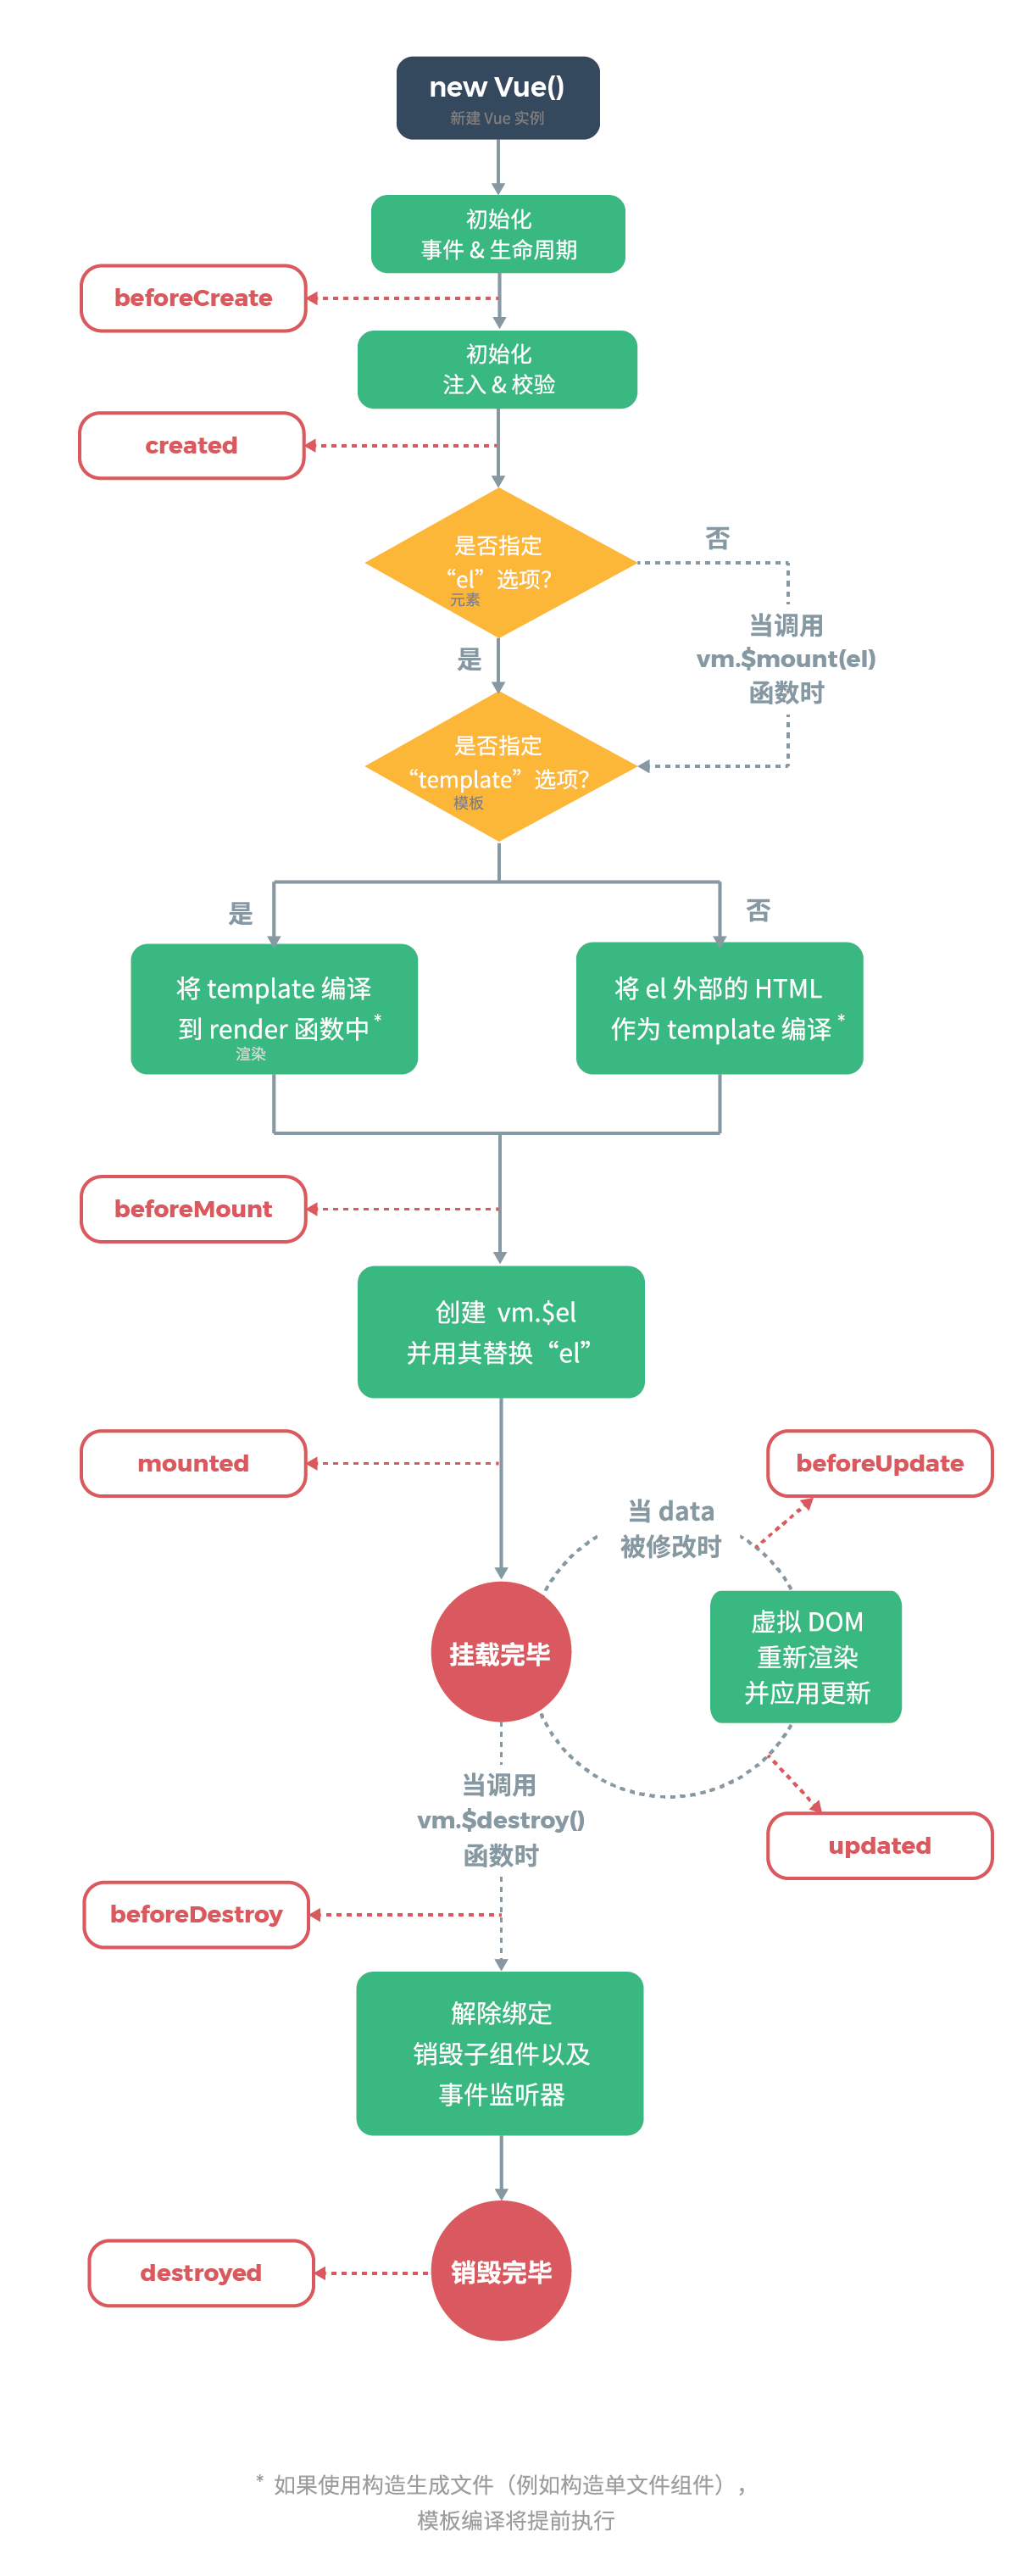
下面引用官网的一张图,这张图展示了Vue 实例的生命周期以及在它生命周期的各个阶段分别调用的钩子函数:
除了上图中展示的之外,还有activated 和 deactivated ,这两个是和 keep-alive 相关的函数。
callHook
回顾 _init 函数有这么一段代码:
// src/core/instance/init.js

Vue.prototype._init = function(options?: Object) {
  // ...

  initLifecycle(vm);
  initEvents(vm);
  initRender(vm);
  callHook(vm, "beforeCreate");
  initInjections(vm); // resolve injections before data/props
  initState(vm);
  initProvide(vm); // resolve provide after data/props
  callHook(vm, "created");

  // ...
};
这里调用了两次 callHook 函数,分别执行了生命周期钩子函数 beforeCreate 和 created 。来看 callHook 函数的定义:
// src/core/instance/lifecycle.js

export function callHook(vm: Component, hook: string) {
  // #7573 disable dep collection when invoking lifecycle hooks
  pushTarget();
  const handlers = vm.$options[hook];
  const info = `${hook} hook`;
  if (handlers) {
    for (let i = 0, j = handlers.length; i < j; i++) {
      invokeWithErrorHandling(handlers[i], vm, null, vm, info);
    }
  }
  if (vm._hasHookEvent) {
    vm.$emit("hook:" + hook);
  }
  popTarget();
}
callHook 函数接收两个参数,一个是 vm 实例,一个是要执行的钩子函数名。这里通过 vm.$options[hook] 拿到对应的函数数组,然后遍历这个数组调用 invokeWithErrorHandling 函数。 invokeWithErrorHandling 函数定义如下:
export function invokeWithErrorHandling(
  handler: Function,
  context: any,
  args: null | any[],
  vm: any,
  info: string
) {
  let res;
  try {
    res = args ? handler.apply(context, args) : handler.call(context);
    if (res && !res._isVue && isPromise(res) && !res._handled) {
      res.catch(e => handleError(e, vm, info + ` (Promise/async)`));
      // issue #9511
      // avoid catch triggering multiple times when nested calls
      res._handled = true;
    }
  } catch (e) {
    handleError(e, vm, info);
  }
  return res;
}
invokeWithErrorHandling 函数主要逻辑就是执行传入的 handler 函数。在调用 invokeWithErrorHandling 函数的时候传入 vm 作为 context 参数,也就是说生命周期函数的 this 会指向当前实例 vm 。另外这里设置一个标识符 _handled 保证函数只被调用一次,避免递归调用。
了解了生命周期的执行方式后,接下来我们会具体介绍每一个生命周期函数它的调用时机。
beforeCreate & created
beforeCreate 和 created 这两个钩子函数的调用时机前面也提到过了,在执行 _init 函数时被调用:
initLifecycle(vm);
initEvents(vm);
initRender(vm);
callHook(vm, "beforeCreate");
initInjections(vm); // resolve injections before data/props
initState(vm);
initProvide(vm); // resolve provide after data/props
callHook(vm, "created");可以看到,在完成初始化生命周期、事件、render 后调用了 beforeCreate 。在调用 beforeCreate 之后才调用 initState 。也就是说在 beforeCreate 函数中是访问不到 data、props 等属性的,因为这个时候还没有初始化。
而 created 是在初始化 data、props 后才被调用,因此在 created 中可以访问这些属性。
beforeMount & mounted
beforeMount 和 mounted 这两个的调用时机是什么时候呢?
顾名思义,beforeMount 钩子函数发生在 mount,也就是 DOM 挂载之前,它的调用时机是在 mountComponent 函数中,定义在 src/core/instance/lifecycle.js 中:
// src/core/instance/lifecycle.js

export function mountComponent(
  vm: Component,
  el: ?Element,
  hydrating?: boolean
): Component {
  // ...
  callHook(vm, "beforeMount");

  let updateComponent;
  /* istanbul ignore if */
  if (process.env.NODE_ENV !== "production" && config.performance && mark) {
    updateComponent = () => {
      const name = vm._name;
      const id = vm._uid;
      const startTag = `vue-perf-start:${id}`;
      const endTag = `vue-perf-end:${id}`;

      mark(startTag);
      const vnode = vm._render();
      mark(endTag);
      measure(`vue ${name} render`, startTag, endTag);

      mark(startTag);
      vm._update(vnode, hydrating);
      mark(endTag);
      measure(`vue ${name} patch`, startTag, endTag);
    };
  } else {
    updateComponent = () => {
      vm._update(vm._render(), hydrating);
    };
  }

  // we set this to vm._watcher inside the watcher's constructor
  // since the watcher's initial patch may call $forceUpdate (e.g. inside child
  // component's mounted hook), which relies on vm._watcher being already defined
  new Watcher(
    vm,
    updateComponent,
    noop,
    {
      before() {
        if (vm._isMounted && !vm._isDestroyed) {
          callHook(vm, "beforeUpdate");
        }
      }
    },
    true /* isRenderWatcher */
  );
  hydrating = false;

  // manually mounted instance, call mounted on self
  // mounted is called for render-created child components in its inserted hook
  if (vm.$vnode == null) {
    vm._isMounted = true;
    callHook(vm, "mounted");
  }
  return vm;
}
可以看到,在组件挂载前就会调用 beforeMount 函数,然后在执行了一系列挂载操作后,在最后的 if 语句判断这个 vm 是外部 new Vue 的实例还是内部的组件实例。
组件实例会有一个
$vnode属性,指向组件的占位符VNode。
如果是外部实例则执行 mounted 函数。
因此组件实例的 mounted 函数调用时机不在 mountComponent 函数中,那是在什么地方呢?
回顾 patch 函数:
function patch(oldVnode, vnode, hydrating, removeOnly) {
  // ...

  invokeInsertHook(vnode, insertedVnodeQueue, isInitialPatch);
  return vnode.elm;
}
组件的 VNode patch 到 DOM 后,会执行 invokeInsertHook 函数,把 insertedVnodeQueue 里保存的钩子函数依次执行一遍,它的定义在 src/core/vdom/patch.js 中:
// src/core/vdom/patch.js

function invokeInsertHook(vnode, queue, initial) {
  // delay insert hooks for component root nodes, invoke them after the
  // element is really inserted
  if (isTrue(initial) && isDef(vnode.parent)) {
    vnode.parent.data.pendingInsert = queue;
  } else {
    for (let i = 0; i < queue.length; ++i) {
      queue[i].data.hook.insert(queue[i]);
    }
  }
}
该函数会执行 insert 这个钩子函数,对于组件而言,insert 钩子函数的定义在 src/core/vdom/create-component.js 中的 componentVNodeHooks 中:
// src/core/vdom/create-component.js

const componentVNodeHooks = {
  insert(vnode: MountedComponentVNode) {
    const { context, componentInstance } = vnode;
    if (!componentInstance._isMounted) {
      componentInstance._isMounted = true;
      callHook(componentInstance, "mounted");
    }
    if (vnode.data.keepAlive) {
      if (context._isMounted) {
        // vue-router#1212
        // During updates, a kept-alive component's child components may
        // change, so directly walking the tree here may call activated hooks
        // on incorrect children. Instead we push them into a queue which will
        // be processed after the whole patch process ended.
        queueActivatedComponent(componentInstance);
      } else {
        activateChildComponent(componentInstance, true /* direct */);
      }
    }
  }
};
可以看到,组件的 mounted 就是在这里通过 callHook 调用的。
beforeUpdate & updated
beforeUpdate 和 updated 是和数据更新相关的,数据更新这一部分会在下一章详细讲解。
beforeUpdate 的调用时机在 mountComponent 创建 Watcher 实例时:
// src/core/instance/lifecycle.js

export function mountComponent(
  vm: Component,
  el: ?Element,
  hydrating?: boolean
): Component {
  // ...

  new Watcher(
    vm,
    updateComponent,
    noop,
    {
      before() {
        if (vm._isMounted && !vm._isDestroyed) {
          callHook(vm, "beforeUpdate");
        }
      }
    },
    true /* isRenderWatcher */
  );
  hydrating = false;

  // ...
}
在 Watcher 的参数中有一个对象,对象中有一个 before 函数,这个函数判断如果组件已经 mounted 并且还没有 destroyed ,就调用 callHook 执行 beforeUpdate 。
而 before 函数的执行时机是在 flushSchedulerQueue 函数调用的时候,它被定义在 src/core/observer/scheduler.js 中:
// src/core/observer/scheduler.js

function flushSchedulerQueue() {
  // ...

  for (index = 0; index < queue.length; index++) {
    watcher = queue[index];
    if (watcher.before) {
      watcher.before();
    }
    id = watcher.id;
    has[id] = null;
    watcher.run();
    // in dev build, check and stop circular updates.
    if (process.env.NODE_ENV !== "production" && has[id] != null) {
      circular[id] = (circular[id] || 0) + 1;
      if (circular[id] > MAX_UPDATE_COUNT) {
        warn(
          "You may have an infinite update loop " +
            (watcher.user
              ? `in watcher with expression "${watcher.expression}"`
              : `in a component render function.`),
          watcher.vm
        );
        break;
      }
    }
  }

  // keep copies of post queues before resetting state
  const activatedQueue = activatedChildren.slice();
  const updatedQueue = queue.slice();

  resetSchedulerState();

  // call component updated and activated hooks
  callActivatedHooks(activatedQueue);
  callUpdatedHooks(updatedQueue);

  // devtool hook
  /* istanbul ignore if */
  if (devtools && config.devtools) {
    devtools.emit("flush");
  }
}
现在我们只需要知道这里的 queue 是一个个 Watcher ,flushSchedulerQueue 函数会遍历 queue 然后执行每一个 Watcher 的 before 方法。
flushSchedulerQueue 函数中还调用了 callUpdatedHooks 函数:
function callUpdatedHooks(queue) {
  let i = queue.length;
  while (i--) {
    const watcher = queue[i];
    const vm = watcher.vm;
    if (vm._watcher === watcher && vm._isMounted && !vm._isDestroyed) {
      callHook(vm, "updated");
    }
  }
}
可以看到 updated 是在这里被调用的。
beforeDestroy & destroyed
beforeDestroy 和 destroyed 都在执行 $destroy 函数时被调用。$destroy 函数是定义在 Vue.prototype 上的一个方法,在 src/core/instance/lifecycle.js 文件中:
// src/core/instance/lifecycle.js

Vue.prototype.$destroy = function() {
  const vm: Component = this;
  if (vm._isBeingDestroyed) {
    return;
  }
  callHook(vm, "beforeDestroy");
  vm._isBeingDestroyed = true;
  // remove self from parent
  const parent = vm.$parent;
  if (parent && !parent._isBeingDestroyed && !vm.$options.abstract) {
    remove(parent.$children, vm);
  }
  // teardown watchers
  if (vm._watcher) {
    vm._watcher.teardown();
  }
  let i = vm._watchers.length;
  while (i--) {
    vm._watchers[i].teardown();
  }
  // remove reference from data ob
  // frozen object may not have observer.
  if (vm._data.__ob__) {
    vm._data.__ob__.vmCount--;
  }
  // call the last hook...
  vm._isDestroyed = true;
  // invoke destroy hooks on current rendered tree
  vm.__patch__(vm._vnode, null);
  // fire destroyed hook
  callHook(vm, "destroyed");
  // turn off all instance listeners.
  vm.$off();
  // remove __vue__ reference
  if (vm.$el) {
    vm.$el.__vue__ = null;
  }
  // release circular reference (#6759)
  if (vm.$vnode) {
    vm.$vnode.parent = null;
  }
};
可以看到在 $destroy 函数一开始就调用了 beforeDestroy ,然后执行一系列销毁操作后再调用 destroyed ,这些销毁操作会在后面章节再来具体分析。
这里调用了我们之前介绍过的__pacth__ 函数,实际上调用__pacth__函数后会触发子组件的 $destroy 函数,然后又执行__pacth__ 函数。
也就是说会通过递归调用按先父后子的顺序把组件一层一层地销毁掉。因此 beforeDestroy 的调用顺序是先父后子,因为它会随着递归被调用;而 destroyed 是递归结束后执行,因此执行顺序是先子后父。
总结
这一小节我们学习了生命周期函数的调用时机以及执行顺序。大概整理一下就是:
created钩子函数中可以访问到data、props等属性mounted钩子函数中可以访问到DOMdestroyed函数中可以执行定时器销毁工作beforeMount/beforeDestroy的执行顺序是先父后子mounted/destroyed的执行顺序是先子后父
