建立hexo博客,用到的命令
1、新建文件夹
person_blog
2、初始化
hexo init
3、clone主题
4、运行测试
hexo g //发布html
hexo s //发布服务,默认端口4000
hexo d //上传同步代码
hexo b //备份源码,需要安装hexo-git-backup插件
1、新建目录,如person_blog
2、初始化hexo
hexo init
3、进入主题目录,拉取主题
cd ./themes/
git clone --branch backup https://github.com/jiangjiawei520/person_blog.github.io.git ./yilia-plus  //拉取备份分支里面的主题
修改hexo根目录下的 _config.yml ,启用yilia-plus主题
theme: yilia-plus
# Hexo Configuration
## Docs: https://hexo.io/docs/configuration.html
## Source: https://github.com/hexojs/hexo/

# Site 博客标题
title: 蒋家威的博客
#subtitle: subtitle
#description: description
#author: JiaWei Jiang
#email: 2314857815@qq.com
#keywords: "linux、oracle"

# URL
## If your site is put in a subdirectory, set url as 'http://yoursite.com/child' and root as '/child/'
#url: https://jiangjiawei520.github.io/person_blog.github.io
#root: /person_blog.github.io/
url: https://bk.jiang7zzz.xyz
root: /
permalink: :year/:month/:day/:title/
permalink_defaults:
pretty_urls:
  trailing_index: true # Set to false to remove trailing 'index.html' from permalinks
  trailing_html: true # Set to false to remove trailing '.html' from permalinks

# Directory
source_dir: source
public_dir: public
tag_dir: tags
archive_dir: archives
category_dir: categories
code_dir: downloads/code
i18n_dir: :lang
#防止README.md被渲染
skip_render: [README.md]

# Writing
new_post_name: :title.md # File name of new posts
default_layout: post
titlecase: false # Transform title into titlecase
external_link:
  enable: true # Open external links in new tab
  field: site # Apply to the whole site
  exclude: ''
filename_case: 0
render_drafts: false
post_asset_folder: false
relative_link: false
future: true
highlight:
  enable: true
  line_number: true
  auto_detect: false
  tab_replace: ''
  wrap: true
  hljs: false
prismjs:
  enable: false
  preprocess: true
  line_number: true
  tab_replace: ''

# Home page setting
# path: Root path for your blogs index page. (default = '')
# per_page: Posts displayed per page. (0 = disable pagination)
# order_by: Posts order. (Order by date descending by default)
index_generator:
  path: ''
  per_page: 10
  order_by: -date

# Category & Tag
default_category: uncategorized
category_map:
tag_map:

# Metadata elements
## https://developer.mozilla.org/en-US/docs/Web/HTML/Element/meta
meta_generator: true

# Date / Time format
## Hexo uses Moment.js to parse and display date
## You can customize the date format as defined in
## http://momentjs.com/docs/#/displaying/format/
date_format: YYYY-MM-DD
time_format: HH:mm:ss
## updated_option supports 'mtime', 'date', 'empty'
updated_option: 'mtime'

# Pagination
## Set per_page to 0 to disable pagination
per_page: 10
pagination_dir: page

# Include / Exclude file(s)
## include:/exclude: options only apply to the 'source/' folder
include:
exclude:
ignore:

# Extensions
## Plugins: https://hexo.io/plugins/
## Themes: https://hexo.io/themes/
#theme: landscape
theme: yilia-plus


# Deployment
## Docs: https://hexo.io/docs/deployment.html
deploy:
  type: git
  repo: git@github.com:JiangJiaWei520/person_blog.github.io.git # 这里的网址填你自己的
  branch: master

jsonContent:
  meta: false
  pages: false
  posts:
    title: true
    date: true
    path: true
    text: false
    raw: false
    content: false
    slug: false
    updated: false
    comments: false
    link: false
    permalink: false
    excerpt: false
    categories: false
    tags: true
完整配置Demo例子,可以参考yilia-plus博客备份
# Header-菜单 配置后再_post中的md文件中填入对应的tags即可(侧边栏菜单)
menu:
  主页: /
  日记本: /tags/日记本/
  我的导航: http://dh.jiang7zzz.xyz/
  心情随笔: /tags/心情随笔/
  韶华追忆: /tags/韶华追忆/
  技术分享: /tags/技术分享/
  网盘域名: /tags/网盘域名/
  科学上网: /tags/科学上网/
  博客网站: /tags/博客网站//
  其他: /tags/其他/

# subNav-子导航
subNav:
  github: "#"
  #gitee: "#" # 码云
  #jianshu: "#" #简书
  #cnblog: "#"
  #blog: "#"
  csdn: "#"
  #rss: "#"
  #zhihu: "#"
  #qq: "img/2434387555.jpg"
  #weixin: "img/weixin_.png"
  #weibo: "#"
  #douban: "#"
  #segmentfault: "#"
  #bilibili: "#"
  #acfun: "#"
  #mail: "mailto:zhousiwei0911@qq.com"
  #facebook: "#"
  #google: "#"
  #twitter: "#"
  #linkedin: "#"

#配置副标题相关内容,如果还不显示,看下\layout\_partial\left-col.ejs中是否被注释掉(站点次标题和打字动效)
subtitle: The first step is as good as half over.
description: description
author: JWSingle
email: 2314857815@qq.com
keywords: "linux、oracle"

# 悬停预览图片效果
hover_effect:
  ## `global` 0: Set separately, 1: Enable global 2: Close global
  ## `global` 0: 分开设置, 1: 全局启用, 2: 全局关闭
  global: 2
  # SubNav-导航
  subNav: true

# RSS订阅(关于如何配置启用:https://www.jianshu.com/p/2aaac7a19736)
rss: /atom.xml

# 是否需要修改 root 路径
# 如果您的网站存放在子目录中,例如 http://yoursite.com/blog,
# 请将您的 url 设为 http://yoursite.com/blog 并把 / 设为 /blog/。
# 新版本已弃用,请在博客根目录文件进行配置
# root: /

# Content

# 文章太长,截断按钮文字(在需要截断的行增加此标记:<!--more-->)
excerpt_link: more
# 文章卡片右下角常驻链接,不需要请设置为false
show_all_link: '展开全文'
# 数学公式
mathjax: false

# Open link in a new tab | 是否在新窗口打开链接
open_in_new:
  article: true  # 文章链接
  menu: true   # 导航菜单
  subNav: true  # 子菜单

# 打赏
# 打赏type设定:0-关闭打赏; 1-文章对应的md文件里有reward:true属性,才有打赏; 2-所有文章均有打赏
reward_type: 2
# 打赏wording
reward_wording: '谢谢你请我吃糖果'
# 支付宝二维码图片地址,跟你设置头像的方式一样。比如:/assets/img/alipay.jpg
alipay: /img/alipay.jpg
# 微信二维码图片地址
weixin: /img/weixin.png

# 目录
# 目录设定:0-不显示目录; 1-文章对应的md文件里有toc:true属性,才有目录; 2-所有文章均显示目录
toc: 1
# 根据自己的习惯来设置,如果你的目录标题习惯有标号,置为true即可隐藏hexo重复的序号;否则置为false
toc_hide_index: true
# 目录为空时的提示
toc_empty_wording: '目录,不存在的…'

# 是否有快速回到顶部的按钮
top: true

# Miscellaneous
# 百度统计
baidu_analytics: ''
google_analytics: ''

# 网站图标
favicon: /favicon.ico

# 你的头像url
avatar: /img/touxiang.jpg

# 是否开启分享
share_jia: true

# 评论:1、畅言;2、Disqus;3、Gitment;4、Giteement
# 不需要使用某项,直接设置值为false,或注释掉
# 具体请参考wiki:https://github.com/JoeyBling/hexo-theme-yilia-plus/wiki

# 1、畅言
changyan_appid: false
changyan_conf: false

# 2、Disqus 在hexo根目录的config里也有disqus_shortname字段,优先使用yilia-plus的
disqus: false

# 3、Gitment----基于GitHub的评论系统(关闭请设置gitment_owner为false)
# 关于如何集成:https://www.jianshu.com/p/ac7658cc912f
gitment_owner: false      #你的 GitHub ID
# 是否使用官方js(false可以提升访问速度,本地修改过一部分的js,官方js可能会出现服务器不稳定,不太建议使用)
gitment_remote: false
gitment_repo: ''          #存储评论的 repo name(需要在Github创建)
gitment_oauth:
  client_id: ''           #client ID
  client_secret: ''       #client secret

# 4、Giteement----【国内用户建议使用这个,相对比较快】
# 关于如何集成:https://www.jianshu.com/p/f5c4633524c7
# 基于码云的评论系统(https://gitee.com/zhousiwei/giteement)
giteement:
  enable: false  # 是否启用码云评论系统
  # 是否使用官方js(false可以提升访问速度)
  remote: false
  redirect_uri: ''   # 应用回调地址(请和配置的第三方应用保持一致)
  # 不能更改(网上开源项目`https://github.com/Rob--W/cors-anywhere`作者提供的专门用来跨域服务器的配置)
  oauth_uri: https://cors-anywhere.herokuapp.com/https://gitee.com/oauth/token
  giteeID: ''  # 你的码云账号英文名
  # 存储评论的 repo name(需要在码云仓库创建公开仓库)
  repo: ''
  gitment_oauth:
    client_id: ''           #client ID
    client_secret: ''       #client secret

# 访问量统计功能(不蒜子)
busuanzi:
  enable: true
  site_visit: true  # 站点访问量显示
  article_visit: true  # 文章访问量显示

# 网易云音乐插件
music:
  enable: false
  # 播放器尺寸类型(1:长尺寸、2:短尺寸)
  type: 2
  #id: 1334445174  # 网易云分享的音乐ID(更换音乐请更改此配置项)
  autoPlay: true  # 是否开启自动播放
  # 提示文本(关闭请设置为false)
  text: '这似乎是首纯音乐,请尽情的欣赏它吧!'

# 页面点击小红心
clickLove:
  # (关闭请设置为false)
  enable: true

# GitHub Ribbons(https://github.blog/2008-12-19-github-ribbons/)
github:
  # (关闭请设置为false)
  url: false

# 页脚 Litten(此配置项已弃用)
# 帮助我们让更多人可以更方便使用Hexo,请尽量不要修改此主题配置
pageFooter:
  jack: GitHub:<a href="xxx1" target="_blank"></a>

# 开启百度站长平台自动推送(https://ziyuan.baidu.com/linksubmit/index)
baidu_push: false

# 版权声明
# 版权声明type设定:0-关闭版权声明; 1-文章对应的md文件里有copyright: true属性,才有版权声明; 2-所有文章均有版权声明
copyright_type: 2
# 版权声明自定义文本(关闭请设置为false)
copyright_text:

# 网站成立年份(默认为 2018,若填入年份小于当前年份,则显示为 2018-2019 类似的格式)
since: 2018

# Progress Bar | 页面加载进度条
# Demo: http://github.hubspot.com/pace/docs/welcome/
# type: barber-shop|big-counter|bounce|center-atom|center-circle|
#       center-radar|center-simple|corner-indicator|flash|flat-top|
#       loading-bar|mac-osx|minimal
# color: black|blue|green|orange|pink|purple|red|silver|white|yellow|
progressBar:
  enable: false
  type: 'minimal'  # Keep Quotes | 保留引号避免出错(某些type会导致样式重叠排版错误)
  color: blue

# Apple Touch icon 苹果图标(关闭请设置为false)
apple_touch_icon: '/apple-touch-icon-180x180.png'

# Tab Title Change | 标签页标题切换
tab_title_change:
  enable: false
  left_tab_title: '(つェ⊂) 我藏好了哦~ '
  return_tab_title: '(*´∇`*) 被你发现啦~ '

# https://github.com/willin/hexo-wordcount
# 是否开启字数统计(关闭请设置enable为false)
# 也可以单独在md文件里Front-matter设置`no_word_count: true`属性,来自定义关闭字数统计
word_count:
  enable: true
  # 只在文章详情显示(不在首页显示)
  only_article_visit: true

# 文字输入特效
# https://github.com/disjukr/activate-power-mode
activate_power_mode:
  enable: true
  # 使输入模式丰富多彩
  colorful: true
  # 是否开启摇动
  shake: false

# 飘雪特效
# https://github.com/MlgmXyysd/snow.js
snow: false

# 看板娘动态模型插件
## https://github.com/JoeyBling/live2d-widget.js
live2d:
  # (关闭请设置为false)
  enable: false
  # 模型名称(取值请参考:https://github.com/JoeyBling/hexo-theme-yilia-plus/wiki/live2d%E6%A8%A1%E5%9E%8B%E5%8C%85%E5%B1%95%E7%A4%BA)
  model: hibiki
  display:
    position: right # 显示位置:left/right(default: 'right')
    width: 145  # 模型的长度(default: 150)
    height: 315 # 模型的高度(default: 300)
    hOffset: 50 # 水平偏移(default: 0)
    #vOffset: -20 # 垂直偏移(default: -20)
  mobile:
    show: false # 是否在移动设备上显示(default: true)
    scale: 0.6 # 移动设备上的缩放(default: 0.5)
  react:
    opacity: 0.8 # 模型透明度(default: 0.7)

# 样式定制 - 一般不需要修改,除非有很强的定制欲望…
style:
  # 头像上面的背景颜色
  # header: '#D3D1DC'
  header: '#4d4d4d'
  gif:
    # 是否启用左侧边栏动态图效果
    enable: false
    # 自定义背景图路径(默认可以不设置,提供默认背景图)
    # path: /img/biubiubiu.gif
  # 右滑板块背景
  slider: 'linear-gradient(200deg,#a0cfe4,#e8c37e)'

# slider的设置
slider:
  # 是否默认展开tags板块
  showTags: true

# 智能菜单
# 如不需要,将该对应项置为false
# 比如
#smart_menu:
#  friends: false
smart_menu:
  innerArchive: '所有文章'
  friends: '友链'
  aboutme: '关于我'

# 友情链接
friends:
  技术笔记:  #网站名称
    #网站地址
    url: https://zhousiwei.gitee.io/ibooks/
    #网站图片(可忽略不写)
    img: https://zhousiwei.gitee.io/ibooks/favicon.ico
    #网站简介(可忽略不写)
    description: 记录工作和学习过程中的笔记:Java、前端开发、Hexo博客、聚合支付、Linux笔记、ElasticSearch、ELK日志分析
  GitHub:
    url: https://github.com/JoeyBling
  CSDN:
    url: https://blog.csdn.net/qq_30930805

# 关于我
aboutme: xxx
思路: 不能把所有图片都放在source静态资源下,一是数据量太大,增加Hexo的负担(所以我们把图片放在github),二是加载高清大图片资源缓慢(所以我们用python对图片进行批量压缩处理),这样加载呈现压缩图,点击才加载原图。
1. 本文为hexo-theme-yilia主题,其他hexo主题请另行百度

2. GitHub上新建一个仓库存储照片(此仓库的作用除了储存还负责更新hexo博客引用的图片链接地址),为了少走弯路,请直接fork原作者的仓库(https://github.com/lawlite19/Blog-Back-Up.git),若下载速度太慢,可选择我的备用地址(https://github.com/Janche/Blog-Photo.git)
3. Python环境(安装Python3,并配置环境变量,对照片的处理是通过Python命令来处理的)
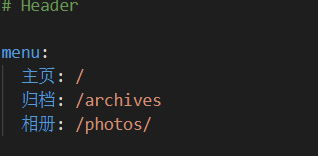
4. 在你的hexo博客的source文件夹下(注意不是yilia主题下的source),新建一个photos文件夹,用于存放照片相关的文件, 也可通过命令 hexo new page photos创建

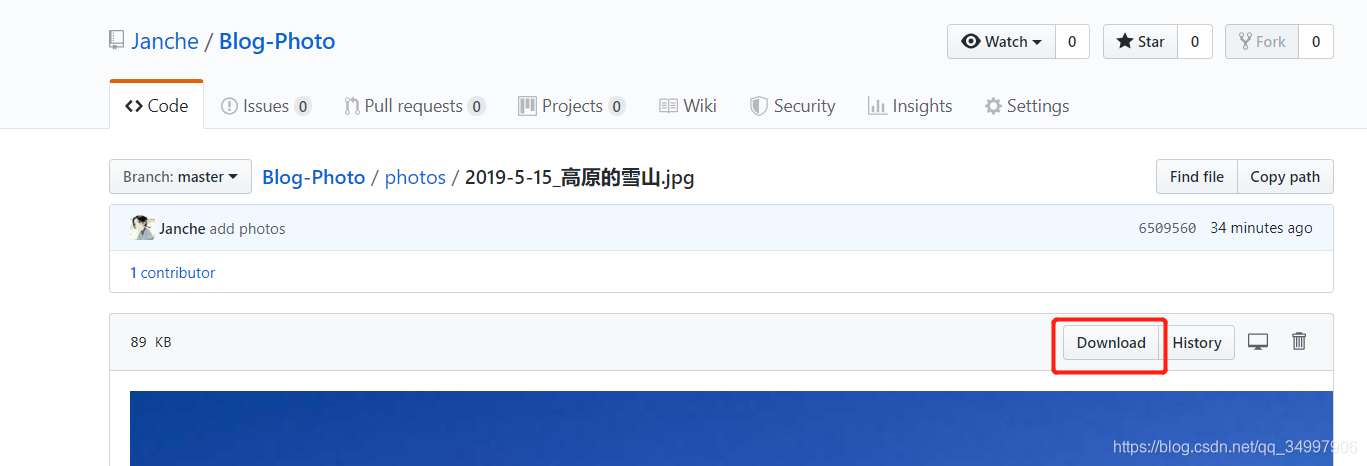
注意一定是点击download后地址栏的url),如图b
将红框处的地址替换为hexo博客刚新建的photos地址,这样每次上传图片后将自动更新到hexo博客中。
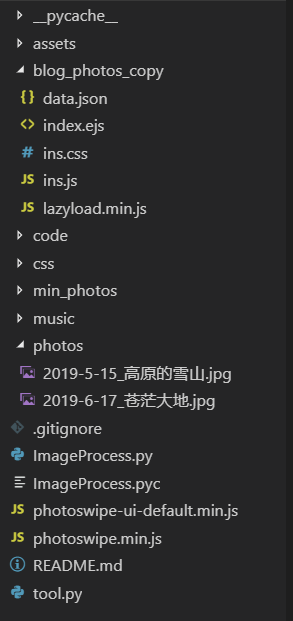
1. 将blog_photos_copy目录下的5个文件拷贝到hexo博客刚新建的photos目录下,注意,只有第一次配置时需要执行这一步,后续新增照片均不需要。
2. 新加的照片按照YYYY-MM-dd_照片文字描述.jpg格式添加到Blog-Photo的photos目录
3. 运行Python命令:python tool.py,期间可能需要下载部分python的依赖,根据错误,百度下载就好了。
4. 上面3后,json文件会生成到设置博客的目录下,对应博客提交同步代码上去就可以使用
**你没有看错,就只有这三行代码,你想在那篇文章加音乐,直接添加这三行就行了,src后的链接为歌曲的外链地址,很多歌曲都因为版权而无法生成外链地址。 **
参考文章:
https://blog.csdn.net/u013082989/article/details/70162293 https://blog.csdn.net/wardseptember/article/details/82780684
- hexo 的 CNAME 文件 需要放在source 目录下,每次运行hexo clean会清除public 目录,hexo g重新生成,hexo d发布到远程服务器。
1、准确来说 CNAME 文件是放在 hexo 项目下的 source 目录,你再运行下
hexo generade
然后你再去 public 目录中看看就明白了
BTW,为了达到更有说服力的验证,最好在开始前先运行下
hexo clean
这样会先删除 public 目录
-
hexo 的 README.md等文件
文件添加在 Hexo目录下的source根目录下创建README.md文件。并编辑保存。
- 防止README.md被渲染
编辑根目录的_config.yml文件中的“skip_render”参数。 eg:
skip_render: [README.md]保存并退出。
- 完成
试着命令部署,再去你的 Git仓库看看是否存在README.md文件。
$ Hexo clean && hexo g && hexo d -
md中存在<title>标签时《所有文章》功能主页时不生效,模板开发者暂未解决【待解决】
-
插入网站运行时间代码
样例 1:
<span>
本站已运行
</span>
<span id="span_dt_dt">
</span>
<script>
/*建站时间*/
function show_date_time() {
window.setTimeout("show_date_time()", 1e3);
var BirthDay = new Date("2018/03/01"),
today = new Date,
timeold = today.getTime() - BirthDay.getTime(),
msPerDay = 864e5,
e_daysold = timeold / msPerDay,
daysold = Math.floor(e_daysold),
e_hrsold = 24 * (e_daysold - daysold),
hrsold = Math.floor(e_hrsold),
e_minsold = 60 * (e_hrsold - hrsold),
minsold = Math.floor(60 * (e_hrsold - hrsold)),
seconds = Math.floor(60 * (e_minsold - minsold));
span_dt_dt.innerHTML = daysold + "天" + hrsold + "小时" + minsold + "分" + seconds + "秒";
}
show_date_time();
</script>
样例 2: 当前系统时间 <span id="nowTime"></span> <script type="text/javascript"> //获取系统时间 var newDate = ''; getLangDate(); //值小于10时,在前面补0 function dateFilter(date){ if(date < 10){return "0"+date;} return date; } function getLangDate(){ var dateObj = new Date(); //表示当前系统时间的Date对象 var year = dateObj.getFullYear(); //当前系统时间的完整年份值 var month = dateObj.getMonth()+1; //当前系统时间的月份值 var date = dateObj.getDate(); //当前系统时间的月份中的日 var day = dateObj.getDay(); //当前系统时间中的星期值 var weeks = ["星期日","星期一","星期二","星期三","星期四","星期五","星期六"]; var week = weeks[day]; //根据星期值,从数组中获取对应的星期字符串 var hour = dateObj.getHours(); //当前系统时间的小时值 var minute = dateObj.getMinutes(); //当前系统时间的分钟值 var second = dateObj.getSeconds(); //当前系统时间的秒钟值 var timeValue = "" +((hour >= 12) ? (hour >= 18) ? "晚上" : "下午" : "上午" ); //当前时间属于上午、晚上还是下午 newDate = dateFilter(year)+"年"+dateFilter(month)+"月"+dateFilter(date)+"日 "+" "+dateFilter(hour)+":"+dateFilter(minute)+":"+dateFilter(second); document.getElementById("nowTime").innerHTML = timeValue+"好!当前时间为: "+newDate+" "+week; setTimeout("getLangDate()",1000); } </script>样例 3: function showtime(times) { //传入时间的参数 var time_1 = new Date(times).getTime(); var time_2 = new Date().getTime(); var time_3; var time_distance; //计算时间差 if (time_1 > time_2) { time_distance = time_1 - time_2; } else { time_distance = time_2 - time_1; } if (time_distance > 0) { // 天时分秒换算 var int_day = Math.floor(time_distance / 86400000); time_distance -= int_day * 86400000; var int_hour = Math.floor(time_distance / 3600000); time_distance -= int_hour * 3600000; var int_minute = Math.floor(time_distance / 60000); time_distance -= int_minute * 60000; var int_second = Math.floor(time_distance / 1000); // 时分秒为单数时、前面加零 if (int_day < 10) { int_day = "0" + int_day; } if (int_hour < 10) { int_hour = "0" + int_hour; } if (int_minute < 10) { int_minute = "0" + int_minute; }


