A module which makes connecting to NetSuite RESTlets using OAuth and NLAuth much easier.
npm install nsrestlet
Connecting to NetSuite RESTlets with external programs can be really hard.
- NLAuth has to deal with password changes and two factor authentication problems (which are required on high-permission accounts)
- OAuth is really hard to set up
- NetSuite errors for debugging NLAuth and OAuth applications are somewhat vague
- The examples they have on SuiteAnswers don't always seem to work
var nsrestlet = require('nsrestlet');

//For OAuth (we can do NLAuth too, see later in documentation):
var accountSettings = {
    accountId: "PUT YOUR ACCOUNT ID HERE",
    tokenKey: "PUT YOUR TOKEN KEY HERE",
    tokenSecret: "PUT YOUR TOKEN SECRET HERE",
    consumerKey: "PUT YOUR CONSUMER KEY HERE",
    consumerSecret: "PUT YOUR CONSUMER SECRET HERE" };
var urlSettings = {
    url: 'https://ACCOUNTID.restlets.api.netsuite.com/app/site/hosting/restlet.nl?script=SCRIPTID&deploy=DEPLOYID'
 }

//create a link
var myInvoices = nsrestlet.createLink(accountSettings, urlSettings)

//then call get, post, put, or delete
myInvoices.get({id: '12345'}, function(error, body)
{
    console.log(body);
});
That may look a bit intimidating, but trust me, it's not. Here is a tutorial on how to set up OAuth with Netsuite, which makes things much easier, even if you aren't familiar with OAuth.
First, ensure that you have set up your Netsuite environment for OAuth or NLAuth and created your script
In order to create a connection to Netsuite, you need to provide some account settings.
For OAuth, the account settings will look like this:
//all fields are required
var accountSettings = {
    accountId: "PUT YOUR ACCOUNT ID HERE",
    tokenKey: "PUT YOUR TOKEN KEY HERE",
    tokenSecret: "PUT YOUR TOKEN SECRET HERE",
    consumerKey: "PUT YOUR CONSUMER KEY HERE",
    consumerSecret: "PUT YOUR CONSUMER SECRET HERE"
};
For NLAuth, the account settings look like this:
//all fields except role are required
var accountSettings = {
    accountId: "PUT YOUR ACCOUNT ID HERE",
    email: "PUT YOUR EMAIL HERE",
    password: "PUT YOUR PASSWORD HERE",
    role: "PUT YOUR ROLE KEY HERE"     //optional, but recommended
};You also need to provide some URL settings. The URL settings can be formatted in one of two ways.
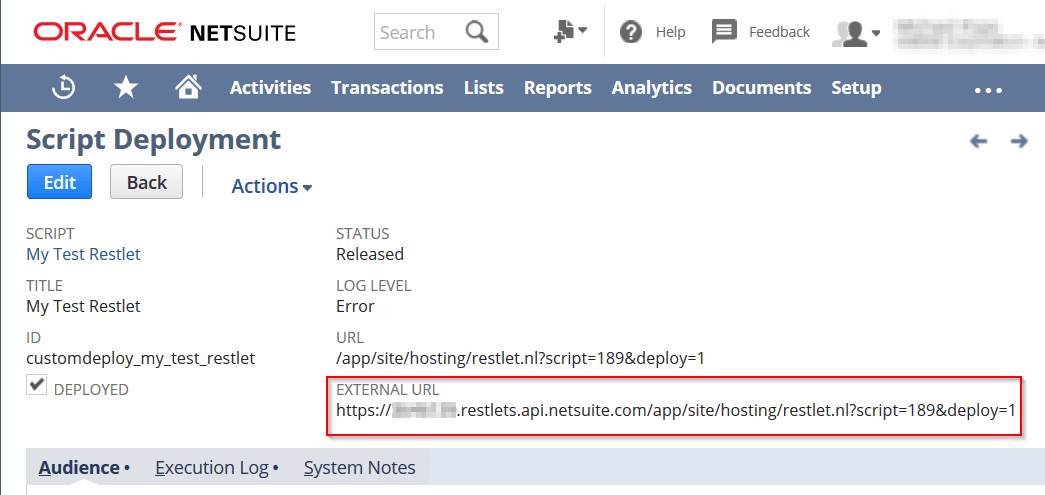
Use an explicit URL. This is listed on the script deployment page in Netsuite as the EXTERNAL URL field:
var urlSettings = {
    url: "https://12345.restlets.api.netsuite.com/app/site/hosting/restlet.nl?script=1&deploy=1"
};
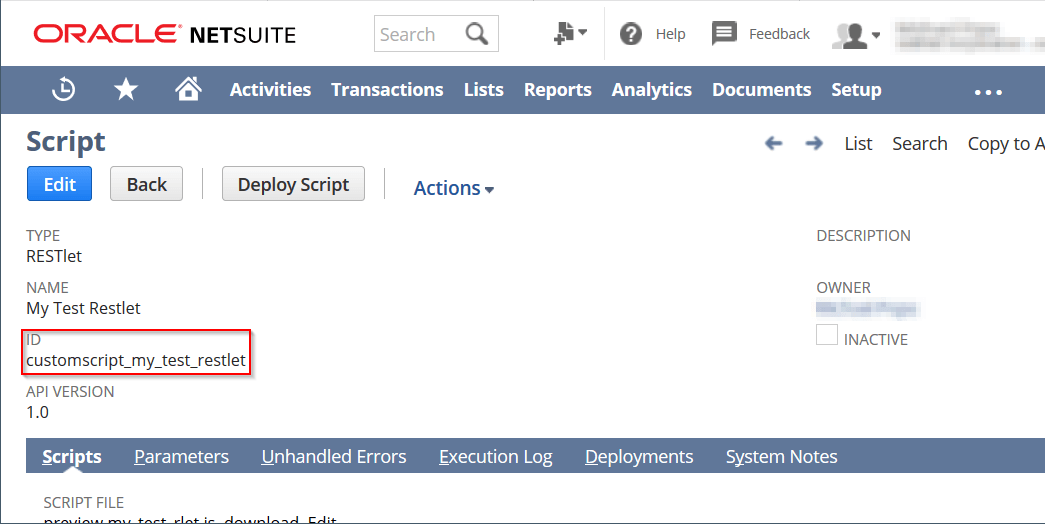
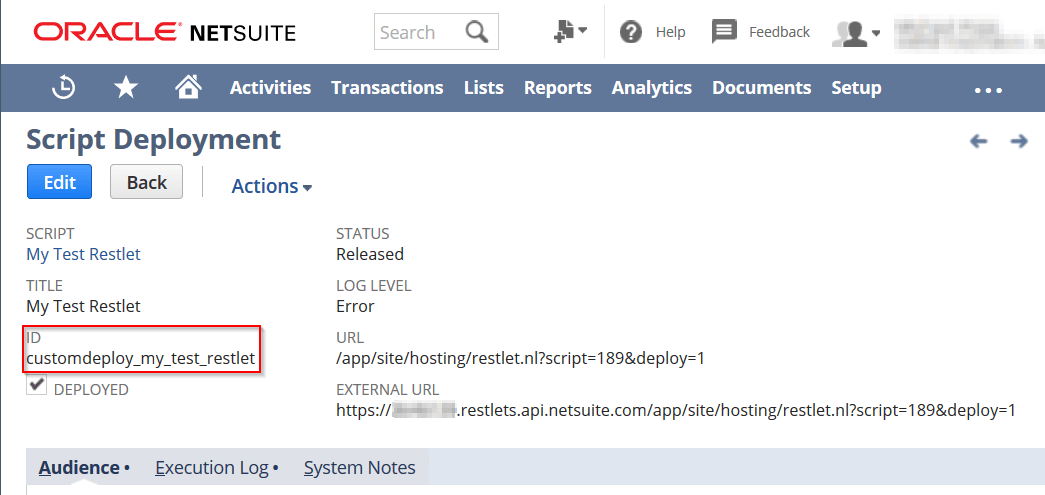
Alternatively, provide the script id and deployment id (either the string version or number version). These can be found on the script and script deployment pages in Netsuite in the ID field:
// You can use the string version...
var urlSettings = {
    script: "customscript_test_restlet",
    deployment: "customdeploy_test_restlet"
}

// or, the number version
var urlSettings = {
    script: 142,
    deployment: 1
}Once you've created the account settings and url settings objects, pass them into nsrestlet.createLink():
var invoiceLink = nsrestlet.createLink(accountSettings, urlSettings);This link allows you to call a restlet endpoint in an easy, clean, and repeatable way. It also allows you to reuse the account settings to connect to other restlets.
Once you have a link, you can directly call the four basic HTTP methods (GET, POST, PUT, DELETE).
The first parameter you provide is the data which will be sent to the restlet.
The second parameter is an optional callback. If not provided, a promise will be returned instead. This callback or promise will receive data from your NetSuite Restlet.
For GET requests, make sure the data you provide is strings or a one-level-deep JS object with strings. For PUT, POST, and DELETE, you can use any JS object you'd like.
// Using callbacks
invoiceLink.get({tranid: 12345}, function(error, body) {
    console.log(error, body);
});

// Promises
invoiceLink.post({tranid: 12345}).then(function(body) {
    console.log(body);
})
.catch(function(error) {
    console.log(error);
});

// invoiceLink also has .put() and .delete() methods
Note that for GET requests, you should limit the data you post to 1 level deep strings.
Inside of your Restlet script in NetSuite, you will receive the data as the first parameter:
function restlet_called(body)
{
  // you receive the payload as 'body'

  // if your application likes JSON, you can send data back to it like this:
  return {message: "I got your message", data: body}

  // ...otherwise send it as a string using JSON.stringify()
}
Or in SuiteScript 2.0:
/**
 * @NApiVersion 2.x
 * @NScriptType Restlet
 */

define(['N/log'],
    function(log)
    {
        function restlet_called(body)
        {
            // you receive the payload as 'body'

            // if your application likes JSON, you can send data back to it like this:
            return {message: "I got your message", data: body}

            // ...otherwise send it as a string using JSON.stringify()
        }
        return {
            get:    restlet_called,
            post:   restlet_called,
            put:    restlet_called,
            delete: restlet_called
        };
});
For GET, POST, and PUT requests, you can return data back to the external application.
This data will be provided in the callback or promise (depending on which you are using).
// for example as a callback
invoiceLink.post({tranid:12345}, function(error, body) {
    console.log(body);
    /*
        You'd see this printed out:

        { message: "I got your message",
          data: { tranid:12345 } }
    */
});
For DELETE requests, you won't receive any data back, but you should still provide a callback or promise resolution to catch any errors that might occur.
Sometimes things go wrong when trying to call a Restlet, and an error is emitted.
In cases like rate limiting or dropped requests, nsrestlet will retry the call (by default up to three times) before emitting an error. In other cases where retrying wouldn't make a difference, nsrestlet will emit an error immediately.
You can receive this error in you callback (error parameter) or promise (.catch()).
You can customize the retry settings by adding some fields to the URLSettings object.
var urlSettings = {
    script: 142,
    deployment: 1,
    retries: 5,     // number of retries on retryable errors, default is 3
    backoff: 120    // multiplicative backoff in ms, default is 0
}
Backoff refers to how many milliseconds to delay on a retryable error if a request fails. The backoff is multiplicative, so each failure (in this case, 3 of them), will double the time delay (120, 240, 480 milliseconds). This is a useful field if you're receiving rate limiting errors from NetSuite.
Here is some basic code you can start with. It provides a good base for a custom solution.
Feel free. Please see the Development page to get started.
MIT (see LICENSE file). But we love contributions and suggestions. Please feel free to suggest improvements.
This module was made after looking at a lot of good code. Here is some the code that inspired this module and effected how it was designed:
- bknight's response in this thread is excellent - the idea of a facade for four HTTP codes works really well. The error handling and retrying capabilities also comes from looking at his code. He was generous enough to post a full example of what was working on his end.
- suiteplus has an excellent module called nscabinet, which helps upload and download files from Netsuite as a gulp task. Reading through it helped me understand how to use the
querystringmodule and NLAuth. - Marty Zigman has a good sample that got me pointed in the right direction.
- These excellent modules are used in this project - request, oauth-1.0a, and qs.
This package has also been helped by:
- Some conversations with
scottvonduhnandbattkon the Unofficial Netsuite Slack Server. If you have Netsuite related questions, this is the place to go. - Some excellent pull requests by awesome folk here on Github.
Please see the Changelog


