This document describes how to connect the WBZ451 Curiosity Development Board to Azure IoT Central. The embedded firmware demo project leverages Microsoft’s Azure IoT "Embedded C" SDK. Secure connections are made possible by using CA-signed X.509 certificate-based authentication between the server and client.
Microchip’s PIC32CX-BZ2 family includes System-on-Chip (SoC) devices as well as global regulatory-certified, RF-ready modules. In addition to Bluetooth Low Energy, the chip supports Zigbee stacks and Over the Air (OTA) update capabilities.
The hardware includes a 12-bit analog to digital converter (ADC), multiple timer/counters for control (TCC) channels, an on-board encryption engine, and a broad set of interfaces to touch, CAN, sensor, display and other peripherals. The 1 MB of Flash memory supports large application codes, multiprotocol wireless stacks and OTA updates. AEC-Q100 Grade 1 (125 °C) qualified packages further simplify wireless connectivity integration where highly robust solutions are required.

- Introduction
- Hardware Requirements
- Demo Platform Assembly
- Software Requirements
- Background Knowledge
- Create an Azure Account and Subscription
- IoT Central Overview
- Program the Plug and Play Demo
- Create an IoT Central Application
- Create an Enrollment Group
- Test the Plug and Play Device
- BLE Mobile Application
- Creating a Dashboard for Custom Data Visualization
- Frequently Asked Questions
- References
- Conclusion
-
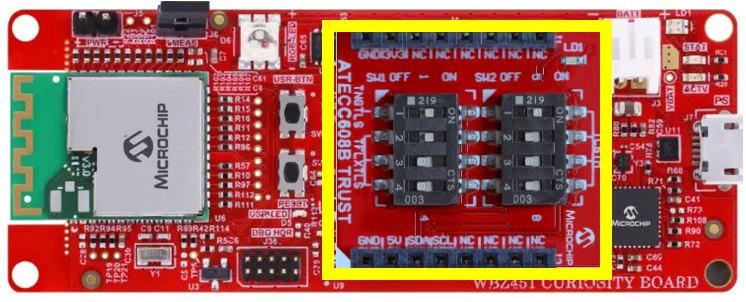
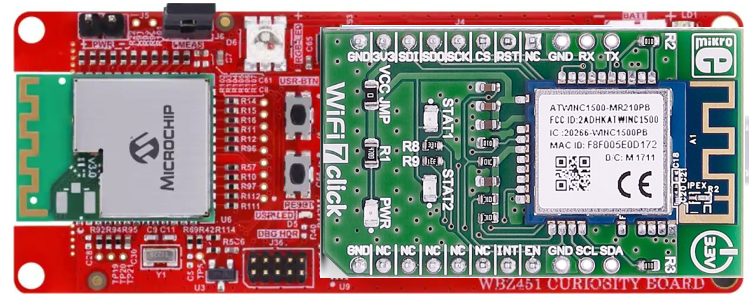
Host MCU Main Board: "WBZ451 Curiosity Development Board" featuring Microchip's WBZ451PE SoC multi-protocol module
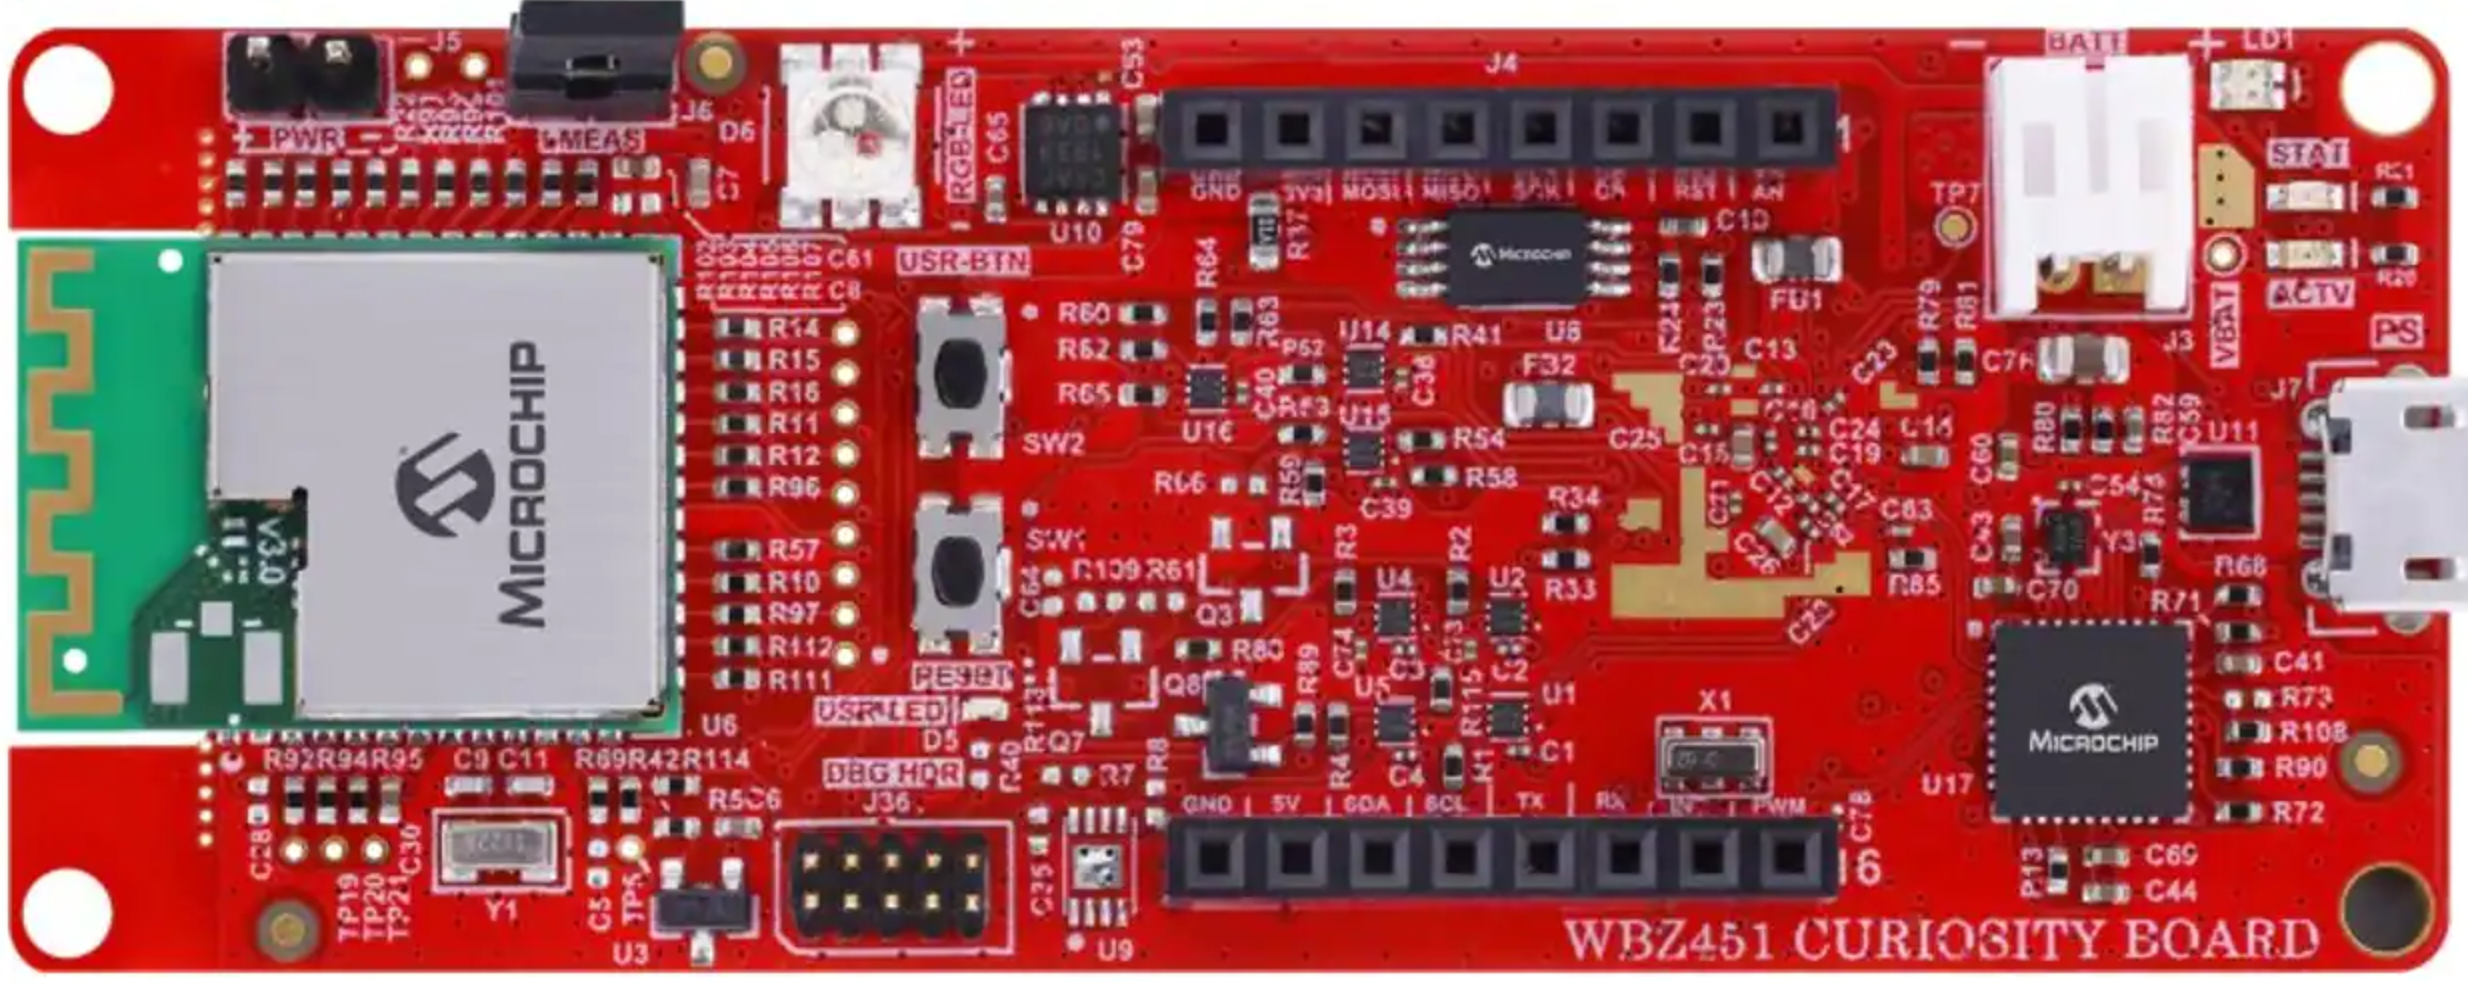
Download the WBZ451 Curiosity Development Board User Guide for more details (including the schematics for the board)
-
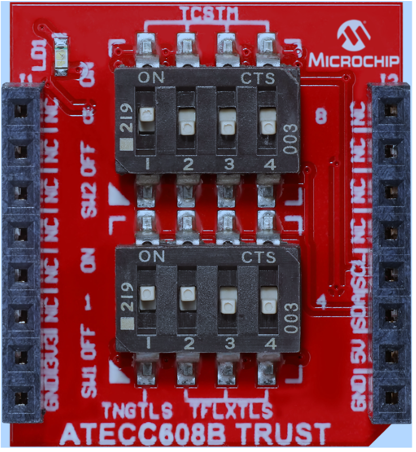
Secure Element Add-On Board: "ATECC608B TRUST" featuring Microchip's ATECC608B secure element configured as a Trust&GO device which is pre-provisioned with signer and client certificates
-
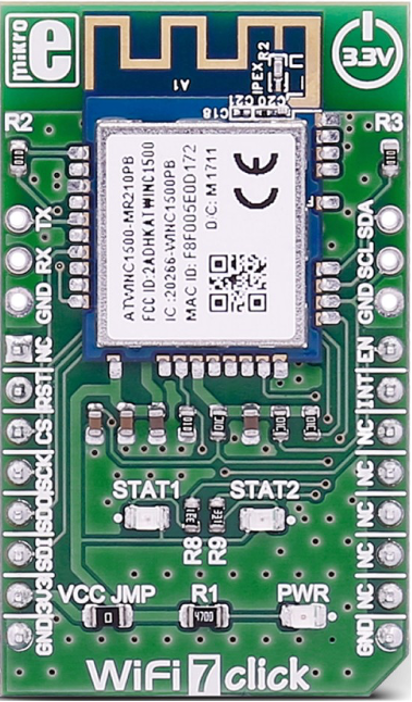
Wireless Connectivity Add-On Board: "WiFi7 click" board featuring Microchip's ATWINC1500 Wi-Fi network controller module
-
Serial Bridge for Host PC Connection to WiFi7 click board: The combination of the "ATSAMD21 Xplained Pro Evaluation Kit" and the "mikroBUS Xplained Pro" is used once as a vehicle for updating the firmware for the ATWINC1500 Wi-Fi module on the WiFi7 click board.
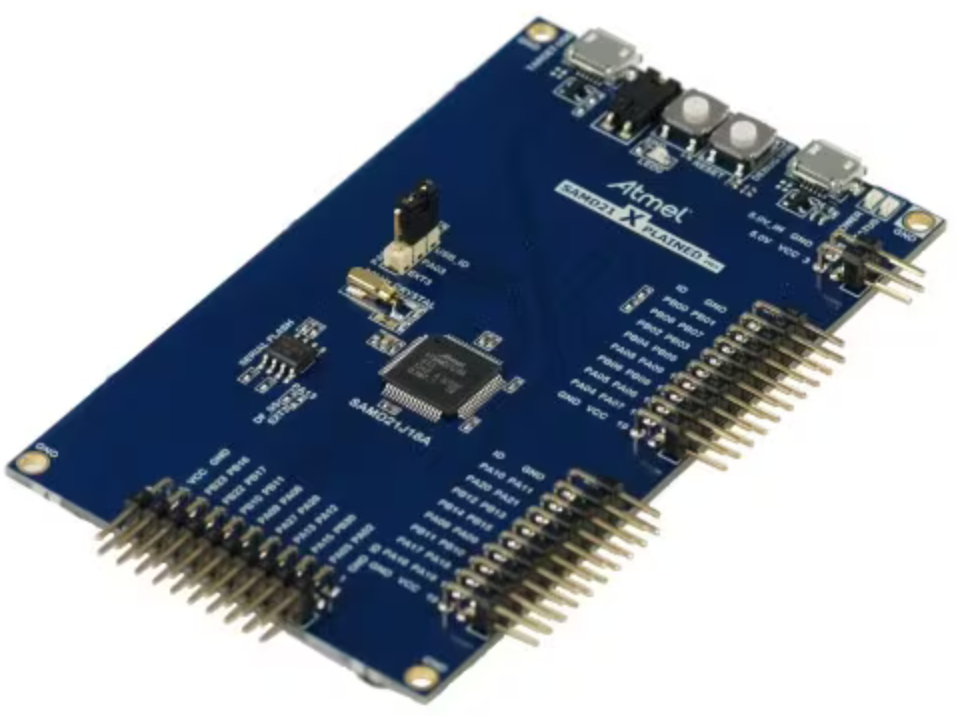
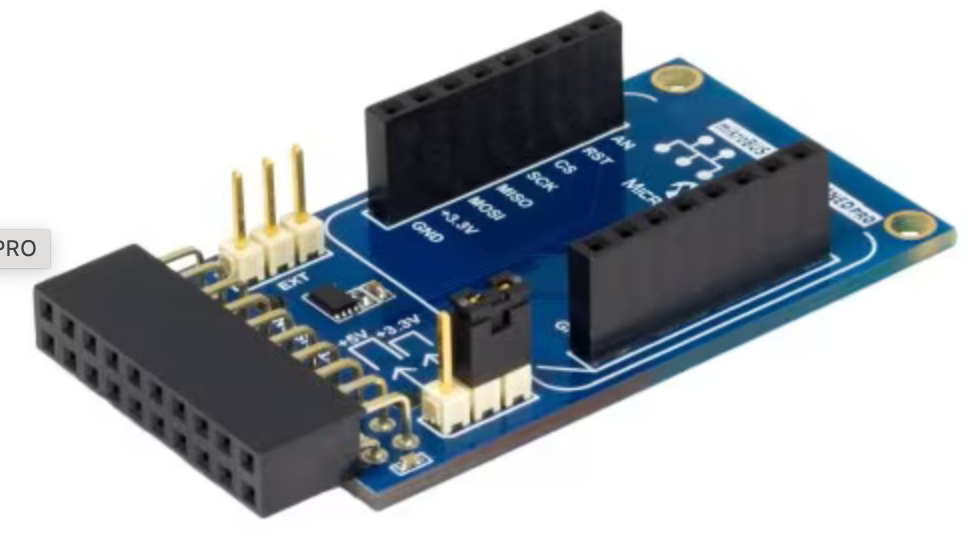


[IMPORTANT - PLEASE NOTE] WiFi7 click boards that are being used for the very first time out of the box, and which have not gone through a firmware update, will most likely be pre-programmed with an earlier version of Wi-Fi firmware that precedes inclusion of cloud authentication capabilities.
Click here for the procedure on using the ATSAMD21 Xplained Pro Evaluation Kit as a serial bridge (between the PC & WiFi7 click) to update the WiFi7 click board with the required version of Wi-Fi module firmware.
The following 2 minor hardware modifications are required for the WBZ451PE SoC multi-protocol module (on the Curiosity Board) to properly communicate with the ATWINC1500 Wi-Fi network controller module (on the WiFi7 click board):
-
WBZ451 Curiosity Development Board: Remove/lift resistor
R120from the backside/bottom of the board
-
WiFi7 click board: Connect a jumper wire between "NC" (mikroBUS pin 1) & "EN" (mikroBUS pin 16)
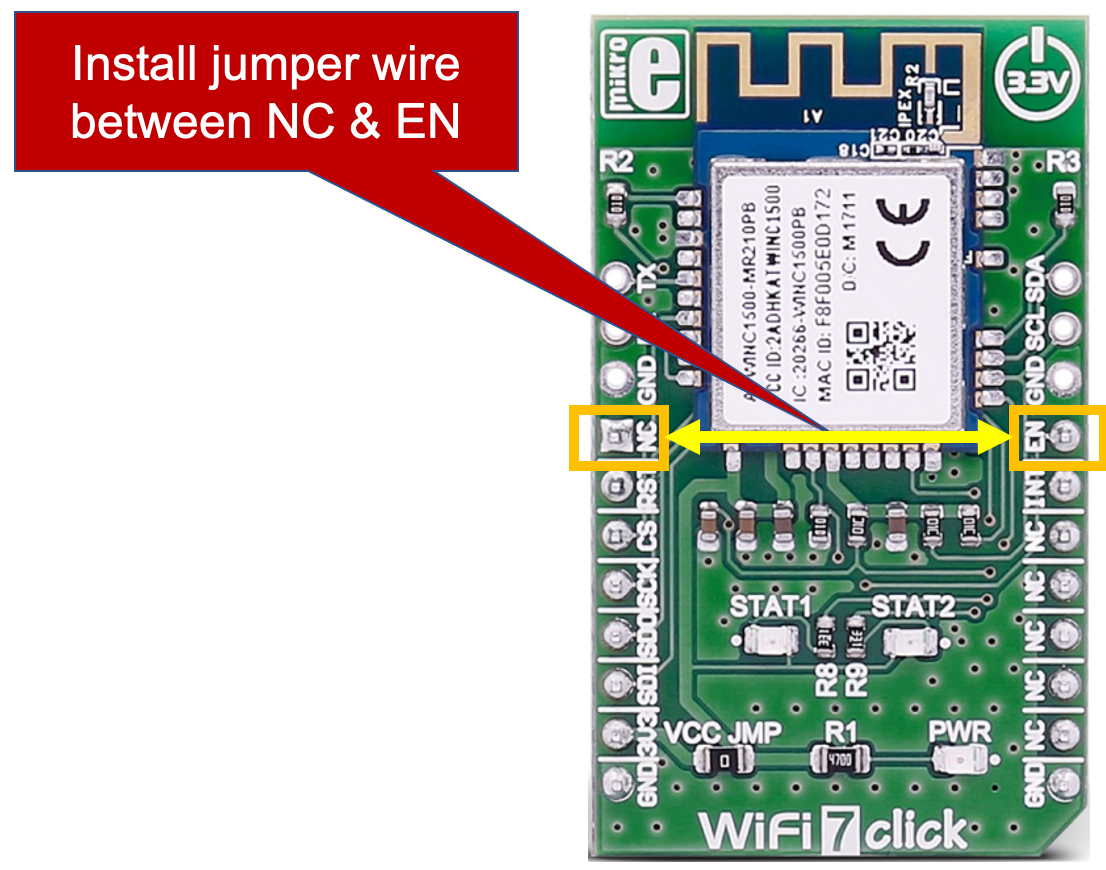


-
Set the dip switches on the ATECC608B TRUST board based on the following settings (only SW1-1 needs to be set to the ON position to configure the secure element for Trust&GO operation)
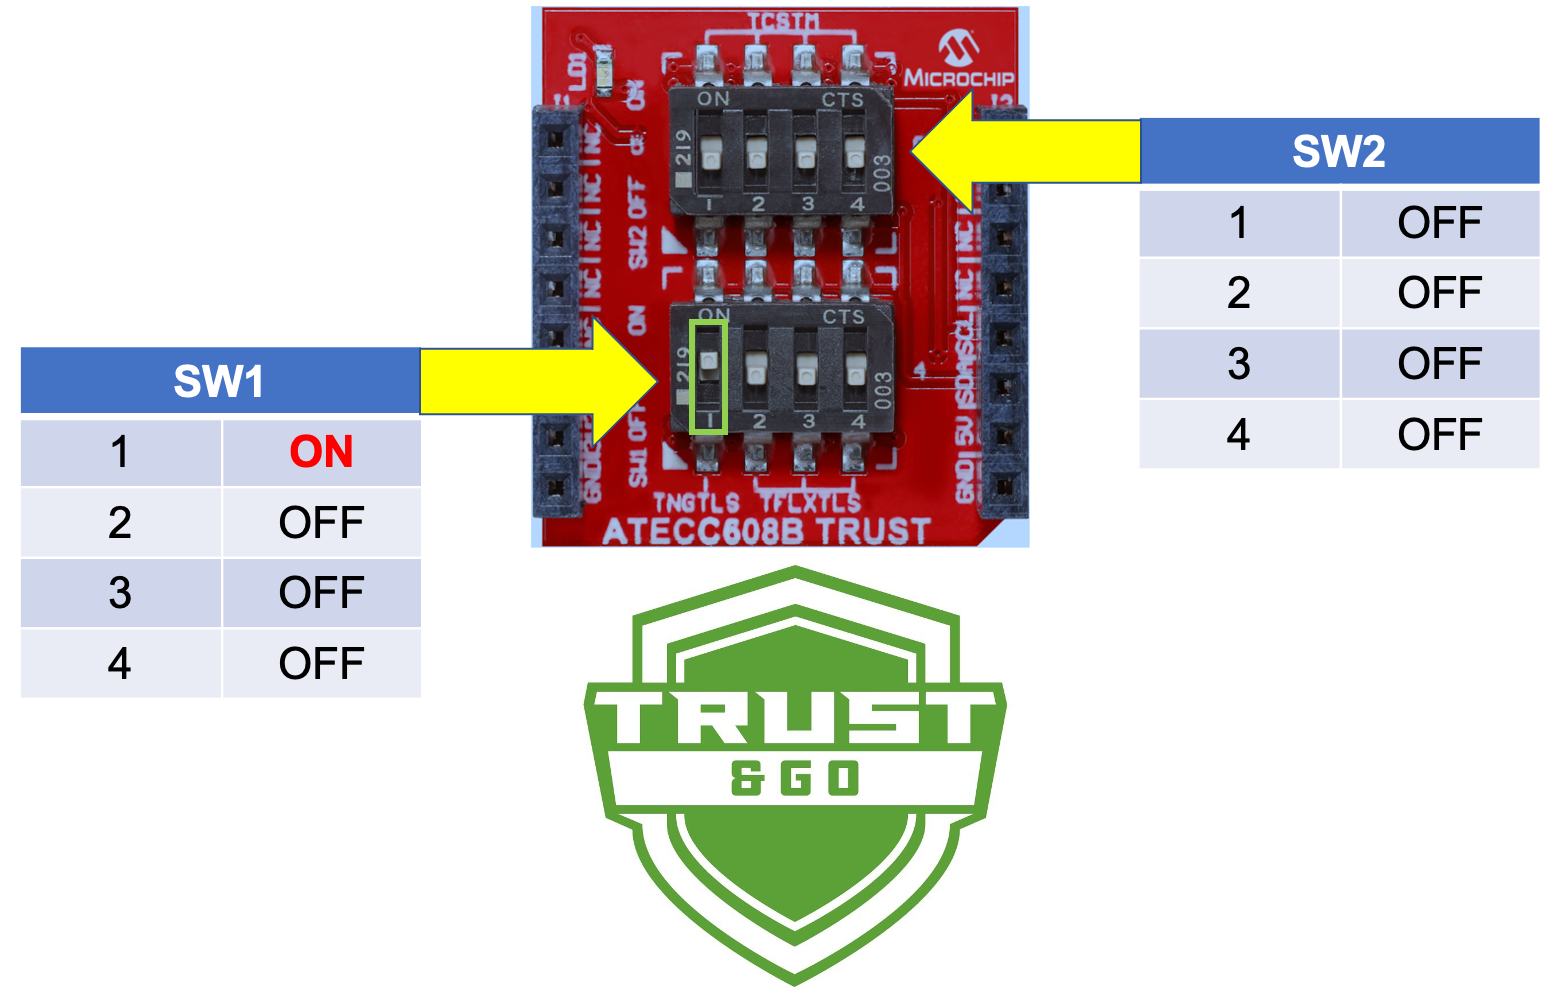
-
Install the ATECC608B TRUST board onto the mikroBUS socket of the WBZ451 Curiosity Development Board
-
Install the WiFi7 click board onto the mikroBUS socket of the ATECC608B TRUST board


This specific combination of stacked development boards provides a hardware platform which supports multiple wireless connectivity standards such as Zigbee 3.0, BLE 5.2, and 2.4 GHz Wi-Fi.
Embedded software development tools need to be installed in order to properly program the WBZ451 Curiosity Development Board and then provision/test it for use with Microsoft Azure IoT services.
-
Microchip
MPLAB Xtool chain for embedded code development on 32-bit architecture MCU/MPU platforms (made up of 3 major components)-
MPLAB X IDE (when prompted, enable the installation of the MPLAB IPE too)
NOTE: This demonstration project was last tested successfully with MPLAB X v6.05. If a previous version of the IDE is needed, download it from the MPLAB Development Ecosystem Downloads Archive (to fall back to the version Microchip successfully tested prior to release).
-
NOTE: This demonstration project was tested successfully with XC32 v4.21, and in general should work with later versions of the compiler as they become available. If you encounter issues building the project with a newer version of the compiler, it is recommended to download the compiler version that was last tested successfully from the MPLAB Development Ecosystem Downloads Archive (to fall back to the version Microchip successfully tested prior to release).
-
-
Git (a free and open source distributed version control system)
-
Download/install the latest version of Git for Windows, macOS, or Linux
-
Verify working operation of the
Git Bashprompt (e.g. for Windows: clickStart> typeGit Bash)
- Any Terminal Emulator program of your choice
This high-level architecture description summarizes the interactions between the WBZ451 Development Board and Azure. These are the major puzzle pieces that make up this enablement work of connecting the development board to Azure using X.509-based certificate authentication:
-
ATECC608B: a secure element from the Microchip CryptoAuthentication portfolio. It securely stores a private key that is used to authenticate the hardware with cloud providers to uniquely identify every board
-
ATWINC1500: a low-power consumption Wi-Fi module that has access to the device certificate, signer CA certificate, and public key for mutual TLS handshaking between the board and the cloud
-
Azure IoT "Embedded C" SDK: Microsoft-provided API designed to allow small, low-cost embedded IoT devices to communicate with Azure services, serving as translation logic between the application code and transport client
-
Azure IoT Central: IoT Central is an IoT application platform that reduces the burden and cost of developing, managing, and maintaining enterprise-grade IoT solutions
-
Device Provisioning Service (DPS): a helper service for IoT Central that enables zero-touch, just-in-time provisioning to the right IoT Hub without requiring human intervention, allowing customers to automatically provision millions of devices in a secure and scalable manner
On successful authentication, the WBZ451 Curiosity Development Board will be provisioned to the correct IoT Hub that is pre-linked to the DPS during the setup process. Note that the ATECC608B only contains the private key. The self-signed certificate chain including root CA, signer CA (or intermediate CA), and client is stored in the ATWINC1500 Wi-Fi module used for the mutual TLS handshake.
This is the high-level view of the "Embedded C" SDK which translates the application code into Azure-friendly logic that can be easily understood by Azure IoT Hub. Note that Microsoft is only responsible for the logic in the green box; it is up to the IoT Developer to provide the remaining layers of application code, Transport Client, TLS, and Socket. In the provided demo project, Microchip provides the layers in blue. Please reference the Azure SDK for Embedded C document for more details.

The TLS connection performs both authentication and encryption. Authentication consists of two parts:
- Server authentication: the board (client) authenticates the server
- Client authentication: the server authenticates the board (client)
Server authentication happens transparently to the user since the ATWINC1500 on the WiFi7 click board comes preloaded with the required root CA certificate. During client authentication, the client private key must be used, but since this is stored inside the ATECC608B chip and cannot be extracted, all calculations must be done inside the ATECC608B. The ATWINC1500 library offers an API to delegate the TLS calculations to the main application. The main application will in turn call the ATECC608B library API’s to perform the calculations. Before the TLS connection is complete, a shared secret key must be negotiated between the server and the client. This key is used to encrypt all future communications during the connection.
After successfully connecting on the TLS level, the board starts establishing the MQTT connection. Since the TLS handles authentication and security, the client's MQTT protocol does not have to provide a username nor password to successfully connect to the IoT Hub used by the IoT Central application.
Before connecting to Azure, you must first create a user account with a valid subscription. The Azure free account includes free access to popular Azure products for 12 months, $200 USD credit to spend for the first 30 days, and access to more than 25 products that are always free. This is an excellent way for new users to get started and explore.
To sign up, you need to have a phone number, a credit card, and a Microsoft or GitHub account. Credit card information is used for identity verification only. You won't be charged for any services unless you upgrade. Starting is free, plus you get $200 USD credit to spend during the first 30 days and free amounts of services. At the end of your first 30 days or after you spend your $200 USD credit (whichever comes first), you'll only pay for what you use beyond the free monthly amounts of services. To keep getting free services after 30 days, you can move to pay-as-you-go pricing. If you don't move to the pay-as-you-go plan, you can't purchase Azure services beyond your $200 USD credit — and eventually your account and services will be disabled. For additional details regarding the free account, check out the Azure free account FAQs.
When you sign up, an Azure subscription is created by default. An Azure subscription is a logical container used to provision resources in Azure. It holds the details of all your resources like virtual machines (VMs), databases, and more. When you create an Azure resource like a VM, you identify the subscription it belongs to. As you use the VM, the usage of the VM is aggregated and billed monthly. You can create multiple subscriptions for different purposes.
Sign up for a free Azure account for evaluation purposes by following the process outlined in the Microsoft Azure online tutorial. It is highly recommended to go through the entire section of the tutorial so that you fully understand what billing and support plans are available and how they all work.
Should you encounter any issues with your account or subscription, submit a technical support ticket.
Azure IoT Central is an IoT application platform that reduces the burden and cost of developing, managing, and maintaining enterprise-grade IoT solutions. Choosing to build with IoT Central gives you the opportunity to focus time, money, and energy on transforming your business with IoT data, rather than just maintaining and updating a complex and continually evolving IoT infrastructure.
The web UI lets you quickly connect devices, monitor device conditions, create rules, and manage millions of devices and their data throughout their life cycle. Furthermore, it enables you to act on device insights by extending IoT intelligence into line-of-business applications.
IoT Plug and Play enables solution builders to integrate IoT devices with their solutions without any manual configuration. At the core of IoT Plug and Play, is a device model that a device uses to advertise its capabilities to an IoT Plug and Play-enabled application. This model is structured as a set of elements that define:
-
Propertiesthat represent the read-only or writable state of a device or other entity. For example, a device serial number may be a read-only property and a target temperature on a thermostat may be a writable property -
Telemetrywhich is the data emitted by a device, whether the data is a regular stream of sensor readings, an occasional error, or an information message -
Commandsthat describe a function or operation that can be done on a device. For example, a command could reboot a gateway or take a picture using a remote camera
As a solution builder, you can use IoT Central to develop a cloud-hosted IoT solution that uses IoT Plug and Play devices. IoT Plug and Play devices connect directly to an IoT Central application where you can use customizable dashboards to monitor and control your devices. You can also use device templates in the IoT Central web UI to create and edit Device Twins Definition Language (DTDL) models.
-
Clone/download the MPLAB X demo project by issuing the following command line in a
Command PromptorPowerShellwindowgit clone https://github.com/MicrochipTech/AzureDemo_WBZ451
-
Connect the board to the PC using a micro USB cable. If using a board that has not been programmed previously, a device named
CURIOSITYmay show up as a Mass Storage Device (MSD) on theDesktopor in aFile Explorerwindow. If this is the case, "drag and drop" (i.e. copy) the pre-built*.hexfile (e.g. "WBZ451_Trust_WiFi7.X.production.hex") directly to theCURIOSITYdrive. The hex file should be located in the folder atAzureDemo_WBX451>WBZ451_Curiosity>firmware>WBZ451_Trust_WiFi7.X>dist>default>productionNOTE: If this file copy operation fails for any reason or is not possible, Make and Program Device by building the original MPLAB X source code project that was used to generate the
*.hexfile. -
Set up a Command Line Interface (CLI) to the board
-
Open a serial terminal (e.g. PuTTY, TeraTerm, etc.) and connect to the COM port corresponding to your board at
115200 baud(e.g. open PuTTY Configuration window > choosesession> chooseSerial> Enter the right COMx port). You can find the COM info by opening your PC’sDevice Manager> expandPorts(COM & LPT)> take note ofCuriosity Virtual COM Port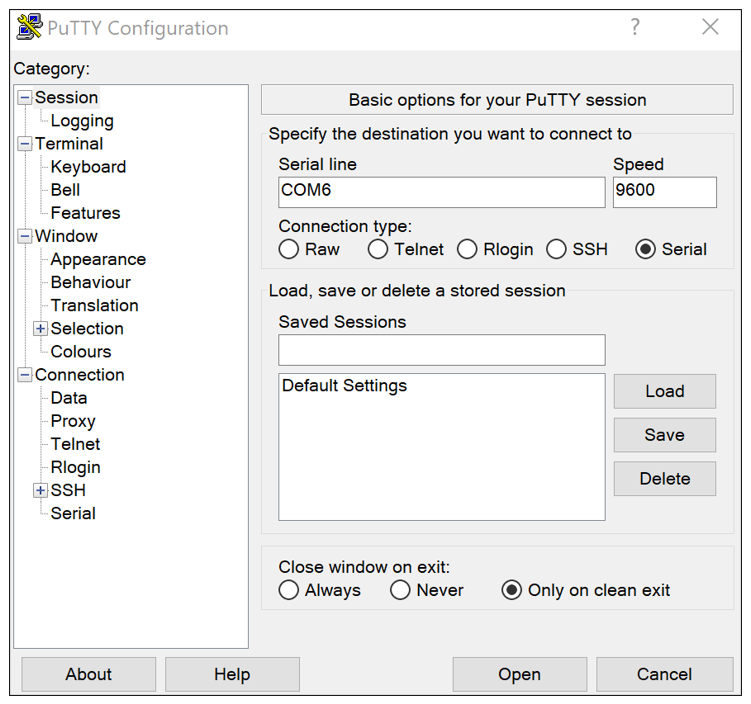
-
-
Before typing anything in the terminal emulator window, disable the local echo feature in the terminal settings for best results. In the terminal window, hit
[RETURN]to bring up the Command Line Interface prompt (which is simply the>character). Typehelpand then hit[RETURN]to get the list of available commands for the CLI implemented in the board's firmware. The Command Line Interface allows you to send simple ASCII-string commands to set or get the user-configurable operating parameters of the application while it is running.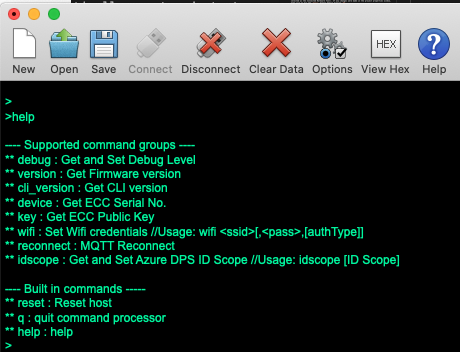
-
Press the
RESETbutton on the WBZ451 Curiosity board and then immediately turn your attention to the terminal window.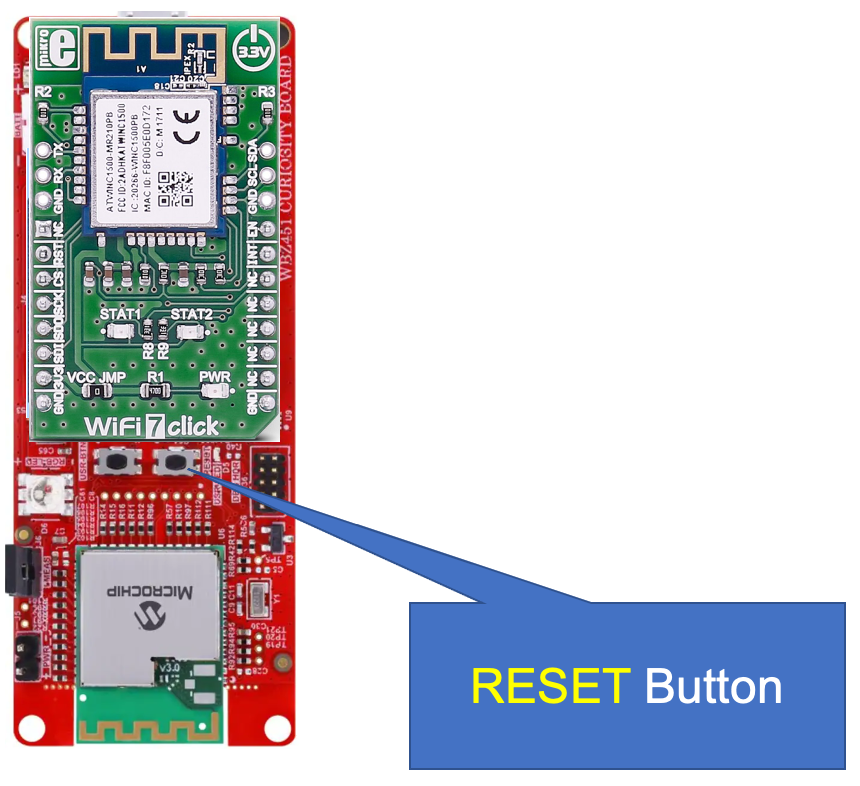
-
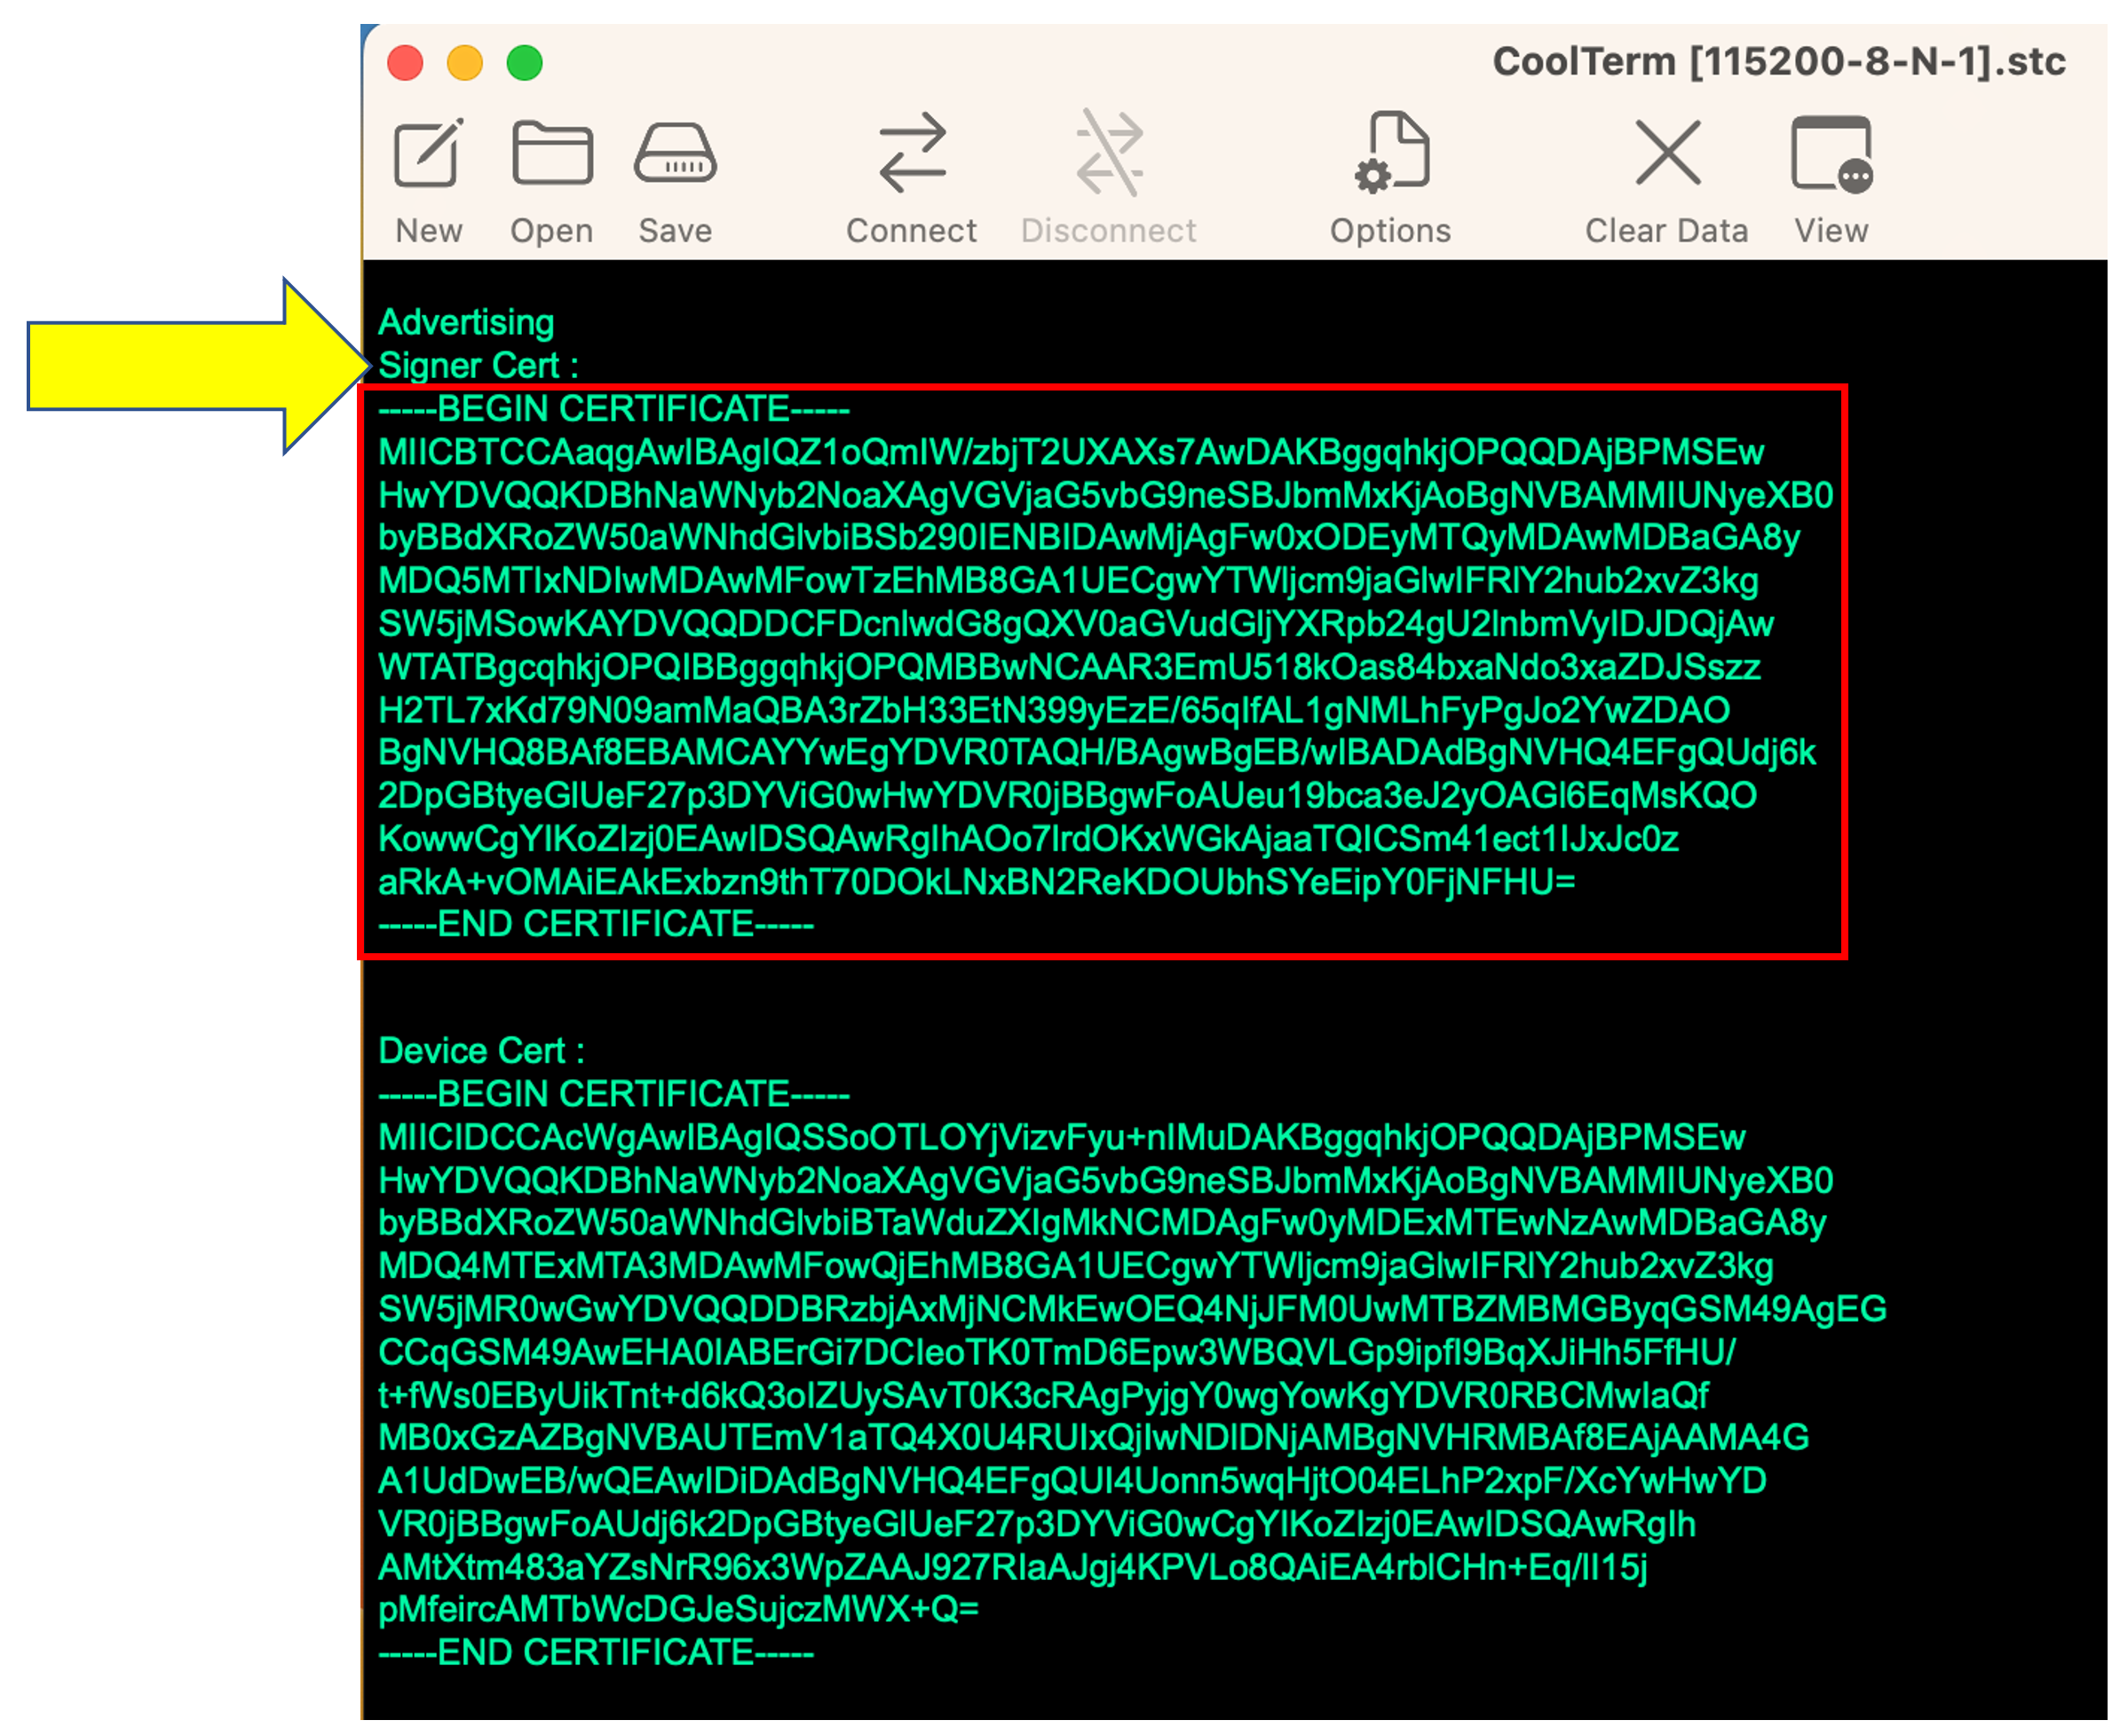
Look for the signer and device certificate information which is output in the terminal emulator window. This information is always the first set of messages output to the terminal window whenever the WBZ451 board is reset. Pause the terminal window's serial output so that you can copy the signer certificate information from the window and then paste the contents into a new file called "signer.pem". This file contains the information of the certificate for the signer of the client certificate that were both pre-provisioned into the ATECC608B Trust&GO secure element on the ATECC608 TRUST accessory board. This certificate will need to be uploaded into your IoT Central application in a future step when creating an enrollment group. The signer *.pem file needs to begin with the ASCII text "-----BEGIN CERTIFICATE-----" and end with "-----END CERTIFICATE-----".
-
In the terminal emulator window, set the debug messaging level to 0 to temporarily disable the output messages. The debug level can be set anywhere from 0 to 4. Use the
debug <level>command by manually typing it into the CLI. The complete command must be followed by hitting[RETURN]>debug 0 -
Perform a Wi-Fi scan to see the list of Access Points that are currently in range and being detected by the WiFi7 click board's Wi-Fi network controller. Use the
wificommand'sscanoption by manually typing it into the CLI. The complete command must be followed by hitting[RETURN]>wifi -scan -
Configure the board's internal Wi-Fi settings with your wireless router’s SSID and password using the
wificommand'ssetoption by manually typing it into the CLI. The complete command must be followed by hitting[RETURN](there cannot be any spaces used in the SSID or password)>wifi -set <NETWORK_SSID>,<PASSWORD>,<SECURITY_OPTION[1=Open|2=WPA|3=WEP]>
For example, if the SSID of the router is "MyWirelessRouter" and the WPA/WPA2 key is "MyRoutersPassword", the exact command to type into the CLI (followed by
[RETURN]) would be>wifi -set MyWirelessRouter,MyRoutersPassword,2 -
At the CLI prompt, type in the command
resetand hit[RETURN]to restart the host application. The Blue LED should eventually stay solidly ON to signify that the board has successfully connected to the wireless router.>reset -
In the terminal emulator window, set the debug messaging level to 0 to temporarily disable the output messages. The debug level can be set anywhere from 0 to 4. Use the
debug <level>command by manually typing it into the CLI. The complete command must be followed by hitting[RETURN]>debug 0 -
At this point, the board is connected to Wi-Fi, but has not yet established a connection with the cloud. The
cloudcommand can be used at any time to confirm the cloud connection status (which as of right now should be "false"). The complete command must be followed by hitting[RETURN]>cloud -status


IoT Central allows you to create an application dashboard to monitor the telemetry and take appropriate actions based on customized rules. To access all of your custom applications, you must be signed into the Azure IoT Central Portal (it is recommended to bookmark this link for later use).
-
Review the below recomendations for creating the IoT Central application using the Azure IoT Central Builder and then create your IoT Central application by clicking here.
NOTE: Only perform the steps in the first 2 sections titled "Prerequisites" and "Create an application"; once the application is created, stop and return to this page (i.e. DO NOT do the section titled "Register a device" as that will be done in a future step).
If you are not currently logged into your Microsoft account, you will be prompted to sign in with your credentials to proceed.
-
Choose a unique
Application namewhich (will result in a uniqueURL) for accessing your application. Azure IoT Builder will populate a suggested uniqueApplication namewhich can/should be leveraged, resulting in a uniqueURL. Take note of the unique/customizable portion of theURL(e.g. "custom-120683lb8ae") as it will be needed in a future step (suggest copy and pasting the exact text into a temporary doc file)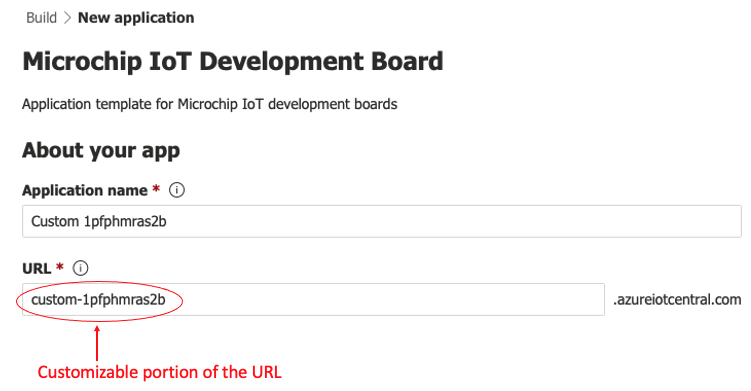
-
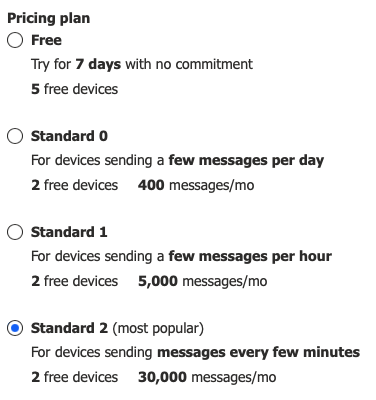
If you select the Free plan, you can connect up to 5 devices for free. However, the free trial period will expire after 7 days which means a paid pricing plan will need to be selected to continue using the application. Of course, there is nothing to stop you from creating a new free trial application but the device will need to be configured for the app from scratch. Since the Standard plans each allow 2 free devices with no time-restricted trial period, if you only plan on evaluating 1 or 2 devices for connecting to the IoT Central app, then it's best to choose the Standard 2 plan to get the highest total allowable number of messages (30K per month)
-
Billing infosection: If there is an issue with selecting an existing subscription in the drop-down list (or no subscriptions appear in the list at all), click on theCreate subscriptionlink to create a new subscription to use for the creation of this application. Take note of the exact subscription name (e.g. "Azure subscription 1") which was selected as it will be needed in a future step (suggest typing the exact text into a temporary doc file)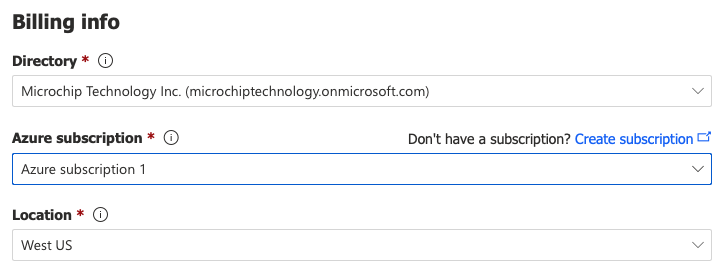
-
NOTE: If the message
Something went wrongappears underneath theAzure subscriptionfield, open up a web browser and log into your account using the Azure portal then retry selecting (or creating) a valid subscription
-
-
Once the application has been created, the application will be automatically saved and accessible in your IoT Central Portal (it might be a good idea to bookmark this link now).
-
Whenever specific settings are needed to be read (typically the custom URL to access the application in the future), look up the settings for your application by using the left-hand navigation pane to select
Settings>Application>Management -
To access any of your IoT Central applications in the future, you can also go to Azure IoT Central and click on
My apps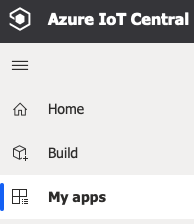


-
Using the left-hand side navigation pane of your IoT Central application, select
Security>Permissions>Device connection groups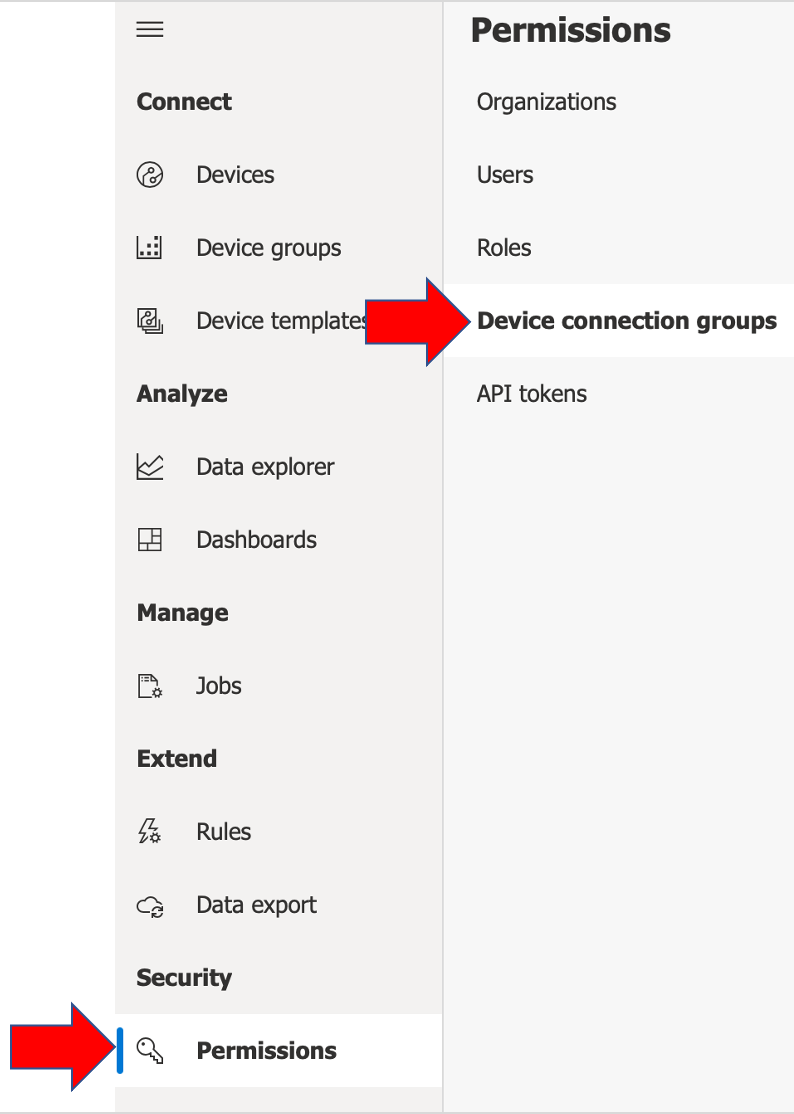
-
Click on the
+ Newbutton and create a new enrollment group using any name (with Group type =IoT devicesand attestation type =Certificates (X.509)). Hit theSaveicon when finished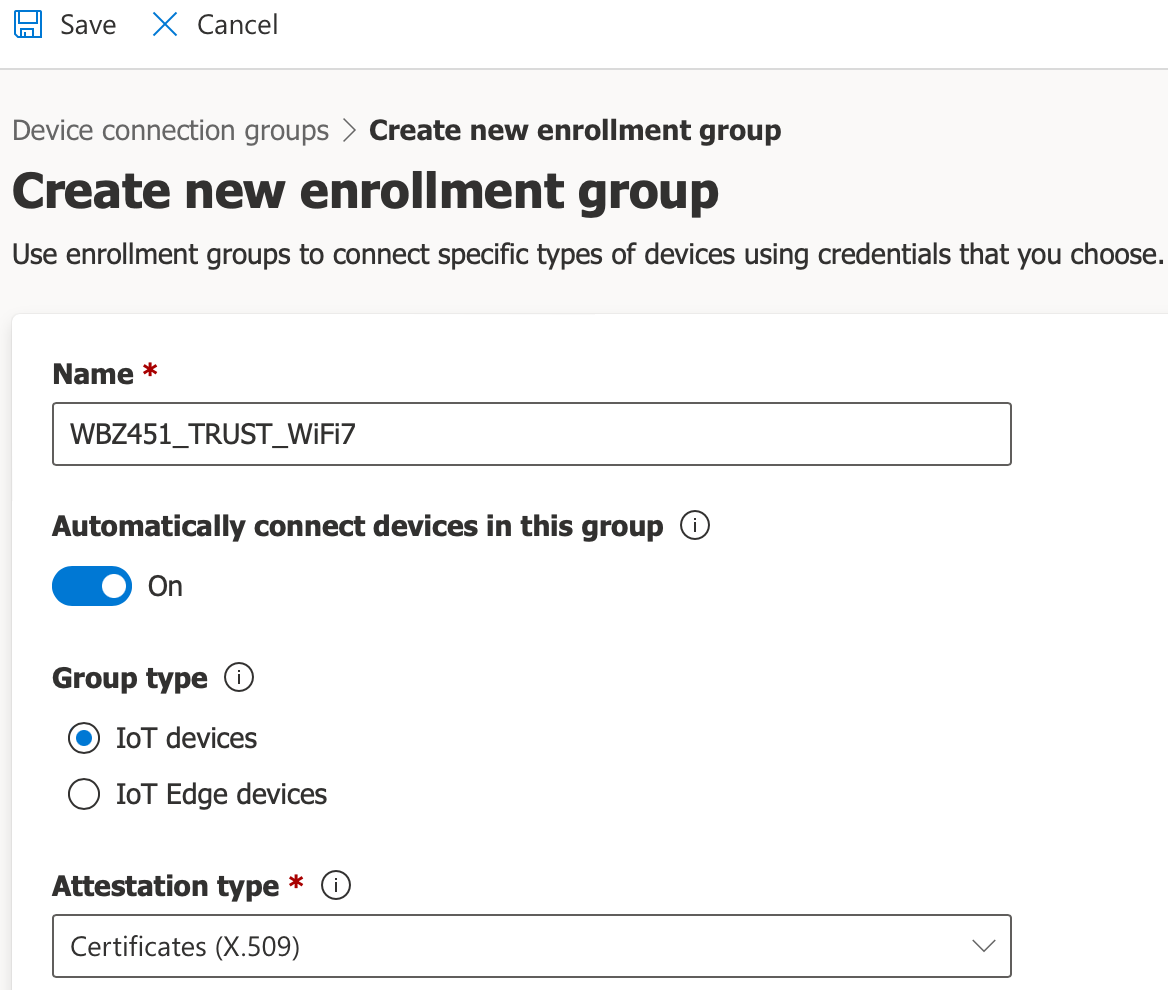
-
Now that the new enrollment group has been created, click on
+ Manage Primary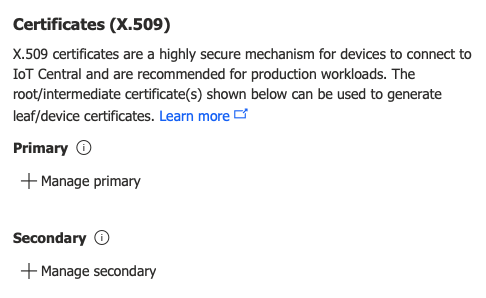
-
Click on
+ Add certificateand browse to the signer certificate file (i.e. thesigner.pemfile that was created in a previous step). Click theUploadbutton (then click onClosewhen the certificate has been accepted)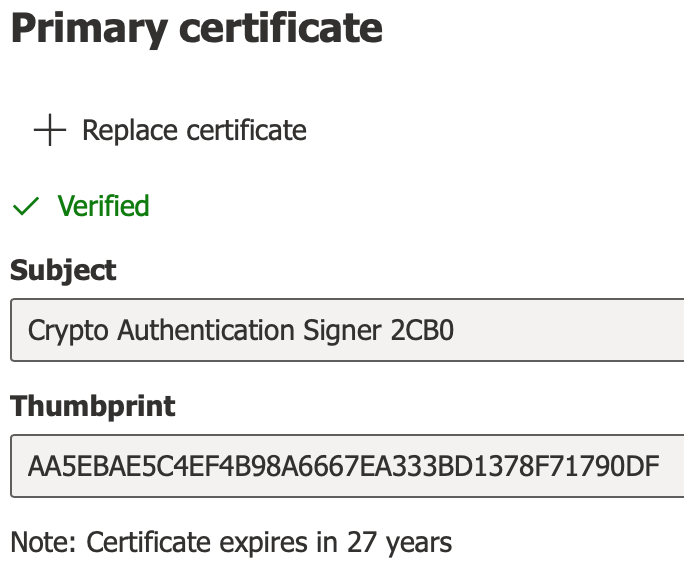
-
Click on the
Saveicon at the top of the page, and note the ID Scope which was created for the enrollment group. The X.509 enrollment group has been successfully created and should be ready to go!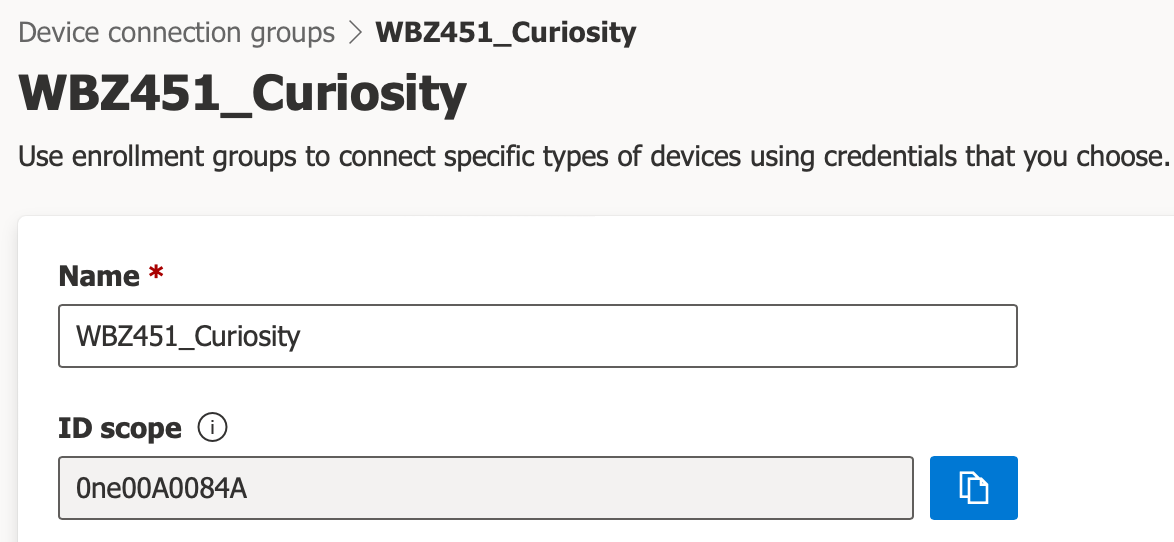


-
Launch a terminal emulator window and connect to the COM port corresponding to the WBZ451 Curiosity board at
115200baud (disable local echo for the terminal settings for best results). If there are continuous non-stop messages being displayed on the terminal, disable them by typingdebug 0followed by[RETURN]. Hit[RETURN]a couple of times to bring up the Command Line Interface prompt (which is simply the>character). Typehelpand then hit[RETURN]to get the list of available commands for the CLI. The Command Line Interface allows you to send simple ASCII-string commands to set or get the user-configurable operating parameters of the application while it is running.
-
Look up the
ID Scopefor your IoT Central application (navigate to your application's web page and using the left-hand navigation pane, selectPermissions>Device connection groups). TheID Scopewill be programmed/saved into the ATECC608B secure element on the ATECC608B TRUST board in the next step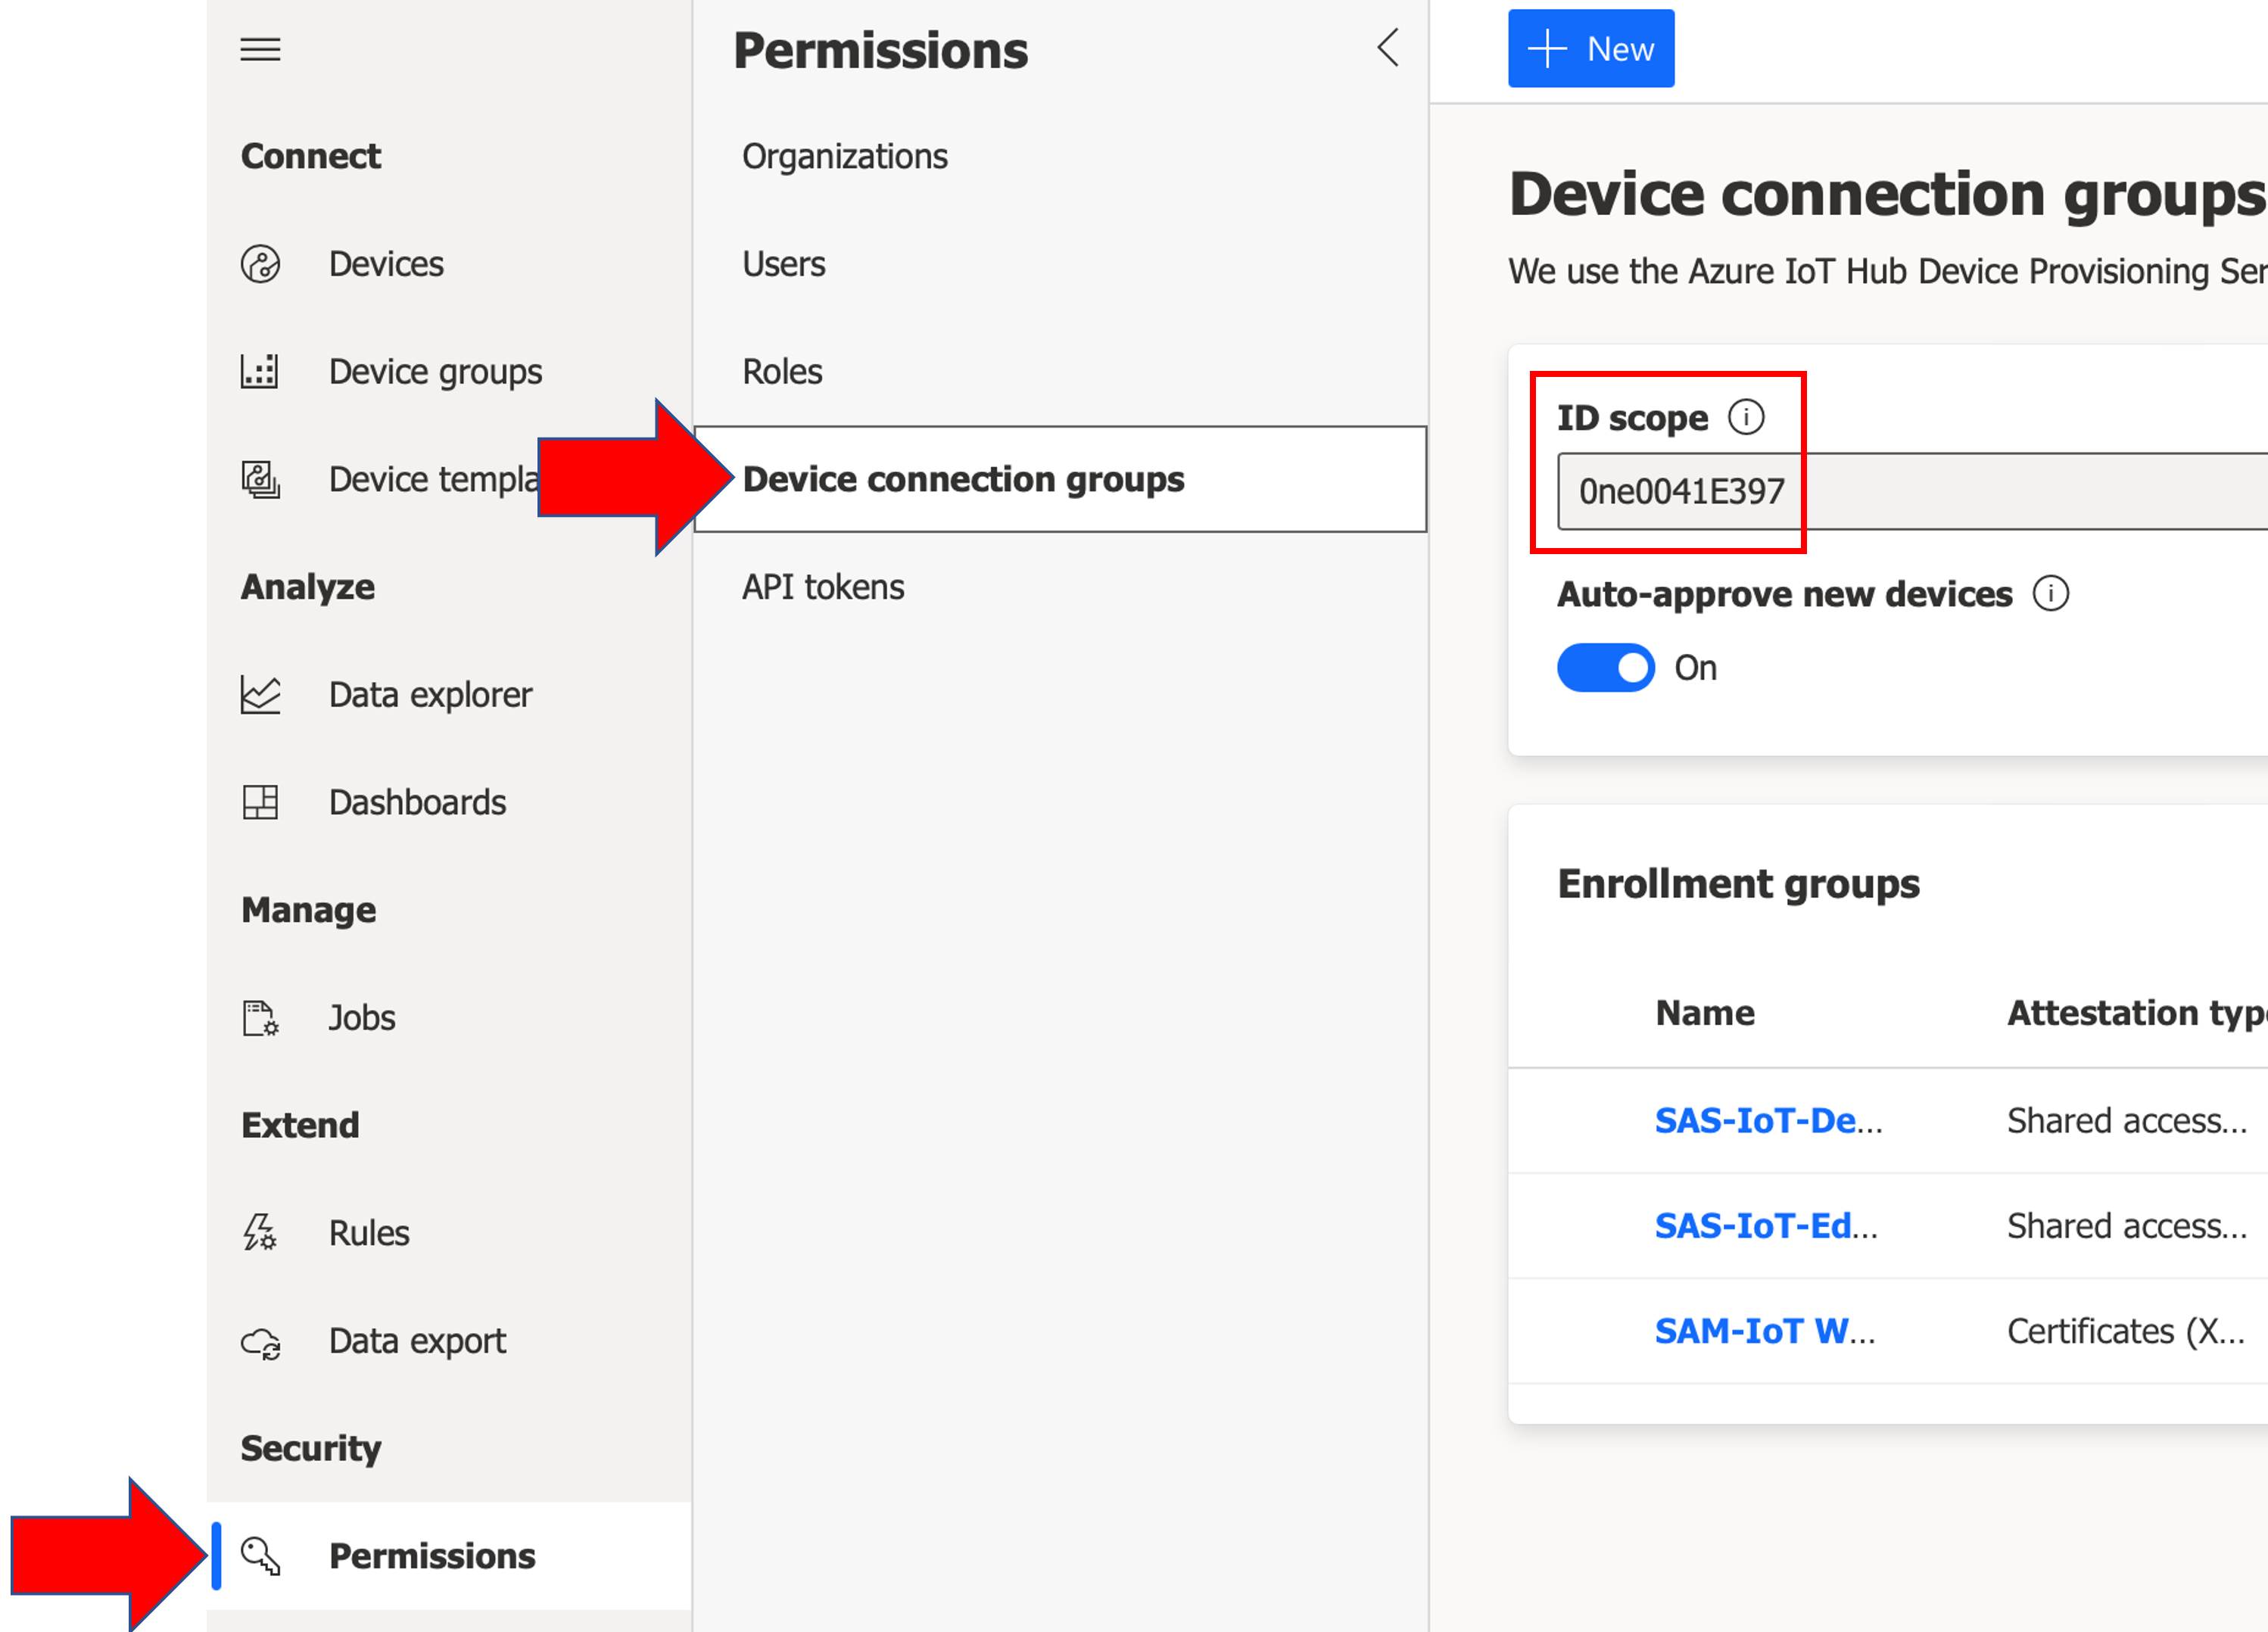
-
In the terminal emulator window, hit
[RETURN]to bring up the Command Line Interface prompt (which is simply the>character>). At the CLI prompt, type in theidscope <your_ID_scope>command to set it (which gets saved in the ATECC608B secure element on the board) and then hit[RETURN]. The ID Scope can be read out from the board by issuing theidscopecommand without specifying any parameter on the command line - confirm that the ID Scope has been read back correctly before proceeding to the next step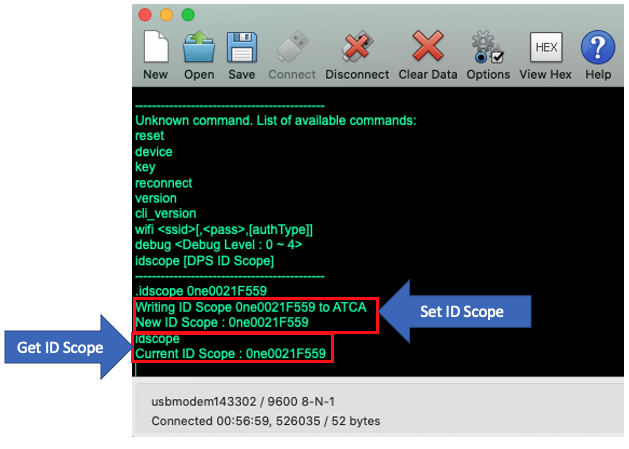
NOTE: Make sure the ID scope reads back correctly. If not, keep repeating the write/read sequence until the correct ID scope has been read back from the board
-
In the terminal emulator window, hit
[RETURN]to bring up the CLI prompt. Type in the commandresetand hit[RETURN] -
The board should go through its connection process and may take a minute or two to successfully connect to the cloud. The
cloudcommand can be used at any time to confirm the cloud connection status using the CLI. The complete command must be followed by hitting[RETURN]>cloud -status -
Periodically execute the
cloudcommand until the status returned is displayed/returned as "true". -
Go back to your web browser to access the Azure IoT Central application. Use the left-hand side pane and select
Devices>All Devices. Confirm that your device is listed – that the "Device name" & "Device ID" shown is the Common Name in the client certificate (which should besn + {17-digit device ID}). Click on the device name to see the additional details available for viewing
-
[OPTIONAL] If desired, change the Device name by clicking on
Manage device>Rename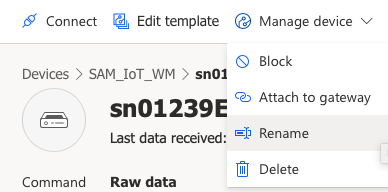
-
Click on the
Commandstab; typePT5Sin theDelay before reboot operationfield and then click onRunto send the command to the device to reboot in 5 seconds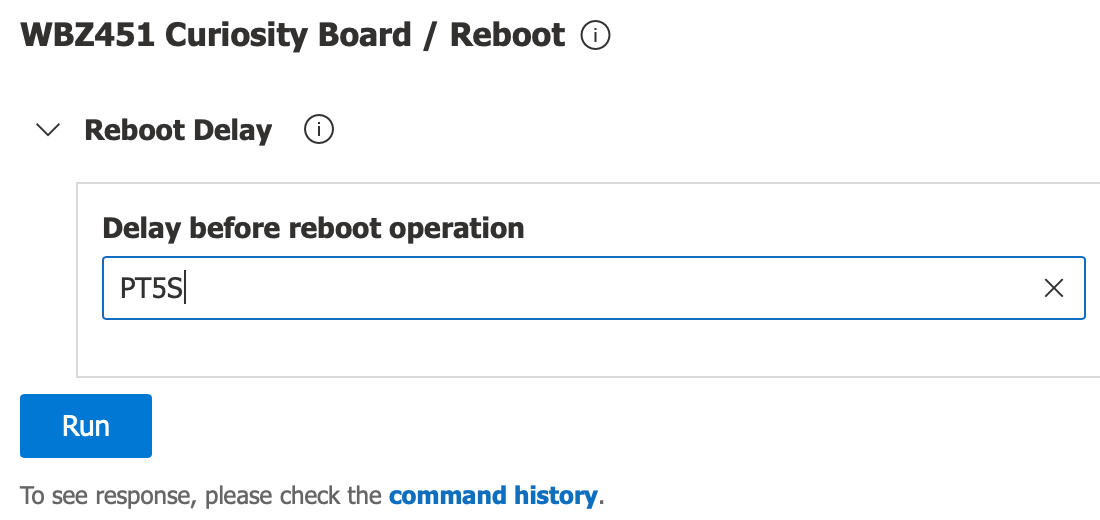
-
Within 5 seconds of sending the Reboot command, the development board should reset itself. Wait a minute or two and periodically issue the
cloudcommand until the status is displayed/returned as "true". Locate the button labeledUSR-BTNon the board and press it a few times.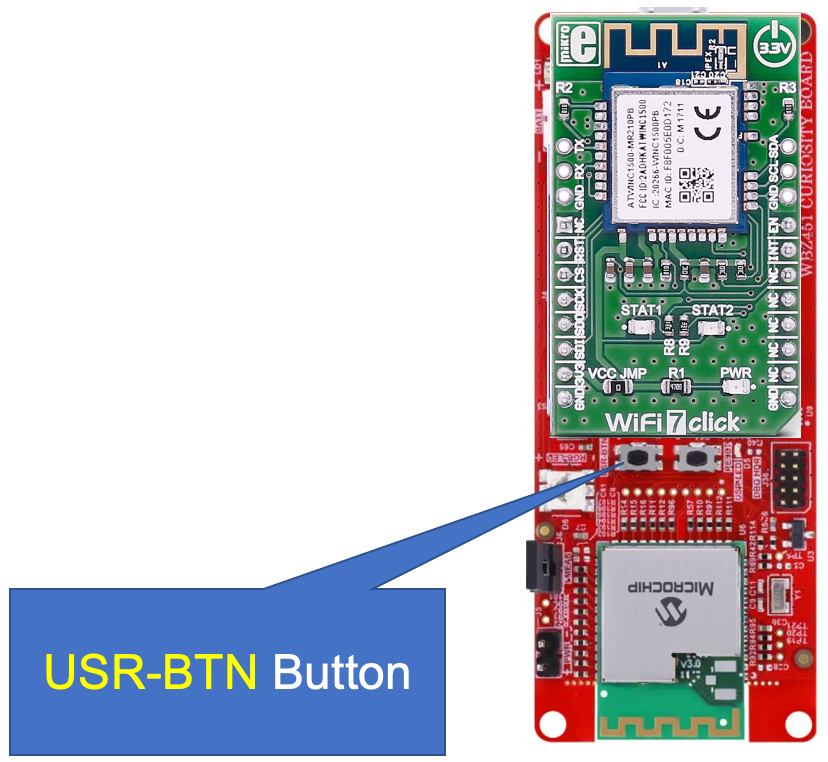
-
Click on the
Raw datatab and confirm that the button press telemetry messages were received (scroll the page to the right to view theButton Presscolumn)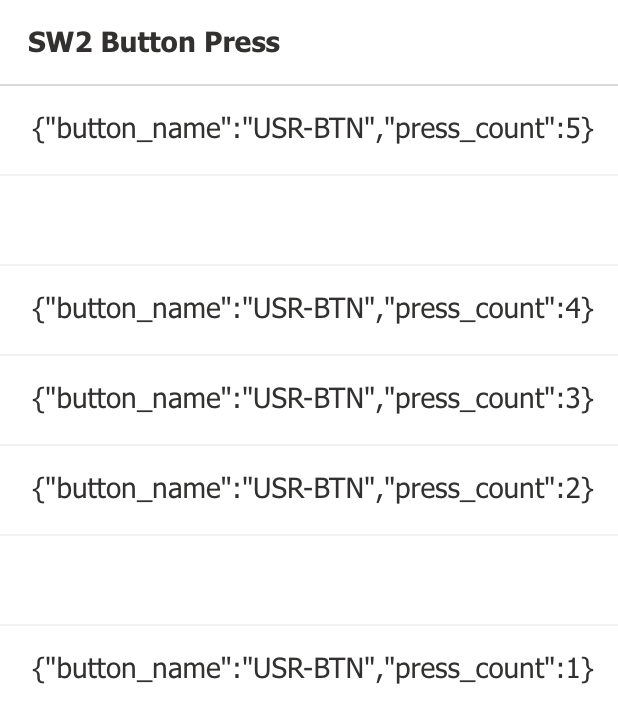
-
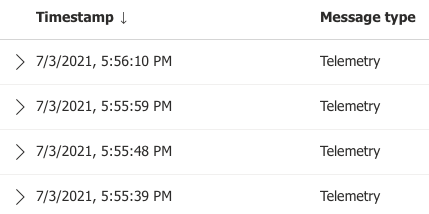
Click on the
Refreshicon to display all messages received since the previous page refresh operation. Confirm that periodic telemetry messages are being continuously received every few seconds.
-
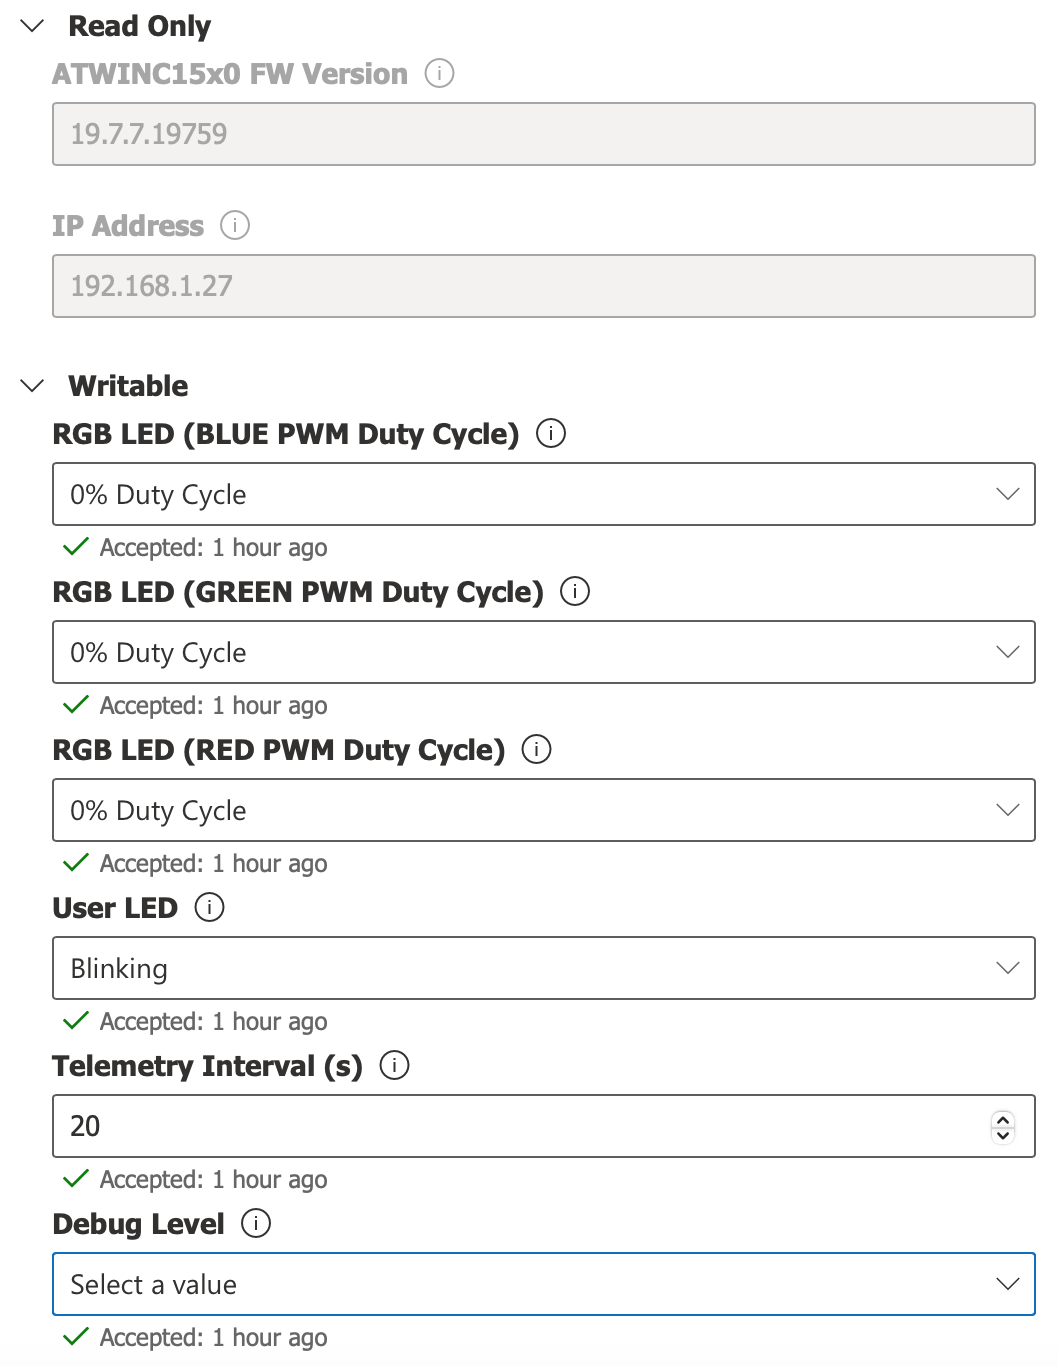
Click here to create an additional "Properties" view that allows you to change any of the Cloud-writable properties. Once this new view has been added to the device template, click on the Properties view and type in a new value for the Telemetry Interval. Click on the Save icon to send the property update request to the physical device. You should see the status of the property listed as "Pending" until a confirmation has been received from the physical device that the property was successfully updated. At this point in time, the status of the property should revert back to the "Accepted" state.
-
Click on the
Propertiestab and try changing the 3 PWM duty cycle properties of the RGB LED to 100% (remember to hit theSaveicon for each property write operation to take effect). Confirm that the RGB LED lights up based on different combinations of 0% and/or 100% duty cycle values. In addition, try changing the state of the User LED to On, Off, and Blinking.NOTE: Depending how quickly the write property response is received, it is possible that IoT Central will show the value as "Pending". If the device is offline or doesn't respond to a writable property request, the value can display as "Pending" indefinitely in IoT Central until a valid property update acknowledge has been received from the device.
-
Click on the
Abouttab to conveniently view all of the device's property settings/states on a single page.


A sample BLE mobile application (tested on Android 12 & 13 operating systems) is provided to demonstrate ASCII message strings being sent/received from a smartphone to/from the cloud. The sample BLE application was developed using the MIT App Inventor. Refer to the About App Inventor page for details on how to load the sample project into the visual programming environment to make changes for creating your own customized mobile application.
Since the combined hardware of this demo platform supports both BLE 5.2 and 2.4 GHz Wi-Fi wireless connectivity, it can be used as a bridge between BLE (mobile device) & Wi-Fi (cloud). Click here for instructions on setting up and running the mobile application.

Try creating an IoT Central dashboard by clicking here and following the procedure outlined in the online guide. The below screen captures show the possibilities of dashboard components that can highlight the telemetry data and properties facilitated by the IoT Plug and Play interface. Note that multiple devices can be selected for each tile to allow groups of devices to be visualized within a single tile.


Having issues with connecting the board with Azure IoT services? Check out the FAQ section
Refer to the following links for additional information for IoT Explorer, IoT Hub, DPS, Plug and Play model, and IoT Central
• Manage cloud device messaging with Azure-IoT-Explorer
• Import the Plug and Play model
• Configure to connect to IoT Hub
• How to use IoT Explorer to interact with the device
• Azure IoT Central - All Documentation
• Create an Azure IoT Central application
• Manage devices in your Azure IoT Central application
• How to connect devices with X.509 certificates for IoT Central
• Configure the IoT Central application dashboard
• Customize the IoT Central UI
You are now able to connect the WBZ451 Curiosity Development Board to Azure IoT services using self-signed X.509 certificate-based authentication and have deeper knowledge of how all the pieces of the puzzle fit together from the ATECC608B secure element, ATWINC1510 Wi-Fi, Azure Embedded C SDK, and Azure IoT Hub/Central/DPS. Let’s start thinking out of the box and see how you can apply this project to provision securely and quickly a massive number of Microchip devices to Azure and safely manage them through the entire product life cycle.