Environment: Ubuntu 18.04
Paper:Yolov3.pdf
$ git clone https://github.com/pjreddie/darknet
$ cd darknet
1. Change makefile(optional) ---> vim Makefile
-
Want to use GPU --->
GPU=1 -
Want to use openCV --->
OPENCV=1 -
Want to use CUDNN
 CUDNN=1
 NVCC=/usr/local/cuda-10.0/bin/nvcc
2. Compile ---> make
3. Test
Download a pre-trained model to test --> wget https://pjreddie.com/media/files/yolov3.weights
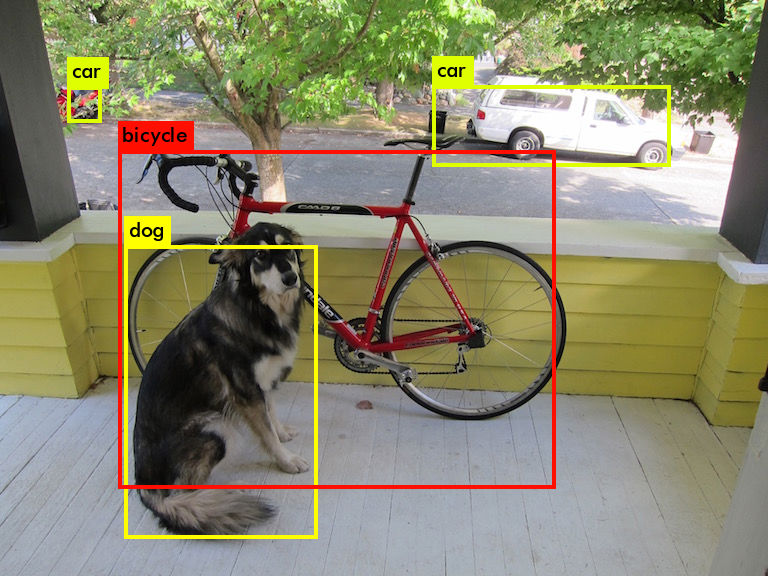
Then test the dog picture ---> ./darknet detect cfg/yolov3.cfg yolov3.weights data/dog.jpg
you will get a picture prediction.jpg like this

The following tutorial is to detect three different kinds of objects: person,cat,dog,
and use labelImg to label pictures.
1.Download labelImg:
- Double click to run
- The saved file is in XML format:
2.Create myData folder in the Darknet directory
Put the previously marked pictures and XML files in the corresponding directory, the directory structure is as follows.
myData
  ...JPEGImages #Storing images

  ...Annotations #Storing the XML file corresponding to the image

  ...ImageSets/Main #The name where the training/validation images are stored(The format is like 000001.jpg or 000001), which includes train.txt.
3.Create test.py under myData, copy the following code into test.py and run it.
Four files will be generated: train.txt, val.txt, test.txt and trainval.txt.
import os
import random

trainval_percent = 0.1
train_percent = 0.9
xmlfilepath = 'Annotations'
txtsavepath = 'ImageSets\Main'
total_xml = os.listdir(xmlfilepath)
num = len(total_xml)
list = range(num)
tv = int(num * trainval_percent)
tr = int(tv * train_percent)
trainval = random.sample(list, tv)
train = random.sample(trainval, tr)

ftrainval = open('ImageSets/Main/trainval.txt', 'w')
ftest = open('ImageSets/Main/test.txt', 'w')
ftrain = open('ImageSets/Main/train.txt', 'w')
fval = open('ImageSets/Main/val.txt', 'w')

for i in list:
    name = total_xml[i][:-4] + '\n'
    if i in trainval:
        ftrainval.write(name)
        if i in train:
            ftest.write(name)
        else:
            fval.write(name)
    else:
        ftrain.write(name)

ftrainval.close()
ftrain.close()
fval.close()
ftest.close()
After running test.py,the following files will be generated in ~/darknet/myData/ImageSets/Main
4.Convert data to the format supported by Darknet
Yolov3 provides the code to convert the VOC data set into the format required by Yolo training,
which is displayed in scripts/voc_label.py scripts file. Here is a modified version, create my_lables.pyin the darknet folder.
The contents are as follows:
import xml.etree.ElementTree as ET
import pickle
import os
from os import listdir, getcwd
from os.path import join

#source code
sets=[('2012', 'train'), ('2012', 'val'), ('2007', 'train'), ('2007', 'val'), ('2007', 'test')]
#Change it to mydata
sets=[('myData', 'train')]

#Change it to your own categories
classes = ["person", "cat", "dog"]

def convert(size, box):
    dw = 1./(size[0])
    dh = 1./(size[1])
    x = (box[0] + box[1])/2.0 - 1
    y = (box[2] + box[3])/2.0 - 1
    w = box[1] - box[0]
    h = box[3] - box[2]
    x = x*dw
    w = w*dw
    y = y*dh
    h = h*dh
    return (x,y,w,h)

def convert_annotation(year, image_id):
    in_file = open('myData/Annotations/%s.xml'%(image_id))  #source code:VOCdevkit/VOC%s/Annotations/%s.xml
    out_file = open('myData/labels/%s.txt'%(image_id), 'w')  #source code:VOCdevkit/VOC%s/labels/%s.txt
    tree=ET.parse(in_file)
    root = tree.getroot()
    size = root.find('size')
    w = int(size.find('width').text)
    h = int(size.find('height').text)

    for obj in root.iter('object'):
        difficult = obj.find('difficult').text
        cls = obj.find('name').text
        if cls not in classes or int(difficult)==1:
            continue
        cls_id = classes.index(cls)
        xmlbox = obj.find('bndbox')
        b = (float(xmlbox.find('xmin').text), float(xmlbox.find('xmax').text), float(xmlbox.find('ymin').text), float(xmlbox.find('ymax').text))
        bb = convert((w,h), b)
        out_file.write(str(cls_id) + " " + " ".join([str(a) for a in bb]) + '\n')

wd = getcwd()

for year, image_set in sets:
    if not os.path.exists('myData/labels/'):  # change it to myData
        os.makedirs('myData/labels/')
    image_ids = open('myData/ImageSets/Main/%s.txt'%(image_set)).read().strip().split()
    list_file = open('myData/%s_%s.txt'%(year, image_set), 'w')
    for image_id in image_ids:
        list_file.write('%s/myData/JPEGImages/%s.jpg\n'%(wd, image_id))
        convert_annotation(year, image_id)
    list_file.close()
Running the scripts:
$ python darknet/my_label.py
It will generate a txt file myData_train.txt(content: category code and relative position of target),
in the directory darknet/myData/labels/myData_train.txt
The meaning of "txt file" in the labels file is:

1.Modify voc.data and yolov3-voc.cfg in ~/darknet/cfg
Copy the two files and rename them my_data.data and my_yolov3.cfg
my_data.data content:
##Change to your own number of categories
classes= 3
##Change to your own path
train  = /home/XXX/darknet/myData/myData_train.txt
names = /home/XXX/darknet/myData/myData.names #the file will be created later
backup = backup #Where weight is stored
my_yolov3.cfg:
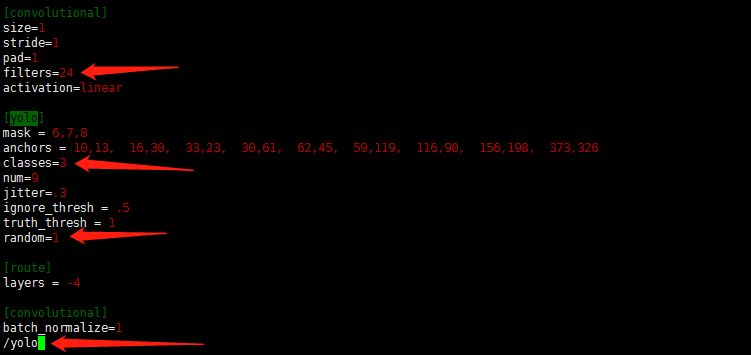
$ vim ./darknet/cfg/my_yolov3.cfg
$ /yolo
There are three [yolo] layers in total, change all of them.In front of every [yolo] layer there is a [convolutional] layer, change filter number. Every place should be modified according to your number of categories.
filters:3*(5+len(classes))
#take this project for example
filters = 24
classes = 3
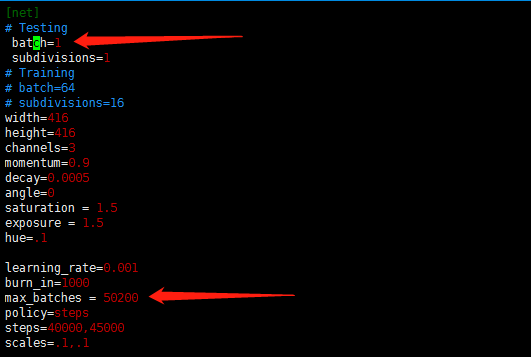
2.specify training batches and training rounds
Because it's training, annotate testing and open training.
3.Create myData.names file in the ~/darknet/myData
##You can change to names of your project
people
cat
dog
1.Download pre-trained weights
$ wget https://pjreddie.com/media/files/darknet53.conv.74
2.Start training
$ ./darknet detector train cfg/my_data.data cfg/my_yolov3.cfg darknet53.conv.74
Or specify gpu training, and use gpu0 by default(you can use nvidia-smi to view gpu information )
$ ./darknet detector train cfg/my_data.data cfg/my_yolov3.cfg darknet53.conv.74 -gups 0,1,2,34
Every 100 iterations, a model weight is generated on the backup folder, when AVG loss doesn't drop in several iterations, you can stop training.


