从零手写pm-cli脚手架,统一阿里拍卖源码架构
Nealyang opened this issue · 2 comments
前言
脚手架其实是大多数前端都不陌生的东西,基于前面写过的两篇文章:
大概呢,就是介绍下,目前我的几个项目页面的代码组织形式。
用了几个项目后,发现也挺顺手,遂想着要不搞个 cli 工具,统一下源码的目录结构吧。
这样不仅可以减少一个机械的工作同时也能够统一源码架构。同学间维护项目的陌生感也会有所降低。的确是有一部分提效的不是。虽然我们大多数页面都走的大黄蜂搭建🥺。。。
cli工具其实就一些基本的命令运行、CV大法,没有什么技术深度。
bin
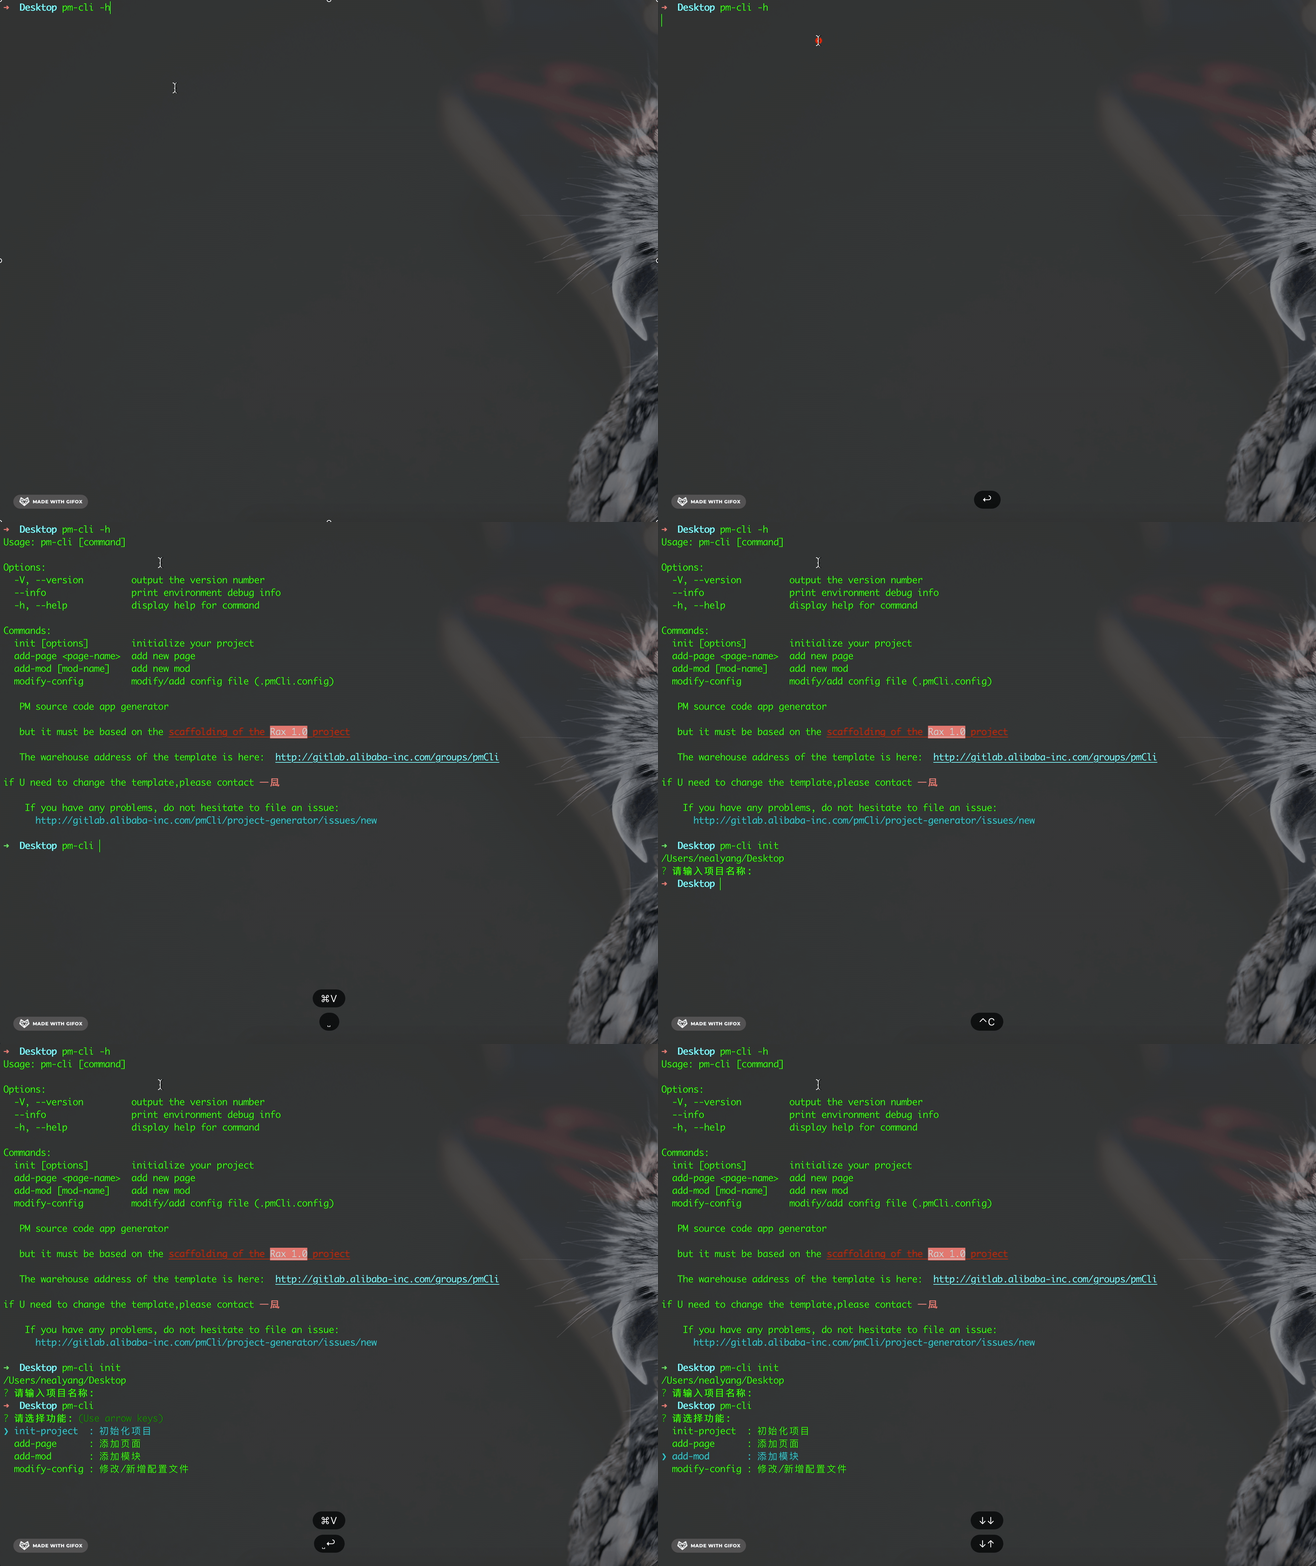
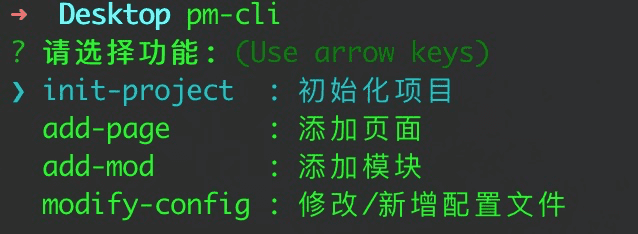
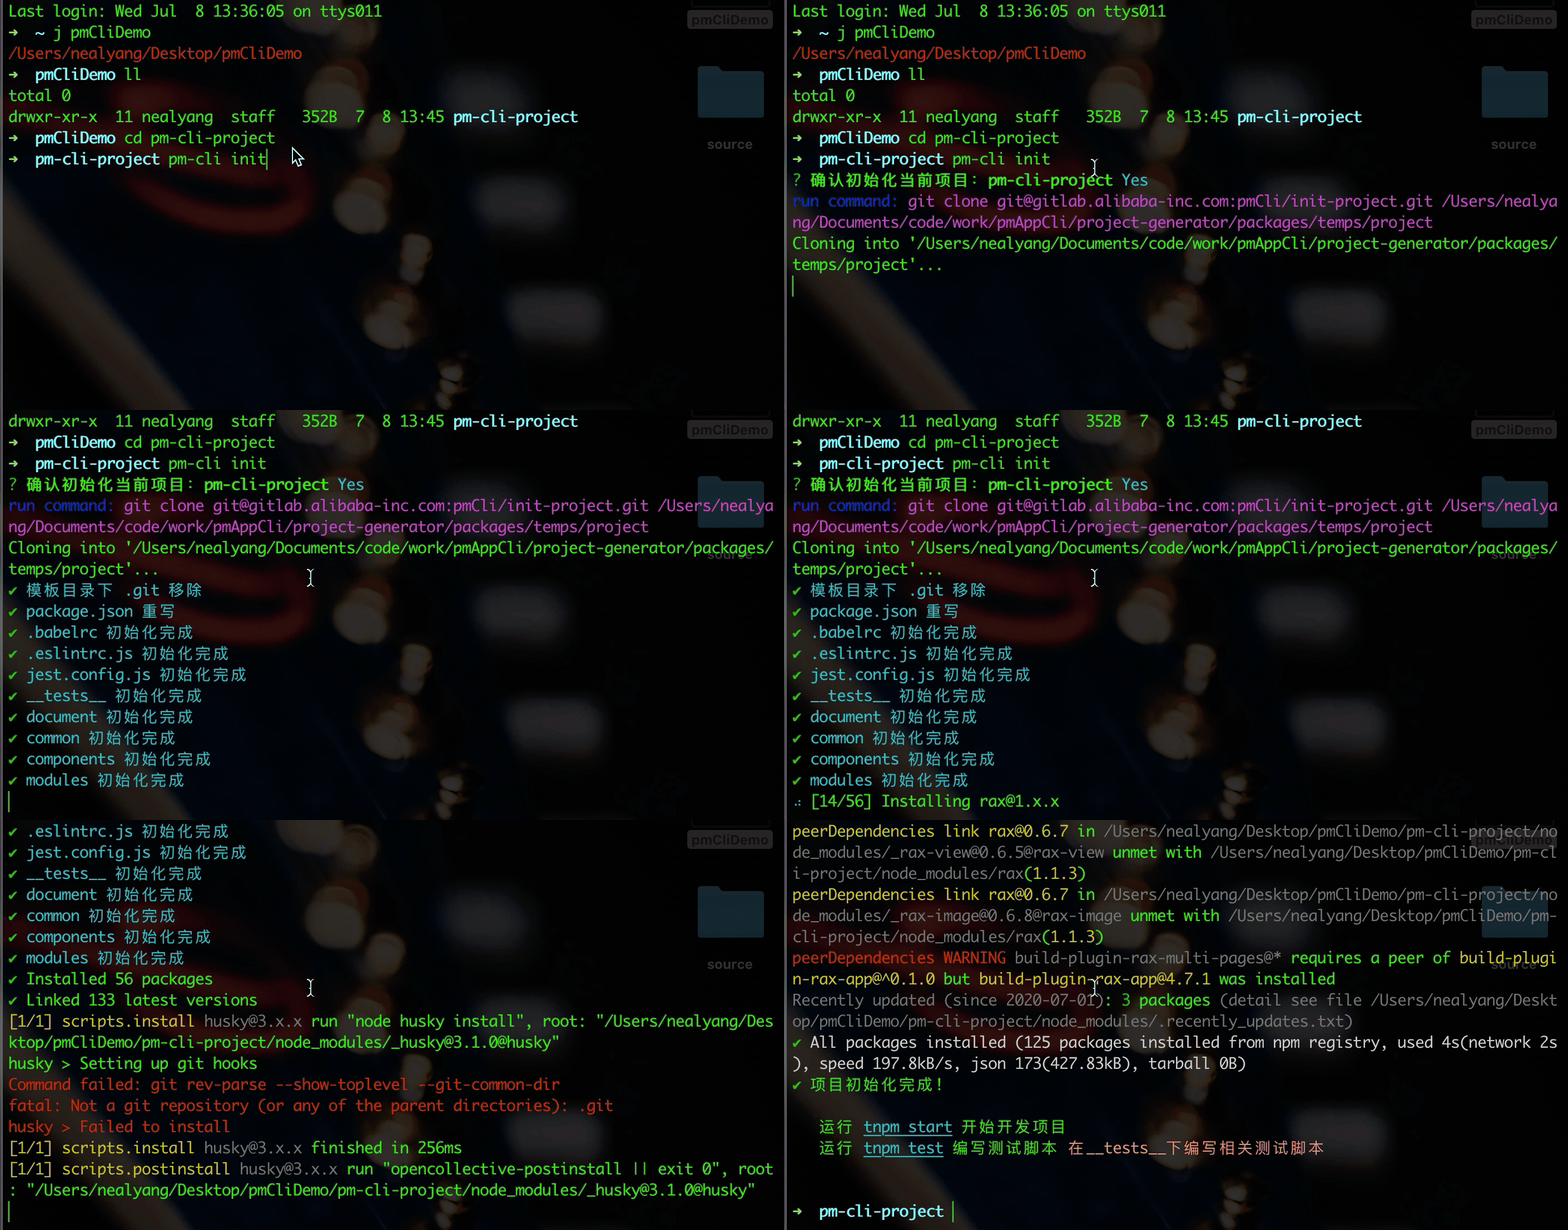
效果
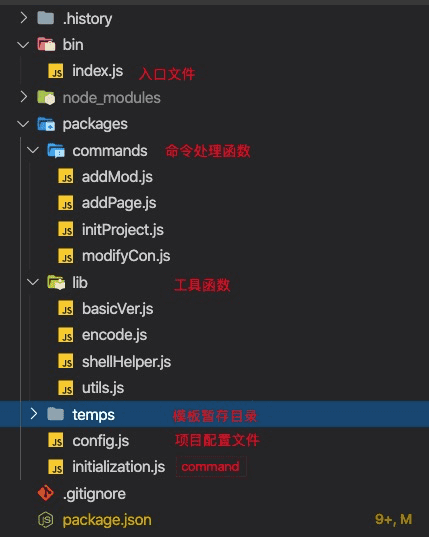
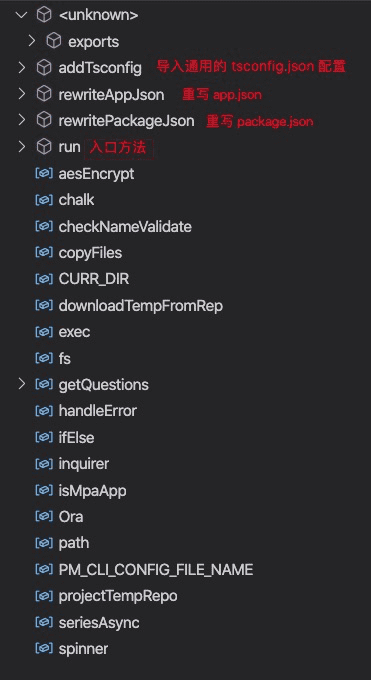
工程目录
代码实现
- bin/index.js
#!/usr/bin/env node

'use strict';

const currentNodeVersion = process.versions.node;
const semver = currentNodeVersion.split('.');
const major = semver[0];

if (major < 10) {
  console.error(
    'You are running Node ' +
      currentNodeVersion +
      '.\n' +
      'pmCli requires Node 10 or higher. \n' +
      'Please update your version of Node.'
  );
  process.exit(1);
}

require('../packages/initialization')();
这里是入口文件,比较简单,就是配置个入口,顺便校验 node 的版本号
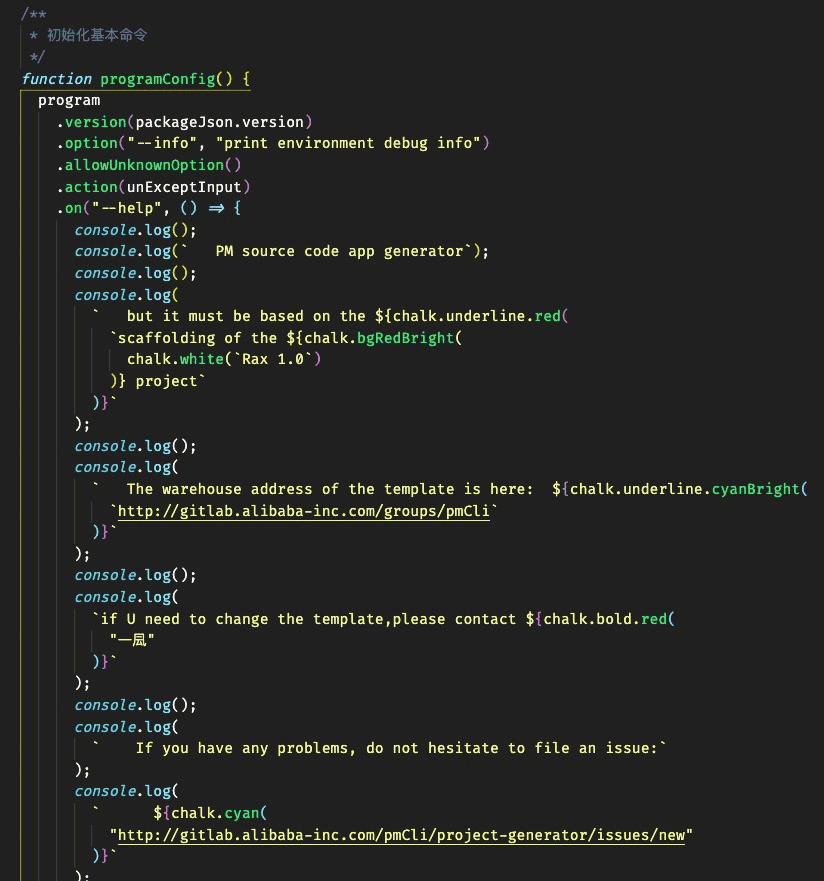
- initialization.js
这个文件主要是配置一些命令,其实也比较简单,大家从 commander里面查看自己需要的配置,然后配置出来就可以了
就是根据自己需求去配置这里就不赘述了,除了以上,就以下两点实现:
- 功能入口
 // 创建工程
  program
    .usage("[command]")
    .command("init")
    .option("-f,--force", "overwrite current directory")
    .description("initialize your project")
    .action(initProject);

  // 新增页面
  program
    .command("add-page <page-name>")
    .description("add new page")
    .action(addPage);

  // 新增模块
  program
    .command("add-mod [mod-name]")
    .description("add new mod")
    .action(addMod);

  // 添加/修改 .pmConfig.json
  program
    .command("modify-config")
    .description("modify/add config file (.pmCli.config)")
    .action(modifyCon);

program.parse(process.argv);- 兜底
所谓兜底就是输入 pm-cli 后没有跟任何命令

pm-cli init
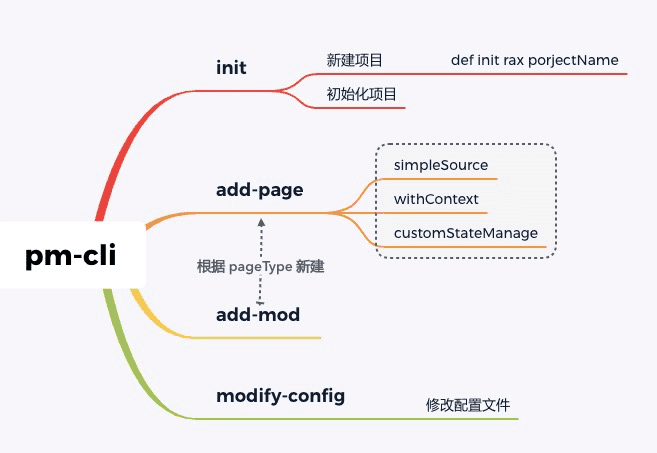
在说 init 之前呢,这里有个技术背景。就是我们的 rax 工程,基于 def 平台初始化出来的,所以说自带一个脚手架。但是我们在源码开发中呢,会对其进行一些改动。为了避免认知重复呢,init 我分为两个功能:
init projectName从 0 创建一个def init rax projectName项目- 在 raxProject 里面 init 会基于当前架构补充我们所统一的源码架构
init projectName
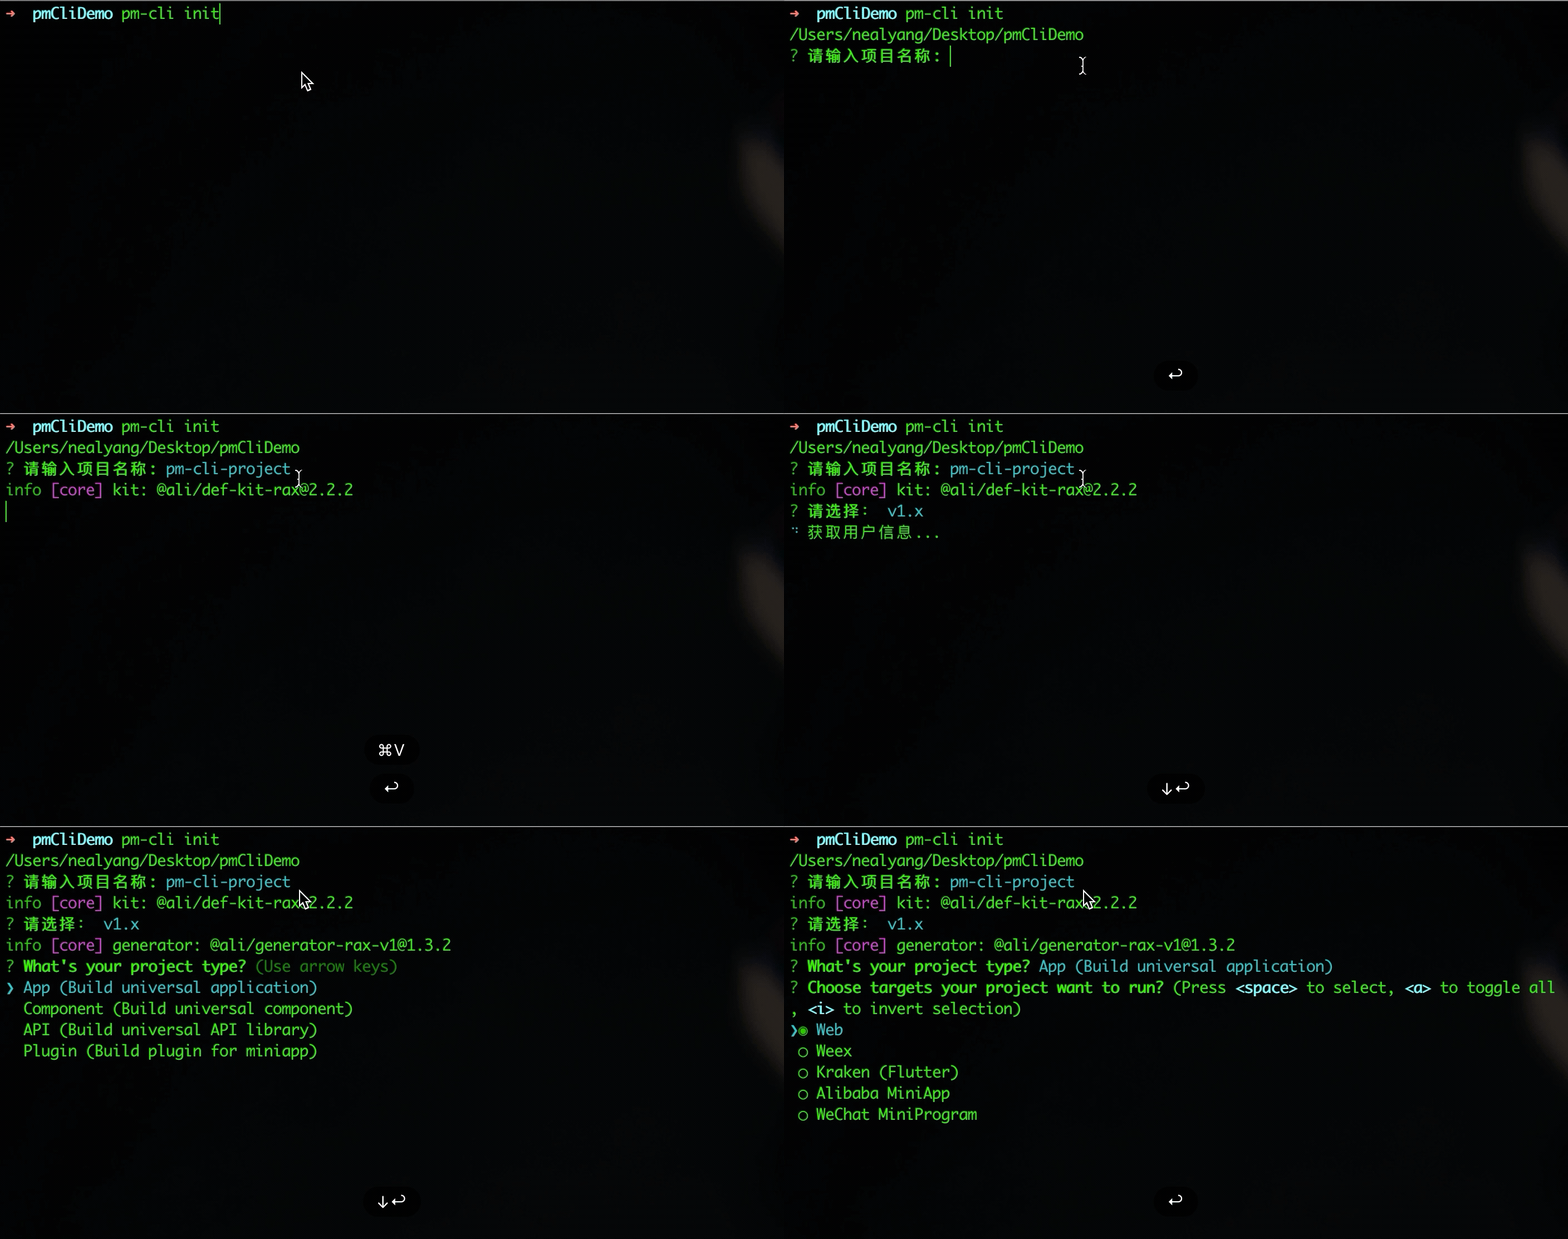
这里我们在一个空目录中进行演示
init
至于这里的一些问题的交互就不介绍了,就是inquirer配置的一些问题而已。没有太大的参考价值 。
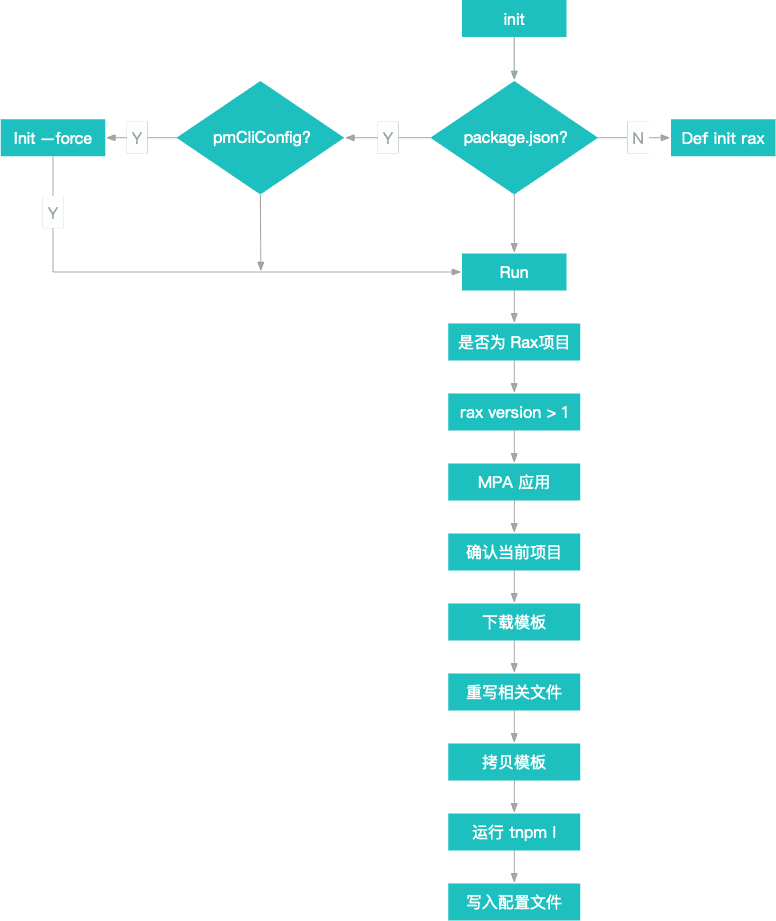
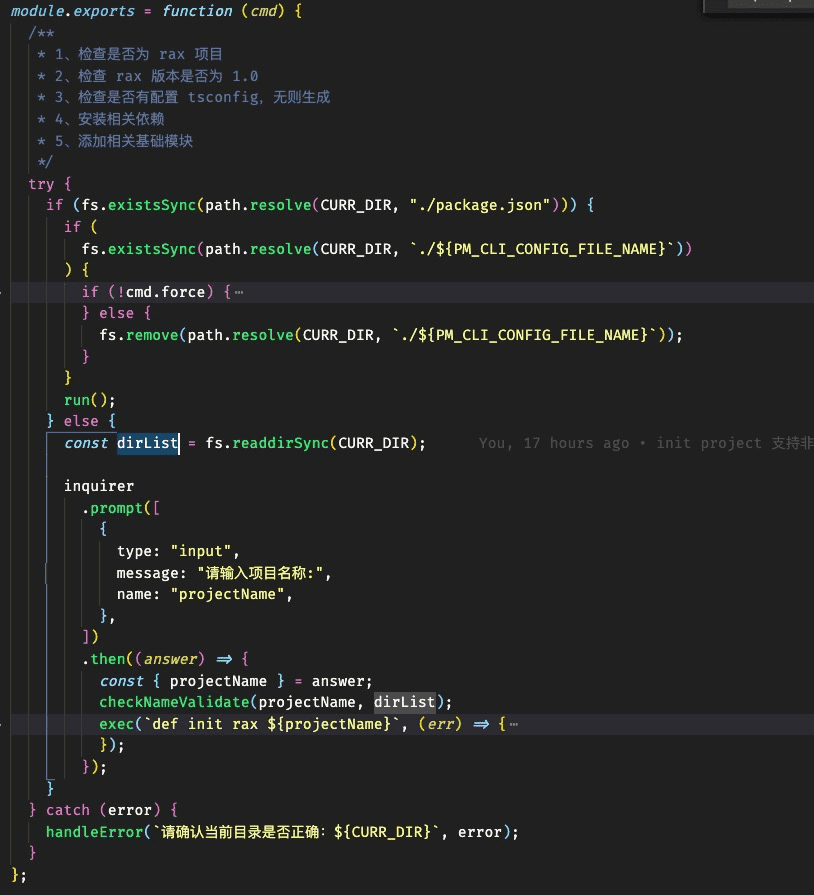
入口方法较为简单,其实就是区分当前运行 pm-cli init到底是基于已有项目初始化,还是新建一个 rax 项目 ,判断依据也非常简单,就是判断当前目录下是否有 package.json 来
虽然这么判断感觉是草率了点,但是,你细品也确实如此!对于有 package.json 的当前目录,我还会去校验别的不是。
如果当前目录存在 package.json,那么我认为你是一个项目,想在此项目中,初始化拍卖源码架构的配置。所以我会去判断当前项目是否已经初始化过了。
fs.existsSync(path.resolve(CURR_DIR, `./${PM_CLI_CONFIG_FILE_NAME}`))也就是这个PM_CLI_CONFIG_FILE_NAME的内容。那么则给出提示。毕竟不需要重复初始化嘛。如果你想强行再初始化一次,也可以!
pm-cli init -f准备工作坐在前期,最终运行的功能都在 run 方法里面。
校验名称合法性
这里还有个功能函数非常的通用,也就提前拿出来说了吧。
const dirList = fs.readdirSync(CURR_DIR);

checkNameValidate(projectName, dirList);
/**
* 校验名称合法性
* @param {string} name 传入的名称 modName/pageName
* @param {Array}} validateNameList 非法名数组
*/
const checkNameValidate = (name, validateNameList = []) => {
const validationResult = validatePageName(name);
if (!validationResult.validForNewPackages) {
console.error(
chalk.red(
`Cannot create a mod or page named ${chalk.green(
`"${name}"`
)} because of npm naming restrictions:\n`
)
);
[
...(validationResult.errors || []),
...(validationResult.warnings || []),
].forEach((error) => {
console.error(chalk.red(` * ${error}`));
});
console.error(chalk.red("\nPlease choose a different project name."));
process.exit(1);
}
const dependencies = [
"rax",
"rax-view",
"rax-text",
"rax-app",
"rax-document",
"rax-picture",
].sort();
validateNameList = validateNameList.concat(dependencies);
if (validateNameList.includes(name)) {
console.error(
chalk.red(
`Cannot create a project named ${chalk.green(
`"${name}"`
)} because a page with the same name exists.\n`
) +
chalk.cyan(
validateNameList.map((depName) => ` ${depName}`).join("\n")
) +
chalk.red("\n\nPlease choose a different name.")
);
process.exit(1);
}
};其实就是校验名称合法性以及排除重名。这个工具函数可以直接 CV。
如上的流程图,我们已经走到run 方法了,剩下的就是里面的一些判断。
  const packageObj = fs.readJSONSync(path.resolve(CURR_DIR, "./package.json"));
  // 判断是 rax 项目
  if (
    !packageObj.dependencies ||
    !packageObj.dependencies.rax ||
    !packageObj.name
  ) {
    handleError("必须在 rax 1.0 项目中初始化");
  }
  // 判断 rax 版本
  let raxVersion = packageObj.dependencies.rax.match(/\d+/) || [];
  if (raxVersion[0] != 1) {
    handleError("必须在 rax 1.0 项目中初始化");
  }

  if (!isMpaApp(CURR_DIR)) {
    handleError(`不支持非 ${chalk.cyan('MPA')} 应用使用 pmCli`);
  }
因为这些判断也不是非常的具有参考价值,这里就简单跳过了,然后在重点介绍下一些公共方法的编写。
addTsConfig
/**
 * 判断目标项目是否为 ts,并创建配置文件
 */
function addTsconfig() {
  let distExist, srcExist;
  let disPath = path.resolve("./tsconfig.json");
  let srcPath = path.resolve(__dirname, "../../ts.json");

  try {
    distExist = fs.existsSync(disPath);
  } catch (error) {
    handleError("路径解析发生错误 code:0024,请联系@一凨");
  }
  if (distExist) return;
  try {
    srcExist = fs.existsSync(srcPath);
  } catch (error) {
    handleError("路径解析发生错误 code:1233,请联系@一凨");
  }
  if (srcExist) {
    // 本地存在
    console.log(
      chalk.red(`编码语言请采用 ${chalk.underline.red("Typescript")}`)
    );
    spinner.start("正在为您创建配置文件:tsconfig.json");
    fs.copy(srcPath, disPath)
      .then(() => {
        console.log();
        spinner.succeed("已为您创建 tsconfig.json 配置文件");
      })
      .catch((err) => {
        handleError("tsconfig 创建失败,请联系@一凨");
      });
  } else {
    handleError("路径解析发生错误 code:2144,请联系@一凨");
  }
}
上面的代码大家都能读的懂,粘贴这一段代码的目的就是,希望大家写cli 的时候,一定要多考虑边界情况,存在性判断,以及一些异常兜底。避免不必要的 bug 产生
rewriteAppJson
/**
 * 重写项目中的 app.json
 * @param {string} distAppJson app.json 路径
 */
function rewriteAppJson(distAppPath) {
  try {
    let distAppJson = fs.readJSONSync(distAppPath);
    if (
      distAppJson.routes &&
      Array.isArray(distAppJson.routes) &&
      distAppJson.routes.length === 1
    ) {
      distAppJson.routes[0] = Object.assign({}, distAppJson.routes[0], {
        title: "阿里拍卖",
        spmB: "B码",
        spmA: "A码",
      });

      fs.writeJSONSync(path.resolve(CURR_DIR, "./src/app.json"), distAppJson, {
        spaces: 2,
      });
    }
  } catch (error) {
    handleError(`重写 ${chalk.cyan("app.json")}出错了,${error}`);
  }
}
别的重写方法就不粘贴了,因为也是比较枯燥且重复的。下面说一下公共方法和用处吧
下载模板
const templateProjectPath = path.resolve(__dirname, `../temps/project`);
// 下载模板
await downloadTempFromRep(projectTempRepo, templateProjectPath);
/**
*从远程仓库下载模板
* @param {string} repo 远程仓库地址
* @param {string} path 路径
*/
const downloadTempFromRep = async (repo, srcPath) => {
if (fs.pathExistsSync(srcPath)) fs.removeSync(`${srcPath}`);
await seriesAsync([`git clone ${repo} ${srcPath}`]).catch((err) => {
if (err) handleError(`下载模板出错:errorCode:${err},请联系@一凨`);
});
if(fs.existsSync(path.resolve(srcPath,'./.git'))){
spinner.succeed(chalk.cyan('模板目录下 .git 移除'));
fs.remove(path.resolve(srcPath,'./.git'));
}
};下载模板这里我直接用的 shell 脚本,因为这里涉及到很多权限的问题。
shell
// execute a single shell command where "cmd" is a string
exports.exec = function (cmd, cb) {
  // this would be way easier on a shell/bash script :P
  var child_process = require("child_process");
  var parts = cmd.split(/\s+/g);
  var p = child_process.spawn(parts[0], parts.slice(1), { stdio: "inherit" });
  p.on("exit", function (code) {
    var err = null;
    if (code) {
      err = new Error(
        'command "' + cmd + '" exited with wrong status code "' + code + '"'
      );
      err.code = code;
      err.cmd = cmd;
    }
    if (cb) cb(err);
  });
};

// execute multiple commands in series
// this could be replaced by any flow control lib
exports.seriesAsync = (cmds) => {
  return new Promise((res, rej) => {
    var execNext = function () {
      let cmd = cmds.shift();
      console.log(chalk.blue("run command: ") + chalk.magenta(cmd));
      shell.exec(cmd, function (err) {
        if (err) {
          rej(err);
        } else {
          if (cmds.length) execNext();
          else res(null);
        }
      });
    };
    execNext();
  });
};
copyFiles
/**
 * 拷贝页面s
 * @param {array} filesArr 文件数组,二维数组
 * @param {function} errorCb 失败回调函数
 * @param {成功回调函数} successCb 成功回调函数
 */
const copyFiles = (filesArr, errorCb, successCb) => {
  try {
    filesArr.map((filePathArr) => {
      if (filePathArr.length !== 2) throw "配置文件读写错误!";
      fs.copySync(filePathArr[0], filePathArr[1]);
      spinner.succeed(chalk.cyan(`${path.basename(filePathArr[1])} 初始化完成`));
    });
  } catch (error) {
    console.log(error);

    errorCb(error);
  }
};
在将远程代码拷贝到源码目录 temps/下,进行一波修改后,还是需要 copy 到项目目录中的,所以这里封装了一个方法。
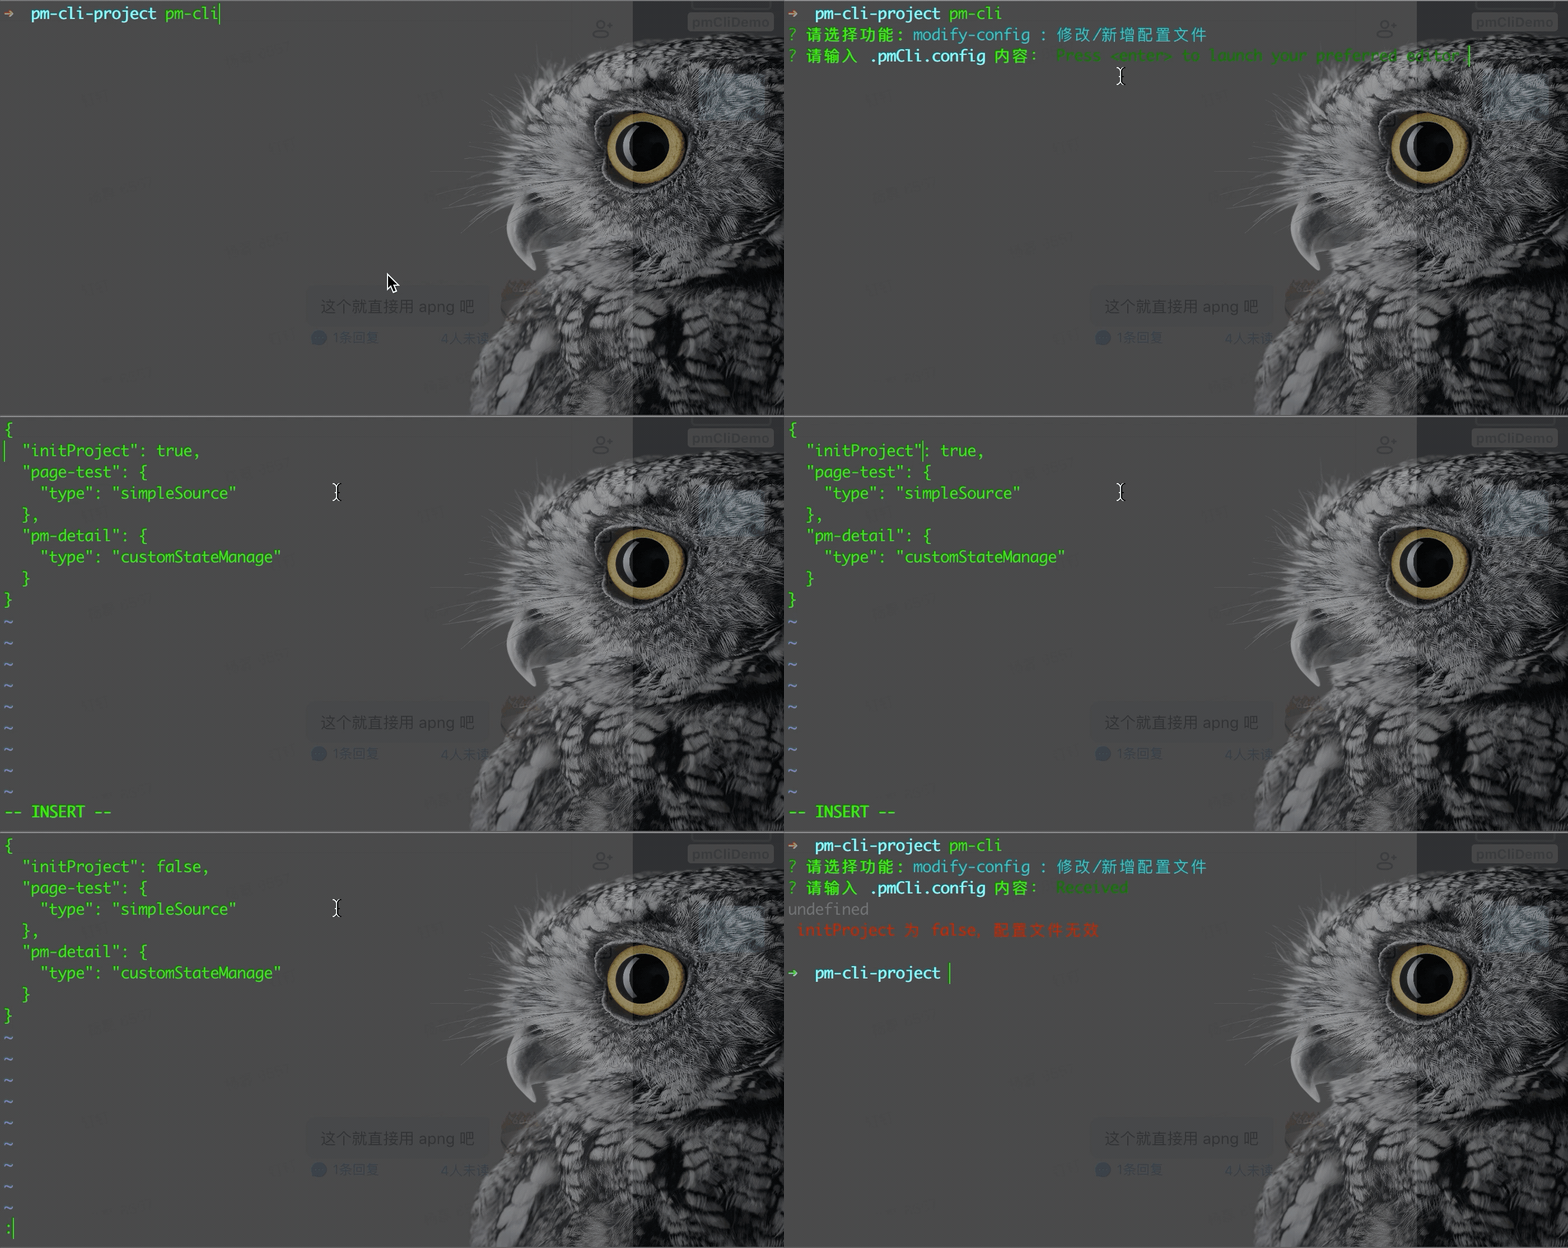
配置文件
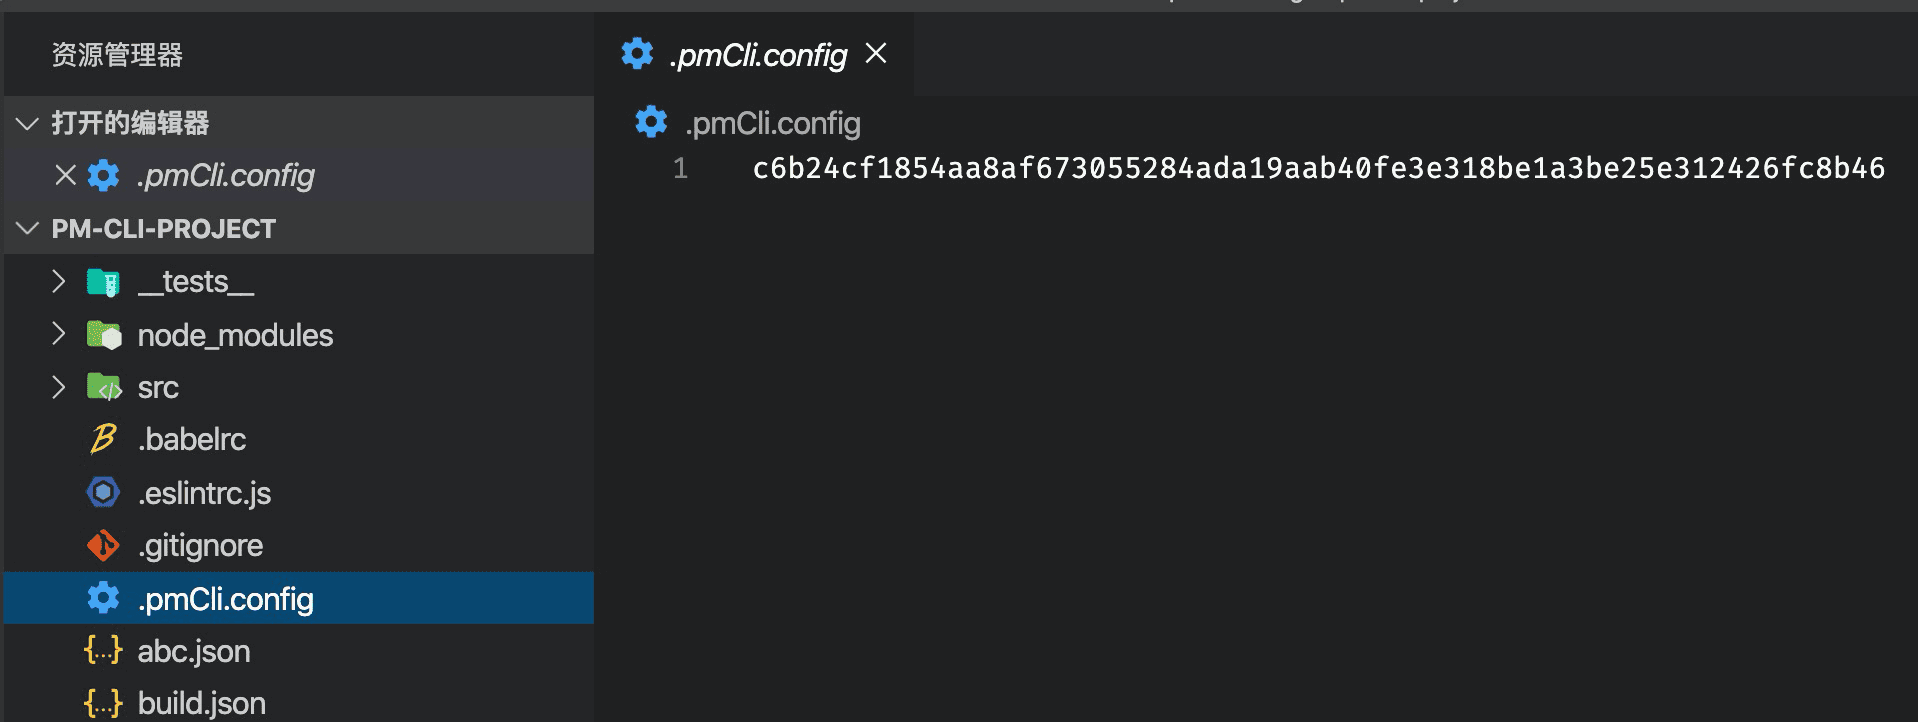
配置文件是我为了标识出当前项目,是否为 pmCli 初始化所得。因为在addPage 的时候,page 中的一些页面会使用到外部的组件,比如 loadingPage
如上,initProject:true|false用来标识当前仓库。
[pageName] 用来表示有哪些页面是用 pmCli 新建的。属性 type:'simpleSource'|'withContext'|'customStateManage'则用来告诉后续 add-mod 到底添加哪种类型的模块。
同时呢,对内容进行了加密,因为配置页面,是放在用户的项目下的
加密
const crypto = require('crypto');
function aesEncrypt(data) {
    const cipher = crypto.createCipher('aes192', 'PmCli');
    var crypted = cipher.update(data, 'utf8', 'hex');
    crypted += cipher.final('hex');
    return crypted;
}

function aesDecrypt(encrypted) {
    const decipher = crypto.createDecipher('aes192', 'PmCli');
    var decrypted = decipher.update(encrypted, 'hex', 'utf8');
    decrypted += decipher.final('utf8');
    return decrypted;
}
module.exports = {
    aesEncrypt,
    aesDecrypt
}
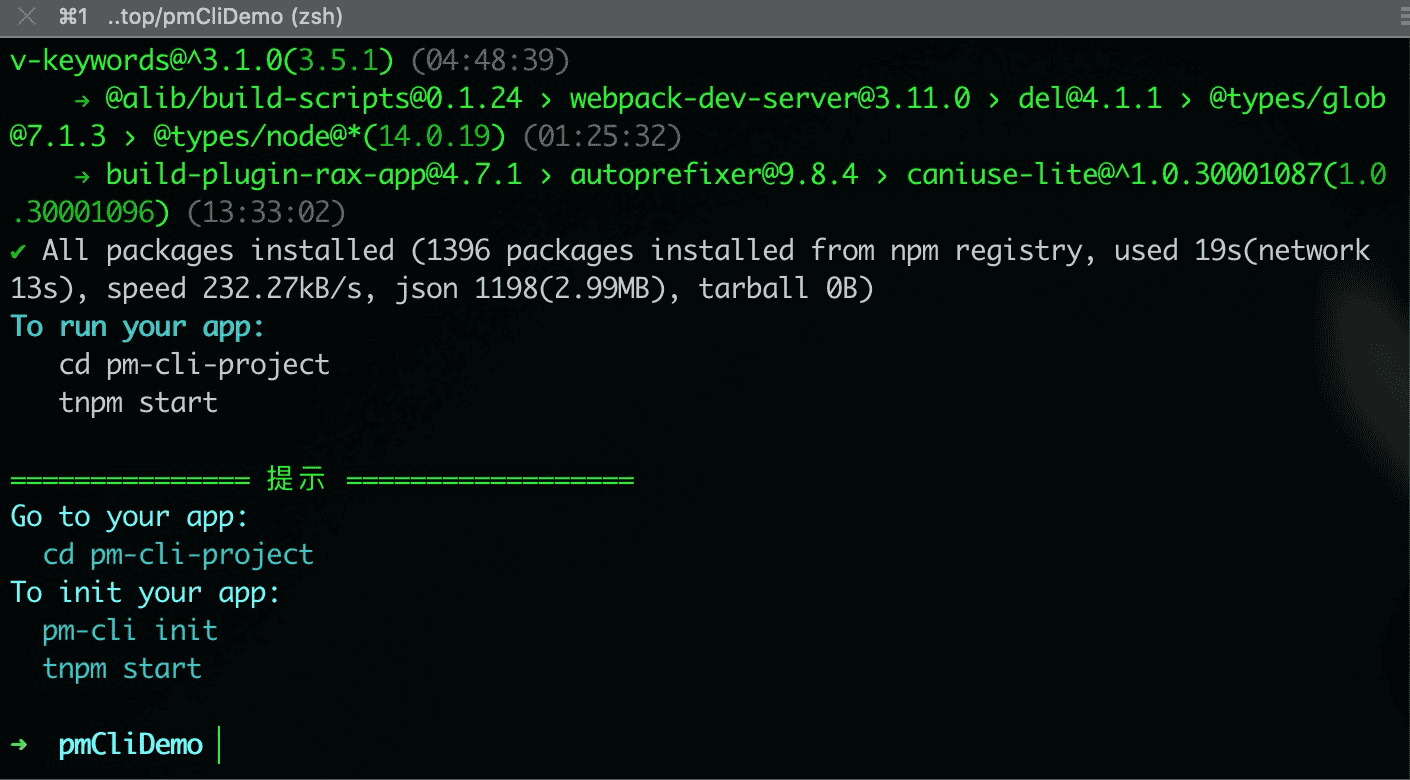
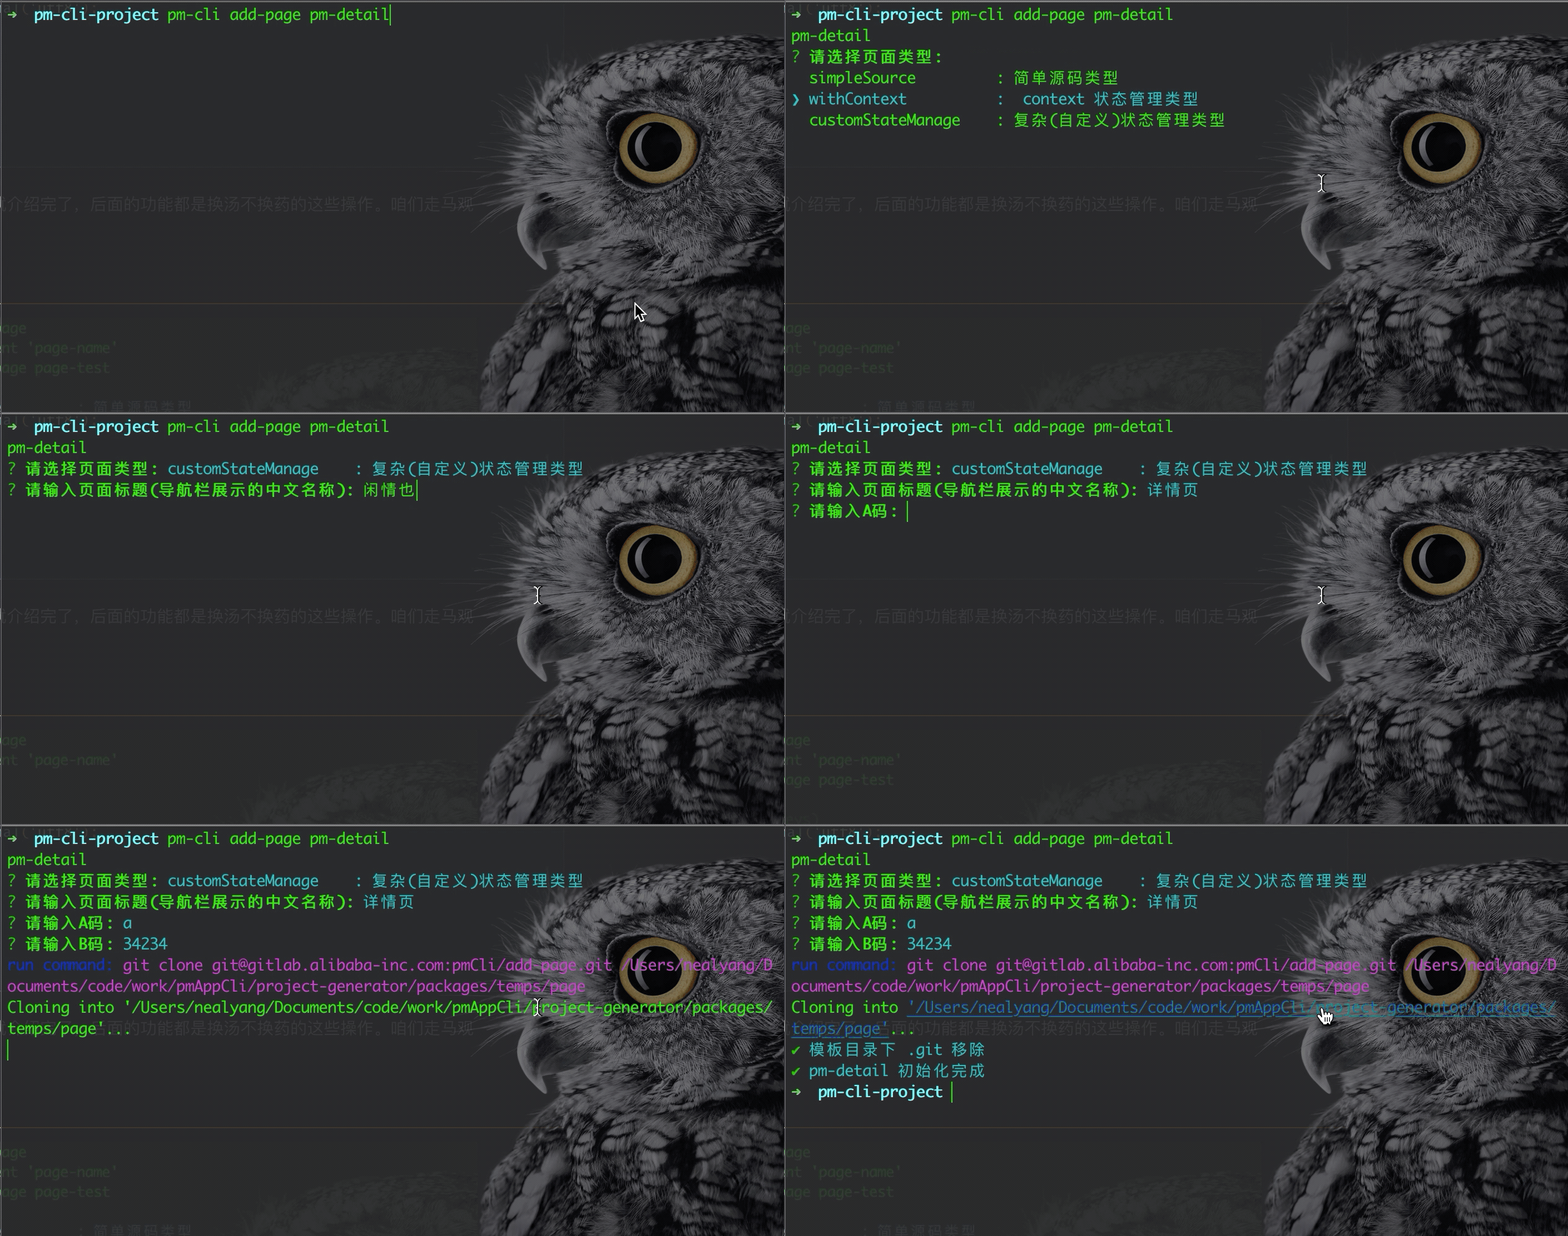
基本上如上,初始化项目的功能就介绍完了,后面的功能都是换汤不换药的这些操作。咱们走马观花,提个要点。
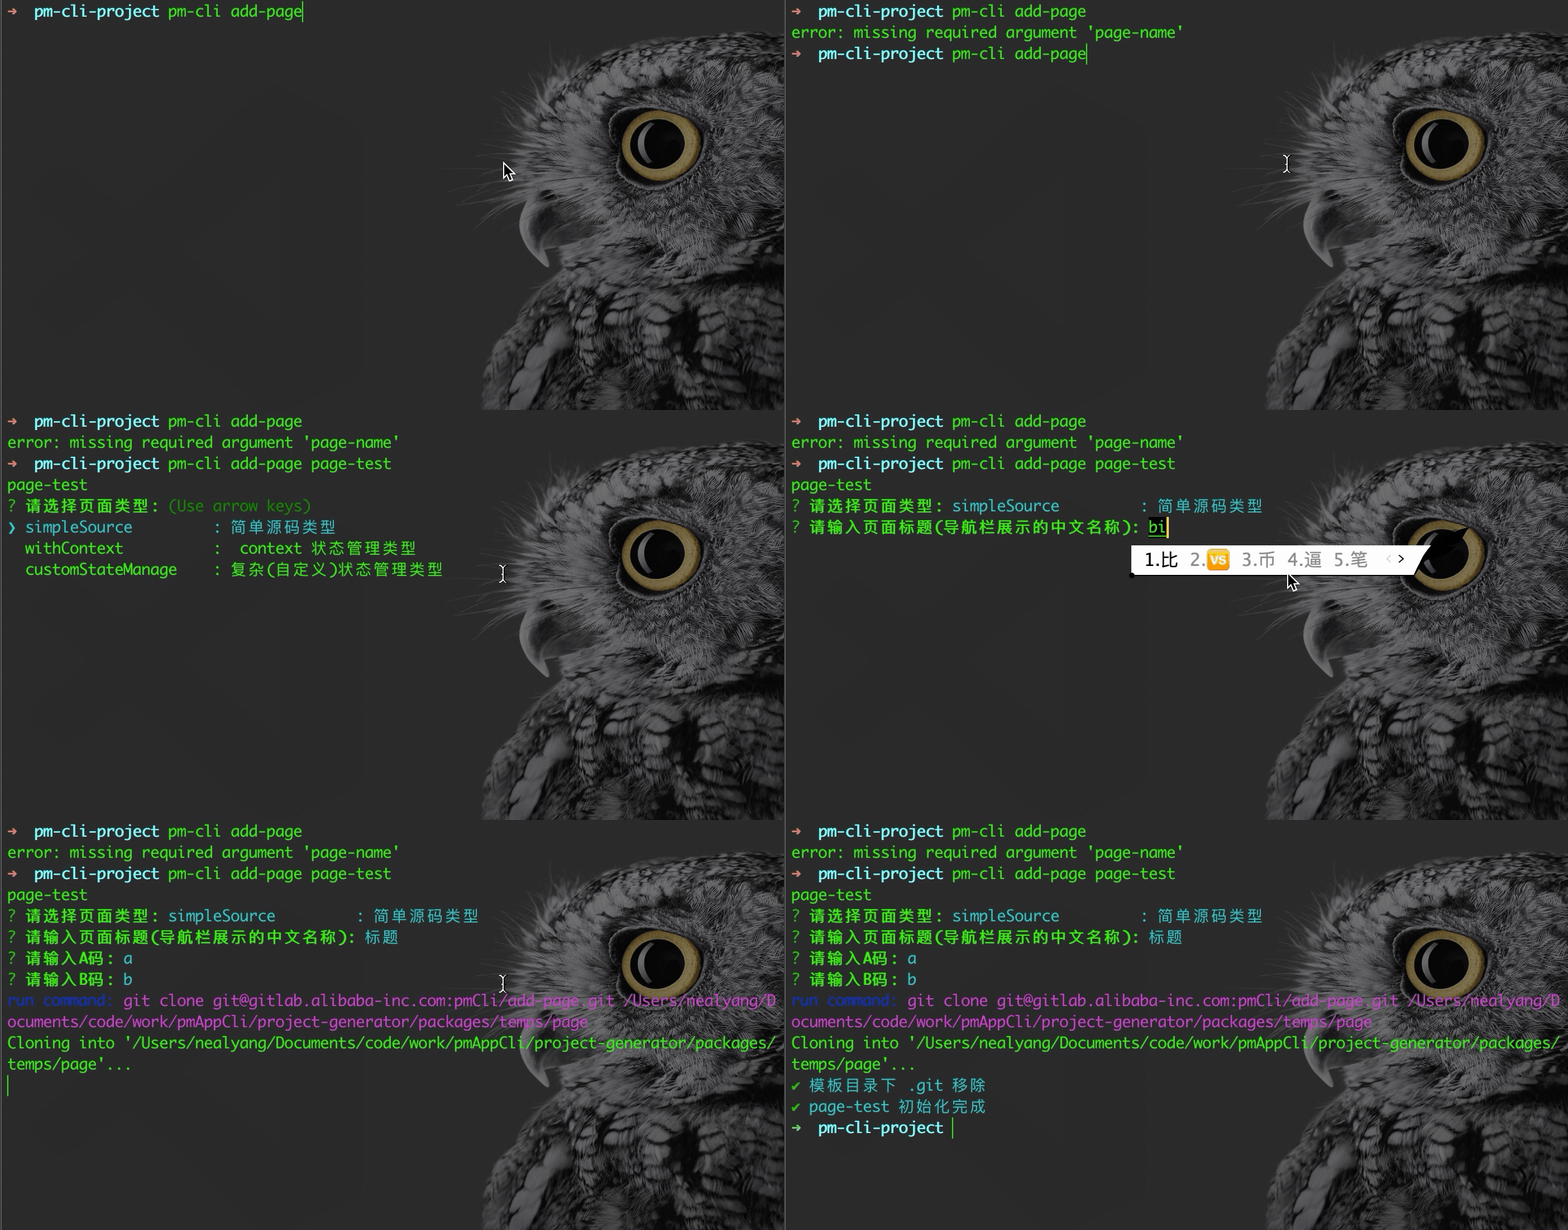
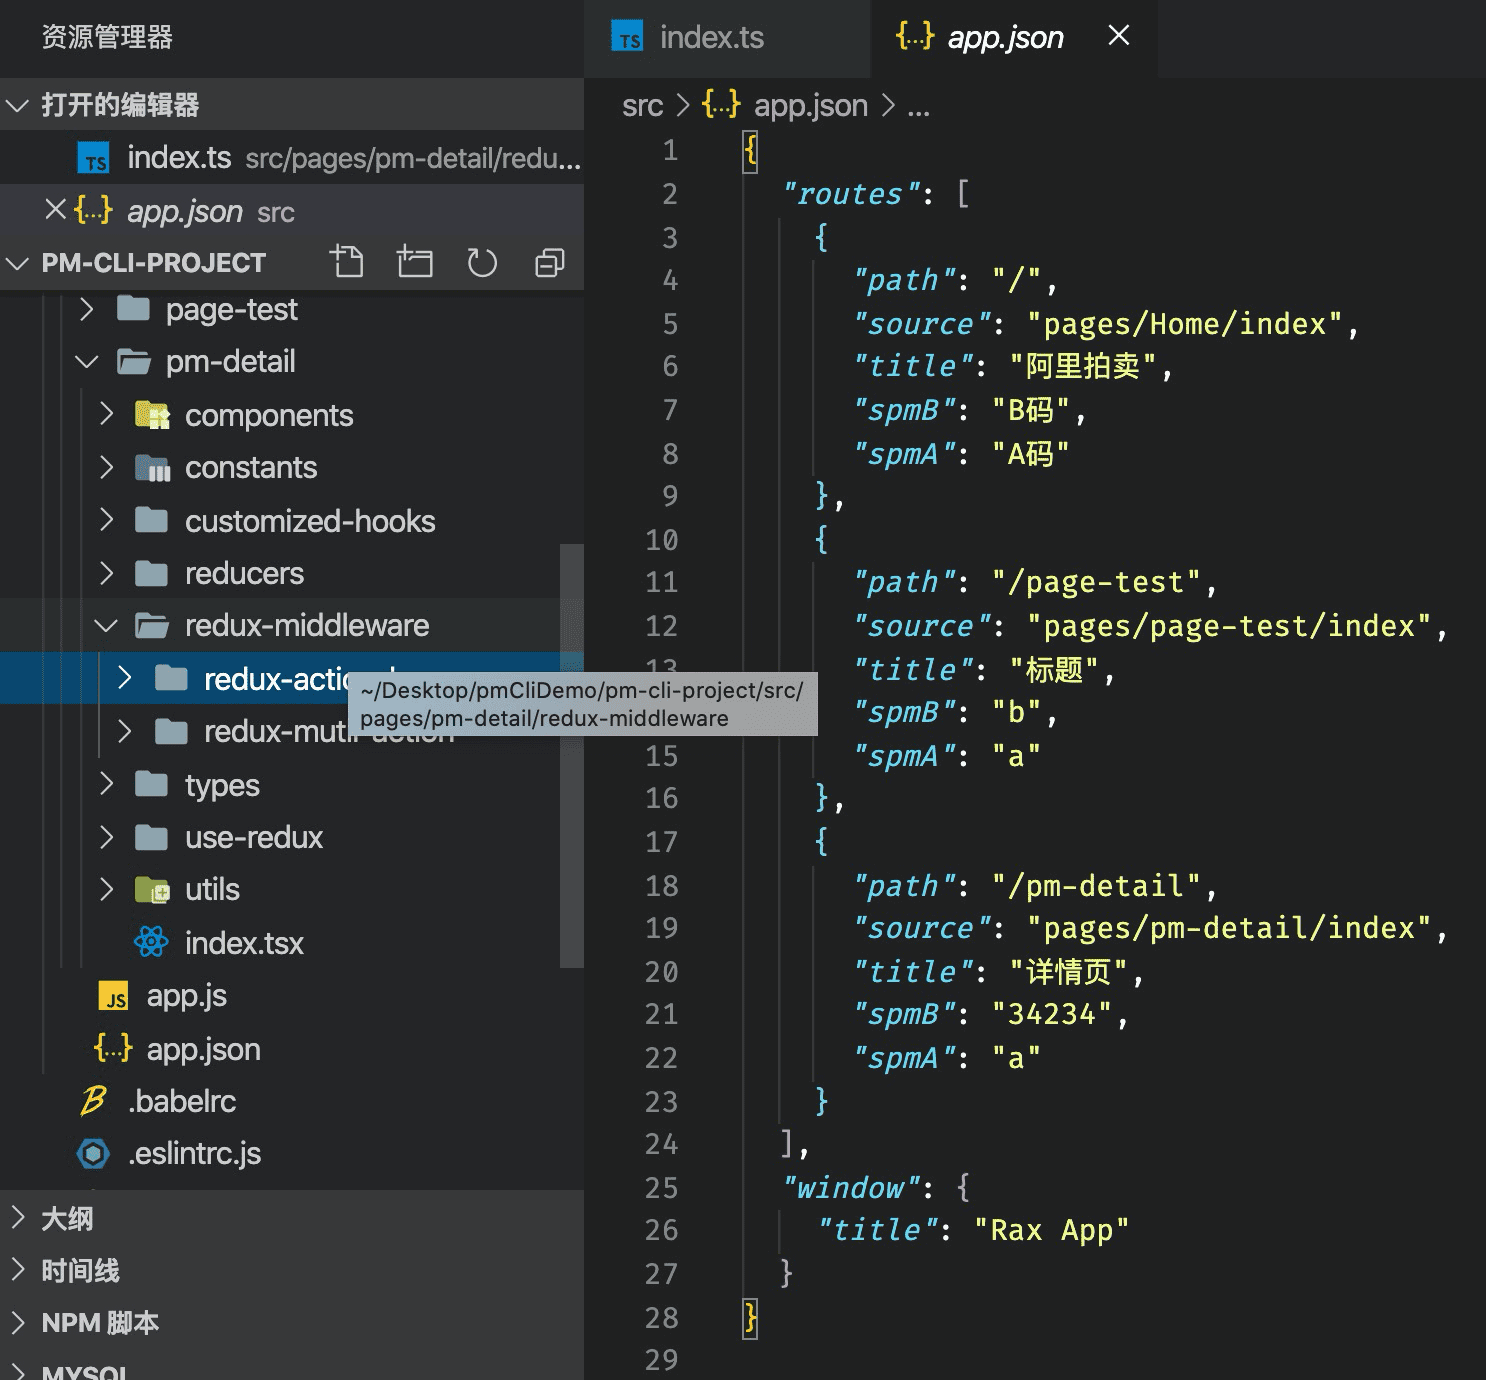
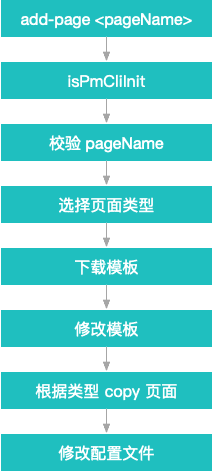
pm-cli add-page
流程图
上面的功能,其实就是跟 initProject里面的代码相似,就是一些“业务”情况的判断不同而已。
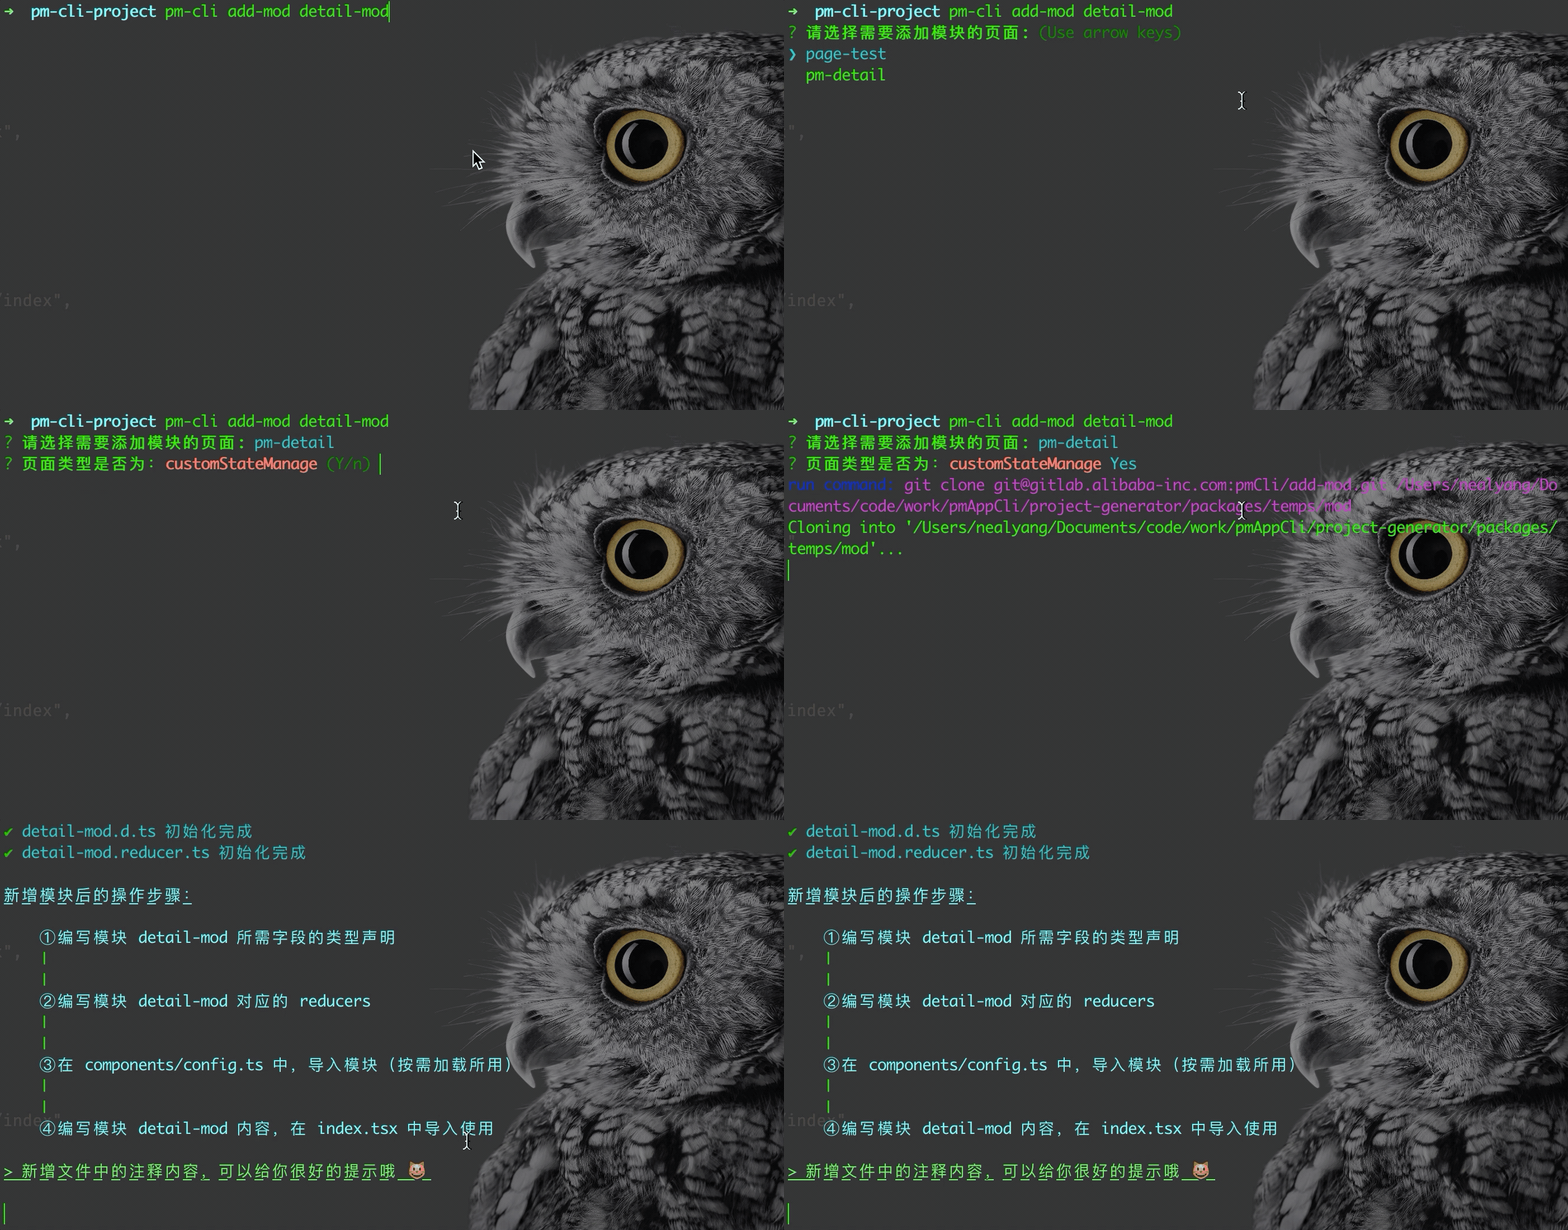
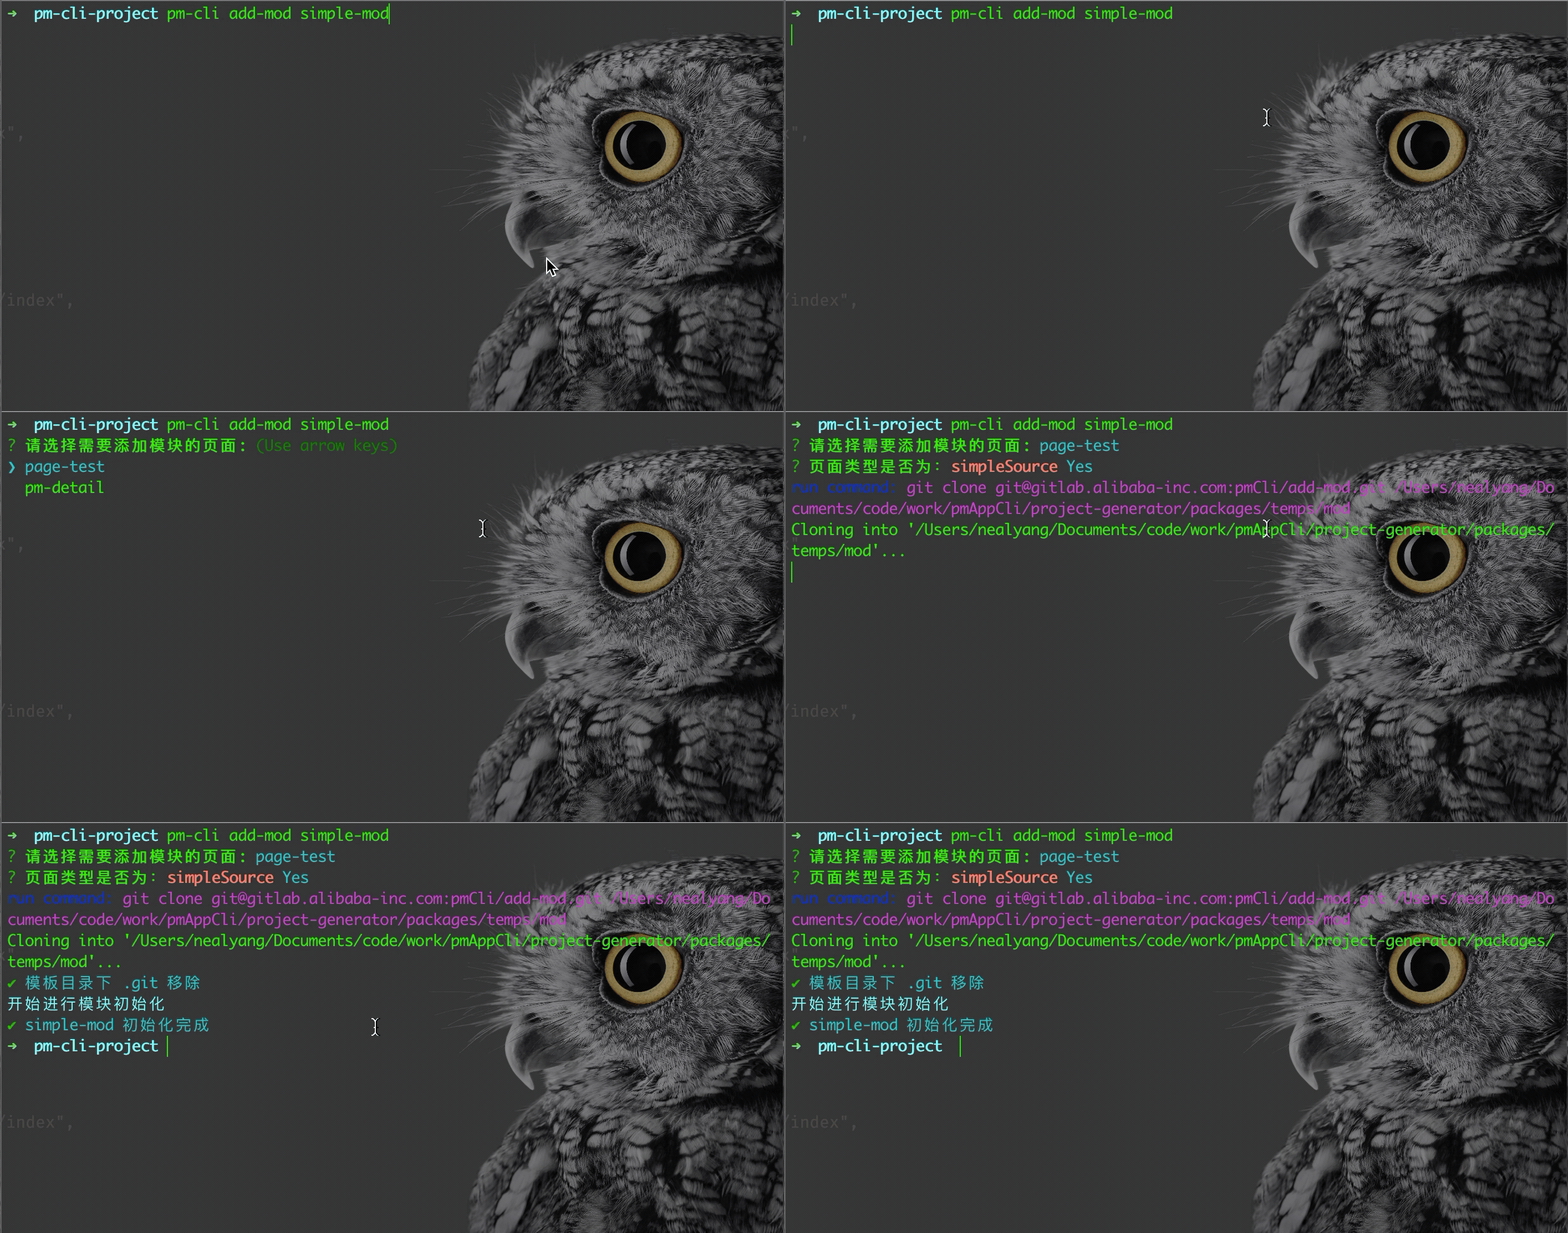
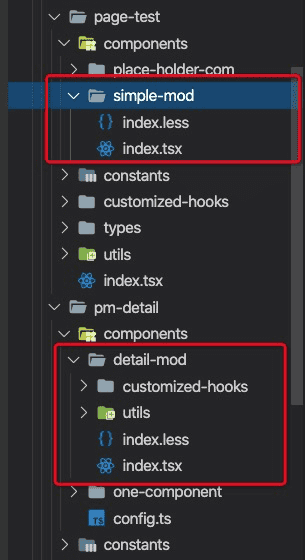
pm-cli add-mod
其实模块的新增也没有特别的技术点。先选择页面列表,然后读取.pmCli.config中的页面的类型。根据类型去新增页面
function run(modName) {
  // 新增模块,需要定位当前位置
  modifiedCurrPathAndValidatePro(CURR_DIR);
  // 选择能够新增模块的页面
  pageList = Object.keys(pmCliConfigFileContent).filter((val) => {
    return val !== "initProject";
  });
  if (pageList.length === 0) {
    handleError();
  }

  inquirer.prompt(getQuestions(pageList)).then((answer) => {
    const { pageName } = answer;
    // modName 重名判断
    try {
      checkNameValidate(
        modName,
        fs.readdirSync(
          path.resolve(CURR_DIR, `./src/pages/${pageName}/components`)
        )
      );
    } catch (error) {
      console.log("读取当前页面模块列表失败", error);
    }

    let modType = pmCliConfigFileContent[pageName].type;
    inquirer.prompt(getInsureQuestions(modType)).then(async (ans) => {
      if (!ans.insure) {
        modType = ans.type;
      }
      const distPath = path.resolve(
        CURR_DIR,
        `./src/pages/${pageName}/components`
      );
      const tempPath = path.resolve(__dirname, "../temps/mod");
      // 下载模板
      await downloadTempFromRep(modTempRepo, tempPath);
      try {
        if (fs.existsSync(distPath)) {
          console.log(chalk.cyanBright(`开始进行模块初始化`));
          let copyFileArr = [
            [
              path.resolve(tempPath, `./${modType}`),
              path.resolve(distPath, `./${modName}`),
            ],
          ];
          if(modType === 'customStateManage'){
            copyFileArr = [
              [
                path.resolve(tempPath,`./${modType}/mod-com`),
                path.resolve(distPath,`./${modName}`)
              ],
              [
                path.resolve(tempPath,`./${modType}/mod-com.d.ts`),
                path.resolve(distPath,`../types/${modName}.d.ts`)
              ],
              [
                path.resolve(tempPath,`./${modType}/mod-com.reducer.ts`),
                path.resolve(distPath,`../reducers/${modName}.reducer.ts`)
              ],
            ]
          }
          copyFiles(copyFileArr, (err) => {
            handleError(`拷贝配置文件失败`, err);
          });
          if (!ans.insure) {
            console.log();
            console.log(
              chalk.underline.red(
                ` 请确认页面:${pageName},在 .pmCli.config 中的类型`
              )
            );
            console.log();
          }
          modAddEndConsole(modName,modType);
        } else {
          handleError("本地文件目录有问题");
        }
      } catch (error) {
        handleError("读取文件目录出错,请联系@一凨");
      }
    });
  });
}
矫正 CURR_DIR
在添加模块的时候,我还做了个人性化处理。防止好心人以为要到 cd 到指定 pages 下才能 addMod,所以我支持只要你在 src、pages 或者项目根目录下,都可以执行 add-mod
/**
 * 纠正当前路径到项目路径下,主要是为了防止用户在当前页面新建模块
 */
const modifiedCurrPathAndValidatePro = (proPath) => {
  const configFilePath = path.resolve(CURR_DIR, `./${PM_CLI_CONFIG_FILE_NAME}`);
  try {
    if (fs.existsSync(configFilePath)) {
      pmCliConfigFileContent = JSON.parse(
        aesDecrypt(fs.readFileSync(configFilePath, "utf-8"))
      );
      if (!isTrue(pmCliConfigFileContent.initProject)) {
        handleError(`配置文件:${PM_CLI_CONFIG_FILE_NAME}被篡改,请联系@一凨`);
      }
    } else if (
      path.basename(CURR_DIR) === "pages" ||
      path.basename(CURR_DIR) === "src"
    ) {
      CURR_DIR = path.resolve(CURR_DIR, "../");
      modifiedCurrPathAndValidatePro(CURR_DIR);
    } else {
      handleError(`当前项目并非${chalk.cyan("pm-cli")}初始化,不可使用该命令`);
    }
  } catch (error) {
    handleError("读取项目配置文件失败", error);
  }
};
pm-cli modify-config
因为之前介绍过源码的页面架构,同时我也应用到了项目开发中。开发 pmCli 的时候,又新增了新增了配置文件,存在本地还是加密的。那么岂不是我之前的项目需要新增页面还不能用这个 pmCli?
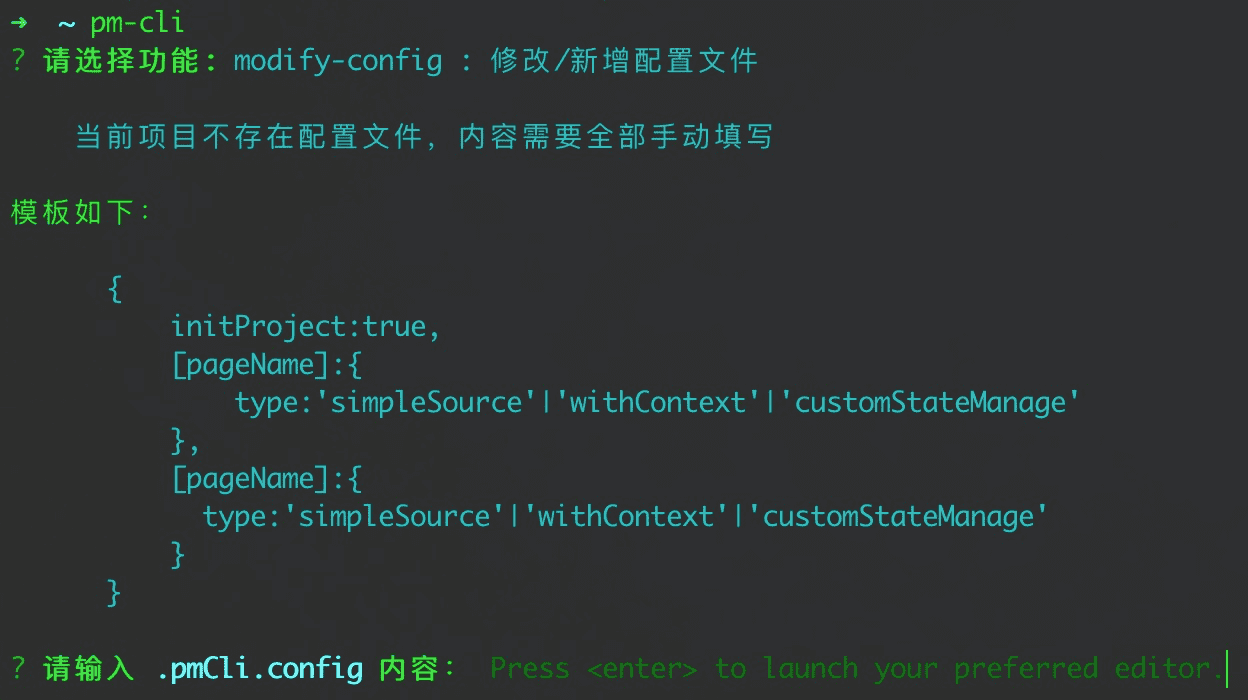
所以,就新增了这个功能:
modify-config:
- 当前项目是否存在
pmCli,没有则新建,有,则修改
注意点(总结)
- cli 其实就是个简单的 node 小应用。
fs-extra+shell就能玩起来,非常简单 - 边界情况以及各种人性化的交互需要考虑周到
- 异常处理和异常反馈需要给足
- 无聊且重复的工作。当然,你可以发挥你的想象
THE LAST TIME
- 彻底吃透 JavaScript 执行机制
- this:call、apply、bind
- 一文吃透所有JS原型相关知识点
- 深入浅出 JavaScript 模块化
- TypeScript进阶 之 重难点梳理
- 从 Redux 源码中学习它的范式
TODO
- 集成发布端脚手架(React)
- 支持参数透传
- vscode 插件,面板化操作
工具
所谓工欲善其事必先利其器,在 cli 避免不了使用非常多的工具,这里我主要是使用一些开源包以及从 CRA 里面 copy 过来的方法。
commander
homePage:https://github.com/tj/commander.js
node.js 命令行接口的完整解决方案
Inquirer
homePage:https://github.com/SBoudrias/Inquirer.js
交互式命令行用户界面的组件
fs-extra
homePage:https://github.com/jprichardson/node-fs-extra
fs模块自带文件模块的外部扩展模块
semver
homePage:https://github.com/npm/node-semver
用于对版本的一些操作
chalk
homePage:https://github.com/chalk/chalk
在命令行中给文本添加颜色的组件
clui
spinners、sparklines、progress bars图样显示组件
download-git-repo
homePage:https://gitlab.com/flippidippi/download-git-repo
Node下载并提取一个git仓库(GitHub,GitLab,Bitbucket)
ora
homePage:https://github.com/sindresorhus/ora
命令行加载效果,同上一个类似
shelljs
homePage:https://github.com/shelljs/shelljs
Node跨端运行 shell 的组件
validate-npm-package-name
homePage:https://github.com/npm/validate-npm-package-name
用于检查包名的合法性
blessed-contrib
homePage:https://github.com/yaronn/blessed-contrib
命令行可视化组件
本来这些工具打算单独写一篇文章的,但是堆 list 的文章的确不是很有用。容易忘主要是,所以这里就带过了。功能和效果,大家自行查看和测试吧。然后 CRA 中的比较不错的方法,我也在文章末尾列出来了。关于 CRA 的源码阅读,也可以查看我以往的文章:github/Nealyang
CRA 中不错的方法/包
commander:概述一下,Node命令接口,也就是可以用它代管Node命令。npm地址envinfo:可以打印当前操作系统的环境和指定包的信息。 npm地址fs-extra:外部依赖,Node自带文件模块的外部扩展模块 npm地址semver:外部依赖,用于比较Node版本 npm地址checkAppName():用于检测文件名是否合法,isSafeToCreateProjectIn():用于检测文件夹是否安全shouldUseYarn():用于检测yarn在本机是否已经安装checkThatNpmCanReadCwd():用于检测npm是否在正确的目录下执行checkNpmVersion():用于检测npm在本机是否已经安装了validate-npm-package-name:外部依赖,检查包名是否合法。npm地址printValidationResults():函数引用,这个函数就是我说的特别简单的类型,里面就是把接收到的错误信息循环打印出来,没什么好说的。execSync:引用自child_process.execSync,用于执行需要执行的子进程cross-spawn:Node跨平台解决方案,解决在windows下各种问题。用来执行node进程。npm地址dns:用来检测是否能够请求到指定的地址。npm地址
参考
想问问这个脚手架现在的使用情况,效率提高的明显吗?有哪些可以改进的地方。
想问问这个脚手架现在的使用情况,效率提高的明显吗?有哪些可以改进的地方。
提效还是比较明显的,新建页面和工程的步骤都已经省去了。
