Eclipse Cyclone DDS
Eclipse Cyclone DDS is a very performant and robust open-source DDS implementation. Cyclone DDS is developed completely in the open as an Eclipse IoT project (see eclipse-cyclone-dds).
Getting Started
Building Eclipse Cyclone DDS
In order to build Cyclone DDS you need a Linux, Mac or Windows 10 machine (or, with some caveats, an OpenIndiana one or a Solaris 2.6 one) with the following installed on your host:
- C compiler (most commonly GCC on Linux, Visual Studio on Windows, Xcode on macOS);
- GIT version control system;
- CMake, version 3.7 or later;
- OpenSSL, preferably version 1.1 or later if you want to use TLS over
TCP. You can explicitly disable it by setting
ENABLE_SSL=NO, which is very useful for reducing the footprint or when the FindOpenSSL CMake script gives you trouble; - Java JDK, version 8 or later, e.g., OpenJDK;
- Apache Maven, version 3.5 or later.
On Ubuntu apt install maven default-jdk should do the trick for getting Java and Maven
installed, and the rest should already be there. On Windows, installing chocolatey and choco install git cmake openjdk maven should get you a long way. On macOS, brew install maven cmake
and downloading and installing the JDK is easiest.
The Java-based components are the preprocessor and a configurator tool. The run-time
libraries are pure C code, so there is no need to have Java available on "target"
machines. If desired, it is possible to do a build without Java or Maven installed by
defining BUILD_IDLC=NO, but that effectively only gets you the core library. For the
current ROS2 RMW layer, that is sufficient.
To obtain Eclipse Cyclone DDS, do
$ git clone https://github.com/eclipse-cyclonedds/cyclonedds.git
$ cd cyclonedds
$ mkdir build
Depending on whether you want to develop applications using Cyclone DDS or contribute to it you can follow different procedures
For application developers
To build and install the required libraries needed to develop your own applications using Cyclone DDS requires a few simple steps. There are some small differences between Linux and macOS on the one hand, and Windows on the other. For Linux or macOS:
$ cd build
$ cmake -DCMAKE_INSTALL_PREFIX=<install-location> ..
$ cmake --build .
and for Windows:
$ cd build
$ cmake -G "<generator-name>" -DCMAKE_INSTALL_PREFIX=<install-location> ..
$ cmake --build .
where you should replace <install-location> by the directory under which you would like to
install Cyclone DDS and <generator-name> by one of the ways
CMake generators offer for
generating build files. For example, "Visual Studio 15 2017 Win64" would target a 64-bit build
using Visual Studio 2017.
To install it after a successful build, do:
$ cmake --build . --target install
which will copy everything to:
<install-location>/lib<install-location>/bin<install-location>/include/ddsc<install-location>/share/CycloneDDS
Depending on the installation location you may need administrator privileges.
At this point you are ready to use Eclipse Cyclone DDS in your own projects.
Note that the default build type is a release build with debug information included
(RelWithDebInfo), which is generally the most convenient type of build to use from applications
because of a good mix between performance and still being able to debug things. If you'd rather
have a Debug or pure Release build, set CMAKE_BUILD_TYPE accordingly.
Contributing to Eclipse Cyclone DDS
We very much welcome all contributions to the project, whether that is questions, examples, bug
fixes, enhancements or improvements to the documentation, or anything else really. When considering
contributing code, it might be good to know that build configurations for Travis CI and AppVeyor are
present in the repository and that there is a test suite using CTest and CUnit that can be built
locally if desired. To build it, set the cmake variable BUILD_TESTING to on when configuring, e.g.:
$ cd build
$ cmake -DCMAKE_BUILD_TYPE=Debug -DBUILD_TESTING=ON ..
$ cmake --build .
$ ctest
Such a build requires the presence of CUnit. You can install this yourself, or you can choose to instead rely on the Conan packaging system that the CI build infrastructure also uses. In that case, install Conan and do:
$ conan install .. --build missing
in the build directory prior to running cmake.
The CUnit Conan package is hosted in the Bincrafters Bintray repository. In case this repository was not added to your Conan remotes list yet (and the above mentioned install command failed because it could not find the CUnit package), you can add the Bintray repository by:
$ conan remote add <REMOTE> https://api.bintray.com/conan/bincrafters/public-conan
Replace <REMOTE> with a name that identifies the repository (e.g. bincrafters).
For Windows, depending on the generator, you might also need to add switches to select the architecture
and build type, e.g., conan install -s arch=x86_64 -s build_type=Debug .. This will automatically
download and/or build CUnit (and, at the moment, OpenSSL).
Documentation
The documentation is still rather limited, and at the moment only available in the sources (in the
form of restructured text files in docs and Doxygen comments in the header files), or as
a
PDF. The
intent is to automate the process of building the documentation and have them available in more
convenient formats and in the usual locations.
Building and Running the Roundtrip Example
We will show you how to build and run an example program that measures latency. The examples are built automatically when you build Cyclone DDS, so you don't need to follow these steps to be able to run the program, it is merely to illustrate the process.
$ mkdir roundtrip
$ cd roundtrip
$ cmake <install-location>/share/CycloneDDS/examples/roundtrip
$ cmake --build .
On one terminal start the application that will be responding to pings:
$ ./RoundtripPong
On another terminal, start the application that will be sending the pings:
$ ./RoundtripPing 0 0 0
# payloadSize: 0 | numSamples: 0 | timeOut: 0
# Waiting for startup jitter to stabilise
# Warm up complete.
# Latency measurements (in us)
#             Latency [us]                                   Write-access time [us]       Read-access time [us]
# Seconds     Count   median      min      99%      max      Count   median      min      Count   median      min
    1     28065       17       16       23       87      28065        8        6      28065        1        0
    2     28115       17       16       23       46      28115        8        6      28115        1        0
    3     28381       17       16       22       46      28381        8        6      28381        1        0
    4     27928       17       16       24      127      27928        8        6      27928        1        0
    5     28427       17       16       20       47      28427        8        6      28427        1        0
    6     27685       17       16       26       51      27685        8        6      27685        1        0
    7     28391       17       16       23       47      28391        8        6      28391        1        0
    8     27938       17       16       24       63      27938        8        6      27938        1        0
    9     28242       17       16       24      132      28242        8        6      28242        1        0
   10     28075       17       16       23       46      28075        8        6      28075        1        0
The numbers above were measured on Mac running a 4.2 GHz Intel Core i7 on December 12th 2018. From these numbers you can see how the roundtrip is very stable and the minimal latency is now down to 17 micro-seconds (used to be 25 micro-seconds) on this HW.
Performance
Reliable message throughput is over 1MS/s for very small samples and is roughly 90% of GbE with 100 byte samples, and latency is about 30us when measured using ddsperf between two Intel(R) Xeon(R) CPU E3-1270 V2 @ 3.50GHz (that's 2012 hardware ...) running Ubuntu 16.04, with the executables built on Ubuntu 18.04 using gcc 7.4.0 for a default (i.e., "RelWithDebInfo") build.
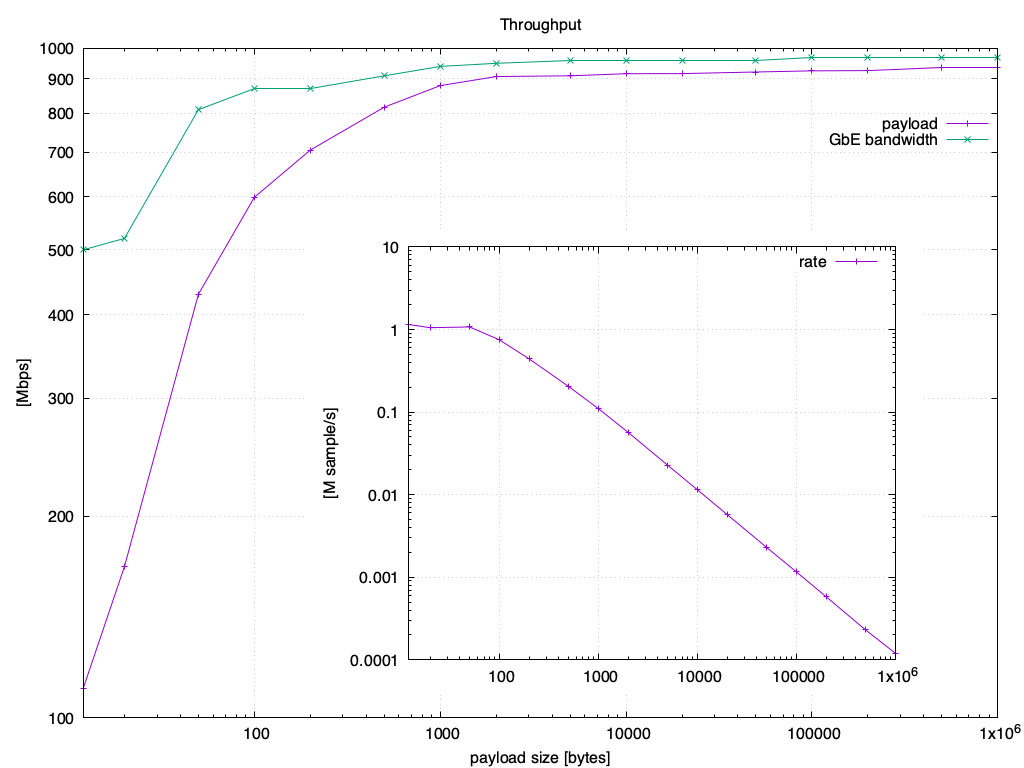
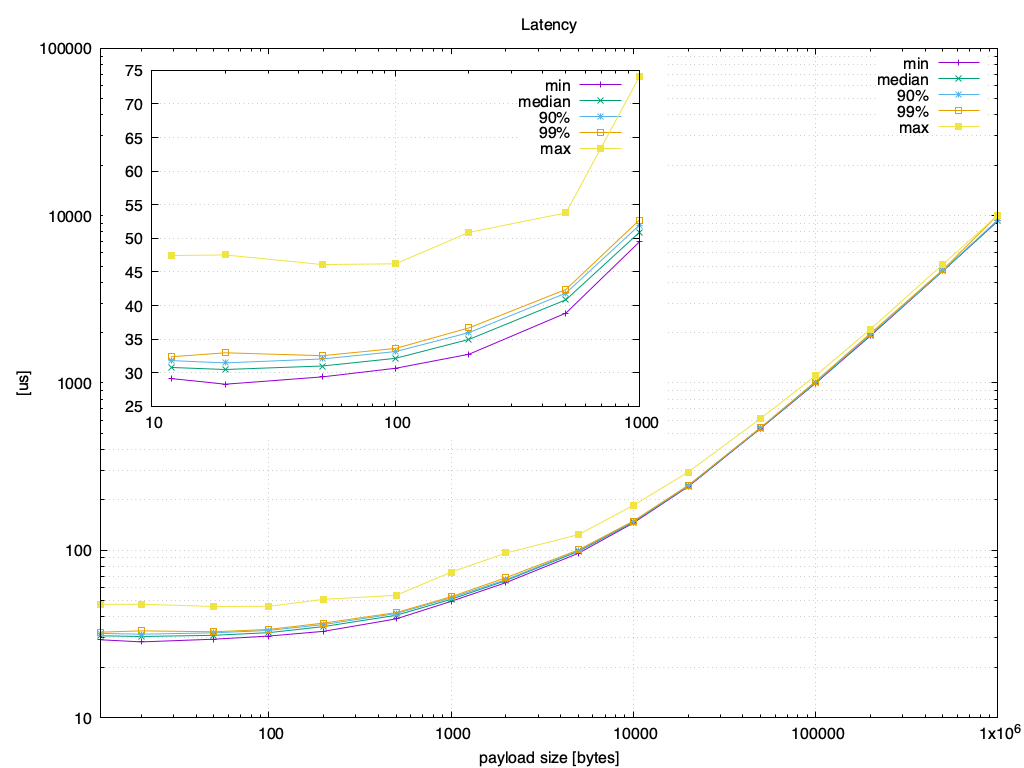
This is with the subscriber in listener mode, using asynchronous delivery for the throughput test. The configuration is a marginally tweaked out-of-the-box configuration: an increased maximum message size and fragment size, and an increased high-water mark for the reliability window on the writer side. For details, see the scripts directory, the environment details and the throughput and latency data underlying the graphs. These also include CPU usage (throughput and latency) and memory usage.
Configuration
The out-of-the-box configuration should usually be fine, but there are a great many options that can
be tweaked by creating an XML file with the desired settings and defining the CYCLONEDDS_URI to
point to it. E.g. (on Linux):
$ cat cyclonedds.xml
<?xml version="1.0" encoding="UTF-8" ?>
<CycloneDDS xmlns="https://cdds.io/config" xmlns:xsi="http://www.w3.org/2001/XMLSchema-instance" xsi:schemaLocation="https://cdds.io/config https://raw.githubusercontent.com/eclipse-cyclonedds/cyclonedds/master/etc/cyclonedds.xsd">
    <Domain id="any">
        <General>
            <NetworkInterfaceAddress>auto</NetworkInterfaceAddress>
            <AllowMulticast>default</AllowMulticast>
            <MaxMessageSize>65500B</MaxMessageSize>
            <FragmentSize>4000B</FragmentSize>
        </General>
        <Internal>
            <Watermarks>
                <WhcHigh>500kB</WhcHigh>
            </Watermarks>
        </Internal>
        <Tracing>
            <Verbosity>config</Verbosity>
            <OutputFile>stdout</OutputFile>
        </Tracing>
    </Domain>
</CycloneDDS>
$ export CYCLONEDDS_URI=file://$PWD/cyclonedds.xml
(on Windows, one would have to use set CYCLONEDDS_URI=file://... instead.)
This example shows a few things:
NetworkInterfaceAddresscan be used to override the interface selected by default (you can use the address or the interface name). Proper use of multiple network interfaces simultaneously will come, but is not there yet.AllowMulticastconfigures the circumstances under which multicast will be used. If the selected interface doesn't support it, it obviously won't be used (false); but if it does support it, the type of the network adapter determines the default value. For a wired network, it will use multicast for initial discovery as well as for data when there are multiple peers that the data needs to go to (true); but on a WiFi network it will use it only for initial discovery (spdp), because multicast on WiFi is very unreliable.Verbosityallows control over the tracing, "config" dumps the configuration to the trace output (which defaults to "cyclonedds.log"). Which interface is used, what multicast settings are used, etc., is all in the trace. Setting the verbosity to "finest" gives way more output on the inner workings, and there are various other levels as well.MaxMessageSizeandFragmentSizecontrol the maximum size of the RTPS messages (basically the size of the UDP payload), and the size of the fragments into which very large samples get split (which needs to be "a bit" less). Large values such as these typically improve performance over the (current) default values.WhcHighdetermines when the sender will wait for acknowledgements from the readers because it has buffered too much unacknowledged data. There is some auto-tuning, the (current) default value is a bit small to get really high throughput.
Background information on configuring Cyclone DDS can be found here and a list of settings is available.
Trademarks
-
"Eclipse Cyclone DDS" and "Cyclone DDS" are trademarks of the Eclipse Foundation.
-
"DDS" is a trademark of the Object Management Group, Inc.