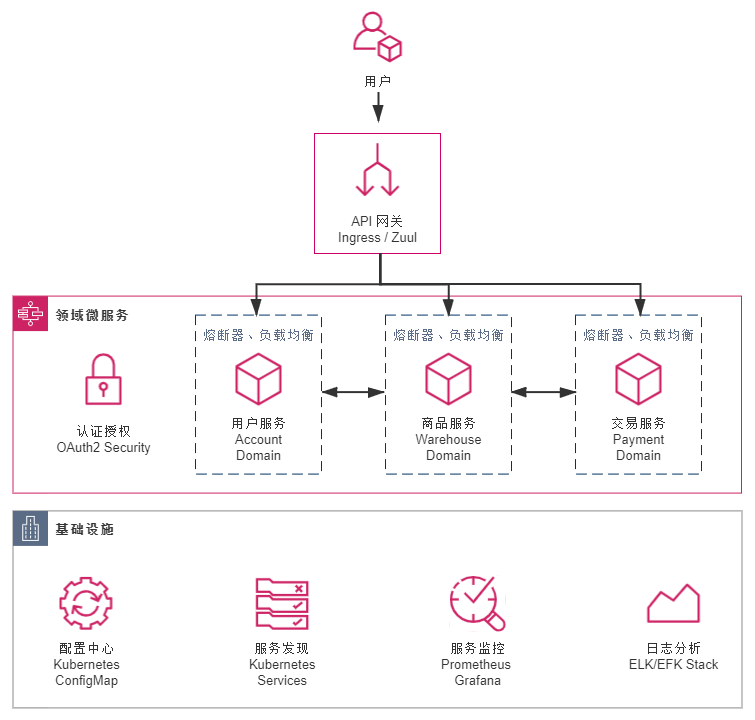
此项目示例主要是参考Java版Kubernets微服务示例,在业务需求相同的情况下,搭建一个Golang版本的Kubernetes项目
项目代码:Go微服务架构 Kubernetes
本项目和Java版本的示例类似架构,也是采用的DDD领域驱动设计,故架构图如下:
本项目分别采用了字节的kitex和hertz框架构建的微服务,具体的内容包括:
- 框架方面,domain领域模块(account/payment/warehouse)采用的Kitex框架;gateway网关采用的**Hertz框架**,网关目前只做了简单的转发验签
- 配置方面,使用https://github.com/spf13/viper读取 toml 文件,同时兼容了environment环境变量
- 通信和序列化协议方面,account领域提供了RPC+Thrift协议进行内部服务间调用;payment和warehouse模块提供了RPC+Protobuf协议进行内部服务间调用;gateway模块提供了RESTful接口供外部前端模块使用
Kitex框架中序列化的代码生成,具体参考代码生成工具
采用基于Kubernetes的微服务架构,其中的技术组件包括
- 配置中心:采用的 Kubernetes 的 ConfigMap 来管理配置文件。在Kubernetes的 Deployment 中,将 ConfigMap 中的配置文件映射到Pod容器内,使用 viper 读取容器中配置文件并实现动态更新。
- 服务发现:采用 Kubernetes 的Service 来管理,通过 Kubernetes 的 NameSpace 名称空间,使用 Service name 自动将 RPC 访问中的服务路由到对应容器。
- 服务网关:仅用hertz框架搭建了一个简易的网关,只是进行简单的 restful 到 RPC 的请求转发,并使用Oauth中间键做权限校验。
- 认证授权:采用Google OAuth2
DockerFile 中的镜像生成,将镜像构建和镜像运行分为了两步:
- 使用golang:1.20镜像作为builder,编译构建微服务,产出二进制文件
- 使用alpine镜像运行 builder 中产生的二进制文件
以gateway模块为例,具体的操作如下:
FROM golang:1.20 as builder

RUN mkdir /app
WORKDIR /app

ENV GO111MODULE=on \
    GOPROXY=https://goproxy.cn,direct \
    PORT=8888

COPY *.go ./
COPY go.mod go.sum ./
RUN go mod tidy
RUN CGO_ENABLED=0 go build -o bookstore-platform-gateway *.go

###################################################################
# Run container
FROM alpine:latest

RUN apk --no-cache add ca-certificates

RUN mkdir /app
WORKDIR /app
COPY conf/*.toml conf/
COPY --from=builder /app/bookstore-platform-gateway .

EXPOSE $PORT

# Run
CMD [ "./bookstore-platform-gateway" ]
相比于《凤凰架构》中的原工程,这里仅支持 Skaffold 的方式运行。
Skaffold 是根据skaffold.yml中的配置来进行的,开发时 skaffold 通过dev指令来执行这些配置。
kitex 框架中 fastpb 部分对于 google.timestamp 的序列化暂无支持,具体 issue 可以追溯到 https://github.com/cloudwego/kitex/issues/835,这里通过 string 类型兼容了这一处理,具体操作如下:
import "google/protobuf/timestamp.proto";

message Payment {
  google.protobuf.Timestamp createTime = 1;
  string payId = 2;
  double totalPrice = 3;
  int64 expires = 4;
  string paymentLink = 5;
}
type Payment struct {
state protoimpl.MessageState
sizeCache protoimpl.SizeCache
unknownFields protoimpl.UnknownFields
CreateTime *timestamppb.Timestamp `protobuf:"bytes,1,opt,name=createTime,proto3" json:"createTime,omitempty"`
PayId string `protobuf:"bytes,2,opt,name=payId,proto3" json:"payId,omitempty"`
TotalPrice float64 `protobuf:"fixed64,3,opt,name=totalPrice,proto3" json:"totalPrice,omitempty"`
Expires int64 `protobuf:"varint,4,opt,name=expires,proto3" json:"expires,omitempty"`
PaymentLink string `protobuf:"bytes,5,opt,name=paymentLink,proto3" json:"paymentLink,omitempty"`
}
func (x *Payment) fastReadField1(buf []byte, _type int8) (offset int, err error) {
value, offset, err := fastpb.ReadString(buf, _type)
if err != nil {
return offset, err
}
timestamp, _ := time.Parse(time.RFC3339Nano, value)
x.CreateTime = ×tamppb.Timestamp{Seconds: timestamp.Unix(), Nanos: int32(timestamp.Nanosecond())}
return offset, nil
}
func (x *Payment) fastWriteField1(buf []byte) (offset int) {
if x.CreateTime == nil {
return offset
}
timestamp := x.GetCreateTime().AsTime()
offset += fastpb.WriteString(buf[offset:], 1, timestamp.Format(time.RFC3339Nano))
return offset
}
func (x *Payment) sizeField1() (n int) {
if x.CreateTime == nil {
return n
}
timestamp := x.GetCreateTime().AsTime()
n += fastpb.SizeString(1, timestamp.Format(time.RFC3339Nano))
return n
}采用 Kubernetes ConfigMap 定义config.toml 配置文件,在使用 Kubernetes Deployment 构建过程中,将 ConfigMap 映射到 volumes ,并在 volumes 映射到 container 对应的配置文件目录。具体的操作示例如下:
# ConfigMap 定义配置配置文件config.toml
kind: ConfigMap
apiVersion: v1
metadata:
  name: gateway
  namespace: bookstore-microservices
data:
  config.toml: |-
    [account.client]
    connnum = 1
    hostport = ["account:8810"]

    [payment.client]
    connnum = 1
    hostport = ["payment:8812"]

    [warehouse.client]
    connnum = 1
    hostport = ["warehouse:8811"]

---
kind: Deployment
apiVersion: apps/v1
metadata:
  name: bookstore-platform-gateway
  namespace: bookstore-microservices
  labels:
    app: gateway
spec:
  replicas: 1
  selector:
    matchLabels:
      app: gateway
  template:
    metadata:
      labels:
        app: gateway
    spec:
      serviceAccountName: book-admin
      containers:
        - name: gateway
          image: icyfenix/bookstore-platform-gateway
          ports:
            - name: http-server
              containerPort: 8888
          env:
            - name: CONFIG_PATH
              value: /app/conf/config.toml
          # volumes 映射到 container 中的配置文件目录
          volumeMounts:
            - name: config-volume
              mountPath: /app/conf
      # 映射 configmap 到 volumes
      volumes:
        - name: config-volume
          configMap:
            name: gateway
微服务层面,使用 viper 读取对应的配置文件,具体操作如下:
func NewConfig() (v *viper.Viper) {
	v = viper.New()
	v.SetDefault(configPathKey, defaultConfigPath)
	defaultClientConfig(v)
	v.AutomaticEnv()
	// 通过ENV获取
	v.SetEnvKeyReplacer(strings.NewReplacer(".", "_"))
	v.SetTypeByDefaultValue(true)
	v.SetConfigFile(v.GetString(configPathKey))
	err := v.ReadInConfig()
	if err != nil {
		klog.CtxErrorf(context.Background(), err.Error())
	}
	v.WatchConfig()
	v.OnConfigChange(func(in fsnotify.Event) {
		klog.CtxErrorf(context.Background(), "Config file changed: %s", in.Name)
	})
	return
}https://github.com/cloudwego/kitex
https://github.com/cloudwego/hertz
https://github.com/spf13/viper
https://github.com/golang/oauth2
