PowerfulSeal adds chaos to your Kubernetes clusters, so that you can detect problems in your systems as early as possible. It kills targeted pods and takes VMs up and down.
It follows the Principles of Chaos Engineering, and is inspired by Chaos Monkey. Watch the Seal at KubeCon 2017 Austin.
Embrace the inevitable failure. Embrace The Seal.
- PowerfulSeal
- works with
OpenStack,AWS,Azure,GCPand local machines - speaks
Kubernetesnatively - interactive and autonomous, policy-driven mode
- web interface to interact with PowerfulSeal
- metric collection and exposition to
PrometheusorDatadog - minimal setup, easy yaml-based policies
- easy to extend
PowerfulSeal works in several modes:
-
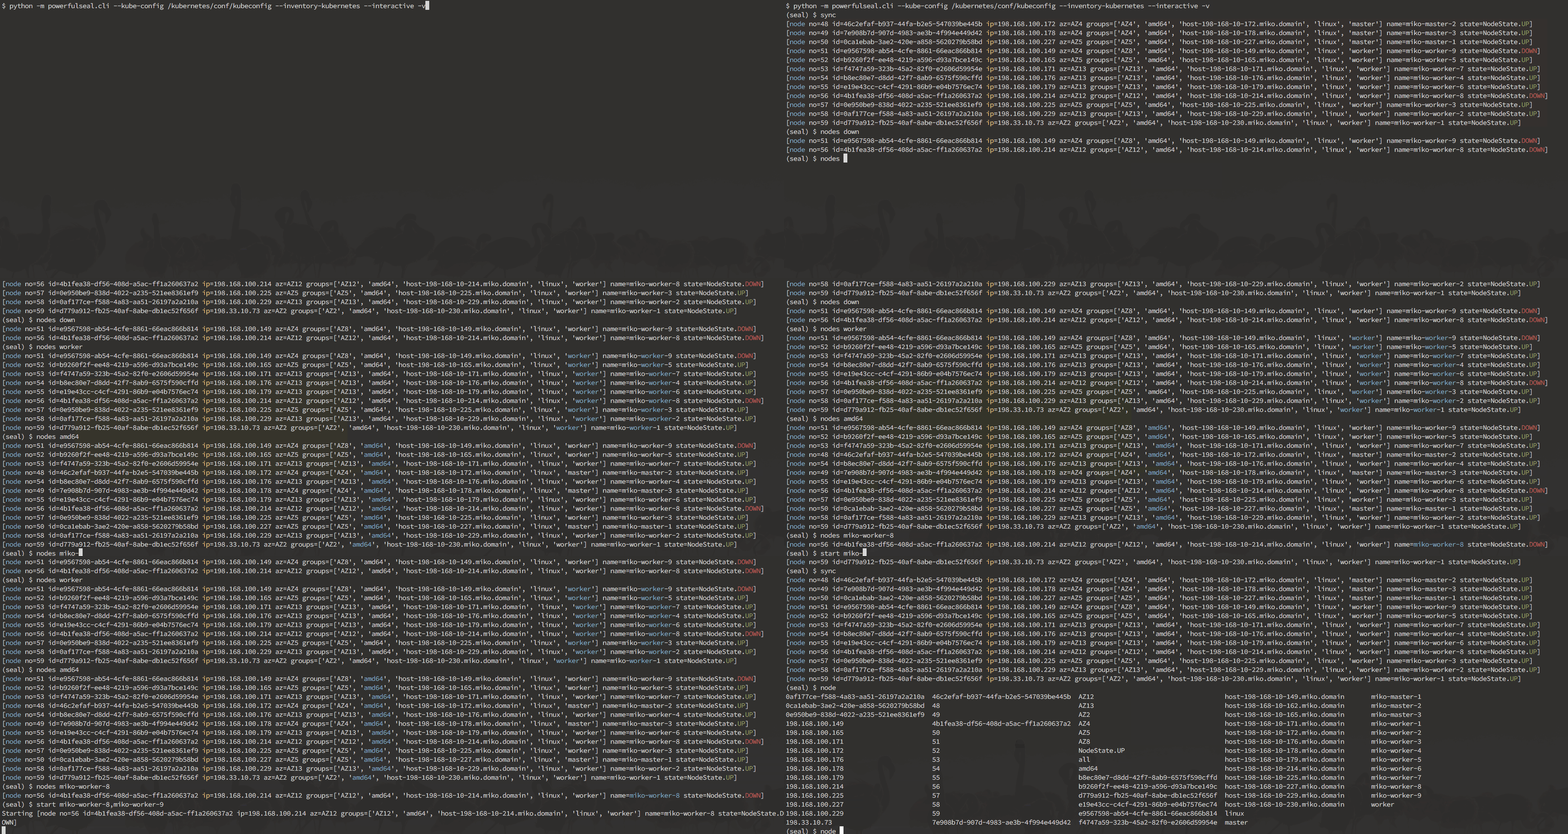
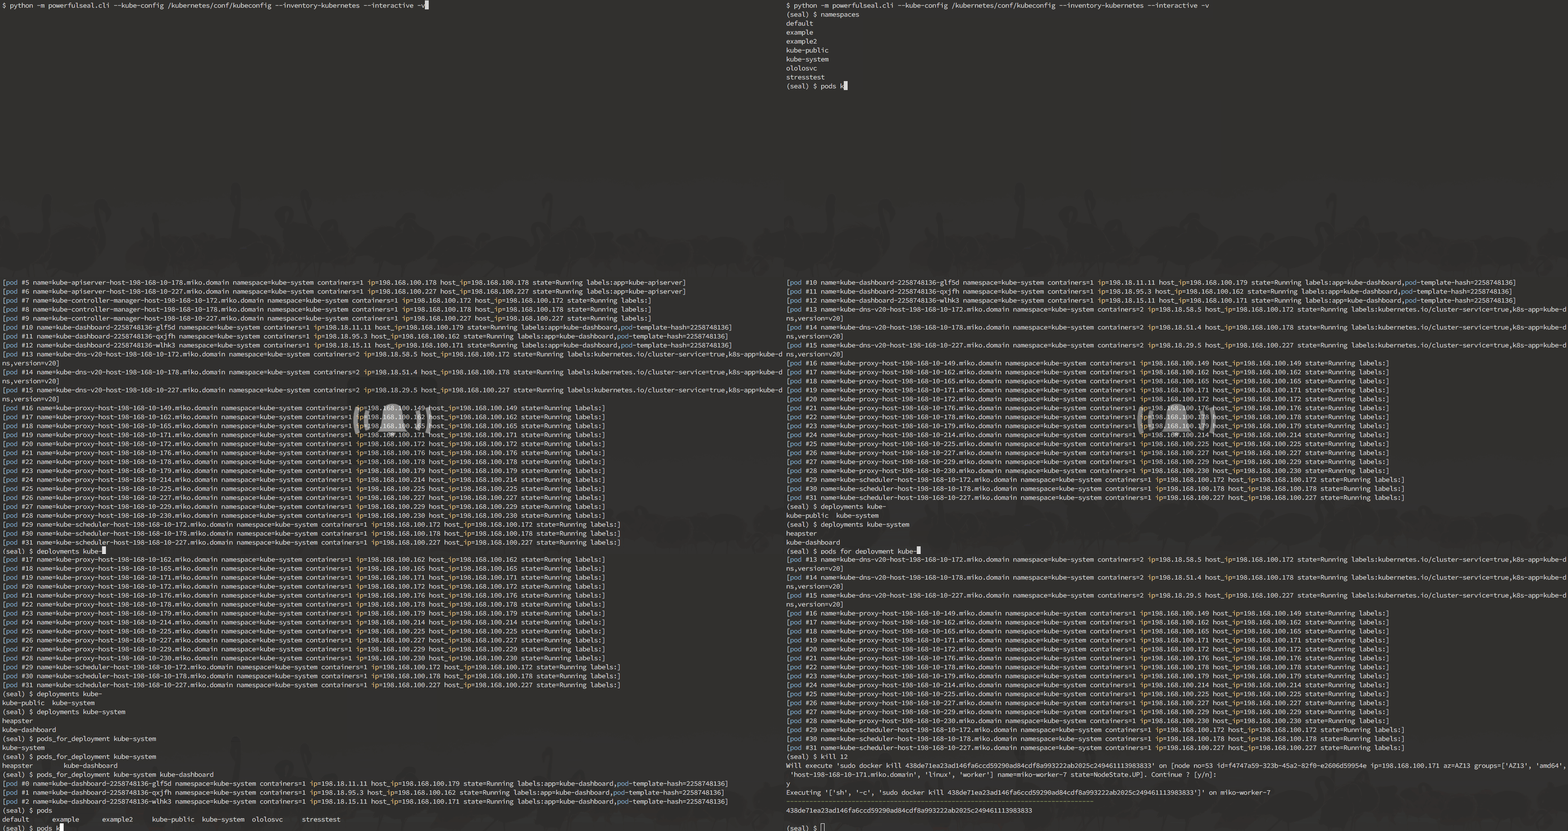
Interactive mode is designed to allow you to discover your cluster's components and manually break things to see what happens. It operates on nodes, pods, deployments and namespaces.
-
Autonomous mode reads a policy file, which can contain any number of pod and node scenarios. Each scenario describes a list of matches, filters and actions to execute on your cluster, and will be executed in a loop.
-
Label mode allows you to specify which pods to kill with a small number of options by adding
seal/labels to pods. This is a more imperative alternative to autonomous mode. -
Demo mode allows you to point the Seal at a cluster and a
metrics-serverserver and let it try to figure out what to kill, based on the resource utilization.
The setup depends on whether you run PowerfulSeal inside or outside of your cluster.
If you're running inside of the cluster (for example from the docker image), the setup is pretty easy.
You can see an example of how to do it in ./kubernetes. The setup involves:
- creating RBAC rules to allow the seal to list, get and delete pods,
- creating a powerfulseal configmap and deployment
- your scenarios will live in the configmap
- if you'd like to use the UI, you'll probably also need a service and ingress
- make sure to use
--use-pod-delete-instead-of-ssh-killflag to not need to configure SSH access for killing pods
- profit!
- the Seal will self-discover the way to connect to
kubernetesand start executing your policy
- the Seal will self-discover the way to connect to
If you're running outside of your cluster, the setup will involve:
- pointing PowerfulSeal at your Kubernetes cluster by giving it a Kubernetes config file
- pointing PowerfulSeal at your cloud by specifying the cloud driver to use and providing credentials
- making sure the seal can SSH into the nodes in order to execute
docker killcommand - writing a set of policies
It should look something like this.
It is possible to test a subset of Seal's functionality using a minikube setup.
To achieve that, please inspect the Makefile. You will need to override the ssh host, specify the correct username and use minikube's ssh keys.
If you'd like to test out the interactive mode, start with this:
seal \
  -vv \
  interactive \
    --no-cloud \
    --inventory-kubernetes \
    --ssh-allow-missing-host-keys \
    --remote-user docker \
    --ssh-path-to-private-key `minikube ssh-key` \
    --ssh-password `minikube ssh-password` \
    --override-ssh-host `minikube ip`
For label mode, try something like this:
seal \
  -vv \
  label \
    --no-cloud \
    --min-seconds-between-runs 3 \
    --max-seconds-between-runs 10 \
    --inventory-kubernetes \
    --ssh-allow-missing-host-keys \
    --remote-user docker \
    --ssh-path-to-private-key `minikube ssh-key` \
    --ssh-password `minikube ssh-password` \
    --override-ssh-host `minikube ip`
For autonomous mode, this should get you started:
seal \
  -vv \
  autonomous \
    --no-cloud \
    --policy-file ./examples/policy_kill_random_default.yml \
    --inventory-kubernetes \
    --prometheus-collector \
    --prometheus-host 0.0.0.0 \
    --prometheus-port 9999 \
    --ssh-allow-missing-host-keys \
    --remote-user docker \
    --ssh-path-to-private-key `minikube ssh-key` \
    --ssh-password `minikube ssh-password` \
    --override-ssh-host `minikube ip` \
    --host 0.0.0.0 \
--port 30100PowerfulSeal is available to install through pip:
pip install powerfulseal
powerfulseal --help # or seal --help
To start the web interface, use flags --server --server-host [HOST] --server-port [PORT] when starting PowerfulSeal in autonomous mode and visit the web server at http://HOST:PORT/.
Both Python 3.6 and Python 3.7 are supported.
The automatically built docker images are now available on docker hub
docker pull bloomberg/powerfulseal:2.7.0$ seal interactive --helpMake sure you hit tab for autocompletion - that's what really makes the seal easy to use.
Here's a sneak peek of what you can do in the interactive mode:
Autonomous reads the scenarios to execute from the policy file, and runs them:
- The matches are combined together and deduplicated to produce an initial working set
- They are run through a series of filters
- For all the items remaining after the filters, all actions are executed
$ seal autonomous --helpA minimal policy file, doing nothing, looks like this:
config:
  loopsNumber: 1 # will execute the provided scenarios once and then exit

nodeScenarios: []

podScenarios: []
A more interesting schema, that kills a random pod in default namespace every 1-30 seconds:
config:
  # we don't set loopsNumber, so it will loop indefinitely
  minSecondsBetweenRuns: 1
  maxSecondsBetweenRuns: 30

nodeScenarios: []
podScenarios:
  - name: "delete random pods in default namespace"

    match:
      - namespace:
          name: "default"

    filters:
      - randomSample:
          size: 1

    actions:
      - kill:
          probability: 0.77
          force: true
A full featured example listing most of the available options can be found in the tests.
The schemas are validated against the powerful JSON schema.
Autonomous mode also comes with the ability for metrics useful for monitoring to be collected. PowerfulSeal currently has a stdout, Prometheus and Datadog collector. However, metric collectors are easily extensible so it is easy to add your own. More details can be found here.
--headless to disable it
PowerfulSeal comes with a web interface to help you navigate Autonomous Mode. Features include:
- starting/stopping autonomous mode
- viewing and filtering logs
- changing the configuration (either overwriting the remote policy file or copying the changes to clipboard)
- stopping/killing individual nodes and pods
Label mode is a more imperative alternative to autonomous mode, allowing you to specify which specific per-pod whether a pod should be killed, the days/times it can be killed and the probability of it being killed.
To mark a pod for attack, do kubectl label pods my-app-1 seal/enabled=true, and the Seal will start attacking it, but only during working hours (defaults).
Detailed instructions on how to use label mode can be found in LABELS.md.
$ seal label --helpThe main way to use PowerfulSeal is to write a policy file for Autonomous mode which reflects realistic failures in your system. However, PowerfulSeal comes with a demo mode to demonstrate how it can cause chaos on your Kubernetes cluster. Demo mode gets all the pods in the cluster, selects those which are using the most resources, then kills them based on a probability.
Demo mode requires metrics-server. To run demo mode, use the demo subcommand along with --metrics-server-path (path to metrics-server without a trailing slash, e.g., http://localhost:8080/api/v1/namespaces/kube-system/services/https:metrics-server:/proxy). You can also optionally specify --aggressiveness (from 1 (weakest) to 5 (strongest)) inclusive, as well as --[min/max]-seconds-between-runs.
$ seal demo --helpPowerfulSeal can use an ansible-style inventory file (in ini format)
[mygroup]
myhost01

[mygroup2]
myhost02

[some_hosts]
myhost01
myhost02In all cases, the SSH Keys must be set up for SSH Client access of the nodes.
Note: With GCP, running
gcloud compute config-sshmakes SSHing to node instances easier by adding an alias for each instance to the user SSH configuration (~/.ssh/config) file and then being able to use the generated file with--ssh-path-to-private-keyargument.
The credentials to connect to Azure may be specified in one of two ways:
- Supply the full path to an Azure credentials file in the environment variable
AZURE_AUTH_LOCATION.
This is the easiest method. The credentials file can be generated viaaz aks get-credentials -n <cluster name> -g <resource group> -a -f <destination credentials file> - Supply the individual credentials in the environment variables:
AZURE_SUBSCRIPTION_ID,AZURE_CLIENT_ID,AZURE_CLIENT_SECRET,AZURE_TENANT_ID
The credentials to connect to AWS are specified the same as for the AWS CLI
The easiest way to use PowerfulSeal, is to download and source the OpenRC file you can get from Horizon. It should ask you for your password, and it should set all the OS_* variables for you. Alternatively, you can set them yourself.
Both approaches are detailed in the official documentation.
Google Cloud SDK and kubectl are required
The GCP cloud driver supports managed (GKE) and custom Kubernetes clusters running on top of Google Cloud Compute.
For setting up PowerfulSeal, the first step is configuring gcloud SDK (as PowerfulSeal will work with your configured project and region) and pointing kubectl to your cluster. Both can be configured easily following this tutorial (For GKE!). In case you don't want to use the default project/region of gcloud SDK, you can point PowerfulSeal to the correct one (in json) with --gcp-config-file argument.
For being able to run node related commands, credentials have to be specified in one of these ways:
- Service account (Recommended): a Google account that is associated with your GCP project, as opposed to a specific user.
PowerfulSealuses the environment variable and is pretty straightforward to set up using this tutorial. - User account: Not recommended as you can reach easily reach a "quota exceeded" or "API not enabled" error.
PowerfulSealuses auto-discovery and to get it working just follow this.
Having configuration ready and ssh connection to the node instances working, you can start playing with PowerfulSeal with this example:
powerfulseal interactive --kubeconfig ~/.kube/config --gcp --inventory-kubernetes --ssh-allow-missing-host-keys --ssh-path-to-private-key ~/.ssh/google_compute_engine --remote-user myuser
Note: In case of running inside Pyenv and getting
python2 command not founderror when running gcloud (and you want to runPowerfulSealwith Python 3+), this might be useful, as gcloud requires Python2.
PowerfulSeal uses tox to test with multiple versions on Python. The recommended setup is to install and locally activate the Python versions under tox.ini with pyenv.
Once the required Python versions are set up and can be discovered by tox (e.g., by having them discoverable in your PATH), you can run the tests by running tox.
For testing the web server and more details on testing, see TESTING.md.
- https://www.techatbloomberg.com/blog/powerfulseal-testing-tool-kubernetes-clusters/
- https://siliconangle.com/blog/2017/12/17/bloomberg-open-sources-powerfulseal-new-tool-testing-kubernetes-clusters/
- https://github.com/ramitsurana/awesome-kubernetes#testing
- https://github.com/ramitsurana/awesome-kubernetes#other-useful-videos
- https://github.com/dastergon/awesome-chaos-engineering#notable-tools
- https://www.linux.com/news/powerfulseal-testing-tool-kubernetes-clusters-0
- https://www.infoq.com/news/2018/01/powerfulseal-chaos-kubernetes
We found these two links to be a good start:
PowerfulSeal was inspired by Chaos Monkey, but it differs in a couple of important ways.
The Seal does:
- speak Kubernetes
- offer flexible, easy to write YAML scenarios
- provide interactive mode with awesome tab-completion
The Seal doesn't:
- need external dependencies (db, Spinnaker), apart from SSH, cloud and Kubernetes API access
- need you to setup
cron
We would love you to. In particular, it would be great to get help with:
- get more cloud drivers
- get more awesome filters
get an amazing logo- make the PowerfulSeal more powerful
Check out our CONTRIBUTING.md file for more information about how to contribute.
It might have been inspired by this comic.
PowerfulSeal logo Copyright 2018 The Linux Foundation, and distributed under the Creative Commons Attribution (CC-BY-4.0) license.


