A remotely controlled lamp based on ESP8266.
This project intended to be built using PlatformIO
- Install Atom editor
- Install PlatformIO
- Clone the repo
$ git clone https://github.com/anisimovsergey/lumino-esp- Open the folder in Atom editor and build it using PlatformIO
- Upload the program to your device using PlatformIO
Lumino uses a captive portal for creating a connection with your home WiFi. The captive portal implementation consists of two parts, one is the WebSockets based API implemented in this lumino-esp project and another one is a static content stored in EEPROM and served by the web served running on the same device.
For building and uploading the static content to EEPROM you need to do the following:
- Clone the lumino-web project.
- Build it by executing
npm install & npm run buildin the project folder. - Copy content of the
/distfolder fromlumino-webto/dataoflumino-esp. - Upload the static content
PlatformIO->Run other target...->PIO Upload SPIFFS image
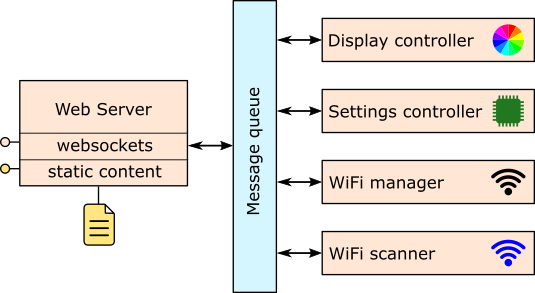
Lumino application architecture is based on the message processing. This approach allows to compose an application from modules which don't directly call functions of each other but instead, they send messages using a message queue and receive responses and events. The advantages of such architecture:
- Modules are completely decoupled and can evolve independently.
- Asynchronous communication support and better responsiveness.
- It is possible to add and remove modules during run time.
Display controller is responsible for reflecting the current state of the application, including currently selected color, the WiFi connection and the access point state, although in this application the display is just a group of NeoPixel LEDs. This controller doesn't process any requests directly, but instead it's listening on the events from the color, settings, connection and access point controllers.
Settings controller provides access to the application settings stored in EEPROM, such as the device name and currently selected color. The settings are not saved immediately when they change but after 10 seconds timeout just to extend the EEPROM live time.
Asynchronous web-server serves static content which is displayed as the WiFi connection page when the user connects to the access point created by the device. This module is also handling asynchronous WebSockets communication by accepting connections, receiving requests, adding them to the message queue and sending responses back to clients.
This manager creates an access point when the device boots up as well as redirects all the DNS requests to the device itself so it can serve as a captive portal. The captive portal allows to connect the device to the user's WiFi network. This module also responsible for establishing a WiFi connection to a specified network and for advertising the device as mDNS service so that it can be discovered by the client applications (such as this one).
WiFi scanner allows to scan available WiFi networks asynchronously and reports the discovered networks back to the clients.
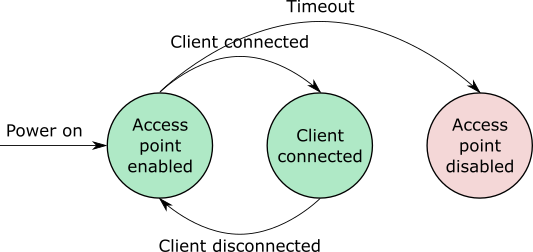
When the device is powered on, it creates an unprotected WiFi access point with a name starting with LUMINO_ followed by a unique four letter sequence which can include capital letters from A to F and numbers from 0 to 9. This unique name is specific to every device and never changes.
When the access point is available, you should be able connect the device to a WiFi network by doing the following steps:
- Scan available WiFi networks on your mobile phone or computer.
- Find the one created by the device (it should have
LUMINO_prefix) and connect to it. - You should be redirected to the captive portal page hosted on the device. If you are not redirected automatically, try to open http://192.168.4.1/ in your browser. This page allows you to see all the WiFi networks available for the device to connect.
- Connect the device to your WiFi network by selecting its SSID in the list of the available ones. For a secured home network, which is mostly the case, you need to provide a password too.
- When the device connects successfully to the selected network, you can disconnect from the one created by the device itself.
If the user doesn't connect to the WiFi access point in 5 minutes or disconnects from it and doesn't reconnect for the same period of time, the device disables it. In order to re-enable the access point, you need to simply switch the device off and on again.
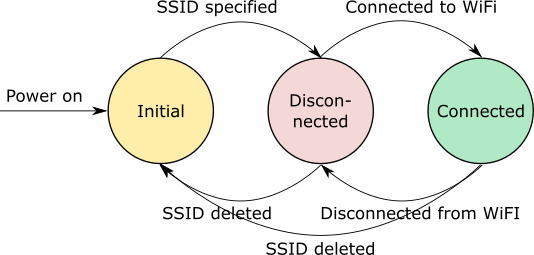
In case of a connection attempt failure, due to an incorrect password or other error, the device displays an error message to the user and remains in the disconnected state trying to connect to the specified WiFi network again and again.
In the connected state the WiFi access point, created by the device in the initial state, gets eventually disabled but the user can still access the device settings through the WiFi network the device now connected to. For doing that, the user, while being connected to the same network, needs to run Lumino application on a mobile device.
If the device losses the WiFi connection, due to a restart or some issues with the network itself, it starts automatically reconnecting using the network identifier and the password stored in the device's memory.
When the device is connected to the local network it can be discovered as service "lumino-ws" using mDNS. The client can communicate with the device using WebSockets protocol by connecting to ws://[device]/ws endpoint where device is the ether a discovered mDNS name or IP address of the device. All the communication messages are formatted as JSON. Some examples of the requests, responses and events you can see below.
Request for the WiFi networks scanning:
{
  "_type": "request",
  "id": "[random id]",
  "requestType": "scan",
  "resource": "networks"
}
Response (request accepted):
{
  "_type": "response",
  "id": "[random id]",
  "requestType": "scan",
  "resource": "networks",
  "content": {
    "_type": "status",
    "code": 202,
    "message": "Scanning WiFi networks."
  }
}When the scan is completed successfully the results are broadcasted to all the clients:
{
  "_type": "event",
  "eventType": "scanned",
  "resource": "networks",
  "content": {
    "_type": "networks",
    "elements": [
      {
        "_type": "network",
        "ssid": "BTHub4-NC8S",
        "rssi": -64,
        "encryption": "auto"
      }
    ]
  }
}Request:
{
  "_type": "request",
  "id": "[random id]",
  "requestType": "read",
  "resource": "connection"
}
Response:
{
  "_type": "response",
  "id": "[random id]",
  "requestType": "read",
  "resource": "connection",
  "content": {
    "_type": "connection",
    "ssid": "BTHub4-NC8S",
    "isConnected": true,
    "isProtected": true,
    "rssi": -82,
    "localIP": "192.168.1.71",
    "subnetMask": "255.255.0.0",
    "gatewayIP": "192.168.1.1",
    "dnsIP": "192.168.1.1"
  }
}For connecting to a WiFi network you need to create a connection resource:
{
  "_type": "request",
  "id": "[random id]",
  "requestType": "create",
  "resource": "connection",
  "content": {
    "_type": "connection",
    "ssid": "BTHub4-NC8S",
    "password": "password"
  }
}For disconnecting from the WiFi network you need to delete the connection resource:
{
  "_type": "request",
  "id": "[random id]",
  "requestType": "delete",
  "resource": "connection"
}When the status of the created WiFi connection changes, the device issues the following event:
{
  "_type": "event",
  "eventType": "updated",
  "resource": "connection",
  "content": {
    "_type": "connection",
    "ssid": "BTHub4-NC8S",
    "isConnected": true,
    "isProtected": true,
    "rssi": -82,
    "localIP": "192.168.1.71",
    "subnetMask": "255.255.0.0",
    "gatewayIP": "192.168.1.1",
    "dnsIP": "192.168.1.1"
  }
}Reading the color:
{
  "_type": "request",
  "id": "[random id]",
  "requestType": "read",
  "resource": "color"
}
Response:
{
  "_type": "response",
  "id": "[random id]",
  "requestType": "read",
  "resource": "color",
  "content": {
    "_type": "color",
    "h": 0.4,
    "s": 0.9,
    "v": 0.3
  }
}
Updating the color:
{
  "_type": "request",
  "id": "[random id]",
  "requestType": "update",
  "resource": "color",
  "content": {
    "_type": "color",
    "h": 0.4,
    "s": 0.9,
    "v": 0.3
  }
}Reading the settings:
{
  "_type": "request",
  "id": "[random id]",
  "requestType": "read",
  "resource": "settings"
}
Response:
{
  "_type": "response",
  "id": "[random id]",
  "requestType": "read",
  "resource": "settings",
  "content": {
    "_type": "settings",
    "isOn": true,
    "uniqueName":"LUMINO_BB6C",
    "deviceName": "MY_LUMINO"
  }
}
Updating the settings:
{
  "_type": "request",
  "id": "[random id]",
  "resource": "settings",
  "requestType": "update",
   "content": {
    "_type": "settings",
    "isOn": true,
    "deviceName": "My new Lumino"
  }
}

