The InsuranceLake solution is comprised of two codebases: Infrastructure and ETL. This codebase is specific to the ETL features (both infrastructure and application code), but the documentation that follows applies to the solution as a whole. For documentation with specific details on the Infrastructure, refer to the InsuranceLake Infrastructure with CDK Pipeline README.
This solution helps you deploy ETL processes and data storage resources to create InsuranceLake. It uses Amazon S3 buckets for storage, AWS Glue for data transformation, and AWS CDK Pipelines. The solution is originally based on the AWS blog Deploy data lake ETL jobs using CDK Pipelines.
CDK Pipelines is a construct library module for painless continuous delivery of CDK applications. CDK stands for Cloud Development Kit. It is an open source software development framework to define your cloud application resources using familiar programming languages.
Specifically, this solution helps you to:
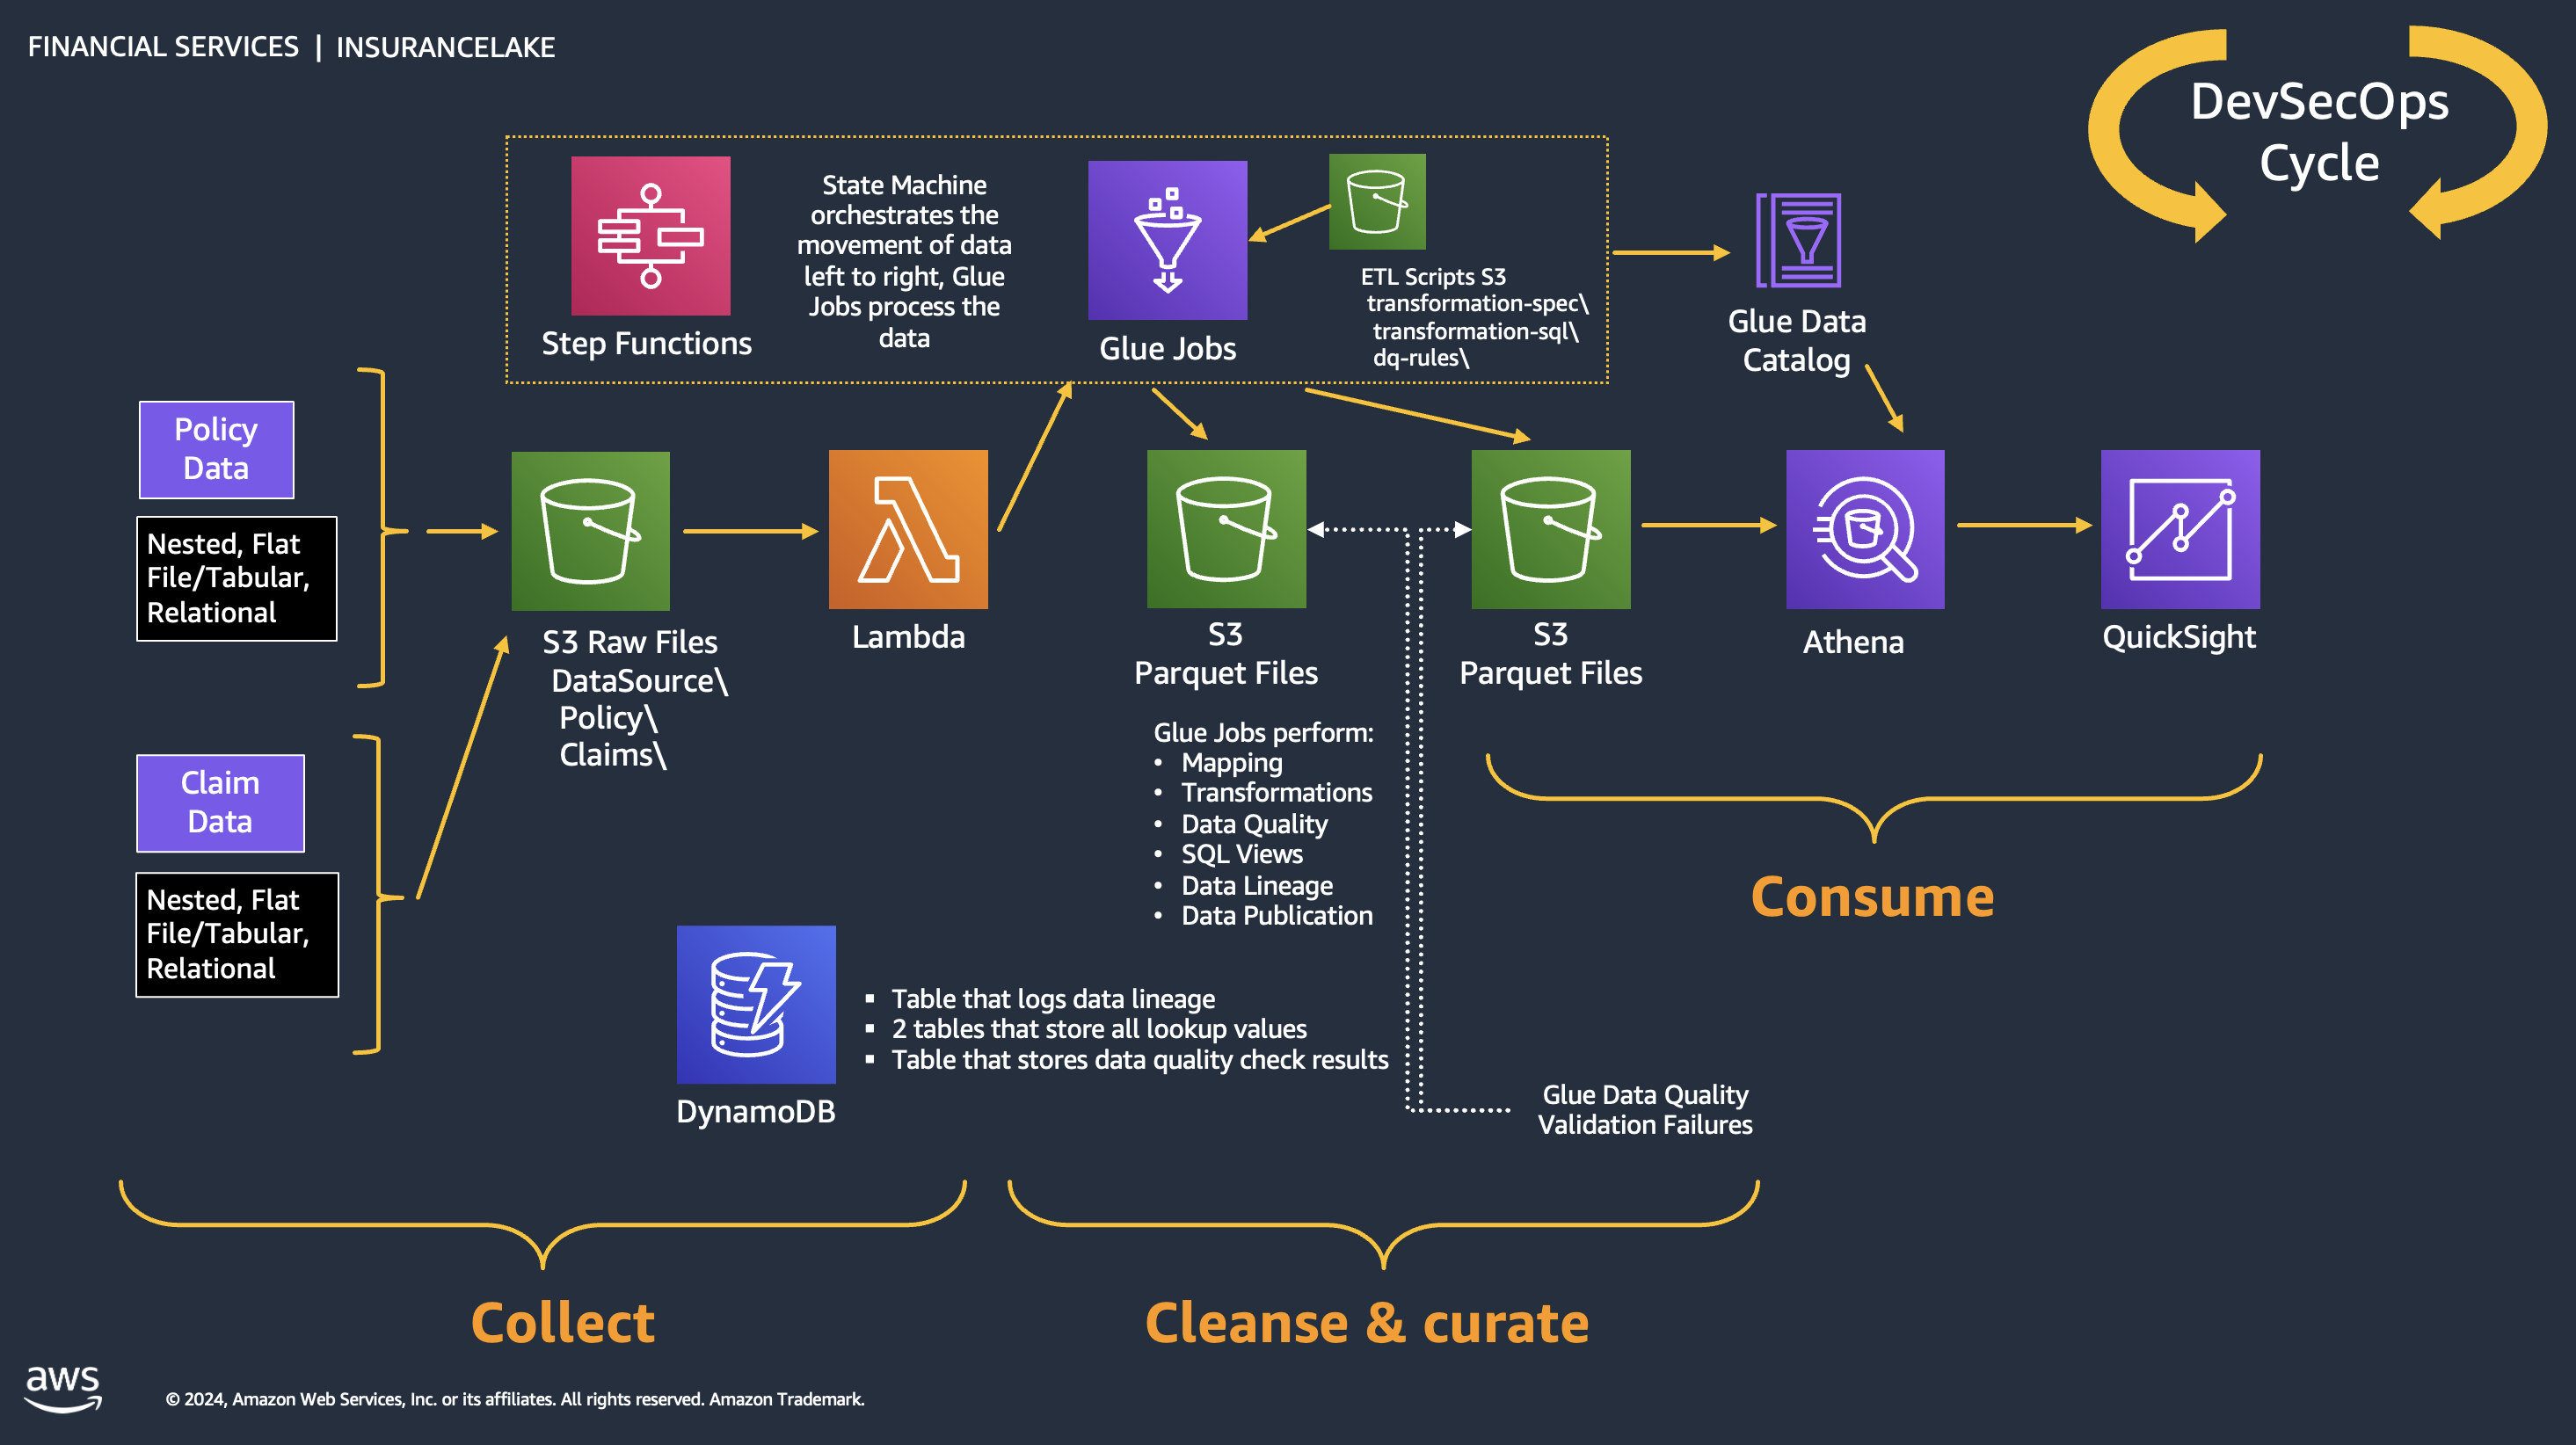
- Deploy a "3 Cs" (Collect, Cleanse, Consume) architecture InsuranceLake
- Deploy ETL jobs needed to make common insurance industry data souces available in a data lake
- Use pySpark Glue jobs and supporting resoures to perform data transforms in a modular approach
- Build and replicate the application in multiple environments quickly
- Deploy ETL jobs from a central deployment account to multiple AWS environments such as Dev, Test, and Prod
- Leverage the benefit of self-mutating feature of CDK Pipelines; specifically, the pipeline itself is infrastructure as code and can be changed as part of the deployment
- Increase the speed of prototyping, testing, and deployment of new ETL jobs
- Cost
- Quickstart
- Quickstart with CI/CD
- Deployment Validation
- Cleanup
- Architecture
- Security
- User Documentation
- Developer Documentation
- Additional resources
- Authors
- License Summary
This solution uses the following services: Amazon Simple Storage Service (S3), AWS Glue, AWS Step Functions, Amazon CloudWatch, Amazon Athena, AWS Cloud9 (for recommended installation process only), AWS CodePipeline (for CI/CD installation only).
An estimated cost for following the Quickstart and Quickstart with CI/CD instructions, assuming a total of 8 Glue DPU hours and cleaning all resources when finished, your cost will not be higher than $2. This cost could be less as some services are included in the Free Tier.
We recommend creating a Budget through AWS Cost Explorer to help manage costs. Prices are subject to change. For full details, refer to the pricing webpage for each AWS service used in this solution.
The following table provides a sample cost breakdown for deploying this Guidance with the default parameters in the US East (Ohio) Region for one month with pricing as of 9 July 2024.
| AWS service | Dimensions | Cost [USD] |
|---|---|---|
| AWS Glue | per DPU-Hour for each Apache Spark or Spark Streaming job, billed per second with a 1-minute minimum | $0.44 |
| Amazon S3 | per GB of storage used, Frequent Access Tier, first 50 TB per month PUT, COPY, POST, LIST requests (per 1,000 requests) GET, SELECT, and all other requests (per 1,000 requests) |
$0.023 $0.005 $0.0004 |
| Amazon Athena | per TB of data scanned | $5.00 |
| Amazon DynamoDB | per million Write Request Units (WRU) per million Read Request Units (RRU) |
$1.25 $0.25 |
If you'd like to get started quickly transforming some sample raw insurance data and running SQL on the resulting dataset, and without worrying about CI/CD, follow this guide.
- Open the AWS Console and navigate to AWS Cloud9
- Select the region to create the Cloud9 environment (should be the same region as the stack; us-east-2 by default)
- Select Create environment
- Enter an environment name, for example, InsuranceLakeDemo
- Select the t3.small instance size (CDK deployment requires more than 1 GB RAM)
- Leave the Platform selected as Amazon Linux 2023
- Adjust the timeout to your preference
- Click Create
- Open the environment you created and wait until it is available for use
- Clone the repositories
git clone https://github.com/aws-solutions-library-samples/aws-insurancelake-infrastructure.git
git clone https://github.com/aws-solutions-library-samples/aws-insurancelake-etl.git
- Use a terminal or command prompt and change the working directory to the location of the infrastructure code
cd aws-insurancelake-infrastructure - Create a Python virtual environment
python3 -m venv .venv
- Activate the virtual environment
source .venv/bin/activate - Install required Python libraries
- NOTE: You may see a warning stating that a newer version is available; it is safe to ignore this for the Quickstart
pip install -r requirements.txt
- Bootstrap CDK in your AWS account
- By default the solution will deploy resources to the
us-east-2region
cdk bootstrap
- By default the solution will deploy resources to the
- Ensure you are still in the
aws-insurancelake-infrastructuredirectory - Deploy infrastructure resources in the development environment (1 stack)
cdk deploy Dev-InsuranceLakeInfrastructurePipeline/Dev/InsuranceLakeInfrastructureS3BucketZones
- Review and accept IAM credential creation for the S3 bucket stack
- Wait for deployment to finish (approx. 5 mins)
- Copy the S3 bucket name for the Collect bucket to use later
- Bucket name will be in the form:
dev-insurancelake-<AWS Account ID>-<Region>-collect
- Bucket name will be in the form:
- Switch the working directory to the location of the etl code
cd ../aws-insurancelake-etl - Deploy the ETL resources in the development environment (4 stacks)
cdk deploy Dev-InsuranceLakeEtlPipeline/Dev/InsuranceLakeEtlDynamoDb Dev-InsuranceLakeEtlPipeline/Dev/InsuranceLakeEtlGlue Dev-InsuranceLakeEtlPipeline/Dev/InsuranceLakeEtlStepFunctions Dev-InsuranceLakeEtlPipeline/Dev/InsuranceLakeEtlAthenaHelper
- Wait for approximately 1 minute for DynamoDB deployment to finish
- Review and accept IAM credential creation for the Glue jobs stack
- Wait approximately 3 minutes for deployment to finish
- Review and accept IAM credential creation for the Step Functions stack
- Wait approximately 7 minutes for deployment of Step Functions and Athena Helper stacks to finish
- Populate the DynamoDB lookup table with sample lookup data
AWS_DEFAULT_REGION=us-east-2 resources/load_dynamodb_lookup_table.py SyntheticGeneralData dev-insurancelake-etl-value-lookup resources/syntheticgeneral_lookup_data.json
- Transfer the sample claim data to the Collect bucket
aws s3 cp resources/syntheticgeneral-claim-data.csv s3://<Collect S3 Bucket>/SyntheticGeneralData/ClaimData/
- Transfer the sample policy data to the Collect bucket
aws s3 cp resources/syntheticgeneral-policy-data.csv s3://<Collect S3 Bucket>/SyntheticGeneralData/PolicyData/
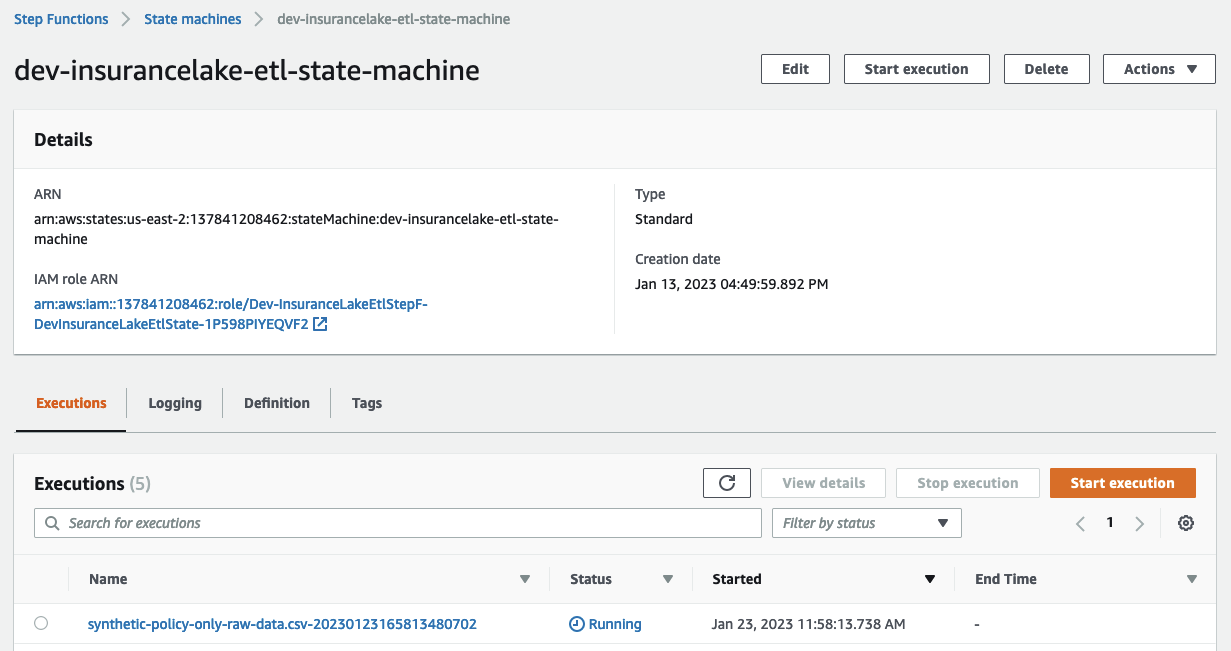
- Open Step Functions in the AWS Console and select
dev-insurancelake-etl-state-machine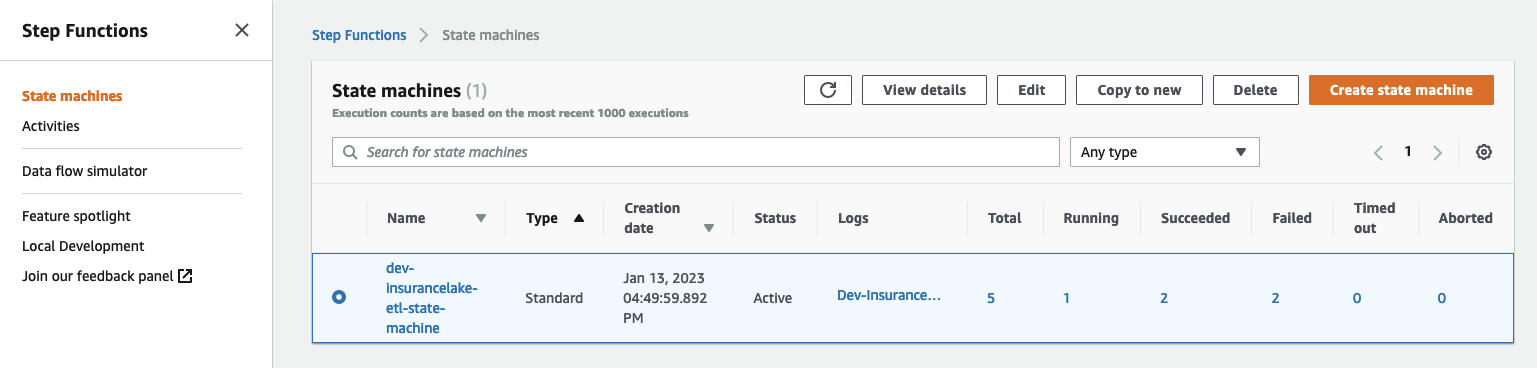
- Open the state machine execution in progress and monitor the status until completed
- Open Athena in the AWS Console
- Select Launch Query Editor, and change the Workgroup to
insurancelake - Run the following query to view a sample of prepared data in the consume bucket:
select * from syntheticgeneraldata_consume.policydata limit 100
- Take the InsuranceLake Deep Dive Workshop
- You may skip to the Modify and test a transform step, as the prior steps overlap with the Quickstart instructions
- Try out loading your own data
- Try the Quickstart with CI/CD
- Dive deeper with the included user documentation
- Contact your AWS account team for a solution deep dive, workshops, or Professional Services support
If you've determined the AWS CDK InsuranceLake is a good starting point for your own InsuranceLake, and would like to rapidly iterate through development cycles with one or more teams, we recommend deploying with a CI/CD pipeline. Follow this guide to create your CodePipeline stack and to use it to deploy the InsuranceLake resources:
- If this is your first time using the application, follow the Python/CDK Basics steps
- Use a terminal or command prompt and change the working directory to the location of the infrastruture code
cd aws-insurancelake-infrastructure - In
lib/configuration.py, review thelocal_mappingstructure in theget_local_configuration()function- Specifically, the regions and account IDs should make sense for your environments. These values, in the repository (not locally), will be used by CodeCommit and need to be maintained in the repository.
- The values for the Test and Production environments can be ommitted at this time, because we will only be deploying the Deployment and Development environments.
- We want to explicitly specify the account and region for each deployment environment so that the infrastructure VPCs get 3 Availability Zones (if the region has them available). Reference
- Deploy CodeCommit repository stack
cdk deploy Deploy-InsuranceLakeInfrastructureMirrorRepository
- If you plan to use CodeCommit as the main repository, install the Git CodeCommit Helper:
sudo pip install git-remote-codecommit
- Initialize git, create a develop branch, perform initial commit, and push to remote
- We are using the develop branch because the Dev environment deployment is triggered by commits to the develop branch.
- Edit the repository URL to correspond to your version control system if you are not using CodeCommit
git init
git branch -M develop
git add .
git commit -m 'Initial commit'
git remote add origin codecommit::us-east-2://aws-insurancelake-infrastructure
git push --set-upstream origin develop
- Deploy Infrastructure CodePipeline resource in the development environment (1 stack)
cdk deploy Dev-InsuranceLakeInfrastructurePipeline
- Review and accept IAM credential creation for the CodePipeline stack
- Wait for deployment to finish (approx. 5 mins)
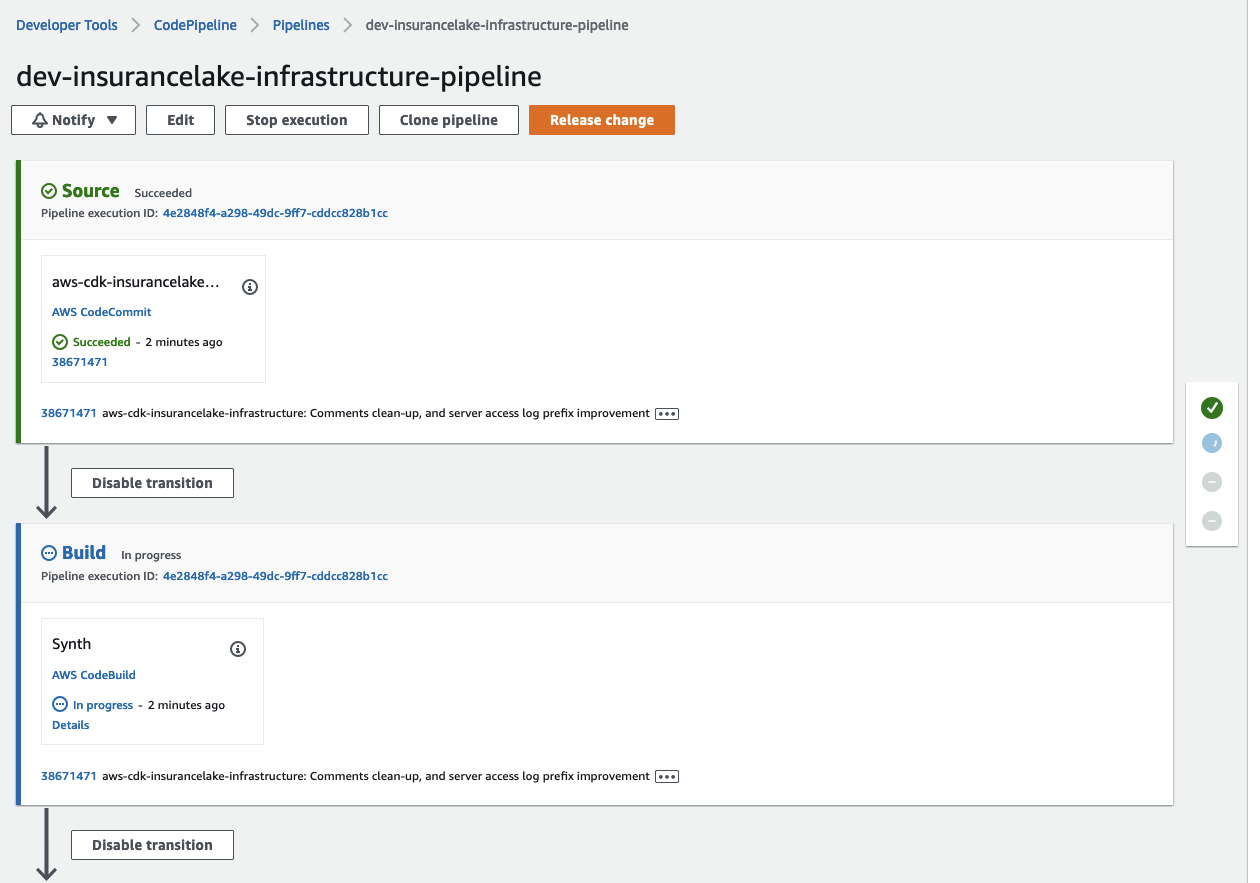
- Open CodePipeline in the AWS Console and select the
dev-insurancelake-infrastructure-pipelinePipeline- The first run of the pipeline starts automatically after the Pipeline stack is deployed.
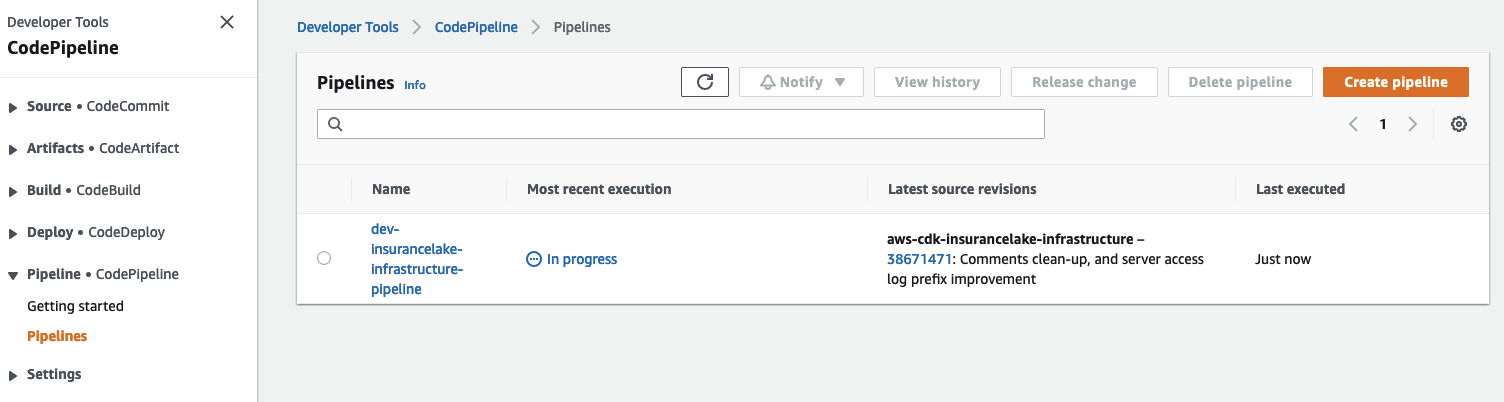
- The first run of the pipeline starts automatically after the Pipeline stack is deployed.
- Monitor the status of the pipeline until completed
- Switch the working directory to the location of the etl code
cd ../aws-insurancelake-etl - In
lib/configuration.py, review thelocal_mappingstructure in theget_local_configuration()function, ensure this matches the Infrastructure configuration, or differs if specifically needed. - Deploy CodeCommit repository stack
cdk deploy Deploy-InsuranceLakeEtlMirrorRepository
- Initialize git, create a develop branch, perform initial commit, and push to remote
- We are using the develop branch because the Dev environment deployment is triggered by commits to the develop branch.
- Edit the repository URL to correspond to your version control system if you are not using CodeCommit
git init
git branch -M develop
git add .
git commit -m 'Initial commit'
git remote add origin codecommit::us-east-2://aws-insurancelake-etl
git push --set-upstream origin develop
- Deploy ETL CodePipeline resource in the development environment (1 stack)
cdk deploy Dev-InsuranceLakeEtlPipeline
- Review and accept IAM credential creation for the CodePipeline stack
- Wait for deployment to finish (approx. 5 mins)
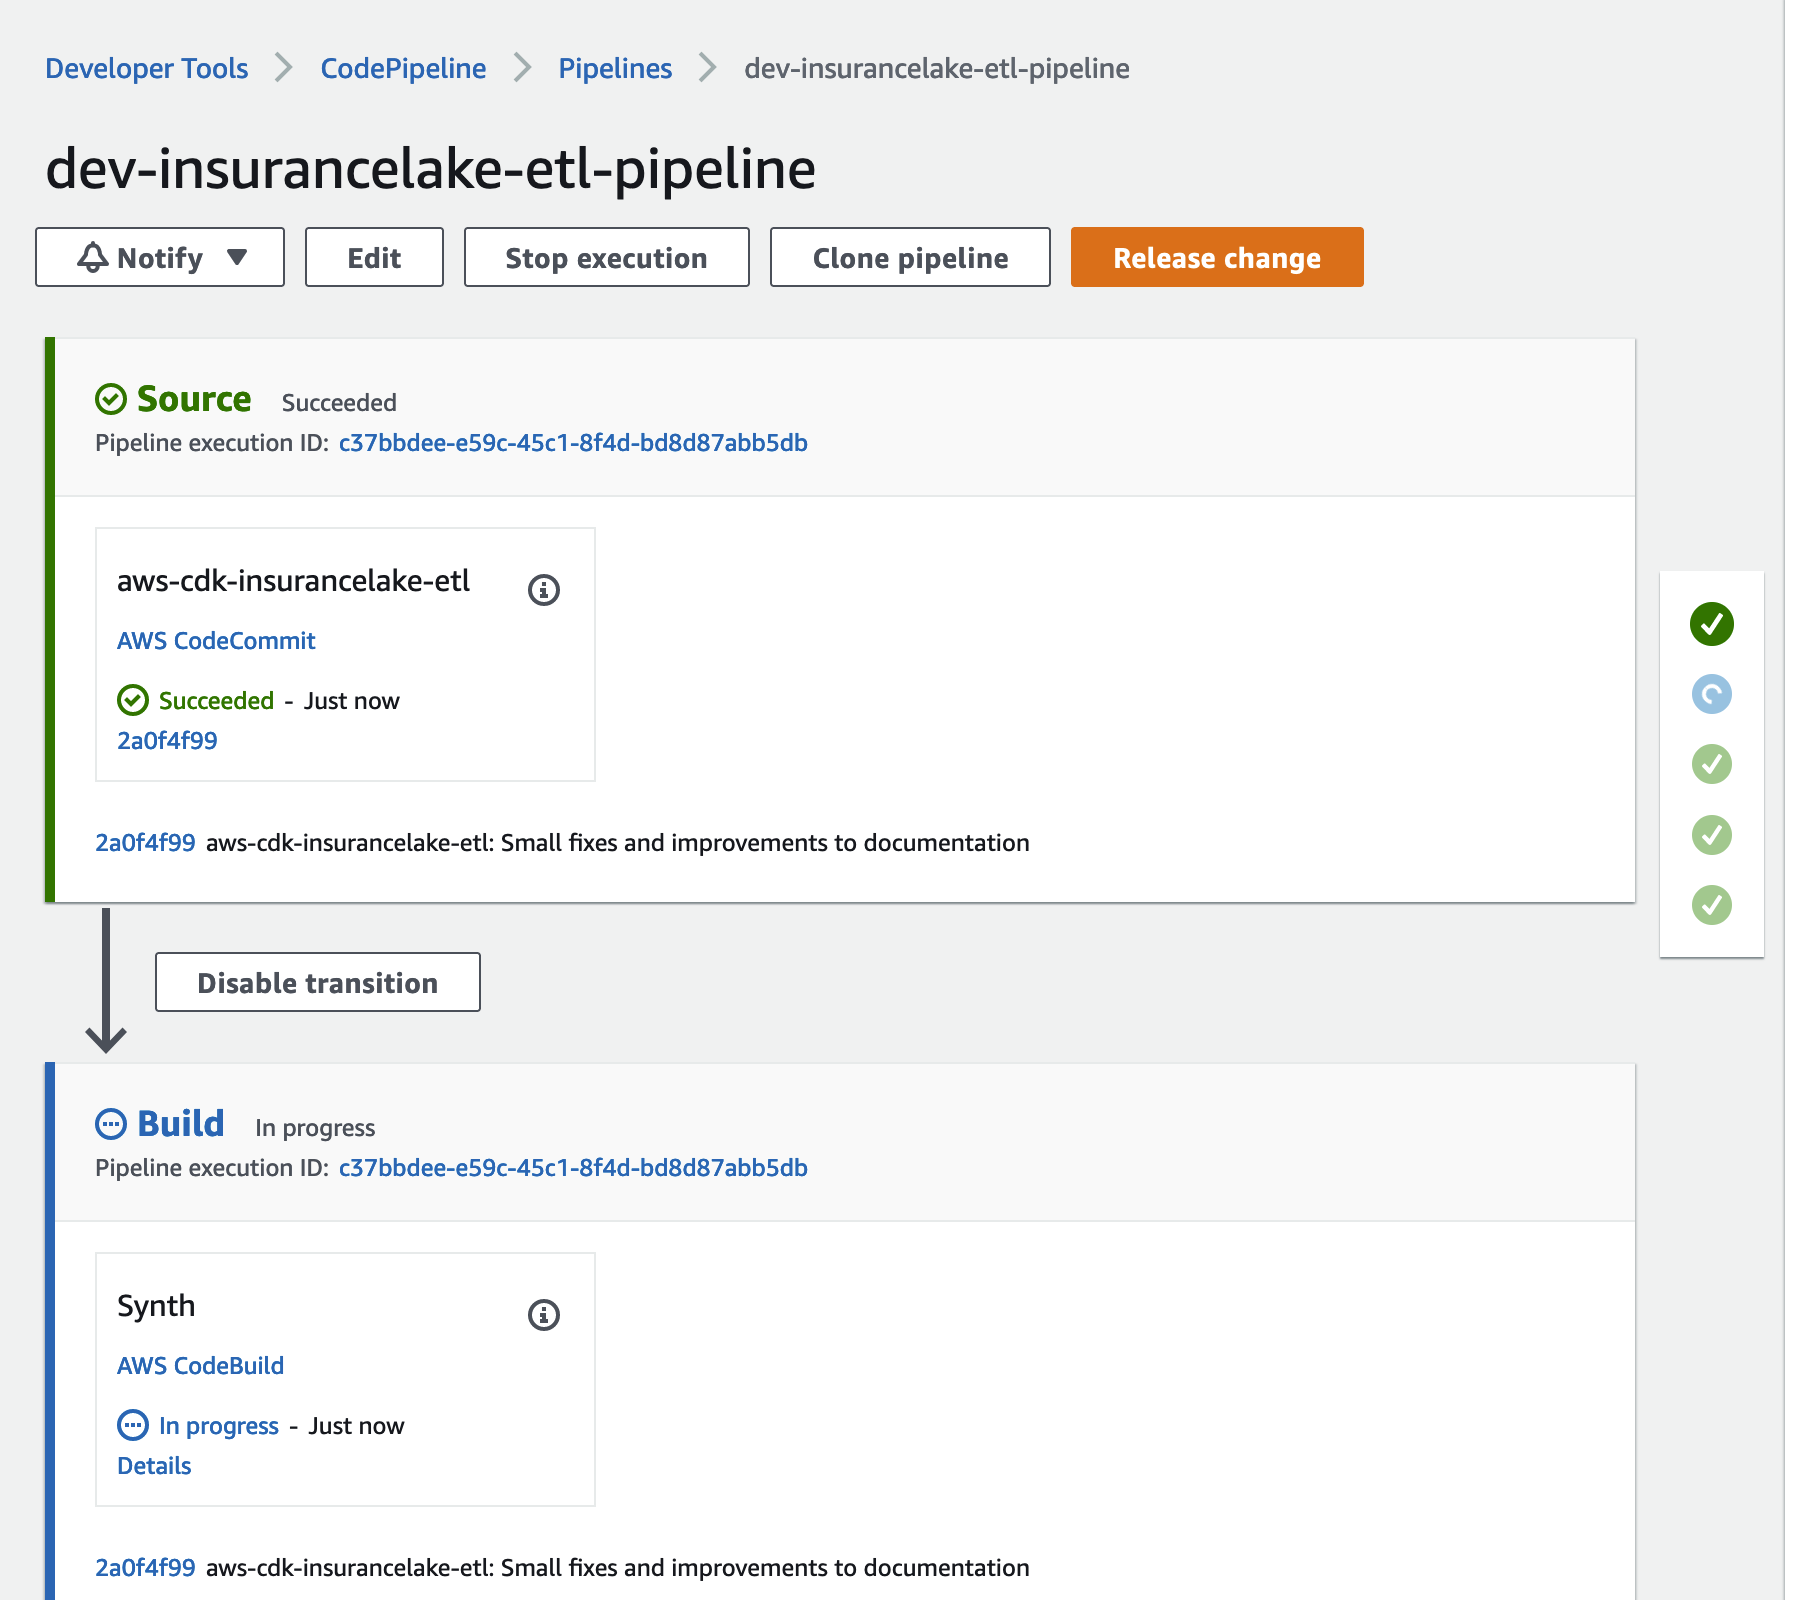
- Open CodePipeline in the AWS Console and select the
dev-insurancelake-etl-pipelinePipeline- The first run of the pipeline starts automatically after the Pipeline stack is deployed.
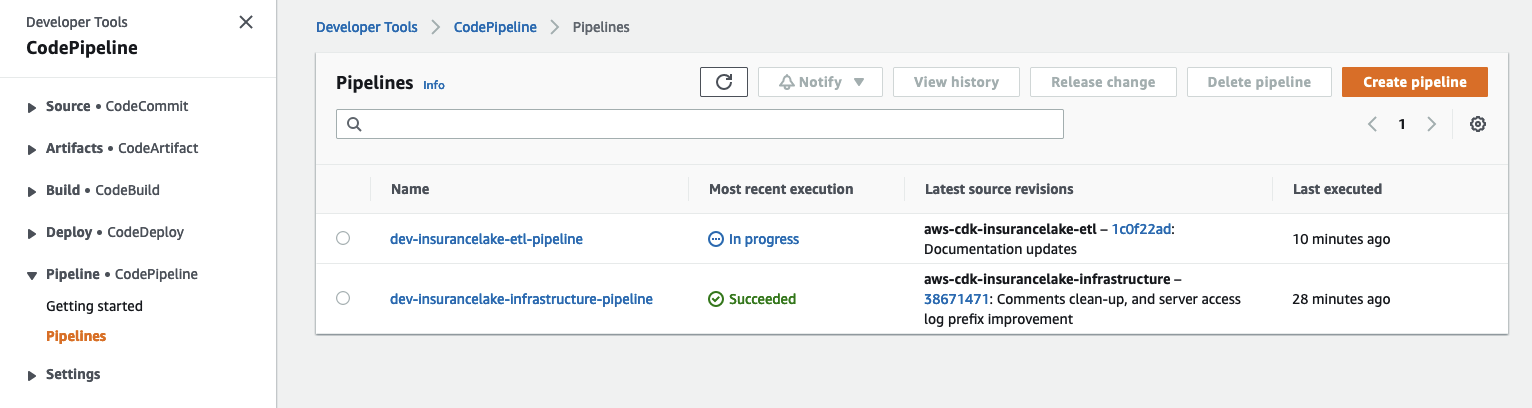
- The first run of the pipeline starts automatically after the Pipeline stack is deployed.
- Monitor the status of the pipeline until completed
-
Transfer the sample claim data to the Collect bucket (Source system: SyntheticData, Table: ClaimData)
aws s3 cp resources/syntheticgeneral-claim-data.csv s3://<Collect S3 Bucket>/SyntheticGeneralData/ClaimData/
-
Transfer the sample policy data to the Collect bucket (Source system: SyntheticData, Table: PolicyData)
aws s3 cp resources/syntheticgeneral-policy-data.csv s3://<Collect S3 Bucket>/SyntheticGeneralData/PolicyData/
-
Upon successful load of file S3 event notification will trigger the state-machine-trigger Lambda function
-
This Lambda function will insert a record into the DynamoDB table
{environment}-{resource_name_prefix}-etl-job-auditto track job start status -
The Lambda function will also trigger the Step Functions State Machine. The State Machine execution name will be
<filename>-<YYYYMMDDHHMMSSxxxxxx>and have the required metadata as input parameters -
The State Machine will trigger the Glue job for Collect to Cleanse data processing
-
The Collect to Cleanse Glue job will execute the transformation logic defined in configuration files
-
Glue job will load the data into the Cleanse bucket using the provided metadata and data will be stored in S3 as
s3://{environment}-{resource_name_prefix}-{account}-{region}-cleanse/syntheticgeneraldata/claimdata/year=YYYY/month=MM/day=DDin Apache Parquet format -
Glue job will create/update the Glue Catalog table using the table name passed as parameter based on folder name (
PolicyDataandClaimData) -
After the Collect to Cleanse job completes, the State Machine will trigger the Cleanse to Consume Glue job
-
The Cleanse to Consume Glue job will execute the SQL logic defined in configuration files
-
The Cleanse to Consume Glue job will store the resulting data set in S3 as
s3://{environment}-{resource_name_prefix}-{account}-{region}-consume/syntheticgeneraldata/claimdata/year=YYYY/month=MM/day=DDin Apache Parquet format -
The Cleanse to Consume Glue job will create/update the Glue Catalog table
-
After successful completion of the Cleanse to Consume Glue job, the State Machine will trigger the etl-job-auditor Lambda function to update the DynamoDB table
{environment}-{resource_name_prefix}-etl-job-auditwith the latest status -
An SNS notification will be sent to all subscribed users
-
To validate the data, use the Athena and execute the following query:
select * from syntheticgeneraldata_consume.policydata limit 100
Refer to the CDK Instructions, Cleanup section.
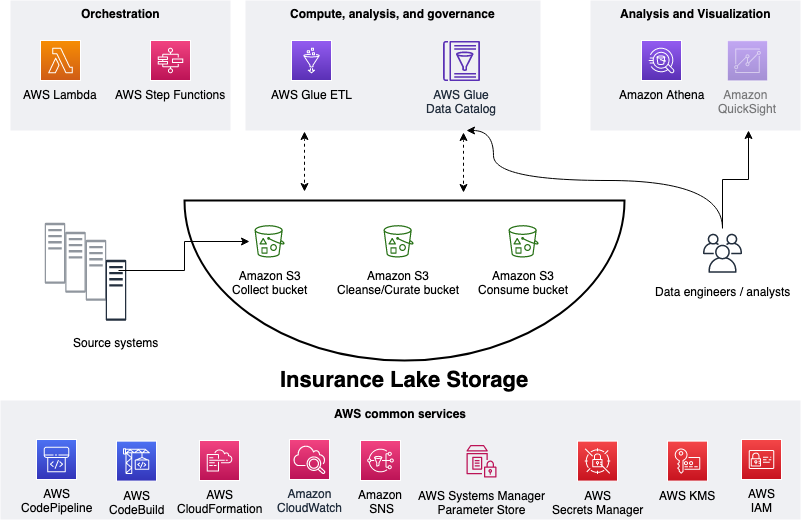
In this section we talk about the overall InsuranceLake architecture and the ETL component.
As shown in the figure below, we use Amazon S3 for storage. We use three S3 buckets: 1. Collect bucket to store raw data in its original format 1. Cleanse/Curate bucket to store the data that meets the quality and consistency requirements of the lake 1. Consume bucket for data that is used by analysts and data consumers of the lake (for example, Amazon Quicksight, Amazon Sagemaker)
InsuranceLake is designed to support a number of source systems with different file formats and data partitions. To demonstrate, we have provided a CSV parser and sample data files for a source system with two data tables, which are uploaded to the Collect bucket.
We use AWS Lambda and AWS Step Functions for orchestration and scheduling of ETL workloads. We then use AWS Glue with pySpark for ETL and data cataloging, Amazon DynamoDB for transformation persistence, Amazon Athena for interactive queries and analysis. We use various AWS services for logging, monitoring, security, authentication, authorization, notification, build, and deployment.
Note: AWS Lake Formation is a service that makes it easy to set up a secure data lake in days. Amazon QuickSight is a scalable, serverless, embeddable, machine learning-powered business intelligence (BI) service built for the cloud. Amazon DataZone is a data management service that makes it faster and easier for customers to catalog, discover, share, and govern data stored across AWS, on premises, and third-party sources. These three services are not used in this solution but can be added.
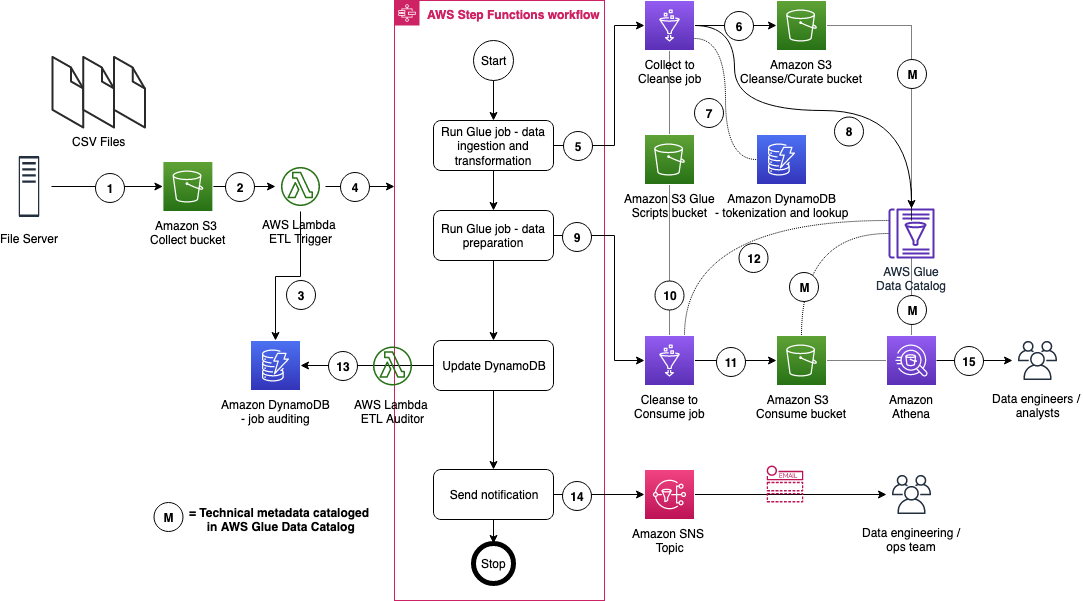
The figure below represents the ETL resources we provision for the data lake.
- A file server uploads files to S3 collect bucket of InsuranceLake; file server is a data producer/source for the data lake
- Amazon S3 triggers an ObjectCreated event notification to AWS Lambda Function
- AWS Lambda function inserts job information in DynamoDB table
- AWS Lambda function starts an execution of AWS Step Functions State machine
- Runs the first Glue job: initiates data processing from Collect to Cleanse
- Glue job: Spark Glue job will process the data from Collect to Cleanse; source data is assumed to be in CSV format and will be converted to Parquet format
- DynamoDB: Glue job tokenization will store original values, and lookup tables reside in database
- After creating Parquet data, update the Glue Data Catalog table
- Runs the second Glue job: initiates data processing from Cleanse to Consume
- Glue job: Cleanse to Consume fetches data transformation rules from Glue scripts bucket, and runs transformations
- Stores the result in Parquet format in Consume bucket
- Glue job updates the Data Catalog table
- Updates DynamoDB table with job status
- Sends SNS notification
- Data engineers or analysts analyze data using Amazon Athena
For more information on how AWS services come together in InsuranceLake to align with the Security Pillar of the AWS Well-Architected Framework refer to the InsuranceLake Well-Architected Pillar Alignment for Security.
InsuranceLake uses CDK-nag to ensure AWS resource security recommendations are followed. CDK-nag can generate warnings, which may need to be fixed depending on the context, and errors, which will interrupt the stack synthesis and prevent any deployment.
To force synthesis of all stacks (including the CodePipeline deployed stacks), which will check all code and generate all reports, use the following command:
cdk synth '**'When this operation is complete, you will also have access to the CDK-nag reports in CSV format in the cdk.out directory and assembly directories.
By default the AWS Solutions Rules Pack is used, but any combination of CDK Nag Rules packs can be selected by adjusting the source code in four locations (two for both the Infrastructure and ETL codebases):
Infrastructure app.py Line 21, ETL app.py Line 20:
# Enable CDK Nag for the Mirror repository, Pipeline, and related stacks
# Environment stacks must be enabled on the Stage resource
cdk.Aspects.of(app).add(AwsSolutionsChecks())
Infrastructure pipeline_stack.py Line 148, ETL pipeline_stack.py Line 147
        # Enable CDK Nag for environment stacks before adding to
        # pipeline, which are deployed with CodePipeline
cdk.Aspects.of(pipeline_deploy_stage).add(AwsSolutionsChecks())InsuranceLake uses Bandit and Amazon CodeGuru for static code analysis of all helper scripts, Lambda functions, and PySpark Glue Jobs.
To configure CodeGuru Code Reviews, follow the AWS Documentation on creating Code Reviews.
To scan all application code using bandit, use the following command:
bandit -r --ini .banditWhen this operation is complete, you will also have access to the CDK-nag reports in CSV format in the cdk.out directory and assembly directories.
- InsuranceLake Quickstart AWS Workshop
- InsuranceLake Deep Dive AWS Workshop
- General Insurance dashboard on Quicksight's DemoCentral using Consume-ready-data
- Life Insurance dashboard also on Quicksight's DemoCentral
- AWS Solutions Library Guidance for Modern Insurance Data Lakes
- InsuranceLake in the AWS Well-Architected Framework Financial Services Industry Lens
The following people are involved in the design, architecture, development, testing, and review of this solution:
- Cory Visi, Senior Solutions Architect, Amazon Web Services
- Ratnadeep Bardhan Roy, Senior Solutions Architect, Amazon Web Services
- Isaiah Grant, Cloud Consultant, 2nd Watch, Inc.
- Muhammad Zahid Ali, Data Architect, Amazon Web Services
- Ravi Itha, Senior Data Architect, Amazon Web Services
- Justiono Putro, Cloud Infrastructure Architect, Amazon Web Services
- Mike Apted, Principal Solutions Architect, Amazon Web Services
- Nikunj Vaidya, Senior DevOps Specialist, Amazon Web Services
This sample code is made available under the MIT-0 license. See the LICENSE file.
Copyright Amazon.com and its affiliates; all rights reserved. This file is Amazon Web Services Content and may not be duplicated or distributed without permission.