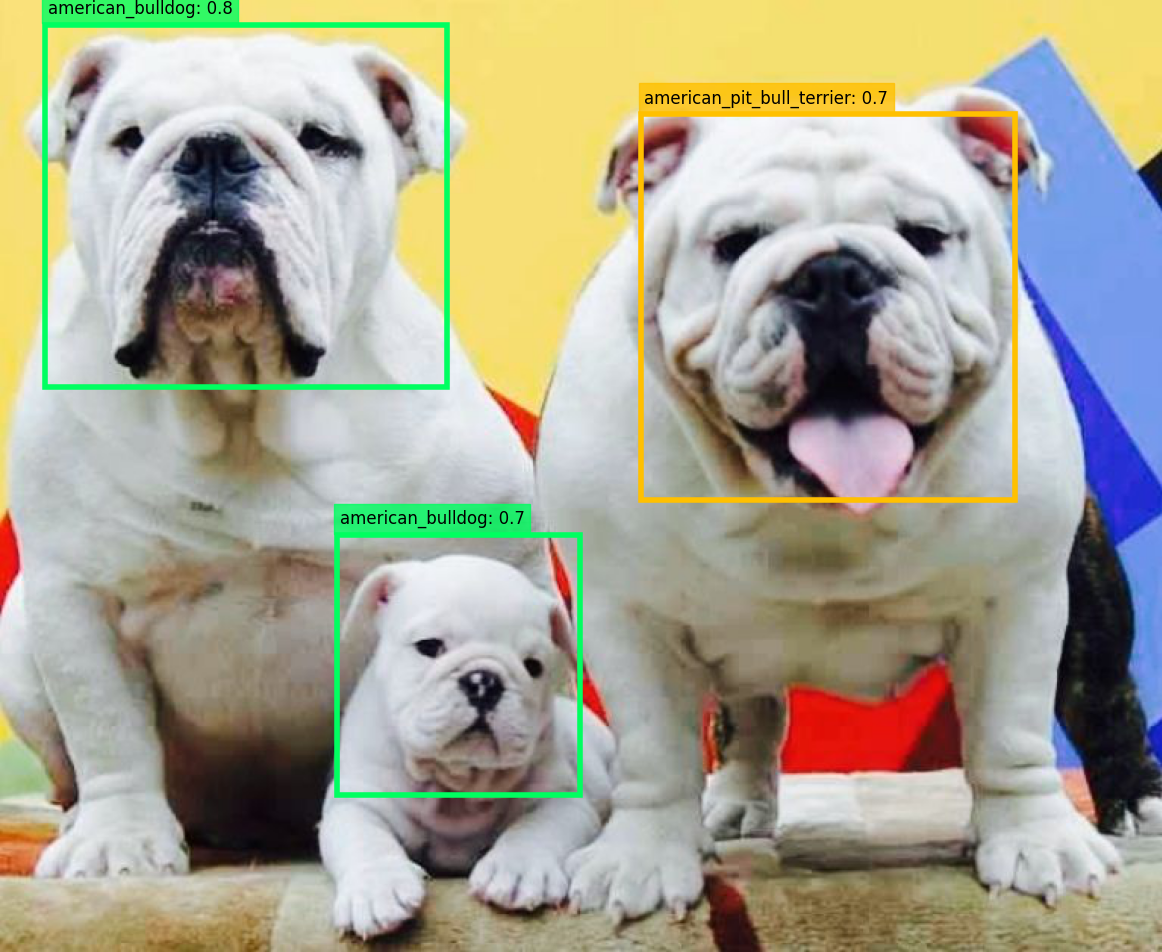
Using a RetinaNet to detect faces of common breeds of Pets.
Go to this link to preview the web app !
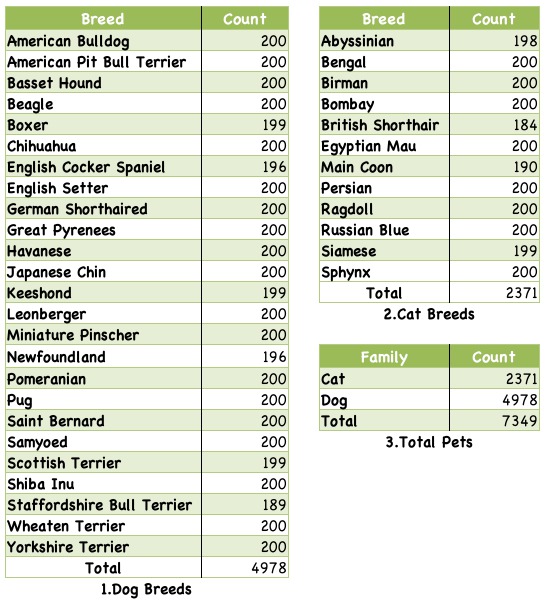
The model not only detects faces of the pets but also classifies the face breed of the animal.The model has been trained on the these following breeds :
This project is built on top of :
For training the models The Oxford-IIIT Pet Dataset has been used which can be found here. Two pretrained models for detections are availabel : (RetinaNet with resnet50 backbone) and (RetinaNet with resnet34 backbone). These pretraned-models can be selected via the .ymal files present in the config/ dir.
- Parse the data and convert it to a managable format ex: CSV.
- Finish Retinanet Project first.
- Train the Network.
- Create WebApp using
StreamLit. - Notebooks & Scripts for Train.
- Deploy WebApp . Link to the app : https://share.streamlit.io/benihime91/retinanet_pet_detector/app.py
- Google Colab Notebook with free GPU:
- Kaggle Notebook with free GPU: https://www.kaggle.com/benihime91/demo-nb
- Install python3
- Install dependencies
$ git clone --recurse-submodules -j8 https://github.com/benihime91/retinanet_pet_detector.git $ cd retinanet_pet_detector $ pip install -r requirements.txt - Run app
$ streamlit run app.py
Python 3.8 or later with all requirements.txt dependencies installed, including torch>=1.6. To install run:
$ pip install -r requirements.txt$ python inference.py \
--config "config/resnet34.yaml"\
--image "/content/oxford-iiit-pet/images/german_shorthaired_128.jpg" \
--save_dir "/content/" \
--fname "res_1.png" \or
$ python inference.py \
      --config "config/resnet50.yaml"\
      --image "/content/oxford-iiit-pet/images/german_shorthaired_128.jpg" \
      --save_dir "/content/" \
--fname "res_1.png" \Flags:
 $ python inference.py --help
    usage: inference.py [-h] [--config CONFIG] --image IMAGE
                    [--score_thres SCORE_THRES] [--iou_thres IOU_THRES]
                    [--md MD] [--save SAVE] [--show SHOW]
                    [--save_dir SAVE_DIR] [--fname FNAME]

    optional arguments:
      -h, --help            show this help message and exit
      --config CONFIG       path to the config file
      --image IMAGE         path to the input image
      --score_thres SCORE_THRES
                            score_threshold to threshold detections
      --iou_thres IOU_THRES
                            iou_threshold for bounding boxes
      --md MD               max detections in the image
      --save SAVE           wether to save the ouput predictions
      --show SHOW           wether to display the output predicitons
      --save_dir SAVE_DIR   directory where to save the output predictions
      --fname FNAME         name of the output prediction file
-
Clone the Repo:
$ git clone --recurse-submodules -j8 https://github.com/benihime91/retinanet_pet_detector.git $ cd retinanet_pet_detector -
Ensure all requirements are installed. To train on GPU need to install PyTroch GPU build. Download it from here. Then commment the first 2 lines from
requirements.txt. After that$ pip install -r requirements.txt
-
Download the dataset from here.
-
After downloading the dataset . Run the
references/data_utils.pyto convert the xml annotations into csv file and also create train, validation and test splits.$ python prep_data.py --help usage: prep_data.py [-h] [--action {create,split}] [--img_dir IMG_DIR] [--annot_dir ANNOT_DIR] [--labels LABELS] [--csv CSV] [--valid_size VALID_SIZE] [--test_size TEST_SIZE] [--output_dir OUTPUT_DIR] [--seed SEED] optional arguments: -h, --help show this help message and exit --action {create,split} --img_dir IMG_DIR path to the image directory --annot_dir ANNOT_DIR path to the annotation directory --labels LABELS path to the label dictionary --csv CSV path to the csv file --valid_size VALID_SIZE size of the validation set relative to the train set --test_size TEST_SIZE size of the test set relative to the validation set --output_dir OUTPUT_DIR path to the output csv file --seed SEED random seedThis commmand converts the xml to csv files. Change the
--img_dirto the path where the dataset images are stored,--annot_dirto the path where the xml annotation are stored &--labelsto where thelabel.namesfile is stored.label.namesis stored indata/labels.names. The csv file will be saved in--output_dirasdata-full.csv.$ python prep_data.py.py \ --action create \ --img_dir "/content/oxford-iiit-pet/images" \ --annot_dir "/content/oxford-iiit-pet/annotations/xmls" \ --labels "/content/retinanet_pet_detector/data/labels.names" \ --output_dir "/content/retinanet_pet_detector/data/"Run this command to convert training, valiation and test splits.
The datasets will be saved in--output_dirastrain.csv,valid.csvandtest.csv.
Set the--csvargument to the path todata-full.csvgenerated above.
You can also set a seed by passing in the--seedargument to insure that results reproducibility.$ python prep_data.py.py \ --action split \ --csv "/content/retinanet_pet_detector/data/data-full.csv"\ --valid_size 0.3 \ --test_size 0.5 \ --output_dir "/content/retinanet_pet_detector/data/" --seed 123 -
Training is controlled by the
main.yamlfile. Before training ensures that the paths inmain.yaml: (hparams.train_csv,hparams.valid_csv,hparams.valid_csv) are the correct paths to the files generated above.
Ifnot trainingon GPU change these arguments:trainer.gpus= 0trainer.precision= 32
In the same the other flags in
main.yamlcan be modified. -
To train run this command. The
--configargument points to the path to where themain.yamlfile is saved.$ python train.py \ --config "/content/retinanet_pet_detector/config/main.yaml" \ --verbose 0 \Model weights are automatically saved as
state_dicts()in thefilepathspecifed intrainer.model_checkpoint.params.filepathinmain.yamlasweights.pth -
For inference modify the
config/34.yamlorconfig/resnet50.yamlfile . Set theurlto be the path where the weights are saved. Example:checkpoints/weights.pth.--config: corresponds to the path where theconfig/resnet34.yamlorconfig/resnet50.yamlfile is saved.--image: corresponds to the path of theimage.- Results are saved as
{save_dir}/{fname}.
$ python inference.py \
    --config "/content/retinanet_pet_detector/config/resnet50.yaml"\
    --image "/content/oxford-iiit-pet/images/german_shorthaired_128.jpg"\
    --score_thres 0.7 \
    --iou_thres 0.4 \
    --save_dir "/content/" \
    --fname "res_1.png" \
or
$ python inference.py \ --config "/content/retinanet_pet_detector/config/resnet34.yaml" \ --image "/content/oxford-iiit-pet/images/german_shorthaired_128.jpg" \ --save_dir "/content/" \ --fname "res_1.png" \ -
To view tensorboard logs:
$ tensorboard --logdir "logs/"
-
Results for RetinaNet model with resnet34 backbone:
[09/19 13:37:58 references.lightning]: Evaluation results for bbox:
IoU metric: bbox
 Average Precision  (AP) @[ IoU=0.50:0.95 | area=   all | maxDets=100 ] = 0.576
 Average Precision  (AP) @[ IoU=0.50      | area=   all | maxDets=100 ] = 1.000
 Average Precision  (AP) @[ IoU=0.75      | area=   all | maxDets=100 ] = 0.608
 Average Precision  (AP) @[ IoU=0.50:0.95 | area= small | maxDets=100 ] = -1.000
 Average Precision  (AP) @[ IoU=0.50:0.95 | area=medium | maxDets=100 ] = 0.500
 Average Precision  (AP) @[ IoU=0.50:0.95 | area= large | maxDets=100 ] = 0.576
 Average Recall     (AR) @[ IoU=0.50:0.95 | area=   all | maxDets=  1 ] = 0.544
 Average Recall     (AR) @[ IoU=0.50:0.95 | area=   all | maxDets= 10 ] = 0.624
 Average Recall     (AR) @[ IoU=0.50:0.95 | area=   all | maxDets=100 ] = 0.624
 Average Recall     (AR) @[ IoU=0.50:0.95 | area= small | maxDets=100 ] = -1.000
 Average Recall     (AR) @[ IoU=0.50:0.95 | area=medium | maxDets=100 ] = 0.500
 Average Recall     (AR) @[ IoU=0.50:0.95 | area= large | maxDets=100 ] = 0.628
-
Results for RetinaNet model with resnet50 backbone:
[09/20 12:39:13 references.lightning]: Evaluation results for bbox:
IoU metric: bbox
 Average Precision  (AP) @[ IoU=0.50:0.95 | area=   all | maxDets=100 ] = 0.600
 Average Precision  (AP) @[ IoU=0.50      | area=   all | maxDets=100 ] = 0.979
 Average Precision  (AP) @[ IoU=0.75      | area=   all | maxDets=100 ] = 0.604
 Average Precision  (AP) @[ IoU=0.50:0.95 | area= small | maxDets=100 ] = -1.000
 Average Precision  (AP) @[ IoU=0.50:0.95 | area=medium | maxDets=100 ] = -1.000
 Average Precision  (AP) @[ IoU=0.50:0.95 | area= large | maxDets=100 ] = 0.600
 Average Recall     (AR) @[ IoU=0.50:0.95 | area=   all | maxDets=  1 ] = 0.606
 Average Recall     (AR) @[ IoU=0.50:0.95 | area=   all | maxDets= 10 ] = 0.619
 Average Recall     (AR) @[ IoU=0.50:0.95 | area=   all | maxDets=100 ] = 0.619
 Average Recall     (AR) @[ IoU=0.50:0.95 | area= small | maxDets=100 ] = -1.000
 Average Recall     (AR) @[ IoU=0.50:0.95 | area=medium | maxDets=100 ] = -1.000
 Average Recall     (AR) @[ IoU=0.50:0.95 | area= large | maxDets=100 ] = 0.619


