[Embedded] enabling the cryptsetup on ramdisk
carloscn opened this issue · 1 comments
[Embedded] enabling the cryptsetup on ramdisk
Linux Unified Key Setup (LUKS) is a specification for block device encryption. It establishes an on-disk format for the data, as well as a passphrase/key management policy. LUKS uses the kernel device-mapper subsystem via the dm-crypt module. This arrangement provides a low-level mapping that handles encryption and decryption of the device's data. User-level operations, such as creating and accessing encrypted devices, are accomplished through the use of the cryptsetup utility1.
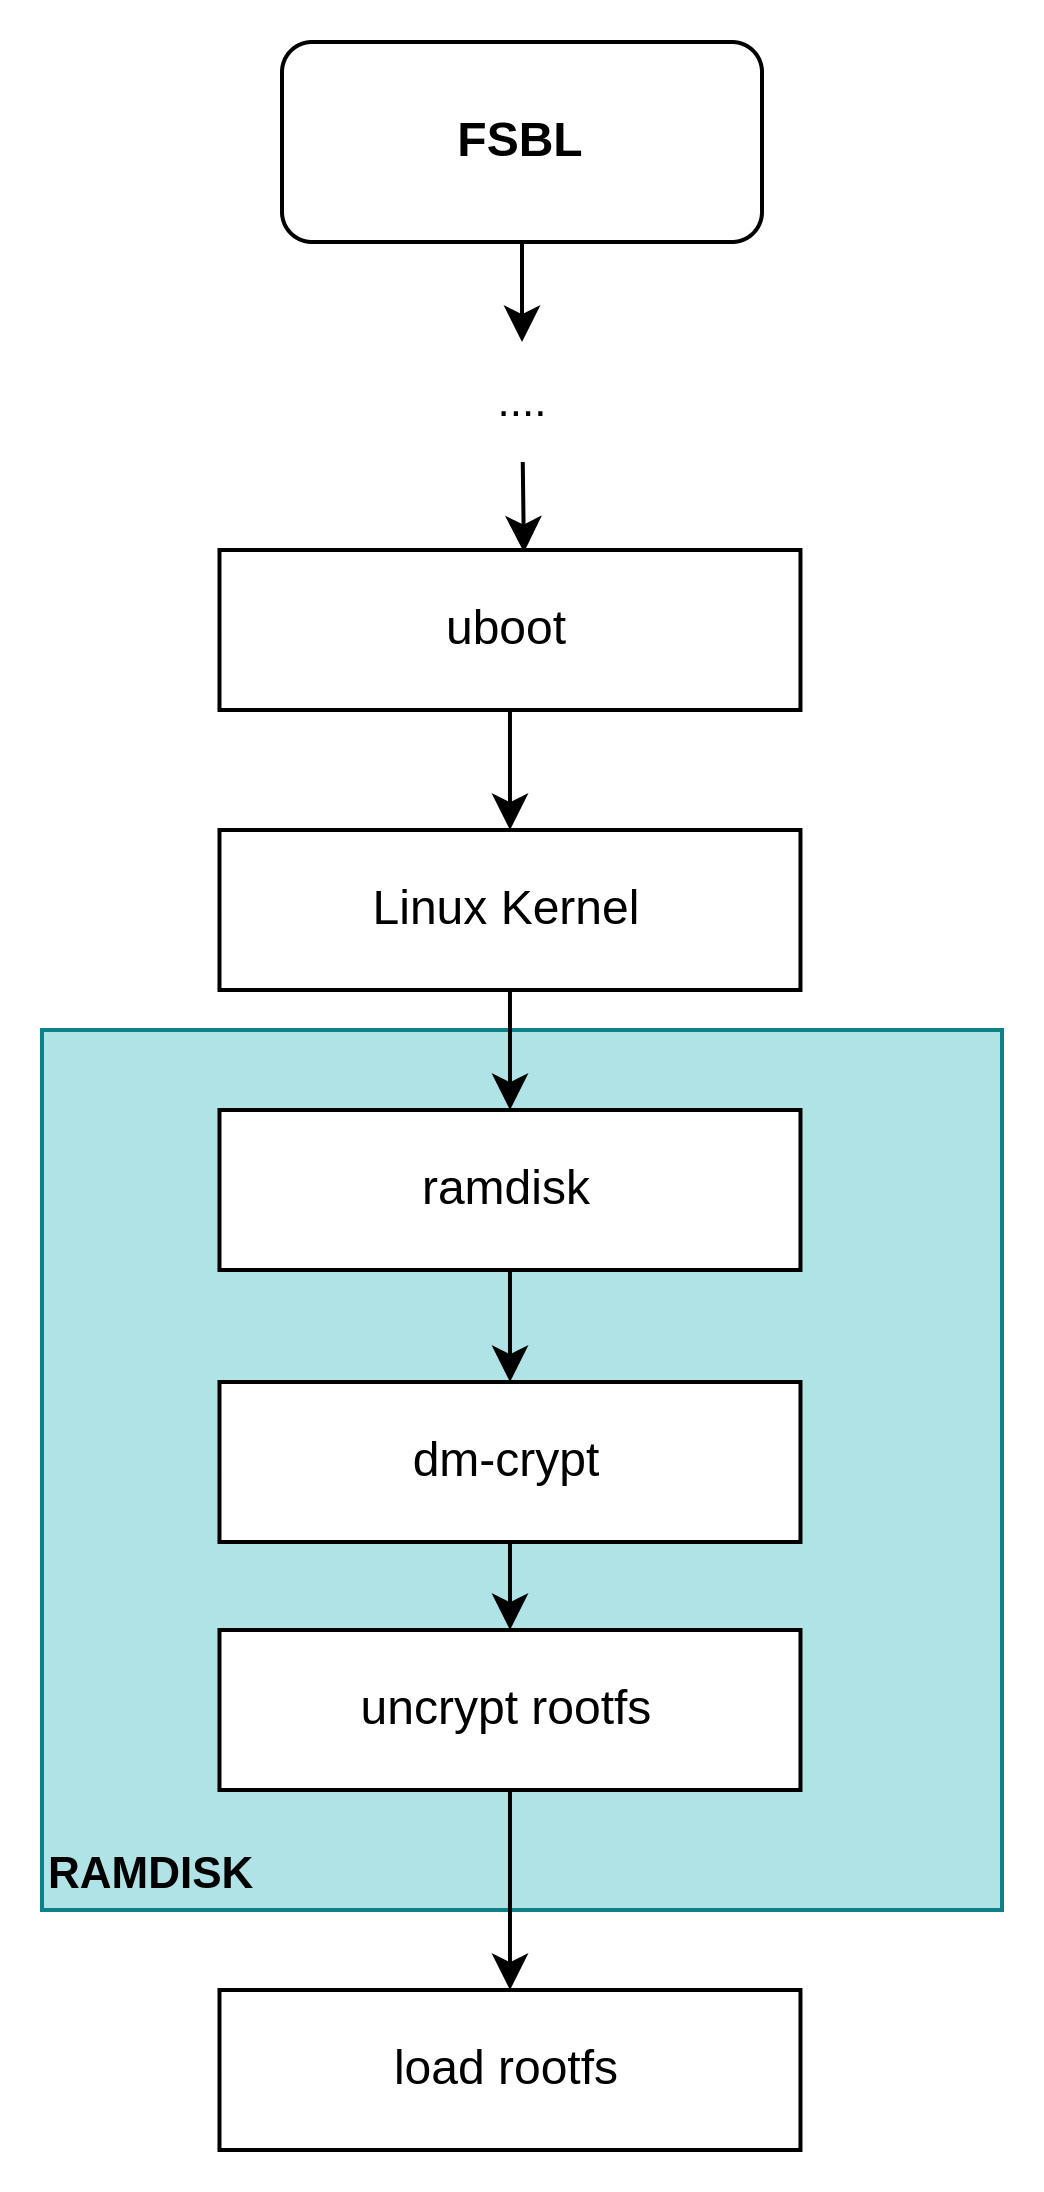
After the U-Boot loads and starts the Linux kernel, the Xilinx Linux can also use dm-crypt and cryptsetup, like the common Linux distribution. The dm-crypt and cryptsetup tools can help us encrypt the rootfs in real time. We use it in our platform as shown in the figure:
1. En/Decryption Principle
1.1 dm-crypt
The dm-crypt is a standard device-mapper encryption function provided by the Linux kernel. It is added to the kernel as a transparent hard disk encryption subsystem in Linux 2.6 to manage partitions and keys2. It is implemented in the form of a device mapper target, which means that it can be used as a block device to support file systems, swap partitions, or as an LVM (https://en.wikipedia.org/wiki/Logical_Volume_Manager_(Linux) ). It can encrypt the whole disk, pluggable devices, hard disk partitions, soft RAID (https://en.wikipedia.org/wiki/RAID ), logical volumes, and files (through a loop device) at the same time. In short, it is very flexible. For more information, please refer to https://wiki.archlinux.org/title/Dm-crypt.
1.2 cryptsetup
As the device mapper target, dm-crypt is all in the kernel and only responsible for the encryption and decryption of block devices. It relies on the user-mode front-end tool cryptsetup to help create encrypted volumes, manage key authorization, and so on. Cryptosetup can be used for the following types of block device encryption: LUKS (the default, namely the LUKS volume), plain (the normal dm-crypt volume), loop-AES, and Truecrypt (limited support). For more information, please refer to https://wiki.archlinux.org/title/Dm-crypt/Device_encryption#Cryptsetup_usage
1.3 LUKS
LUKS (Linux Unified Key Setup), the 2004 Linux hard disk encryption standard, specifies the compatible implementation interfaces for key management and other functions of various hard disk encryption software. The standard is based on the improvement of dm-crypt/cryptsetup, and the latter is the standard reference implementation of LUKS. Cryptosetup uses an additional encapsulation layer to implement the LUKS standard by default. It stores all the setting information required by dm-crypt on the disk itself and abstracts partition and key management to improve ease of use and encryption security. The common dm-crypt mode is the original kernel function without the encapsulation of the LUKS layer. It is difficult to use it to apply the same encryption strength. It is not recommended now. Therefore, dm-crypt/LUKS is the only de facto standard for Linux block device encryption. For more information, please refer to https://en.wikipedia.org/wiki/Linux_Unified_Key_Setup.
1.4 En/Decrypt Flow
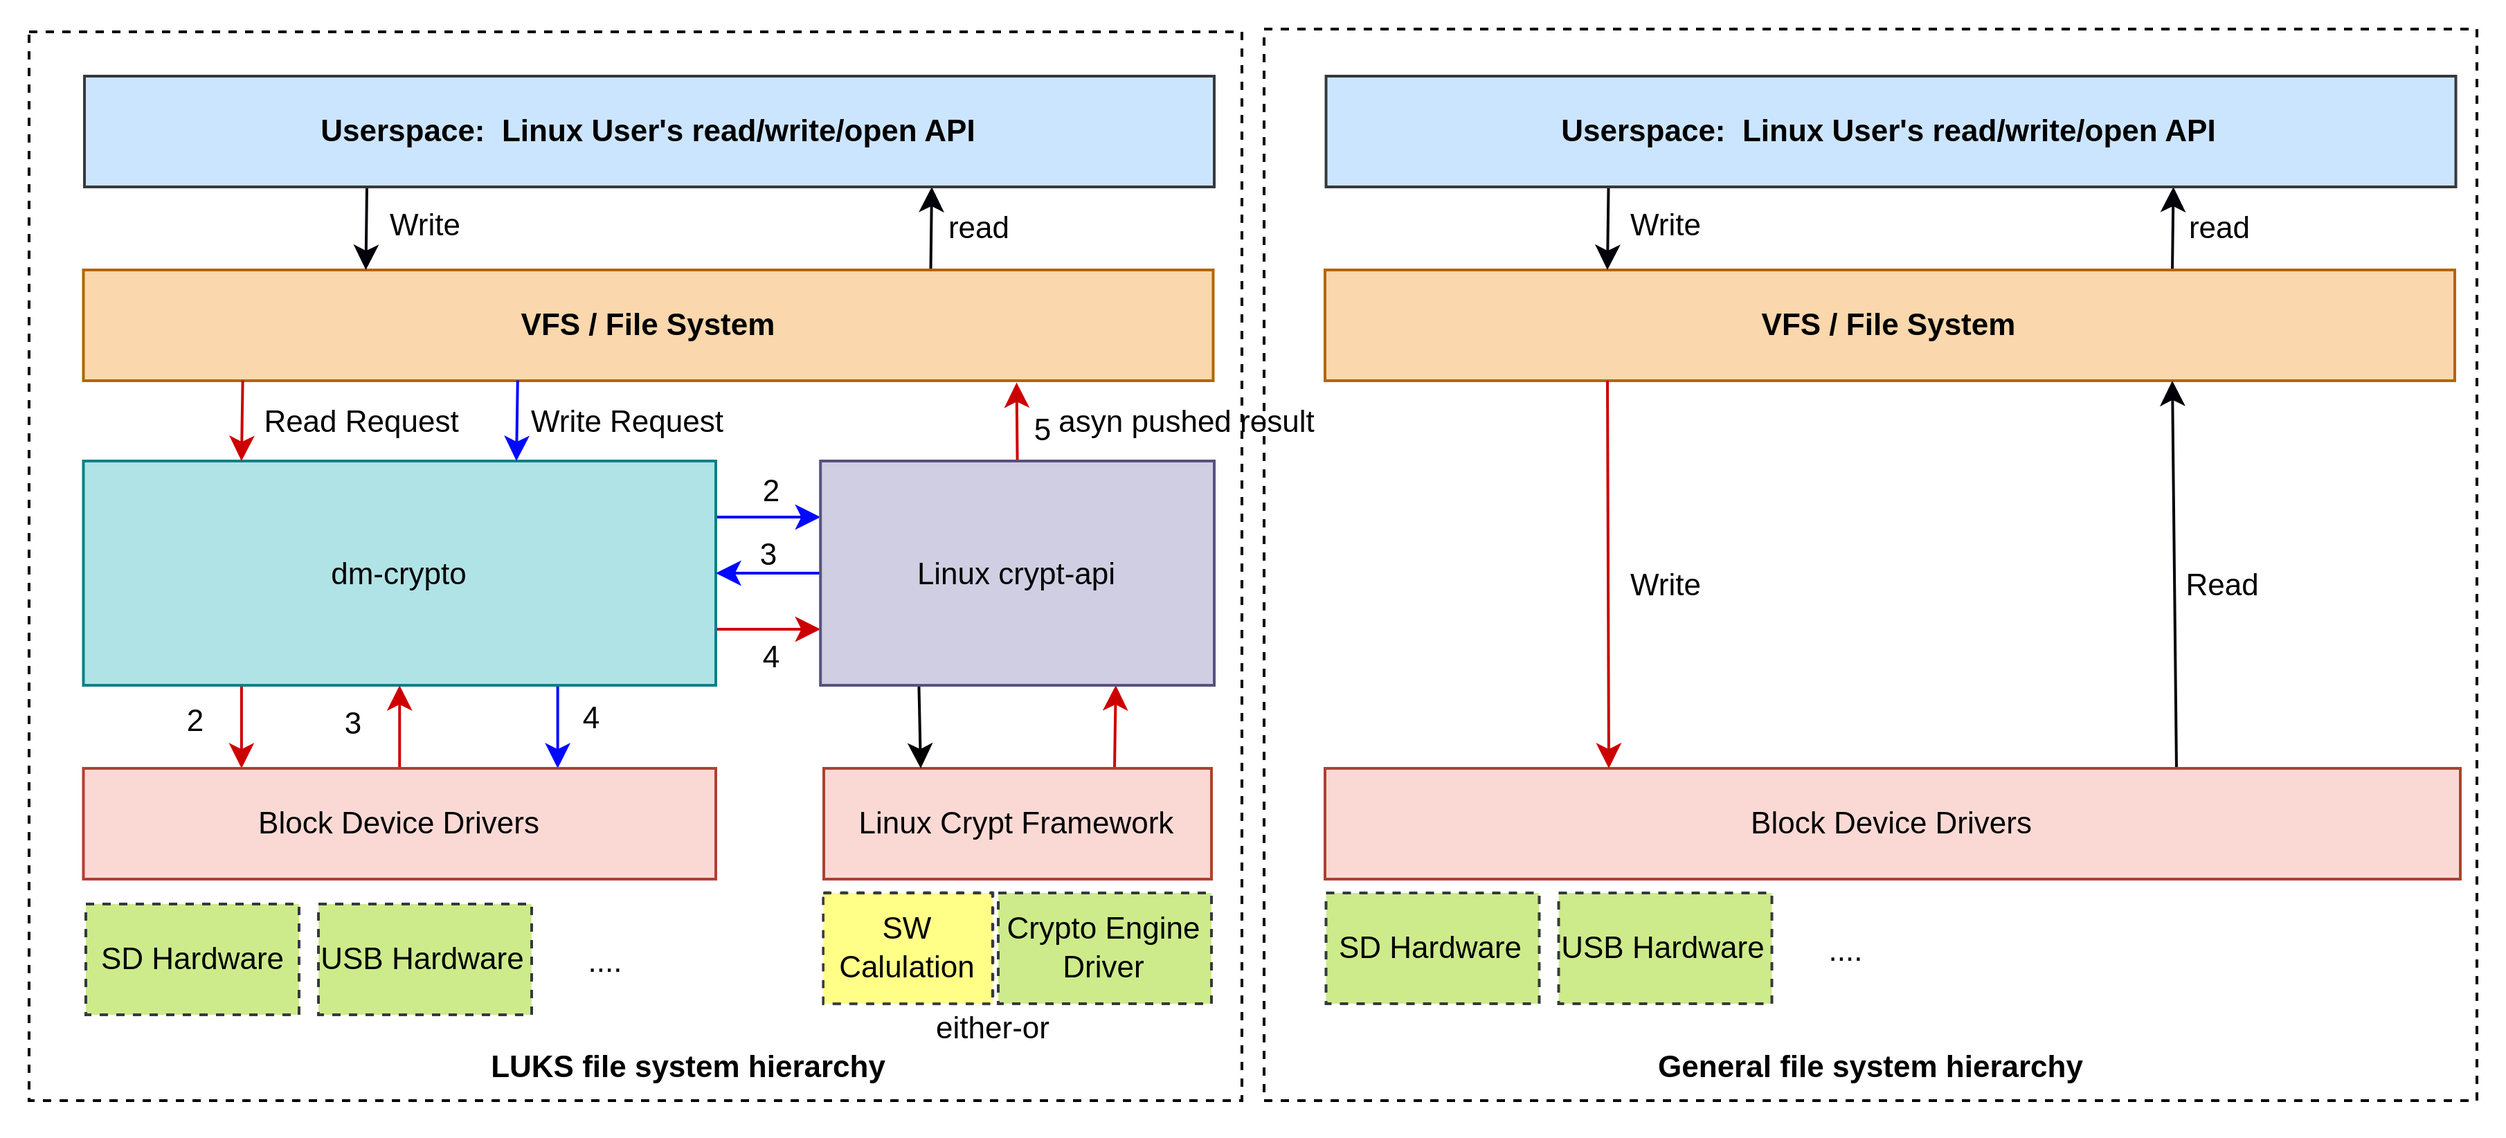
Dm-crypt does not directly perform real encryption and decryption processes but completes them asynchronously through the Linux Kernel Crypto API. The dm-crypt and the crypto-API modules work together to complete data read and write requests from the file system to the block device driver.
There is the Linux Crypt Framework for selecting software calculation or a crypto engine driver that uses the hardware accelerator for the Linux crypt-API 3.
For general file systems that are not recognized as LUKS by the Linux system, the corresponding structure is the right figure. For file systems that are recognized as LUKS by the Linux system, the corresponding structure is the left figure. Therefore, users cannot perceive the difference between encrypted and unencrypted partitions at the using level.
Written Request
The written request flow is written data to the dm-crypt module → calling Linux crypt-api to encrypt the data(2) → the Linux crypt-api returns the encrypted data to the dm-crypt(3) → dm-crypt writes the data to the Linux block device drivers.
Let's take a look at the more specific kernel process: dm-crypt When the file system issues a written request, dm-crypt does not process it immediately; instead, it puts it into a workqueue named "kcryptd". In a nutshell, a kernel work queue just schedules some work (encryption in this case) to be performed at a later time, when it is more convenient. When "the time" comes, dm-crypt sends the request to the Linux Crypto API for actual encryption. However, modern Linux Crypto API is asynchronous as well, so depending on which particular implementation your system will use, most likely it will not be processed immediately, but queued again for a "later time". When the Linux Crypto API finally does the encryption, dm-crypt may try to sort pending write requests by putting each request into a red-black tree. Then a separate kernel thread again at "sometime later" actually takes all IO requests in the tree and sends them down the stack.4
Read Request
The read request flow is read request is re-forwarded by the dm-crypt module to the Linux Block Device Driver (2)→ the block driver returns the encrypted data(3) → the dm-crypt sends the data to Linux crypt API to decrypt data(4) → dm-crypt write the decrypted data to the user space.
Let's take a look at the more specific kernel process for read requests: this time we need to get the encrypted data first from the hardware, but dm-crypt does not just ask the driver for the data, it queues the request into a different workqueue named "kcryptd_io". At some point later, when we actually have the encrypted data, we schedule it for decryption using the now familiar "kcryptd" work queue. "kcryptd" will send the request to the Linux Crypto API, which may decrypt the data asynchronously as well. 4
Encryption algorithm
The following figure shows that dm-crypt supports the XTS encryption mode of AES (XEX Tweak with Ciphertext Stealing), which is currently the most suitable algorithm for hard disk block encryption. For more information, please refer to the linkhttps://www.kingston.com/en/blog/data-security/xts-encryption.
We can utilize the cryptsetup benchmark to report the dm-crypt performance on the Zynq® UltraScale+™ MPSoC ZCU111's cryptography performance.
For comparison, let's take a look at the speed of the ubuntu host (Intel(R) Core(TM) i7-10700K CPU @ 3.80GHz)
It can be seen that the aes-xts-256 encryption and decryption have the best performance whatever the intel or ARM.
Note, no aes engine hardware accelerator on zynqmp.
1.5 Performance on the Zynq® UltraScale Platform
We create LUKS format EXT4 for an SD card to dump the read/write performance on the Zynq® UltraScale platform.
1.5.1 Pre-conditions
| Conditions | Detail |
|---|---|
| Format | LUKS2 EXT4 |
| Cipher | AES-XTS-PLAIN64 |
| Hash | sha256 |
| Key Size | 256-bit |
The creation command is: cryptsetup --type luks2 --cipher aes-xts-plain64 --hash sha256 --iter-time 2000 --key-size 256 --pbkdf argon2id --use-urandom --verify-passphrase luksFormat /dev/sde2
The test method we referenced is https://www.unixtutorial.org/test-disk-speed-with-dd/
- For the written test: time dd if=/dev/urandom of=./test.dbf bs=1M count=10 && time sync
- For the reading test: sync && echo 3 > /proc/sys/vm/drop_caches && time dd if=./test.dbf of=/dev/null bs=1M count=10 && echo "" && time sync
Note, the speed of the dd if=/dev/urandom is 74.02MiB/s in ramdisk, the speed of generating random numbers is much faster than the access speed of the SD card, so it has little impact on the results.
1.5.1 The IO performance
Write Performance speed (MiB/s)
The following table shows the results of ZYNQ running the Linux dd benchmarks under Linux ramdisk:
| Write Performance speed (MiB/s) | Unit | ||||||||
|---|---|---|---|---|---|---|---|---|---|
| Size | 10 | 50 | 100 | 150 | 200 | 500 | 1000 | 2000 | MiB |
| zynq-encrypted-soft | 13.16 | 13.48 | 12.94 | 13.04 | 12.92 | 13.70 | 14.03 | 14.90 | MiB/s |
| zynq-encrypted-engine | 12.99 | 13.05 | 13.30 | 13.07 | 13.13 | 13.81 | 14.92 | 15.10 | MiB/s |
| zynq-plain | 12.66 | 12.82 | 13.07 | 13.00 | 12.94 | 13.56 | 14.89 | 15.95 | MiB/s |
| Read Performance speed (MiB/s) | Unit | ||||||||
|---|---|---|---|---|---|---|---|---|---|
| Size | 10 | 50 | 100 | 150 | 200 | 500 | 1000 | 2000 | MiB |
| zynq-encrypted-soft | 21.74 | 22.83 | 22.83 | 22.83 | 22.83 | 22.83 | 22.84 | 22.84 | MiB/s |
| zynq-encrypted-engine | 21.74 | 22.83 | 22.83 | 22.83 | 22.83 | 22.84 | 22.84 | 22.84 | MiB/s |
| zynq-plain | 22.73 | 22.83 | 22.83 | 22.83 | 22.86 | 22.84 | 22.85 | 22.84 | MiB/s |
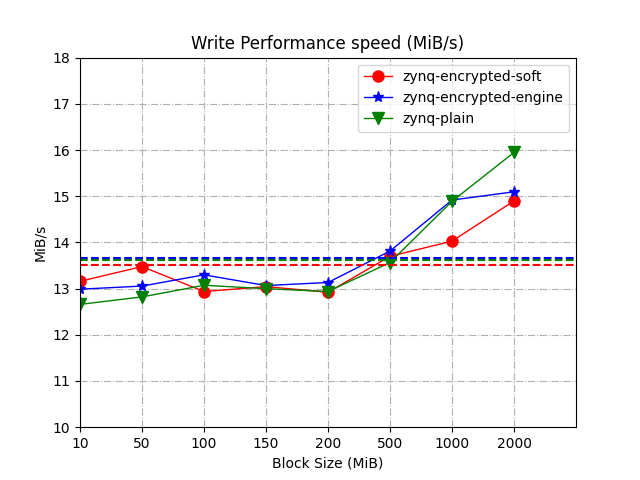
We transformed the above tables into figures. There are shown as follows:
| write | read |
|---|---|
 |
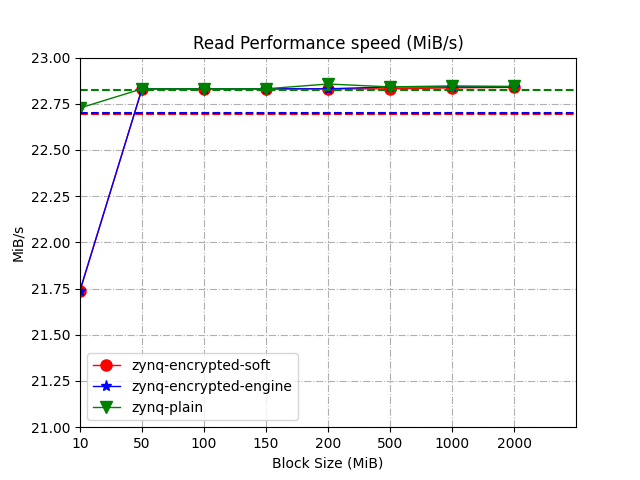 |
- The zynq-plain means using an unencrypted SD card to write the data.
- The zynq-encrypted-soft means using an encrypted SD card and disabling the AES engine on Linux crypt-API.
- The zynq-encrypted-engine means using an encrypted SD card and enabling the AES engine on Linux crypt-API.
- The dashed line is the average data for the corresponding color data.
Note, the engine cannot be enabled, for the reason, So the engine also uses soft algorithms at the Linux kernel, for the zynq-encrypted-engine**, just the kernel is configured to enable engine.**
For the write performance:
The dd tests the read/write speed. It reads the current disk file and writes it to the current disk. To a certain extent, the larger the copy amount, the longer the read and write time, and the more accurate the statistical results.
- For the average data: engine ~= plain > soft
- For the mass data: plain > engine ~= soft
Conclusion: Unencrypted vs. Encrypted 6.5% faster on the written performance.
For the read performance:
Caching is done in such a way that the kernel would cache I/O as long as it has unused memory. As soon as some process needs memory though, the kernel would release it by dropping some clean caches. So for the correct read speed test with dd, we need to disable I/O caching: echo 3 > /proc/sys/vm/drop_caches
The data read is stable:
- For the average data: plain > engine ~= soft
- For the mass data: plain ~= engine ~= soft
Conclusion: Unencrypted vs. Encrypted no difference in the read performance.
For this conclusion, the result of paper 4K random I/O performance test of https://zhuanlan.zhihu.com/p/344478737 using the FIO :
For Ext4 file system:
Unencrypted: IOPS=3730, BW=14.6MiB/s (15.3MB/s)(874MiB/60001msec)
Encrypted: IOPS=3614, BW=14.1MiB/s (14.8MB/s)(847MiB/60001msec)
For Btrfs file system:
Unencrypted: IOPS=3802, BW=14.9MiB/s (15.6MB/s)(891MiB/60001msec)
Encrypted: IOPS=3721, BW=14.5MiB/s (15.2MB/s)(872MiB/60001msec)
Unencrypted vs. Encrypted 3.3% faster. The test results are almost consistent with those in this wiki (write + read) / 2 is (6.5% + 0%) / 2 = 3.25%.
This portion of the test is unrelated to our product.
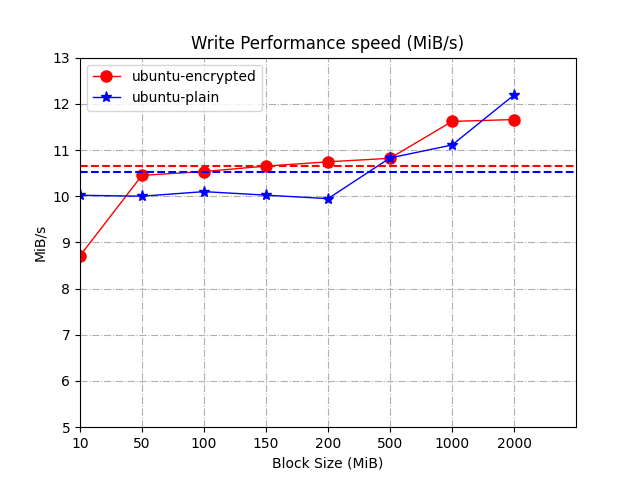
In addition, in order to prove that the encryption and decryption speed is not the bottleneck but the physical interface speed, we measured the data of ubuntu:
In this test scenario, USB 2.0 will strictly limit the read/write speed of the SD card.
| Write Performance speed (MiB/s) | Unit | ||||||||
|---|---|---|---|---|---|---|---|---|---|
| 10 | 50 | 100 | 150 | 200 | 500 | 1000 | 2000 | MiB | |
| ubuntu-encrypted-sd | 8.71 | 10.45 | 10.53 | 10.65 | 10.74 | 10.82 | 11.62 | 11.66 | MiB/s |
| ubuntu-plain-sd | 10.02 | 10.00 | 10.10 | 10.02 | 9.95 | 10.83 | 11.11 | 12.19 | MiB/s |
The data is stable:
- For the average data: encrypted > plain
- For the mass data: plain > encrypted
There is not much difference in the overall (mean) data (0.12MiB/s). In terms of big data, unencrypted data is 0.53MiB/s faster. Therefore, it can be concluded that the main data bottleneck is the data interface (SD card or USB), not the encryption and decryption algorithm in dm-crypt.
From this point of view, since the data bottleneck lies in the physical interface (rootfs in an SD card), it is unnecessary to purchase an AES acceleration engine in the design to improve the performance of encryption and decryption.
2. Set cryptsetup to Ramdisk
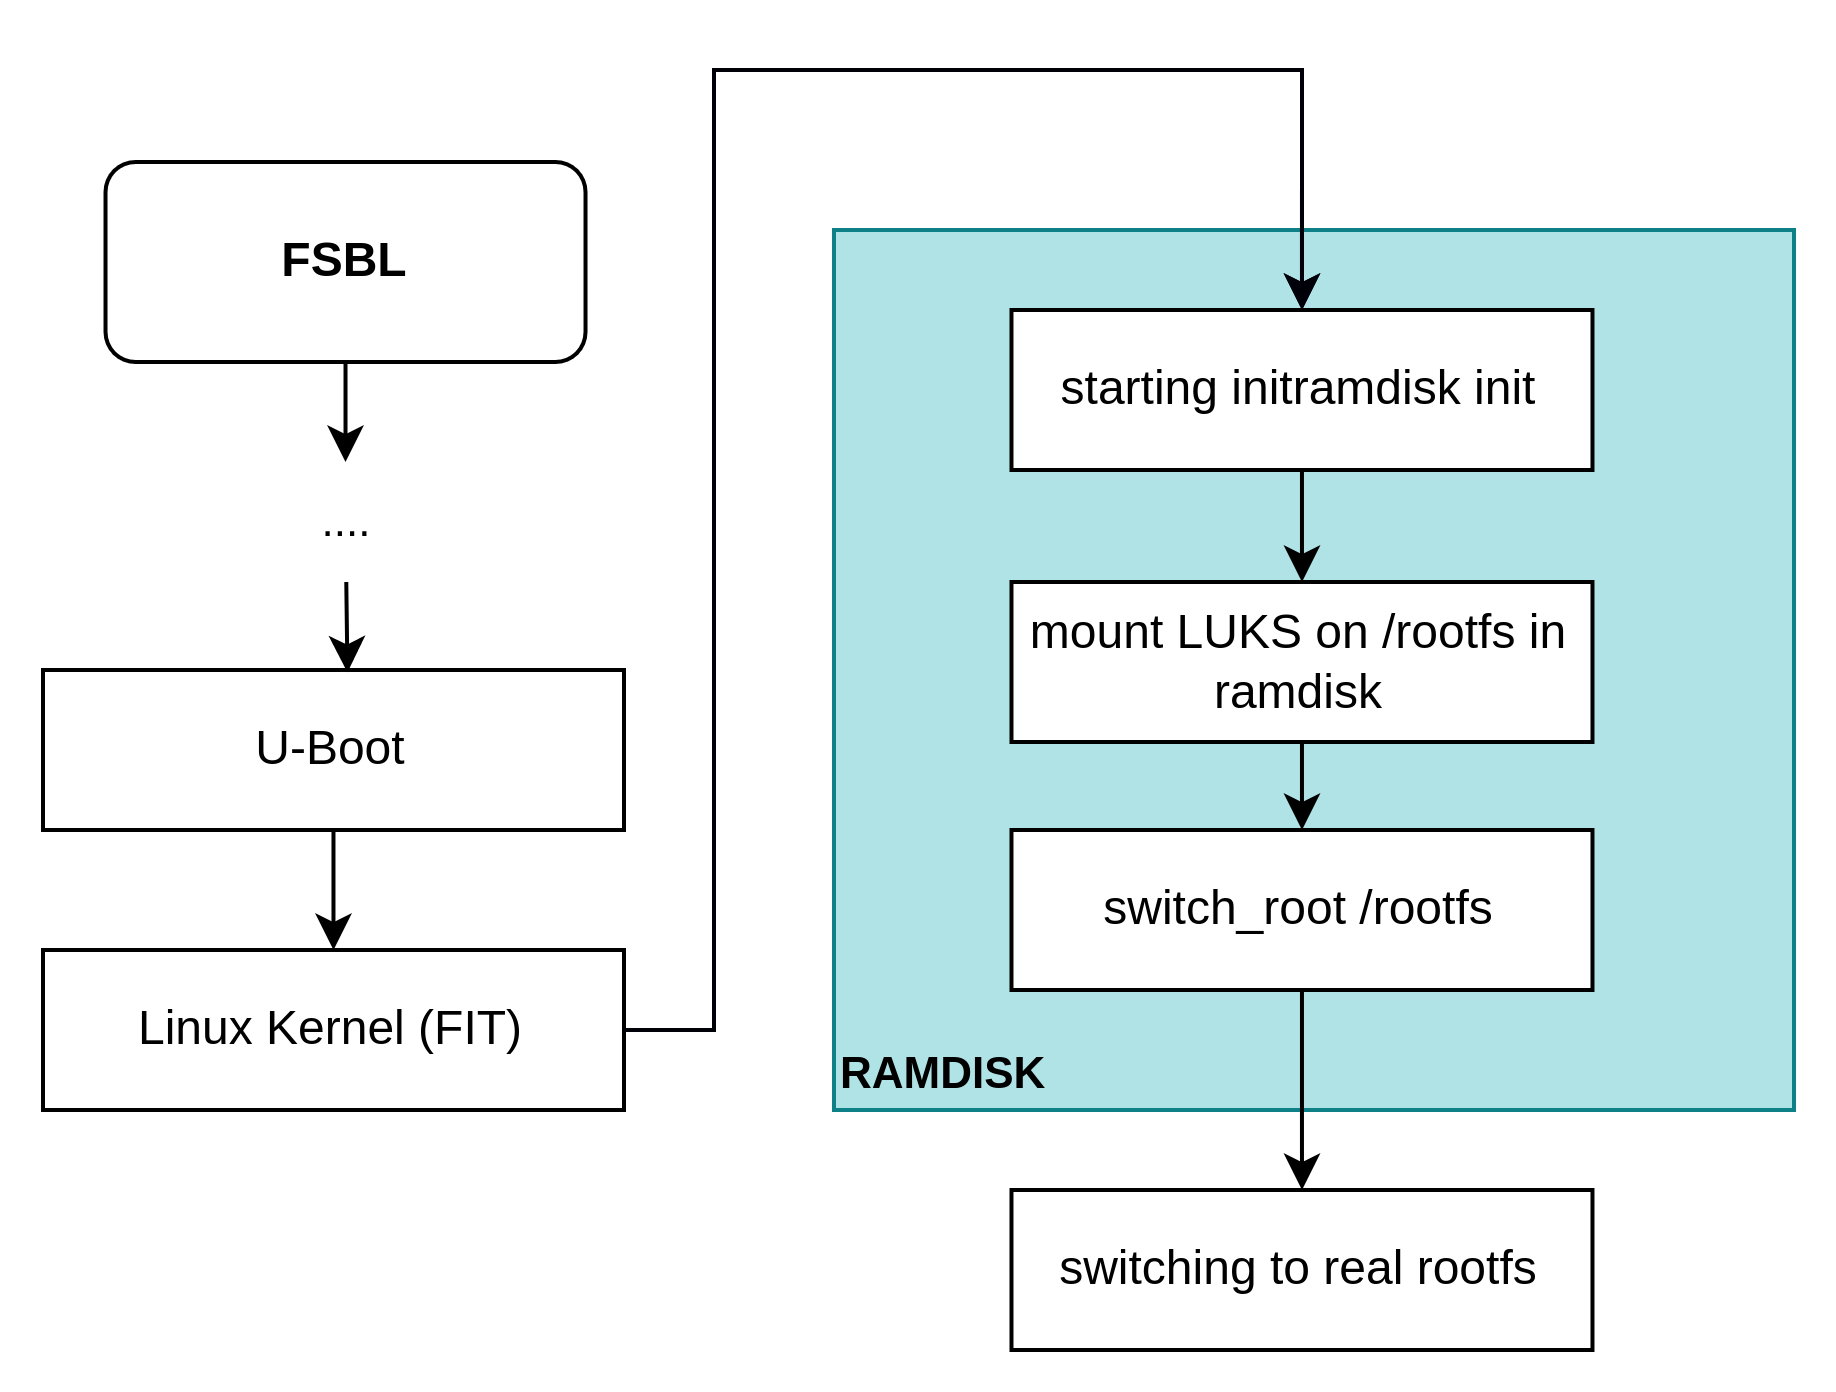
The cryptsetup needs to populate the initramfs for decrypting the encrypted rootfs before mounting the real rootfs.
Therefore, there are some configurations that shall be changed:
- For ramdisk, transplant the cryptsetup to the initramfs;
- For ramdisk, modify the init script to add the process of decryption.
- For Linux Kernel, we need to make a FIT format U-Boot image by repacking the kernel, ramdisk, and device tree files.
- For U-Boot, we need to change the boot script to boot our modified FIT image.
2.1 Transplanting the cryptsetup
After you build the petalinux project, the following files are generated by the petalinux build system. where ramdisk.cpio.gz is the initramfs in cpio format.
To modify an initramfs5:
S1: Extract the contents of the cpio.gz archive.
mkdir tmp_mnt/
gunzip -c ramdisk.cpio.gz | sh -c 'cd tmp_mnt/ && cpio -i'
cd tmp_mnt/
S2: Please refer to [Embedded] cross-compile the cryptsetup on Xilinx ZYNQ aarch64 platform to transplant the cryptsetup on the initramfs.
2.2 Modifying the init for ramdisk
According to the Figure: RAMDISK decrypting flow, the initramfs shall mount the LUKS partition on the ramdisk. TO automate this process, we need to add the mount command in the init script.
# ramdisk file : /init
# mount the crypted rootfs
mount_rootfs() {
    echo "[ramdisk-init-cryptsetup] luksOpen /dev/mmcblk0p2 rootfs decrypting..."
    echo -n "123" | cryptsetup luksOpen /dev/mmcblk0p2 rootfs -d -
    if [ $? -ne 0 ]; then
        echo "[ramdisk-init-cryptsetup] failed on cryptsetup."
    else
        mount /dev/mapper/rootfs /rootfs && \
        echo "[ramdisk-init-cryptsetup] decrpted rootfs on /rootfs" && \
        echo "[ramdisk-init-cryptsetup] done!"
    fi
}
And insert this script function calling behind the use /dev with devtmpfs.
Finally, repack the filesystem into a cpio.gz archive:
sh -c 'cd tmp_mnt/ && find . | cpio -H newc -o' | gzip -9 > new_initramfs.cpio.gz
2.3 Making a FIT format U-Boot image
Flattened uImage Tree (FIT) is a format for combining multiple binary elements such as the kernel, initramfs, and device tree blob into a single image file6. We can reference the https://www.gibbard.me/linux_fit_images/ to create a FIT image device source tree. The Xilinx Linux uses the FIT format to boot the Linux kernel and ramdisk, please refer to the https://xilinx-wiki.atlassian.net/wiki/spaces/A/pages/18842374/U-Boot+Images. We need to repack the Linux kernel, new ramdisk, and device tree for the U-Boot.
The its file is shown as follows:
/dts-v1/;

/ {
    description = "U-Boot fitImage for plnx_aarch64 kernel";
    #address-cells = <1>;

    images {
        kernel-1 {
            description = "Linux Kernel";
            data = /incbin/("./Image");
            type = "Kernel";
            arch = "arm64";
            os = "linux";
            compression = "none";
            load = <0x200000>;
            entry = <0x200000>;
            hash@1 {
                algo = "sha256";
            };
        };
        fdt-1 {
            description = "Flattened Device Tree blob";
            data = /incbin/("./system.dtb");
            type = "flat_dt";
            arch = "arm64";
            compression = "none";
            hash@1 {
                algo = "sha256";
            };
        };
        ramdisk-1 {
            description = "petalinux-initramfs-image";
            data = /incbin/("new_initramfs.cpio.gz");
            type = "ramdisk";
            arch = "arm64";
            os = "linux";
            compression = "gzip";
            hash@1 {
                algo = "sha256";
            };
        };
    };
    configurations {
        default = "conf@1";
        conf@1 {
            description = "Boot Linux kernel with FDT blob + ramdisk";
            kernel = "kernel-1";
            fdt = "fdt-1";
            ramdisk = "ramdisk-1";
            hash@1 {
                algo = "sha256";
            };
        };
    };
};
The image source file is used as an input argument for the mkimage utility to generate the resulting .itb file, which is going to be used by the bootm command in the target to load the Linux image.
$ mkimage -f image.its image.ub Then the image.ub can be generated.
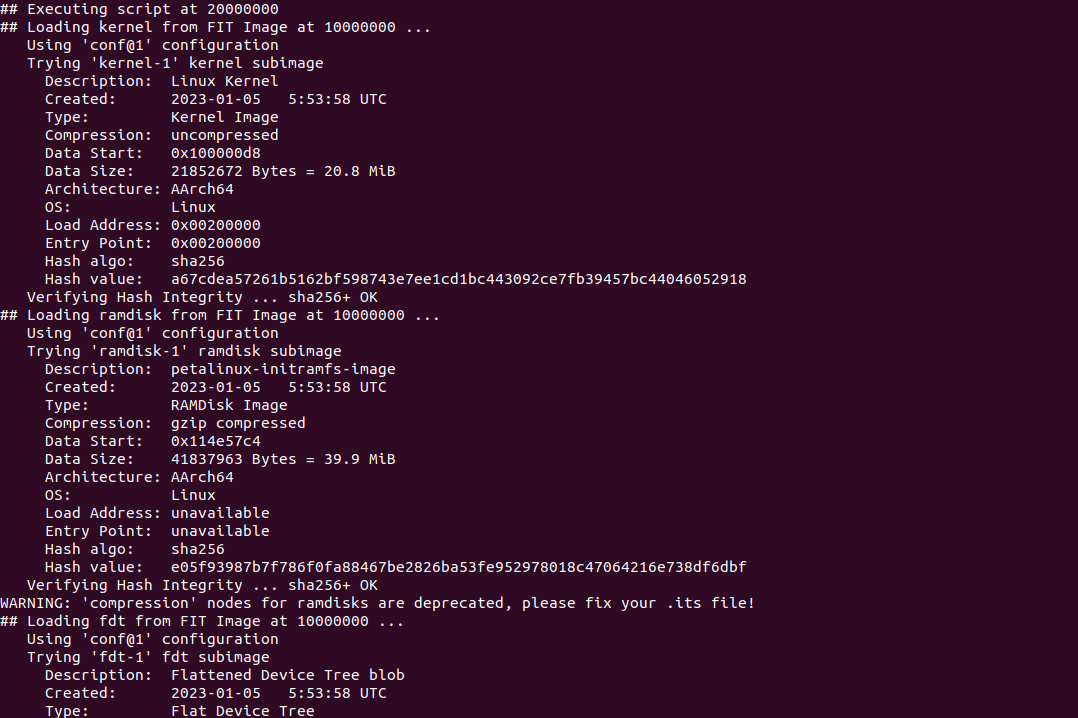
When the board boots the image.ub, the outputted log is shown in the following figure:
Then using the bootgen tool to generate the BOOT.bin.
2.4 Making U-Boot script
Referring the 78https://docs.xilinx.com/r/en-US/ug1144-petalinux-tools-reference-guide/Configuring-U-Boot-Boot-Script-boot.scr, We touch a file “boot.scr.txt“ and add the following content to it:
bootm 0x10000000
Note, the bootm $addr, the addr is image.ub address that is loaded by the secure boot. Please note that the bif file load='0x10000000' for image.ub.
Please remember that the boot.scr.txt file needs to be converted back into the boot.scr file after the edits are complete:
mkimage -c none -A arm -T script -d boot.scr.txt boot.scr
Finally, copy the boot.scr to the SD card boot partition.
Ref
Footnotes
-
Encrypting block devices using dm-crypt/LUKS ↩
-
dm-crypt ↩
-
CESA (HW Crypto) - Crypto API Interfaces ↩
-
Build and Modify a Rootfs ↩
-
Flattened uImage Tree (FIT) Images ↩
-
Configuring U-Boot Boot Script (boot.scr) ↩
-
[Distro Boot with Boot.scr](https://wiki.trenz-electronic.de/display/PD/Distro+Boot+with+Boot.scr ↩
使用cryptsetup创建加密磁盘
目录
cryptsetup是linux下的一个分区加密工具,它通过调用内核中的"dm-crypt"来实现磁盘加密的功能。
dm-crypt的特点
dm-crypt具有如下几个特点:
-
支持多种加密格式
- LUKS(Linux Unified Key Setup)
- Plain
- loop-AES
- TCRYPT
一般我们比较常用的是LUKS格式
-
安装简单
dm-crypt是整合到linux内核中的,而它的命令行前端cryptsetup,在大多数主流的linux发行版中都会自带 -
可以与LVM无缝结合
使用cryptsetup创建加密磁盘
创建虚拟磁盘分区
为了方便,我这里用 dd 命令创建一个文件来代替真实的磁盘分区(因为操作过程会清空整个磁盘分区的内容:()。
dd if=/dev/zero of=/tmp/USB.img bs=1M count=100

ls -l /tmp/USB.img
-rw-r--r-- 1 lujun9972 lujun9972 104857600 4月 12 18:13 /tmp/USB.img
这就创建了一个100M的文件作为虚拟磁盘分区来用。
在实际使用中,你可以用cryptsetup来对实际的磁盘分区来进行操作。
创建加密磁盘分区
虽然说dm-crypt支持多种加密格式,但最常用的还是LUKS。
创建LUKS加密盘的命令为:
cryptsetup [其他参数] luksFormat 设备名
这里常用的参数有下面几个:
--cipher加密方式--key-size密钥长度--hash散列算法--iter-time迭代时间,单位为毫秒。值越大,暴力破解越难,但打开加密盘的时间也越久这里我们直接使用默认值
[lujun9972@X61 ~]$ cryptsetup luksFormat /tmp/USB.img

WARNING!
========
这将覆盖 /tmp/USB.img 上的数据,该动作不可取消。

Are you sure? (Type uppercase yes): YES
输入 /tmp/USB.img 的密码:
确认密码:
[lujun9972@X61 ~]$
执行的过程中,命令会警告你将会清除磁盘上的所有数据,并要求你输入两次密码
打开密码盘
cryptsetup可以打开前面提到的各种加密盘。
打开加密盘的命令为
cryptsetup open --type 加密类型 加密磁盘 映射名称
或者也可以写成
cryptsetup 加密类型Open 加密磁盘 映射名称
比如,我们这个案例中可以执行:
[lujun9972@X61 ~]$ sudo cryptsetup luksOpen /tmp/USB.img USB
[sudo] lujun9972 的密码:
输入 /tmp/USB.img 的密码:
[lujun9972@X61 ~]$
注意这里需要用到root权限。
执行该命令后就会将 /tmp/USB.img 解密,并映射成 /dev/mapper/USB
像普通磁盘分区一样操作 /dev/mapper/USB
你可以像普通磁盘一样来操作 /dev/mapper/USB.
sudo mkfs.ext4 /dev/mapper/USB
sudo mount /dev/mapper/USB /mnt
sudo touch /mnt/secret
ls -l /mnt/secret
结果为
Creating filesystem with 100352 1k blocks and 25168 inodes
Filesystem UUID: b1557874-a538-4ffa-9ce0-c17e8feb4b1c
Superblock backups stored on blocks:
        8193, 24577, 40961, 57345, 73729

Allocating group tables:  0/13�����     �����done
Writing inode tables:  0/13�����     �����done
Creating journal (4096 blocks): done
Writing superblocks and filesystem accounting information:  0/13�����     �����done

-rw------- 1 root root 0 Apr 12 18:39 /mnt/secret
查看加密盘状态
在打开加密盘后,可以查看该加密盘的状态,语法为
cryptsetup status 映射名
同样的,由于需要初始化device mapper,因此需要root权限:
sudo cryptsetup status USB
结果为
/dev/mapper/USB is active and is in use.
  type:    LUKS1
  cipher:  aes-xts-plain64
  keysize: 256 bits
  key location: dm-crypt
  device:  /dev/loop0
  loop:    /tmp/USB.img
  sector size:  512
  offset:  4096 sectors
  size:    200704 sectors
  mode:    read/write
关闭加密盘
操作完磁盘后,使用下面命令关闭加密盘
cryptsetup close 映射名
像这样:
sudo umount /mnt
sudo cryptsetup close USB
让加密盘使用keyfile认证
创建随机文件作为keyfile
dd if=/dev/urandom of=/tmp/keyfile bs=1K count=64
查看key slot
LUKS格式的加密盘默认能够提供8个"key slot",每个"key slot"就是一个解密的钥匙,使用任何一把钥匙都能打开这个LUKS加密盘。
相当于是能有多种解密方式。
要查看LUKS密码盘的"Key Slot",可以用下面命令:
cryptsetup luksDump 加密盘
比如
cryptsetup luksDump /tmp/USB.img
LUKS header information for /tmp/USB.img

Version:        1
Cipher name:    aes
Cipher mode:    xts-plain64
Hash spec:      sha256
Payload offset: 4096
MK bits:        256
MK digest:      0b 6b f3 5d fb 94 1a 8f aa c6 7e 86 d8 64 b0 0b c7 bf 7b 7d
MK salt:        02 9b dc c3 0e 34 79 0b ab a9 44 e6 e4 ad 67 30
                35 f1 dd cf e0 33 0c 36 bf bc 55 f1 d5 ce fb ad
MK iterations:  70167
UUID:           e4e7cfc4-f9ae-4ed1-b65b-1b0e7b84ca7f

Key Slot 0: ENABLED
        Iterations:             1122672
        Salt:                   d2 04 39 66 d7 cb 64 6d e3 ef d9 88 c7 1c 07 b2
                                25 00 8f bf e3 6d f1 9e 3f 31 91 c6 f0 ff 6d 75
        Key material offset:    8
        AF stripes:             4000
Key Slot 1: DISABLED
Key Slot 2: DISABLED
Key Slot 3: DISABLED
Key Slot 4: DISABLED
Key Slot 5: DISABLED
Key Slot 6: DISABLED
Key Slot 7: DISABLED
你会发现,这个LUKS加密盘目前只使用了一个Key Slot,也就是创建盘时设置的密码
添加keyfile认证
使用下面命令为LUKS加密盘添加keyfile认证
cryptsetup luksAddKey 加密盘 keyfile
比如
[lujun9972@X61 ~]$ cryptsetup luksAddKey /tmp/USB.img /tmp/keyfile
输入任意已存在的密码:
[lujun9972@X61 ~]$
再查一下Key Slot:
cryptsetup luksDump /tmp/USB.img
LUKS header information for /tmp/USB.img

Version:        1
Cipher name:    aes
Cipher mode:    xts-plain64
Hash spec:      sha256
Payload offset: 4096
MK bits:        256
MK digest:      0b 6b f3 5d fb 94 1a 8f aa c6 7e 86 d8 64 b0 0b c7 bf 7b 7d
MK salt:        02 9b dc c3 0e 34 79 0b ab a9 44 e6 e4 ad 67 30
                35 f1 dd cf e0 33 0c 36 bf bc 55 f1 d5 ce fb ad
MK iterations:  70167
UUID:           e4e7cfc4-f9ae-4ed1-b65b-1b0e7b84ca7f

Key Slot 0: ENABLED
        Iterations:             1122672
        Salt:                   d2 04 39 66 d7 cb 64 6d e3 ef d9 88 c7 1c 07 b2
                                25 00 8f bf e3 6d f1 9e 3f 31 91 c6 f0 ff 6d 75
        Key material offset:    8
        AF stripes:             4000
Key Slot 1: ENABLED
        Iterations:             1109604
        Salt:                   38 3a 6a 76 c3 10 7c a3 1f fd e8 7c 1a 7f 4b 4f
                                2a bf 99 6c 1c 06 11 00 59 5e ce e4 99 79 79 f7
        Key material offset:    264
        AF stripes:             4000
Key Slot 2: DISABLED
Key Slot 3: DISABLED
Key Slot 4: DISABLED
Key Slot 5: DISABLED
Key Slot 6: DISABLED
Key Slot 7: DISABLED
会发现启用了新的key slot
使用keyfile打开加密盘
使用keyfile打开加密盘的方式跟普通打开加密盘的方式类似,只是要多用一个 --keyfile 来指定keyfile的路径
sudo cryptsetup --key-file /tmp/keyfile open --type luks /tmp/USB.img USB
删除keyslot
使用下面命令可以删除加密盘的其中一个key slot
cryptsetup luksKillSlot /tmp/USB.img 0
再查一下Key Slot:
cryptsetup luksDump /tmp/USB.img
LUKS header information for /tmp/USB.img

Version:        1
Cipher name:    aes
Cipher mode:    xts-plain64
Hash spec:      sha256
Payload offset: 4096
MK bits:        256
MK digest:      0b 6b f3 5d fb 94 1a 8f aa c6 7e 86 d8 64 b0 0b c7 bf 7b 7d
MK salt:        02 9b dc c3 0e 34 79 0b ab a9 44 e6 e4 ad 67 30
                35 f1 dd cf e0 33 0c 36 bf bc 55 f1 d5 ce fb ad
MK iterations:  70167
UUID:           e4e7cfc4-f9ae-4ed1-b65b-1b0e7b84ca7f

Key Slot 0: DISABLED
Key Slot 1: ENABLED
        Iterations:             1109604
        Salt:                   38 3a 6a 76 c3 10 7c a3 1f fd e8 7c 1a 7f 4b 4f
                                2a bf 99 6c 1c 06 11 00 59 5e ce e4 99 79 79 f7
        Key material offset:    264
        AF stripes:             4000
Key Slot 2: DISABLED
Key Slot 3: DISABLED
Key Slot 4: DISABLED
Key Slot 5: DISABLED
Key Slot 6: DISABLED
Key Slot 7: DISABLED
会发现key slot0已经被禁用了
