This project proposed several aggregated models doing facial expression recognition on Facial Expression Recognition 2013(FER2013) dataset. These models based on custom CNN model and VGG16 with SIFT and Dense SIFT feature descriptors and aggregated different models to see how aggregated model performance at the end.
Figure shows the overview of this project:

All the training and evaluations are done on Kaggle dataset - Facial Expression Recognition 2013 (FER2013). Input are various 48x48 resolution grayscale images (one channel), along with label corresponding to one of seven emotions, 0 = Angry, 1 = Disgust, 2 = Fear, 3 = Happy, 4 = Sad, 5 = Surprise, 6 = Neutral [Dataset Link]
Example figures for FER2013 dataset:

-
Training result:
The table shows the validation accuracy and testing accuracy
Methods Accuracy_val(%) Accuracy_test(%) CNN 63.57 62.55 SIFT_CNN 62.6 61.24 DIFT_CNN 60.05 58.99 VGG 68.16 66.75 SIFT_VGG 67.19 66.66 DIFT_VGG 68.1 67.69 -
Aggregated Models:
"Aggregated" means combining original model and both models using SIFT and Dense SIFT
Methods Accuracy(%) CNN + SIFT-CNN 64.89 CNN + DSIFT-CNN 63.54 Aggregated CNN 65.07 VGG + SIFT-VGG 69.20 VGG + DSIFT-VGG 69.45 Aggregated VGG 70.37 -
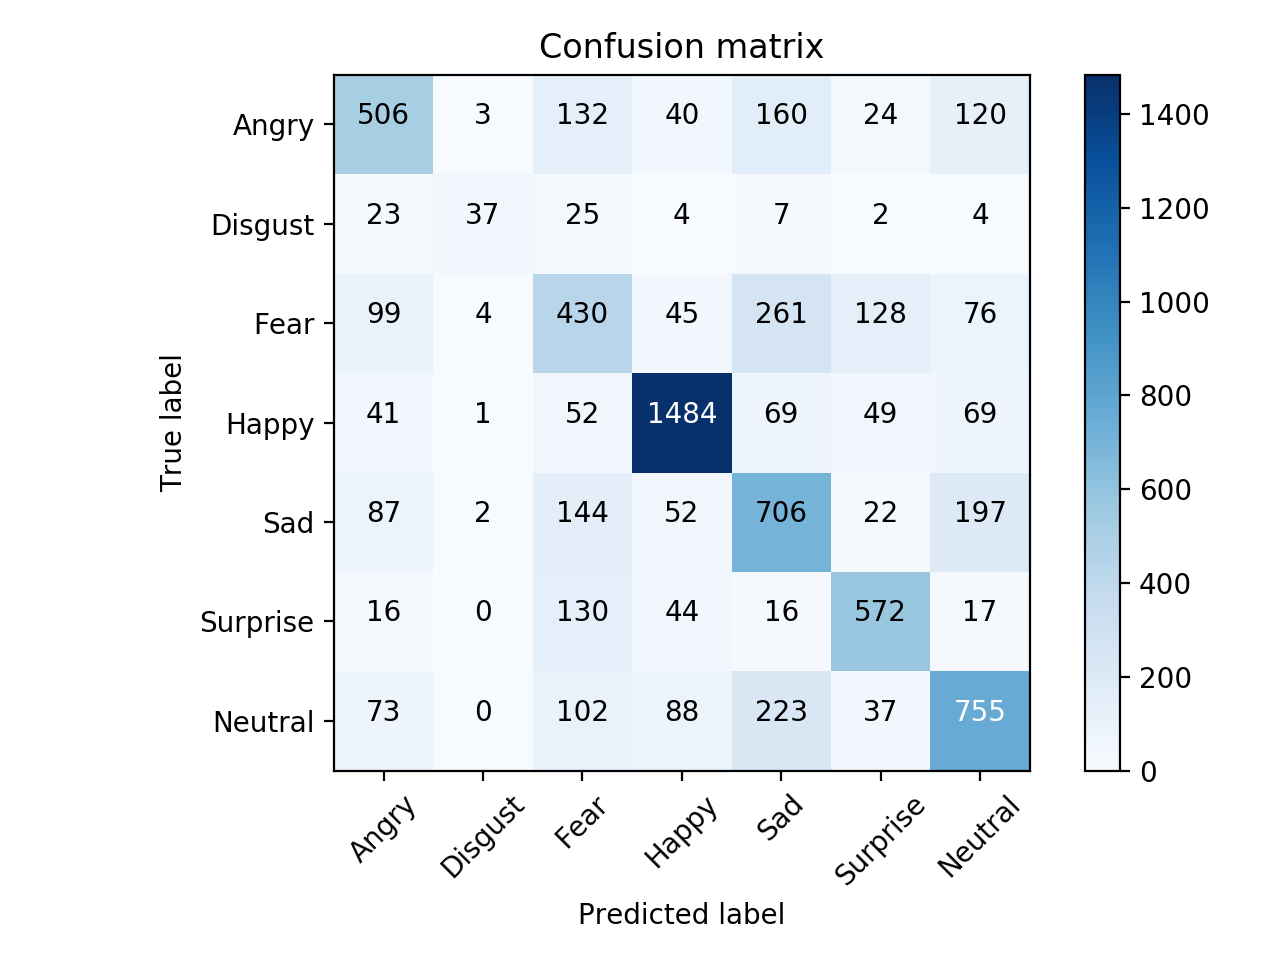
Confusion Matrix results can be found under
ConfusionMatrixfile.e.g. Results of CNN model

Make sure installed these prerequisites before running the code. The installation can be done by using pip
- Python 3.7.6
- matplotlib 3.1.2
- numpy 1.18.1
- Keras 2.3.1
- scikit-learn 0.22.1
- opencv-python 3.4.2.16Clone this file and run the following program using
$ git clone https://github.com/chiehhsi/Expression_Recognition.git
$ cd path/to/this/fileDownload the dataset file fer2013.csv from here and put in the root folder of this package.
Preprocess the data and create dataX.npy and dataY.npy inside root folder
$ python3 preprocessing.pyMake sure there are sift_histogram.npy and d_sift.npy under Result folder for SIFT/ Dense SIFT descriptors respectively
These two files can be found by either from exisiting files or building from scratch
-
Get the descriptors by scratch
If you directly launch the train models, then it will automatically generate otherwise comment out the buttom line inside
feature_extraction.pyand simply run$ python3 feature_extraction.py
you will get two
.npyfiles for SIFT and Dense SIFT descriptors.Besides, the command will also produce
picsfile containing all 48*48 pixels grayscale figures from FER2013 dataset about size 54.7 MB -
Existing files
Details refer to
Result/README.txthere
Launch training
$ python3 training_model.pyThere are also optional arguments according to the needs:
--model(str) : Initial Model type {cnn, scnn, dcc, vgg, svgg', dvgg}, default = cnn--epochs(int) : Number of epochs to run, default = 100--batchsize(int) : Number of images to process in a batch, default = 100
e.g. $ python3 training_model.py --model svgg --epochs 200
The model.py defined the structure of CNN model and layers; model_vgg.py is for VGG16.
The built models in this project can found here which can be downloaded and use them directly. Make sure all files are under Result folder instead the unzip located files.
When facing interrupted during training, as the repository already has model.json(trained model) and model.hdf5(parameters) simply run the command to resume the training process
$ python3 resume_train.pyThe training history is saved in model_histo.npy files, change the filepath inside plotgraph.py. Run the command to get the plotting results of the accuracy and loss for training process.
$ python3 plotgraph.pyEvery .py, model structure, and parameters can be modify according to users' needs.
To get the test accuracy and results of confusion matrix. Run command below produces the accuracy and confusion matrix for each model, e.g. ConfusionMatrix\*.png.
$ python3 predict.pyIf error occurs, please check if there exists .json and .hdf5 files for the same model under Result folder, which has been generated automatically if the training finished successfully. Otherwise, please rerun the training process or download built models. Train Models section has more details.
- Mundher Al-Shabi, ooi Ping Cheah, Tee Connie, Facial Expression Recognition Using a Hybrid CNN-SIFT Aggregator [arXiv1608.02833]