Insprired by [Visual Effects with Particles] course.
- Overview
- Basic modules
- Texture Sheet Animation module
- Fire-related effects
- Bullet holes & hit effects
- Trail module
- Waterfall effect
- Sub Emitters module
- Rate over Distance
- Custom Vertex Stream
- Where to go next
- Particle System is essential to create beautiful visual effects (VFXs)
- Particle System can simulate fluid, liquid materials like fire, water, smoke ... efficiently
- Unity's Particle System is called Shuriken
- Getting familiar with Particle System
- Understanding basic modules: Main, Emission, Shape, Renderer
- Using Spritesheet animation with Particle System
- Understanding other modules: Color, Noise, Trail, Collision
- Understanding advanced features: Sub Emitter, Light, CustomData
- Being able to break down other VFXs to re-create them
- Unity Particle Pack 5.x
- Unity version: 5.x (I'm using 5.6.6f2)
Before we begin, install Unity Particle Pack 5.x above and open scene Menu to see all the effects.
Target: Create embers in Fire effect (#4/22)
- Create a new GameObject with ParticleSystem
- On Renderer module, select
Material = Default-Particle=> We have many white partiles are emitted - Since fire embers are flying up and spreading wider, we choose Shape of emitter = Cone and rotate the GameObjet to head up
(rotation.x = -90) - Adjust angle for cone shape as you like
(mine = 40) - Adjust "height" of the cone shape and you'll see in the Main module to match the weight of embers, the parameter
Start Speedchanges as well(mine = 1) - There are too many particles ! So we need to adjust the parameter
Rate over timeof Emission module to reduce number of new particles are emitted per second(mine = 5) - Adjust
Color over Lifetimemodule to orange to make them look more like embers. Don't use parameterStart Colorin the Main module because we need the embers to fade out, no just disappearing - Add keyframes to control opacity of particles to make them fade in and fade out
- Each particle is a circle now, so let's distort them. Take a look at Renderer module, set
Render Mode = Stretched BillboardandLength Scale = 4to scale particles 4X in vertical direction. In order to understand what is Billboard, Pause the Particle System, checkSelectionin Renderer module and you'll see each particle is a plane. Billboard mode makes these planes rotate to always face the camera, this effect makes them visible in any directions - They look too big now, so change
Start Size (in Main module) = 0.1 - Embers are unpredictable, but all our particles are moving with same speed. Let's change
Start Speed = Random(0.1, 1.2) - To make them more unpredictable, let's enable Noise module with following parameters:
strength=0.5(smooth transition), frequency=0.5(not too much noise in a texture), scroll speed(slow changing), quality=high(more nature noise) - With our settings, embers may fly downward the floor due to affection of Noise -> let's change
Start Speed (Main module) = Random(1,2), andStart Lifetime = 3 (seconds)to make them move upward and fade out sooner
Now we have Ember VFX with built-in Unity Particle System, and getting familiar with some important modules:
- Main (Size, Speed, Lifetime)
- Emission (Rate over Time)
- Shape (Cone)
- Color over Lifetime (Color, Alpha/Opacity)
- Renderer (Billboard, Stretched Billboard, Material)
- Noise
Screenshots:


After this part, you could produce some VFXs:
- Smoke
- Flare
- Rain drops
- Cloud
- ...
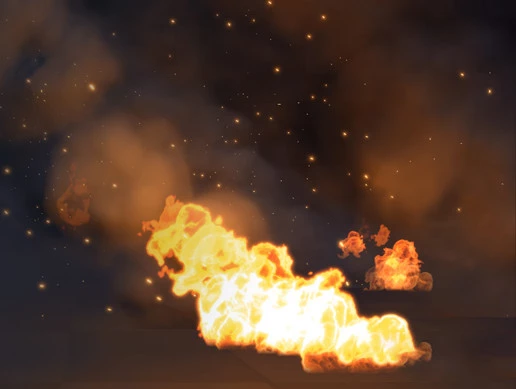
Target: Create Fire effects (#4/22)
- Create a new GameObject to simulate both Fire & Ember VFX
- In module Renderer, select
Material = FlameRoundYellowParticle. It's shader is simple (Mobile/Particles/Additive), and it's texture is a spritesheet of 50 sprites (total size: 2048x2048). At this moment, each particle is an entire spritesheet - In module Texture Sheet Animation, set
Tiles = 10x5 (columns x rows), now each particle is just a frame in spritesheet. - We need to rotate Shape -90 along X axis to mimic realworld flame -> adjust to Shape = Circle
- Particles are spreading but they stay on the ground -> enable module
Velocity over Lifetimeto make Y increase over time leading to particles flying up. Note: Because we rotated the shape, then Y axis is rotated too -> need to use Y axis of World Space - Use module
Color over Lifetimeto make fire fade in and fade out like what we did in Ember VFX - The animation looks not so smooth, it's too slow -> let's change
cycle = 2in module Texture Sheet Animation - Check
Prewarmin main module to make fire particles skip 1 emission loop -> full fire shape right away instead of growing from a small to a big fire - Use module Noise to add randomness to the movement of fire particles (X=going left/right, Y=going up, Z=0). Note: When you click the curve, it will be switched between colored and greyout, and it affects only the appearance in the curve window, not the actual module.
- Particles are too far away -> set
Start Size = 2 - In order to make the fire smaller in the top, just need to use
Size over Lifetimemodule with the curve going down - (Optional) You can create a particle system which emits only 1 particle to mimic the light on the ground. You may need to set
Render Mode = Horizontal Billboardto make the light aligned with the ground.
Now we have Fire VFX with Spritesheet, and getting familiar with some other modules:
- Main (Prewarm)
- Texture Sheet Animation
- Shape (Circle)
- Velocity over Lifetime
- Size over Lifetime
- Noise (Separate Axis)
- Renderer (Horizontal Billboard)
Screenshots:


After this part, you could produce some other VFXs:
- Fire with smoke
- Lightning
- Wind
- ...
Since we're familiar with many modules, let's try to break down some VFXs to see how they are made:
- Torch (#6/22):
Shape: CircleEmission: Low rate over timeMain: Zero start speed, simulation space = World to keep the fire in place when moving the torchRenderer & Texture Sheet Animation modules: same as our Fire VFX- [NEW]
Inherit Velocity: Make newly emitted particles inherit velocity of the source GameObject (then particle velocity become relative)
- Flame thrower (#5/22):
Shape: Cone with small radiusEmission: High rate over timeMain: High start speed, simulation space = World (so when we rotate the GameObject, emitted particles keep their directions, newly emitted particles will have new directions)Color over Lifetime: Fade out with orange colorSize over Lifetime: Scale upRenderer & Texture Sheet Animation modules: same as our Fire VFX- [NEW]
Inherit Velocity: Make newly emitted particles inherit relative velocity of the source GameObject (then particle velocity become relative) - [NEW]
Collision: Let the fire particles change the direction when colliding with the floor (having collider)
Particle System sometimes needs help from other techniques as well, to achieve desired VFX. Let's create a hit effect, when a bullet hit a wall and leave a bullet hole in the wall.
Firstly, we create the hit effect with dust:
- Create a new GameObject with a Particle System, put it close to the wall
- Use default particle material with
Render Mode = Stretched Billboard (Length scale = 20),Shape = Coneheading out of the wall (Rotate Y = 180) - Adjust size of the particles = 0.05 to make them look like a thin line
- To make these dust fade out quickly, adjust
Start Lifetime = 0.5and applyColor over Lifetimewith fading out gradient - When a bullet hits the wall, many dust particles will appear at the same time, and after that, there is no new particles emitted anymore. In order to achieve this effect, in Emission module, set
Rate over Time = 0, Add aburstwith settings:Time=0.0, Min=Max=10. - Particles are moving too slow in comparing to a effect from a hit collision -> set
Start Speed = Random(8, 20). The randomness make the dust particles look more natural. - When we make this VFX, we can keep the option
Loopingin Main module. But in real game, this should be unchecked, because we want the dust to be bursted only once.
Next, we will create a bullet hole on the wall. This can be achieved by 1-particle, but it's just a sprite so we will use a simple quad mesh to attach this sprite to the wall:
- Create a new GameObject, parented to above hit effect
- Add component
Mesh Renderer&Mesh Filterto use Quad mesh and materialBulletDecalStone - You may not see the bullet hole, because it's facing to the inner side of the wall -> rotate it 180 degrees
Now we have Hit VFX with a bullet hole, and getting familiar with some other features:
- Emission (Burst)
- Combine Particle System with other techniques:
- Use a Quad mesh to render a bullet hole on the wall surface
- Some other works need to be done:
- Spawn the hit effect when and where the impact happens
- Rotate the hit effect to match the surface the bullet hits (the bullet hole will be rotated along)
- Auto destroy hit effect after an amount of time (the bullet hole will be destroyed too)
- The bullet hole is drawn by a simple sprite, which will look fake on the edge of the wall (part of it will be out of the wall). This could be fixed by using a Decal, not a Mesh Renderer
Screenshots:


You could see other VFXs (#14-#18 / 22) to see how they make different hit effects to different materials:
- Hit Metal: Straight and long spark particles bursted
- Hit Wood: Wood splinters rotating when emitted bursted
- Hit Stone: Many small dust particles bursted
- Hit Water Container: Many small water particles emitted through time
- Hit Flesh: Many forms of red blood splats are bursted
Take a look at the effect Electrical Spark (#9/22), you will see that the sparks look very close to our dust particles above. But they are falling to the ground beautifully. Let's re-create this effect:
- Clone
VFX_WallHitand removeBulletHoleGameObject - In Emission module, set
Rate over Time = 20and remove Burst to keep emitting sparks - In main module, set
Gravity Modifier = 3 - You might want to adjust the color to yellow, to make them look more "electrical"
But when you want longer sparks (by setting Length Scale = 40 in Renderer module), you'll see something wrong with this. Set Playback Speed = 0.1 to see the effects in Slow Motion, you'll see that the sparks look like rotating tooth-picks.
In the real world, the sparks are just tiny hot particles flying in the air, and leave their light behind when moving. Their trails are bended along the way (look like curves). So, let's try another method to create Electrical Spark VFX:
- Create a new GameObject with a Particle System
- Follow these settings (similar to WallHit VFX):
Rate over Time: 20Start Size: 0.05Shape: ConeGravity Modifier: 3Color over Lifetime: Faded-out yellow
- Turn on module
Trails. Check moduleRenderer, you'll see there's a new parameter calledTrail Material, assigned toDefault Particle. But it seems nothing change. - Enabling trail gives your particles a smoothly bended trail along they way. But for now, your trail is too short due to low
Lifetimein moduleTrails. Let's set it to1, meaning the trail lifetime equal to 100% of particle lifetime. Now your straight spark particles go ahead with a curved trails behind. - We don't need the sparks themselves anymore, then let's hide them by setting
Render mode = None. Only trails are visible now. - What happens when the sparks hit the floor in real life ? They bounce. We heard about
Collisionmodule in part 4, now we have a chance to test it. Let's enable that module and assignPlaneon the floor to the parameterPlanes. The sparks should bounce when they hit the floor now, but maybe they die too soon then you could not see them. - Let's change
(Main) Lifetime = 0.8,(Trail) Lifetime = 0.15to keep the sparks live longer, but keep the trails the same. Now the sparks bounce beautifully, and notice that the trails are bended to form the V shape too. This can not be achieved withoutTrailsmodule. - But the sparks bounce too hard, like jelly beans. Let's reduce the
Bounceparameter to0.4. Perfect !
Now we have Electrical VFX, and getting familiar with some other modules:
- Trail (Lifetime)
- Render (RenderMode=None)
- Collision (Planes, Bounce)
- Question: What if I just want my particles to collider with some surfaces, not all of them ? (hint: Layer)
Screenshots:


If you look at the Spark VFX (#8/22), could you tell how it's made ?
- Similar settings with Electrical Spark VFX
Gravity Modifier = 0- No
Collisionbecause they don't hit the floor - Sometimes, there are short sparks bursted in the wider side of the cone shape. This is achieved by
SubEmittermodule, which we will learn in the next parts.
Target: Create Waterfall effect (#13/22)
-
Main water stream
-
Clone our VFX_ElectricalSpark, created in part 6, name it
VFX_Waterfall -
Set
Trail Renderer = WaterTrailParticleand turn offColor over Lifetime,Collisionmodules -
Adjust some other settings:
(Trails) Size: 1Start Speed: Random (8, 10)(Shape) Box: (10, 0.1, 0.1), to create a big waterfall(Emission) Rate over Time: 50
-
Now the water stream look like toilet papers falling. We need to scale the trails up at the lower height by setting
(Trails) Width over Trail = Going DOWN. By this setting, the trails will scale down by time, so the head of them will remain big size, the tails will become smaller. -
Looking at the top of the waterfall, you'll see many thin trails are twisted. To make it less obvious, we need to scale down the particles (hidden) to scale down the trails as well. This is achieved by
Size over Lifetimemodule (set to going up) -
But water stream are still too separated -> make them blend well by setting
(Trails) Color over Trail = FadeIn + FadeOut -
Water drops
-
Clone
VFX_Waterfall, name itVFX_WaterDrops -
Disable
Trails,Size over Lifetime -
Apply following settings to make water splash out of the water fall:
(Renderer) Mode: Billboard(Renderer) Material: Default-Particle(Shape) Box X: 12Start Speed: Random (10, 14), to make drops go further than the water streamColor over Lifetime: Fade out
-
We've finished creating the waterfall, now let create the impact effect when the water particles hit the ground
-
Water ripples
- Create a new Particle System, parented to
VFX_Waterfall, on the ground where the water stream hits - Apply following settings to make water ripples:
(Renderer) Mode: Horizontal Billboard, to keep the ripples face up(Renderer) Material: WaterRipplesParticle(Emission) Rate over Time: 10(Shape) Shape: Edge, to emit particles on the line where the water stream hits the ground(Shape) Radius: 5Start Speed: 0, to keep the ripples at the place they are emittedStart Size: Random(10, 20)(Renderer) Max Size: 1, since we exceed the max size of the texture already, if we need bigger particle, we need to scale it in theRenderermoduleSize over Lifetime: Scale up quickly at the beginning, slower at the endColor over Lifetime: Fade out
- Since all the ripples look the same (except the size), we should add some randomness to them. In this case, I choose to randomize their rotations by setting
Start Rotation = Random(0, 360
- Create a new Particle System, parented to
-
Water splash
- Create a new Particle System, parented to
VFX_Waterfall, on the ground where the water stream hits - Apply following settings to make water ripples:
(Renderer) Mode: Billboard(Renderer) Material: WaterSplashParticle(Emission) Rate over Time: 20(Shape) Shape: Edge, to emit particles on the line where the water stream hits the ground. Notice: There will be splash underground, because edge emits particles around it. This setting is different in comparing to original waterfall VFX. Because our waterfall is bigger, the water stream hits the ground in a line, not a point (they use Shape = Cone).(Shape) Radius: 5, to match with the ripplesStart Speed: 0, to keep the ripples at the place they are emittedStart Size: Random(5, 10)(Renderer) Max Size: 1Size over Lifetime: Scale up quickly at the beginning, slower at the endColor over Lifetime: Fade out
- Since we don't apply Velocity to the water splashes, their "movement" is made by the
Size over Lifetimemodule, and we control it via a curve, to make it scale up very quickly at the beginning then slower at the end, just like the ripples - Set
Gravty Modifier = 0.2to make the splashes fall slowly at the end (when they fade out)
- Create a new Particle System, parented to
Now we have beautiful Waterfall VFX, and getting familiar with some other features:
- Trail (Width over Trail, Color over Trail)
- Shape (Box, Edge)
- Renderer (Horizontal Billboard, Max Size)
Screenshots:


If you take a look at the water drip VFX (#12/22), could you re-create it ?
- The drip is the only particle emitted from the faucet
- It's size is scale unevenly in separate axis to mimic real water drip exiting the faucet
- When the water drip hits the ground, there will be water splash
- This kind of effect could be achieved by good timing
- But, what if the next water drip exits the faucet faster ? The synchronized time is out of control.
- And, what if there are many water droplets, like the Rain effect (#10/22)
- We need
Sub Emittersmodule for this purpose
Target: Create Rain effect (#10/22)
- I leave the rain VFX for you
- We just talk about the ripples when rain drops hit the ground
- Clone
VFX_RipplefromVFX_Waterfalland adjust itsStart Size = 1,Start Lifetime = 0.5 - Since each rain drop just needs 1 ripple particle, we set
(Emission) Rate ver time = 0,Burst:(Time=0, Min=Max=1). By this setting, every time we need to emit a ripple particle, just 1 particle will be bursted out - Get back to the rain VFX, turn on the
Collisionmodule to enable the rain drops to hit the ground without bouncing(Bounce = 0) - Enable
Sub Emittersmodule and selectCollisionfrom the dropdown to emit new particle everytime the rain drops collide with something - To select which particles will be emitted when collision happens, drag our new
VFX_Rippleto the Particle field next to the drop down. And we now have the ripples. - What if I want some splashes like the waterfall ? There are 2 ways to do this. You can set
VFX_Splashas sub-emitter of theVFX_Ripple, and let it emit splash particles onBirth, then everytime a new ripple particle is emitted, some splash particles will be emitted too. I'll go with the second way: AddVFX_Splashas the 2nd sub-emitter ofVFX_Rain - I leave the splash VFX for you, and you can take some of my settings as references:
Render Mode: BillboardRender MaterialDefault-ParticleShape: Cone (heading up), 60 degreeGravity Modifier: 1Start Speed: 7Start Size: 0.1Emission: Burst, random(0, 1)
- In the origial Rain effect, they even use a mesh to represent a more solid splash, close to the ground. The mesh looks like a cone with less poly. You could try it to test new parameter
RenderMode = MeshinRenderermodule.
Now we have beautiful Rain VFX, and getting familiar with Sub Emitters module
Screenshots:


This is a special mode of Emission module. If this parameter has value > 0, it will emit new particles based on the distance it's parent traveled.
So, if the object moves fast, a lot of particles will be emitted. If it moves slowly, less particles will be emitted. If it stops, no new particles are emitted. It is a convenient way to control the number of particles without coding.
Trail is useful for moving objects / particles, but the trails are attached to their parents. Let's take a look at the Rocket Trail VFX (#20/22), the smoke particle are emitted along the way the rocket moves. And not like trails, the smoke particles flying up from where they are emitted, they don't follow the rocket.
This emission mode is useful for visual effects involving motion, examples:
- Smoke of Rocket (#20/22)
- Dust while character is running
- Dust while car is moving
Particle system is great, but the ultimate tool to create beautiful visual effects is shader, which is harder to understand.
Sometimes, you might need shader's help to control the particles. And you do that by sharing particles data to their shader. You define which attributes will be sent to shader before rendering in property Custom Vertex Stream, module Renderer.
Let's say we have a "Dissolve" shader (Assets/Shaders/Custom/Dissolve.shader), to make object disappear in style. We could burn a dollar bill with this shader by controlling the custom Burn Rate parameter in Material.
Target: Let's burn thousands of dollar bills !
- Create gameobject
VFX_MoneyFountainwith Particle System - Adjust your parameters to:
- Emit many dollar bills upward, then fall down using
Gravity Modifier&Velocity over Lifetime - Dollar bills have same size
- Use
Stretched Billboardto align the bills with moving direction
- Emit many dollar bills upward, then fall down using
That's it. We now have a money fountain. Let's burn the emitted dollar bills.
- Clone
VFX_MoneyFountaintoVFX_MoneyFountain_Burn - Clone shader
Custom/DissolvetoParticles/Dissolveand its material, so we can control theBurn Rateparameter from Particle System - In module
Renderer, enable parameterCustom Vertex Streamto send particle parameters to shader - Remove
Colorpart inCustom Vertex Streamsince we're not using it - We want to burn the dollar bill from the moment it is emitted, and finish burning it when it dies. It means the
Burn Rateparameter of the shader is equal to lifetime of each particle. AddAgePercenttoCustom Vertex Stream. Notice that this is just a number (float, [0-1]), so it's decoded in 'z' component of TEXCOORD - Edit the shader to use TEXCOORD.z as
Burn Rate. You might need to add vertex function to carry the TEXCOORD.z from Vertex Stream to surface function. See detailed implementation in the shader code.
Let's simulate the particle system.
And now we have a money fountain, which emits burning dollar bills.
Notice that particles with different lifetime having different burning rate. It's awesome. Now you understand how we use Custom Vertex Stream to send data from Particle System to shader.
I keep going further by making dollar bills waving like flags in the wind while burning. But a quad with just 4 vertices won't help, so I need to use Plane as a Mesh in Renderer of the Particle System. You can see the details in gameobject VFX_MoneyFountain_Burn_Waving. And guess what, I use AgePercent from Particle Sytem to control how vertices are displaced too.
Screenshots:


There are some effects in the sample using Custom Vertex Stream to send particle color to shader to tint with texture color:
- Big Explosion (#1/22): Dark smoke
- Small Explosion (#2/22): Dark smoke
- Storm Clouds (#11/22): Clouds
Particle System is a classic method to create beautiful visual effects in Unity. By mastering it, you could create many useful effects helping your game to stand out. You might want to explore more about:
- Optimization by reducing number of particle systems, modules, particles
- Optimization by using simple meshes, fake light
- Optimization by using packed texture & Texture Sheet Animation module
- Optimization by re-ordering particle system for batch drawing
- Optimization by using shaders for Mobile
- Sorting order when using particle system with UI
- Capturing particle effect to texture (real-time or baked)
- Point Cache, Vector Field, Signed Distance Function, Texture 3D
- Conformation
- Force field
- Push / Pull force
- Dynamic target ...
~
Unity is doing experiments on new tool called Visual Effect Graph, which has similar concept with Particle System, and we have more control on parameters, with node-based UI.
I think you saw how powerful shader is in this training course. By using shader, you could create ANY visual effects, which Particle System could not or not as efficiently. Shader is the true king in Computer Graphics, especially in game development. At first, it might be tough for you to start, so you should learn from the other great developers out there, to know the keywords (dissolve, triplanar, tesselation ...), then how they did it later. All the smoke & cloud effects in the sample use Normal Map to add depth to the objects.
If you're not comfortable with coding shader, you could use Shader Graph. It is a node-based system to quickly build and preview your shader in real-time. When you're done editing, you still need to compile it to a real shader code, via a button.
Visual Effect in Game Development is a huge topic, and Particle System is a good start. Hope this helps.
THE END
2018