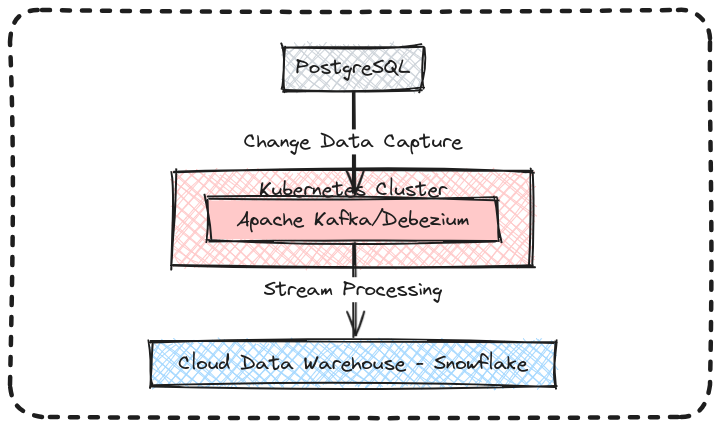
This document outlines a three-part series on building a real-time CDC (Change Data Capture) pipeline using Kafka and Debezium to stream changes from a Postgres database to a Snowflake lake house.
- Kubectl and Minikube with 2 CPUs and 4GB memory
- Linux Ubuntu 22.04 (or similar)
- Kubectl v1.29.3 (or later)
- Minikube v1.32.0 (or later)
Download and install kubectl for your operating system:
https://kubernetes.io/docs/tasks/tools/install-kubectl-linux/
- Download kubectl:
curl -LO "https://dl.k8s.io/release/$(curl -L -s https://dl.k8s.io/release/stable.txt)/bin/linux/amd64/kubectl"
- Install kubectl:
sudo install -o root -g root -m 0755 kubectl /usr/local/bin/kubectl
- Check kubectl version:
kubectl version --client --output=yaml
Install and start Minikube:
https://minikube.sigs.k8s.io/docs/start/
- Download Minikube:
curl -LO https://storage.googleapis.com/minikube/releases/latest/minikube-linux-amd64
- Install Minikube:
sudo install minikube-linux-amd64 /usr/local/bin/minikube && rm minikube-linux-amd64
- Check Minikube version:
minikube version
- Start Minikube:
minikube start
For a development/local environment with minimal CPU/memory configuration:
minikube start --cpus 2 --memory 4096
Deploy Confluent Kafka on Kubernetes using the provided Helm chart:
https://github.com/confluentinc/confluent-kubernetes-examples
- Create a Confluent namespace:
kubectl create namespace confluent
- Set Confluent as your current context:
kubectl config get-contexts
kubectl config set-context --current --namespace confluent
- Set up the Helm Chart:
helm repo add confluentinc https://packages.confluent.io/helm
- Install Confluent Operator for Kubernetes using Helm:
helm upgrade --install confluent-operator confluentinc/confluent-for-kubernetes --namespace confluent
- Deploy Confluent Platform with the provided configuration:
kubectl apply -f ./helm/confluent-platform.yaml
For a development/local environment with minimal configuration:
kubectl apply -f ./helm/confluent-platform-dev.yaml
- Check that the Confluent For Kubernetes pod comes up and is running:
kubectl get pods
- Check that all Confluent Platform resources are deployed:
kubectl get confluent
- Access the Control Center on your web browser:
- Get Kubernetes IP:
minikube ip
- Get exposed port:
kubectl describe service -n confluent | grep -i nodeport
- Access Control Center on
ip:port
Alternatively, forward desired pod ports to your local machine:
kubectl port-forward schemaregistry-0 8081:8081
kubectl port-forward controlcenter-0 9021:9021
kubectl port-forward connect-0 8083:8083
- Use
kubectl get po -n confluentto check pods. - Use
kubectl describe pod connect-0for pod-specific information. - Use
kubectl logs connect-0 | grep -i errorto view error messages.
- Delete Kubernetes resources:
kubectl delete -f ./helm/confluent-platform.yaml
- Alternatively, for the development/local environment:
kubectl delete -f ./helm/confluent-platform-dev.yaml
- Check if ports are being forwarded:
ps -aux | grep kubectl
- Kill process:
pkill kubectl
- Uninstall Confluent Operator:
helm uninstall confluent-operator
- Stop Minikube (if necessary):
minikube stop
- Delete Minikube (WARNING: this will destroy everything deployed):
minikube delete
This is the first of a three-part article. Stay tuned for what's next!
