Tetris Duel
Note: This project has never been tested with the new Raspberry Pi 2.
As an experiment on basic game networking in bare metal assembly, we created a multiplayer Tetris game for Raspberry Pi. Watch our game demo here: http://youtu.be/hTqKRdcKZ9k
Our source code features:
- 4000 lines of documented ARM assembly code
- Asynchronous networking for two Pis connected via GPIO
- Optimized driver (60 μs duty cycle) for a single NES controller
- Rendering logic for HDMI output with double buffering
- Custom ARMv6 assembler written from scratch in C (released as binary only)
We completed this project in 3 weeks, amidst exams and normal school work, as an extension to Imperial College London's first year computing project.
Setup Guide
Prerequisites
Single Player
- Male - Male jumper wires x5
- Female - Male jumper wires x5
- 260 ohm resistors x3
- Breadboard x1
- NES controller x1
- Raspberry Pi rev 2, SD card, power cable x1
- Screen and HDMI cable x1
Multiplayer
- Single player prerequisites x2
- Female - Male jumper wires x14
- 10k ohm resistors x6
- Breadboard x1
Software Setup
-
Format your SD card with Raspbian OS following the image installation guide
-
Assemble the game with the provided assembler (or the official ARM assembler)
on mac:
./assemble_mac tetris.s kernel.imgon linux:
./assemble_linux tetris.s kernel.img -
Copy the generated
kernel.imgto your SD card, replacing existing file -
(Optional) Repeat step 1-3 on second Pi for multiplayer gameplay
-
Before playing, ensure every component is wired correctly as described in Hardware Setup
Hardware Setup
NES Controller
Connect your NES controller to the GPIO pins as shown in the following table.
| NES Controller Pin | GPIO Pin |
|---|---|
| Power | 1 |
| Latch | 11 |
| Clock | 12 |
| Data | 13 |
| Ground | 14 |
          +----> Power  (white)
          |
  +---------+
  | x  x  o   \
  | o  o  o  o |
  +------------+
    |  |  |  |
    |  |  |  +-> Ground (red)
    |  |  +----> Clock  (black)
    |  +-------> Latch  (yellow)
    +----------> Data   (green)
Note: latch, clock, and data pins should be connected using 260 ohm resistors as shown in our demo setup:

Networking (Multiplayer)
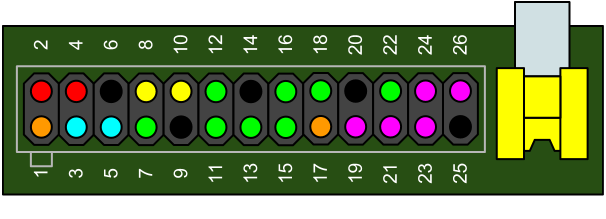
Connect a second Pi running the same kernel using the following GPIO pins.
| P1 Pin Name | P1 Pin No. | P2 Pin No. | P2 Pin Name |
|---|---|---|---|
| Data in | 15 | 16 | Data out |
| Data out | 16 | 15 | Data in |
| Status in | 18 | 22 | Status out |
| Status out | 22 | 18 | Status in |
| Game in | 21 | 23 | Game out |
| Game out | 23 | 21 | Game in |
| Ground | 20 | 20 | Ground |
Note: all pins (except ground) should be connected using 10k ohm resistors as shown in our demo setup:

FAQ
- Where is
tetrisToProcess.s?
We have removed our custom preprocessor (as described in our final report) from github release for a cleaner repository. tetris.s now contains all code in tetrisToProcess.s with only variable names replaced by actual values.
- Why do you have all the code in only one file?
We do understand the importance of writing modular code. However, as part of the requirement of our school project, we must assemble our entire game using our custom assembler which, due to time constraint, was not made to support generating ELF headers for linker scripts.
That said, we have taken great care to separate our code into different sections within the file using comments and we have also refactored as many reusable routines as we can.
Team
- Han Qiao
- Email - qiao.han13@imperial.ac.uk
- Github - @sweatybridge
- Piotr Chabierski
- Email - piotr.chabierski13@imperial.ac.uk
- Github - @piotrchabierski
- Michał Sienkiewicz
- Email - michal.sienkiewicz13@imperial.ac.uk
- GitHub - @michsien
- Utsav Tiwary
- Email - utsav.tiwary13@imperial.ac.uk
- GitHub - @utsavtiwary
Acknowledgement
This is a university project intended for educational purposes and not for commercial use. The tile images were taken from Tetris Battle, which also inspired our game logic.
