ROS package to classify sound stream.
-
Install ROS. Available OS:
- Ubuntu 16.04 (?)
- Ubuntu 18.04
-
Create workspace
mkdir ~/sound_classification_ws/src -p
cd ~/sound_classification_ws/src
git clone https://github.com/708yamaguchi/sound_classification.git
# Note: We should stop using `audio_to_spectrogram` from source after released.
git clone https://github.com/708yamaguchi/jsk_recognition.git -b multi-channel
rosdep install --from-paths . --ignore-src -y -r
cd ..
catkin build sound_classification
source ~/sound_classification_ws/devel/setup.bash
-
Install other packages.
- Some pip packages which are not managed in rosdep are needed.
cd ~/sound_classification_ws/src/sound_classification
pip install requirements.txt
- cuda and cupy are needed for chainer. See https://docs-cupy.chainer.org/en/stable/compatibility.html
- Using GPU is highly recommended.
- Some pip packages which are not managed in rosdep are needed.
-
Write your microphone parameters to
audio_to_spectrogram.launch's arg tags.- In particular,
device,n_channel,bitdepthandsample_rateneed to be specified. - The example bash commands to get these params are below:
# For device. In this example, card 0 and device 0, so device:="hw:0,0"
$ arecord -l
\**** List of CAPTURE Hardware Devices ****
card 0: PCH [HDA Intel PCH], device 0: ALC293 Analog [ALC293 Analog]
Subdevices: 1/1
Subdevice #0: subdevice #0
# For n_channel, bitdepth and sample_rate, $ pactl list short sinks 0 alsa_output.pci-0000_00_1f.3.analog-stereo module-alsa-card.c s16le 2ch 44100Hz SUSPENDED - If you use
/audiotopic from other computer and do not want to publish/audio, setuse_microphone:=falseat each launch flie.
- In particular,
-
Save environmental noise to
train_data/noise.npy.- By subtracting noise, spectrograms become clear.
- During this script, you must not give any sound to the sensor.
- You should update noise data everytime before sound recognition, because environmental sound differs everytime.
- 30 noise samples are enough.
$ roslaunch sound_classification save_noise.launch
-
Publish audio -> spectrum -> spectrogram topics.
-
You can set the max/min frequency to be included in the spectrum by
high_cut_freq/low_cut_freqargs inaudio_to_spectrogram.launch. -
If
gui:=true, spectrum and spectrogram are visualized.$ roslaunch sound_classification audio_to_spectrogram.launch gui:=true
-
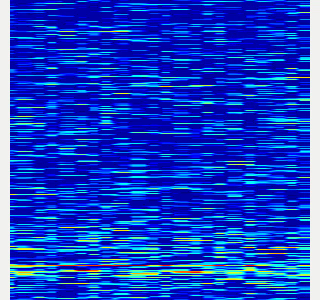
Here is an example spectrogram at quiet environment.
- Horiozntal axis is time [Hz]
- Vertical axis is frequency [Hz]
Spectrogram w/o noise subtraction Spectrogram w/ noise subtraction 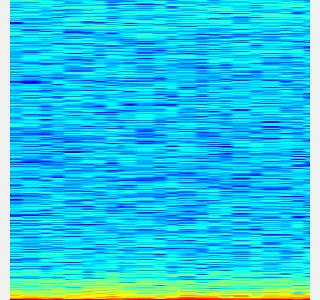
-
-
Collect spectrogram you would like to classify at
train_data/original_spectrogram/TARGET_CLASS.-
Rosbag version (Recommended)
- I recommend to use rosbag to collect spectrograms. The rosbag makes it easy to use
save_sound.launchwith several parameters. - In
target_class:=TARGET_CLASS, you can set the class name of your target sound. - By using
use_rosbag:=trueandfilename:=PATH_TO_ROSBAG, you can save spectrograms from rosbag. - By default, rosbag is paused at first. Press 'Space' key on terminal to start playing rosbag. When rosbag ends, press 'Ctrl-c' to terminate.
- The newly saved spectrograms are appended to existing spectrograms.
- You can change threshold of sound saving by
threshold:=xxx. The smaller the value is, the more easily sound is saved.# Save audio to rosbag $ roslaunch sound_classification record_audio_rosbag.launch filename:=PATH_TO_ROSBAG# play rosbag and collecting data $ export ROS_MASTER_URI=http://localhost:11311 $ roslaunch sound_classification save_sound.launch use_rosbag:=true \ filename:=PATH_TO_ROSBAG target_class:=TARGET_CLASS threshold:=0.5
- By setting
threshold:=0andsave_when_sound:=false, you can collect spectrogram of "no sound".# play rosbag and collecting no-sound data $ export ROS_MASTER_URI=http://localhost:11311 $ roslaunch sound_classification save_sound.launch use_rosbag:=true \ filename:=PATH_TO_ROSBAG target_class:=no_sound threshold:=0 save_when_sound:=false
- I recommend to use rosbag to collect spectrograms. The rosbag makes it easy to use
-
Stream version (Not Recommended)
- You can collect spectrogram directly from audio topic stream.
- Do not use
use_rosbag:=true. The other args are the same as the rosbag version. Please see above.$ roslaunch sound_classification save_sound.launch \ save_when_sound:=true target_class:=TARGET_CLASS threshold:=0.5 save_data_rate:=5
-
-
Create dateaset for chainer from saved spectrograms.
- Some data augmentation is executed.
--number 30means to use maximum 30 images for each class in dataset.$ rosrun sound_classification create_dataset.py --number 30
-
Visualize dataset.
- You can use
trainarg for train dataset (augmented dataset),testarg for test dataset. - The spectrograms in the dataset are visualized in random order.
$ rosrun sound_classification visualize_dataset.py test # train/test
- You can use
-
Train with dataset.
- Default model is
NIN(Recommended). - If you use
vgg16, pretrained weights of VGG16 is downloaded toscripts/VGG_ILSVRC_16_layers.npzat the first time you run this script.$ rosrun sound_classification train.py --epoch 30
- Default model is
-
Classify sounds.
- It takes a few seconds for the neural network weights to be loaded.
use_rosbag:=trueandfilename:=PATH_TO_ROSBAGis available if you classify sound with rosbag.$ roslaunch sound_classification classify_sound.launch
- You can fix class names' color in classification result image by specifying order of class names like below:
<rosparam>
  target_names: [none, other, chip_bag]
</rosparam>
- Example classification result:
no_sound applause voice 


Sound classification demo with your laptop's built-in microphone. You can create dataset from rosbag files in sample_rosbag/ directory.

-
Setup environment and write Microphone settings (1. of Usage section)
-
Save environmental noise
$ roslaunch sound_classification save_noise.launch
-
Collect spectrograms from sample rosbags. Press 'Space' to start rosbag.
- For no_sound class
$ roslaunch sound_classification save_sound.launch use_rosbag:=true \ filename:=$(rospack find sound_classification)/sample_rosbag/no_sound.bag \ target_class:=no_sound threshold:=0 save_when_sound:=false - For applause class
$ roslaunch sound_classification save_sound.launch use_rosbag:=true \ filename:=$(rospack find sound_classification)/sample_rosbag/applause.bag \ target_class:=applause threshold:=0.5 - For voice class
$ roslaunch sound_classification save_sound.launch use_rosbag:=true \
filename:=$(rospack find sound_classification)/sample_rosbag/voice.bag \
target_class:=voice threshold:=0.5
- For no_sound class
-
Create dataset
$ rosrun sound_classification create_dataset.py --number 30
-
Train (takes ~10 minites)
$ rosrun sound_classification train.py --epoch 20
-
Classify sound
$ roslaunch sound_classification classify_sound.launch