#Version 2 of the AWS SDK for iOS
Version 2 of the AWS Mobile SDK for iOS has reached General Availability (GA) and is no longer in Developer Preview. Version 1 is deprecated as of September 29, 2014, and will continue to be available until December 31, 2014, in our aws-sdk-ios-v1 repository. If you are building new apps, we recommend you use Version 2.
##Highlights
- Amazon Cognito – A simple user identity and synchronization service that helps you securely manage and synchronize app data for your users across their mobile devices. With Amazon Cognito, you can save any kind of data, such as app preferences or game state, in the AWS cloud without writing any backend code or managing any infrastructure.
- Amazon Mobile Analytics – A service for collecting, visualizing, and understanding app usage data at scale. Amazon Mobile Analytics reports are typically updated within 60 minutes of data being received. Amazon Mobile Analytics is built to scale with the business and can collect and process billions of events from millions of endpoints.
- Amazon Kinesis Recorder – Enables you to reliably record data to an Amazon Kinesis data stream from your mobile app. Kinesis Recorder batches requests to handle intermittent network connections, and it enables you to record events even when the device is offline.
- Amazon DynamoDB Object Mapper - We have made it easier to use DynamoDB from the AWS SDK for iOS by providing the DynamoDB Object Mapper for iOS. The DynamoDB Object Mapper makes it easy to set up connections to a DynamoDB database and supports high-level operations like creating, getting, querying, updating, and deleting records.
- Amazon S3 Transfer Manager - We have rebuilt the S3TransferManager to utilize BFTask in the AWS SDK for iOS. It has a clean interface, and all of the operations are now asynchronous.
- ARC support - The AWS SDK for iOS is now ARC enabled from the ground up to improve overall memory management.
- BFTask support - With native BFTask support in the AWS SDK for iOS, you can chain async requests instead of nesting them. This makes the logic cleaner while keeping the code more readable.
- Conforming Objective-C recommendations - The AWS SDK for iOS conforms to Objective-C best practices. The SDK returns NSErrors instead of throwing exceptions. iOS developers will now feel at home when using the AWS Mobile SDK.
- Official CocoaPods support - Including the AWS SDK for iOS in your project is now easier than ever. You just need to add
pod 'AWSiOSSDKv2'andpod 'AWSCognitoSync'to your Podfile.
##Setting Up
To get started with the AWS SDK for iOS, you can set up the SDK and start building a new project, or you can integrate the SDK in an existing project. You can also run the samples to get a sense of how the SDK works.
The AWS Mobile SDK for iOS supports the following versions of software:
- Xcode 5 and later
- iOS 7 and later
You can check out the SDK source code.
##Include the SDK for iOS in an Existing Application
The sample apps are standalone projects that are already set up for you. You can also integrate the SDK for iOS with an existing application. If you have an existing app in which you'd like to use AWS, there are two ways to import the AWS Mobile SDK for iOS into your project:
###CocoaPods
-
The AWS Mobile SDK for iOS is available through CocoaPods. If you have not installed CocoaPods, install CocoaPods by running the command:
$ sudo gem install cocoapods -
In your project directory (the directory where your
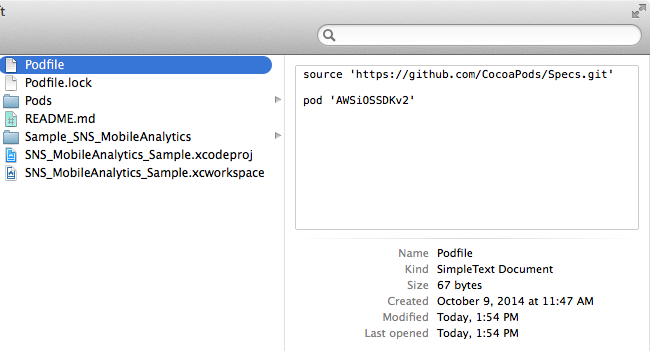
*.xcodeprojfile is), create a plain text file named Podfile (without any file extension) and add the following lines. If you want to use Amazon Cognito Sync, make sure to includepod 'AWSCognitoSync'as well.source 'https://github.com/CocoaPods/Specs.git' pod 'AWSiOSSDKv2' pod 'AWSCognitoSync' -
Then run the following command:
$ pod install -
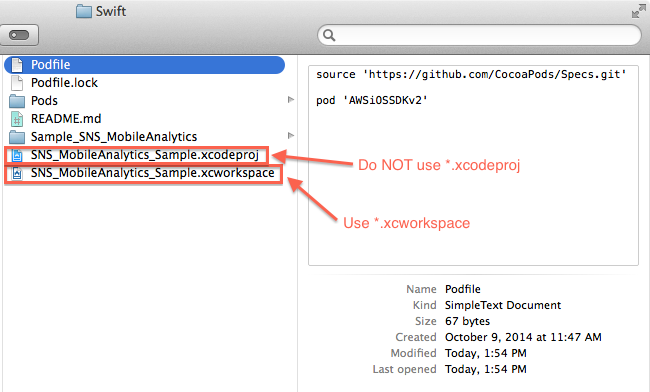
Open up
*.xcworkspacewith Xcode and start using the SDK.Note: Do NOT use
*.xcodeproj. If you open up a project file instead of a workspace, you receive an error:ld: library not found for -lPods-AWSiOSSDKv2 clang: error: linker command failed with exit code 1 (use -v to see invocation)
###Frameworks
-
Download the SDK from our AWS Mobile SDK page. The SDK is stored in a compressed file archive named
aws-ios-sdk-#.#.#(where#.#.#represents the version number, so for version 2.0.0, the filename isaws-ios-sdk-2.0.0).Note: The size of AWSiOSSDKv2.framework is > 65MB; however, it does not add > 65MB to your app binary when imported to your project because:
-
Only objects that you use in your app are included in your app binary from the framework
AWSiOSSDKv2.framework contains a static library, and object code in the library is incorporated in your app binary file at build time. When the
-ObjCand-all_loadlinker flags are NOT used, Xcode is smart enough to figure out what objects from the framework are necessary for your app and include just those objects. AWSiOSSDKv2.framework is packaged so that you do not need to include these linker flags. (If you are using a third-party framework that requires you to include the-ObjCor-all_loadlinker flags, you can use-force_loadinstead to include those frameworks.)For example, if you only use Amazon DynamoDB in your app and none of the other supported services, your app won't include object code for those other services. Unless you use every single object from the framework, only a portion of the code from the framework will be included in your app.
-
The framework contains five architectures, while apps on a device need at most three
We currently compile the AWS Mobile SDK for iOS for five architectures:
armv7,armv7s,arm64,i386, andx86_64. If you want to optimize your app for 64-bit devices including iPhone 6 and iPhone 5S, you need to build your app witharm64support. 32-bit iOS devices that the AWS SDK for iOS supports use thearmv7andarmv7sarchitectures.The 64-bit iPhone simulators use
x86_64, and 32-bit simulators usei386because they run on the Mac. We support these architectures so that the developers can run their apps with our framework on the simulator for testing.x86_64andi386support is essential for testing, but the code is unnecessary for apps on the App Store. Even if you use every single object from the AWS Mobile SDK, the app that you submit to Apple never includes about two fifths of the code included in the framework. -
Apps on the App Store are compressed
After you submit your app to Apple, it is encrypted for DRM purposes and re-compressed. This leads to an even smaller footprint.
-
-
With your project open in Xcode, Control+click Frameworks and then click Add files to "<project name>"....
-
In Finder, navigate to the
AWSiOSSDKv2.frameworkfile and select it. Click Add. If you want to use Amazon Cognito Sync, you also need to add theAWSCognitoSync.framework, which is in the extras directory. -
Following the same procedure, add the following frameworks, located in the third-party directory, into your project.
Bolts.framework(If your application uses the Facebook SDK, you may not need this framework, as it's already included with the Facebook SDK.)GZIP.frameworkMantle.frameworkReachability.frameworkTMCache.frameworkUICKeyChainStore.frameworkXMLDictionary.framework
-
Drag and drop the following JSON files, located in the service-definitions directory, into your project.
autoscaling-2011-01-01.jsoncib-2014-06-30.jsoncss-2014-06-30.jsondynamodb-2012-08-10.jsonec2-2014-06-15.jsonelasticloadbalancing-2012-06-01.jsonemail-2010-12-01.jsonkinesis-2013-12-02.jsonmobileanalytics-2014-06-30.jsonmonitoring-2010-08-01.jsons3-2006-03-01.jsonsdb-2009-04-15.jsonsns-2010-03-31.jsonsqs-2012-11-05.jsonsts-2011-06-15.json
-
Open a target for your project, select Build Phases, expand Link Binary With Libraries, click the + button, and add
libsqlite3.dylibandlibz.dylib.
##Update the SDK to a Newer Version
When we release a new version of the SDK, you can pick up the changes as described below.
###CocoaPods
-
Run the following command in your project directory. CocoaPods automatically picks up the new changes.
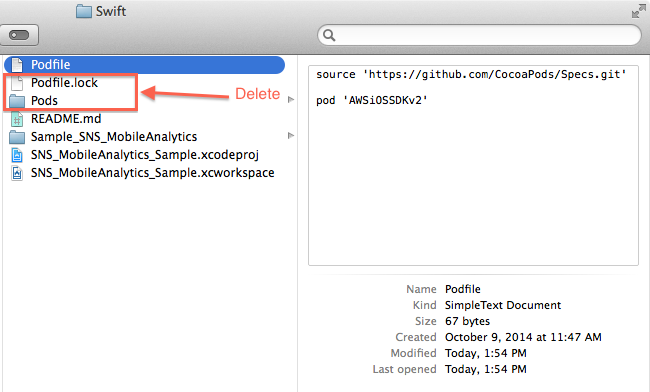
$ pod updateNote: If your pod is having an issue, you can delete
Podfile.lockandPods/then runpod installto cleanly install the SDK.
###Frameworks
-
In Xcode select the following frameworks and hit delete on your keyboard. Then select Move to Trash:
AWSiOSSDKv2.frameworkAWSCognitoSync.frameworkBolts.frameworkGZIP.frameworkMantle.frameworkReachability.frameworkTMCache.frameworkUICKeyChainStore.frameworkXMLDictionary.framework
-
Also, delete the JSON files:
autoscaling-2011-01-01.jsoncib-2014-06-30.jsoncss-2014-06-30.jsondynamodb-2012-08-10.jsonec2-2014-06-15.jsonelasticloadbalancing-2012-06-01.jsonemail-2010-12-01.jsonkinesis-2013-12-02.jsonmobileanalytics-2014-06-30.jsonmonitoring-2010-08-01.jsons3-2006-03-01.jsonsdb-2009-04-15.jsonsns-2010-03-31.jsonsqs-2012-11-05.jsonsts-2011-06-15.json
-
Follow the installation process above to include the new version of the SDK.
##Getting Started with Swift
-
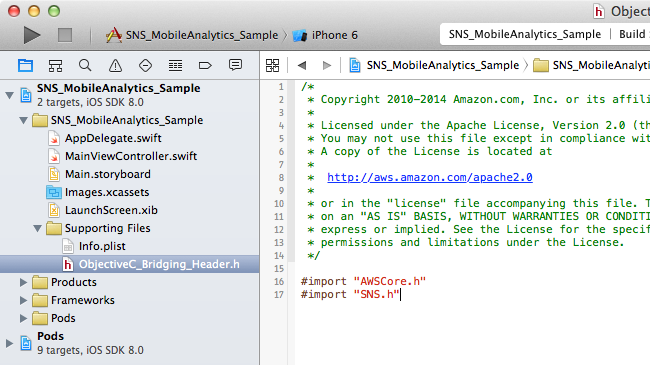
Create an Objective-C bridging header file using Xcode.
-
In the bridging header, import the appropriate headers for the services you are using. The header file import convention for CocoaPods is
#import "SERVICENAME.h", and for frameworks it is#import <FRAMEWORKNAME/SERVICENAME.h>, as in the following examples:CocoaPods
 #import "AWSCore.h"
 #import "S3.h"
 #import "DynamoDB.h"
 #import "SQS.h"
 #import "SNS.h"
Frameworks
#import <AWSiOSSDKv2/AWSCore.h> #import <AWSiOSSDKv2/S3.h> #import <AWSiOSSDKv2/DynamoDB.h> #import <AWSiOSSDKv2/SQS.h> #import <AWSiOSSDKv2/SNS.h> -
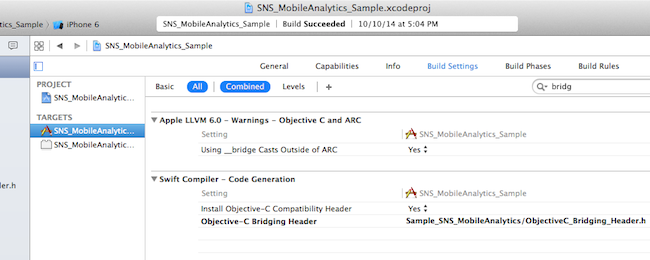
From Your Target > Build Settings > Objective-C Bridging Header, point Objective-C Bridging Header to the bridging header you just created.
-
Import the AWSCore header in the application delegate.
CocoaPods
#import "AWSCore.h"Frameworks
#import <AWSiOSSDKv2/AWSCore.h> -
Create a default service configuration by adding the following code snippet in the
@optional func application(_ application: UIApplication!, didFinishLaunchingWithOptions launchOptions: NSDictionary!) -> Boolapplication delegate method.let credentialsProvider = AWSCognitoCredentialsProvider.credentialsWithRegionType( AWSRegionType.USEast1, accountId: cognitoAccountId, identityPoolId: cognitoIdentityPoolId, unauthRoleArn: cognitoUnauthRoleArn, authRoleArn: cognitoAuthRoleArn) let defaultServiceConfiguration = AWSServiceConfiguration( region: AWSRegionType.USEast1, credentialsProvider: credentialsProvider) AWSServiceManager.defaultServiceManager().setDefaultServiceConfiguration(defaultServiceConfiguration) -
Make a call to the AWS services.
let dynamoDB = AWSDynamoDB.defaultDynamoDB() let listTableInput = AWSDynamoDBListTablesInput() dynamoDB.listTables(listTableInput).continueWithBlock{ (task: BFTask!) -> AnyObject! in let listTablesOutput = task.result as AWSDynamoDBListTablesOutput for tableName : AnyObject in listTablesOutput.tableNames { println("\(tableName)") } return nil }Note: Most of the service client classes have a singleton method to get a default client. The naming convention is
+ defaultSERVICENAME(e.g.+ defaultDynamoDBin the above code snippet). This singleton method creates a service client withdefaultServiceConfiguration, which you set up in step 5, and maintains a strong reference to the client.
##Getting Started with Objective-C
-
Import the AWSCore header in the application delegate.
CocoaPods
#import "AWSCore.h"Frameworks
#import <AWSiOSSDKv2/AWSCore.h> -
Create a default service configuration by adding the following code snippet in the
- application:didFinishLaunchingWithOptions:application delegate method.AWSCognitoCredentialsProvider *credentialsProvider = [AWSCognitoCredentialsProvider credentialsWithRegionType:AWSRegionUSEast1 accountId:AWSAccountID identityPoolId:CognitoPoolID unauthRoleArn:CognitoRoleUnauth authRoleArn:nil]; AWSServiceConfiguration *configuration = [AWSServiceConfiguration configurationWithRegion:AWSRegionUSEast1 credentialsProvider:credentialsProvider]; [AWSServiceManager defaultServiceManager].defaultServiceConfiguration = configuration; -
Import service headers where you want to use the services. The header file import convention for CocoaPods is
#import "SERVICENAME.h", and for frameworks it is#import <FRAMEWORKNAME/SERVICENAME.h>, as in the following examples:CocoaPods
 #import "S3.h"
 #import "DynamoDB.h"
 #import "SQS.h"
 #import "SNS.h"
Frameworks
#import <AWSiOSSDKv2/S3.h> #import <AWSiOSSDKv2/DynamoDB.h> #import <AWSiOSSDKv2/SQS.h> #import <AWSiOSSDKv2/SNS.h> -
Make a call to the AWS services.
AWSS3Transfermanager *transferManager = [AWSS3Transfermanager defaultS3TransferManager]; AWSS3TransferManagerUploadRequest *uploadRequest = [AWSS3TransferManagerUploadRequest new]; uploadRequest.bucket = yourBucket; uploadRequest.key = yourKey; uploadRequest.body = yourDataURL; uploadRequest.contentLength = [NSNumber numberWithUnsignedLongLong:fileSize]; [[transferManager upload:uploadRequest] continueWithBlock:^id(BFTask *task) { // Do something with the response return nil; }];Note: Most of the service client classes have a singleton method to get a default client. The naming convention is
+ defaultSERVICENAME(e.g.+ defaultS3TransferManagerin the above code snippet). This singleton method creates a service client withdefaultServiceConfiguration, which you set up in step 5, and maintains a strong reference to the client.
##BFTask
With native BFTask support in the SDK for iOS, you can chain async requests instead of nesting them. It makes the logic cleaner, while keeping the code more readable. Read this blog post to learn how to use BFTask.
##Logging
Changing log levels during development may make debugging easier. You can change the log level by importing AWSCore.h and calling:
Swift
AWSLogger.defaultLogger().logLevel = .Verbose
The following logging level options are available:
.None.Error(This is the default. Only error logs are printed to the console.).Warn.Info.Debug.Verbose
Objective-C
[AWSLogger defaultLogger].logLevel = AWSLogLevelVerbose;
The following logging level options are available:
AWSLogLevelNoneAWSLogLevelError(This is the default. Only error logs are printed to the console.)AWSLogLevelWarnAWSLogLevelInfoAWSLogLevelDebugAWSLogLevelVerbose
##Sample Apps
The AWS SDK for iOS includes sample apps that demonstrate common use cases.
###Cognito Sync Sample (Objective-C)
This sample demonstrates how to securely manage and sync your mobile app data and create unique identities via login providers including Facebook, Google, and Login with Amazon.
AWS Services Demonstrated:
###DynamoDB Object Mapper Sample (Objective-C)
This sample demonstrates how to insert / update / delete / query items using DynamoDB Object Mapper.
AWS Services Demonstrated:
###S3 Transfer Manager Sample (Objective-C)
This sample demonstrates how to upload / download multiple files simultaneously using S3 Transfer Manager. It also shows how to pause, resume, and cancel file upload / download.
AWS Services Demonstrated:
###SNS Mobile Push and Mobile Analytics Sample (Swift)
This sample demonstrates how to set up Amazon SNS Mobile Push and record events using Amazon Mobile Analytics.
AWS Services Demonstrated:
##Install the Reference Documentation in Xcode
The AWS Mobile SDK for iOS zip file includes documentation in the DocSets format that you can view within Xcode. The easiest way to install the documentation is to use the Mac OS X terminal.
-
Open the Mac OS X terminal and go to the directory containing the expanded archive. For example:
$ cd ~/Downloads/aws-ios-sdk-2.0.0Note: Remember to replace 2.0.0 in the example above with the actual version number of the AWS SDK for iOS that you downloaded.
-
Create a directory called
~/Library/Developer/Shared/Documentation/DocSets:$ mkdir -p ~/Library/Developer/Shared/Documentation/DocSets -
Copy (or move)
Documentation/com.amazon.aws.ios.docsetfrom the SDK installation files to the directory you created in the previous step:$ mv Documentation/com.amazon.aws.ios.docset ~/Library/Developer/Shared/Documentation/DocSets/ -
If Xcode was running during this procedure, restart Xcode. To browse the documentation, go to Help, click Documentation and API Reference, and select AWS SDK for iOS v2.0 Documentation (where '2.0' is the appropriate version number).
##Talk to Us
Visit our GitHub Issues to leave feedback and to connect with other users of the SDK.
##Author
Amazon Web Services
##License
The AWS Mobile SDK for iOS is available under the Apache License. See the LICENSE file for more info.


