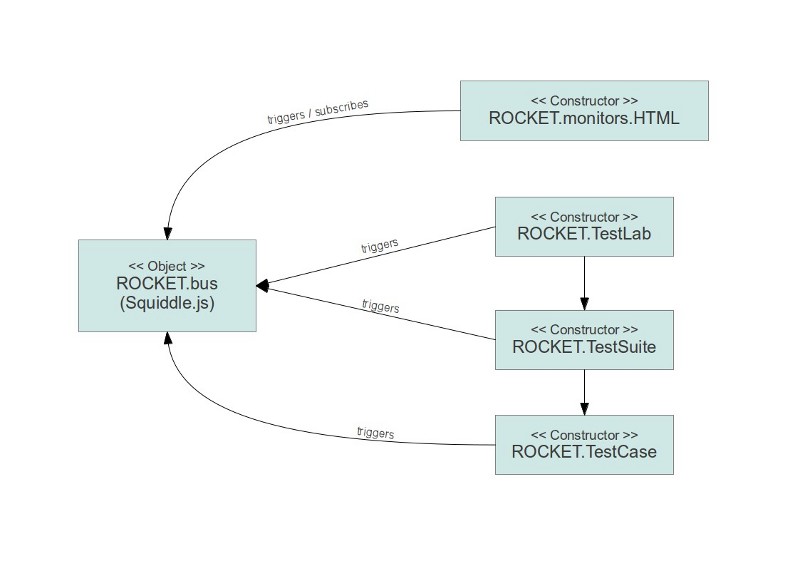
RocketScience is an event-driven, asynchronous testing framework for JavaScript. It works in both browser environments and on the server (node.js).
-
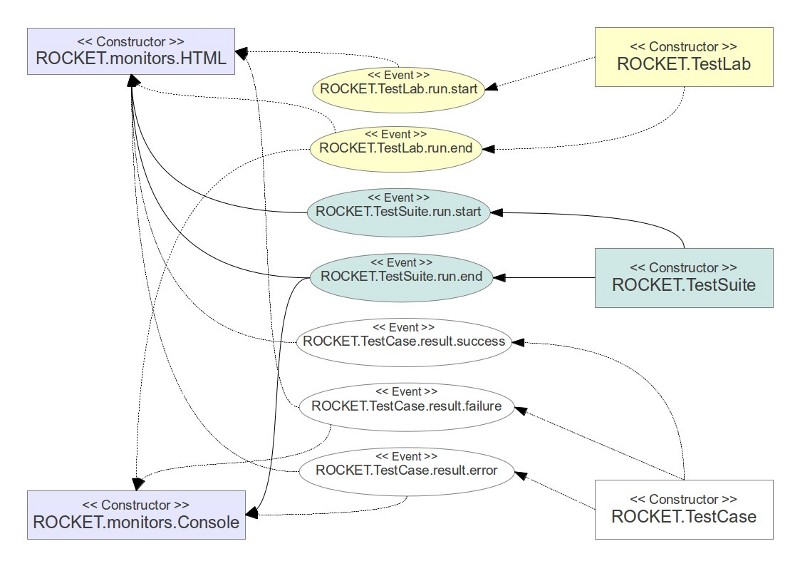
TestCase: A TestCase in RocketScience is one single test that can use any number of assertions to test some code. A TestCase consists of a name, at least one method to run some code and optionally a check method to test asynchronous stuff. A TestCase can also have an initialization method and you can define an offset time for when the check method should be run after the main test method has been called.
-
TestSuite: A TestSuite consists of a bunch of similar TestCases.
-
TestLab: A TestLab can be used to bundle TestSuites and exercise them.
-
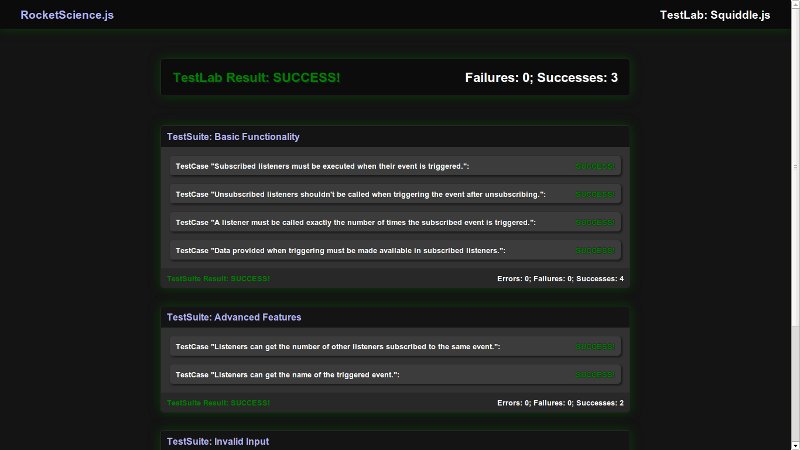
Monitor: A monitor is used to listen for ongoing tests and their results and displays them in one way or another. RocketScience comes with two monitors by default, namely the HTML monitor to be used in browser environments and the Console monitor which uses either the web console or node's console to display results. Also, writing your own monitors is really easy.
Grab the latest version from the download section on GitHub: RocketScience.js on GitHub
Extract the archive in a directory of your choice. If you only want to use RocketScience in the browser, that's it for the installation.
You can install RocketScience with npm:
npm install rocketscience
Or you can download the package (see the browser section above), extract it, go to it's directory and do:
npm install
Then in node files, you can do:
var ROCKET = require("rocketscience");Or you can skip the install and use the downloaded version like this:
var ROCKET = require("./path/to/RocketScience.js/RocketScience.js");RocketScience includes a test file for Squiddle.js which you can use on both the browser and node.
To test it in the browser, just open the file "tests/Squiddle.js.test.html" or drag it onto the browser window.
To test in node, open up a console and type:
cd path/to/RocketScience.js/tests/
node Squiddle.js.test.node.js
A simple test case could look like this:
var test = new ROCKET.TestCase(
    "My first test case.",
    function( params ) // The main testing function.
    {
        params.value = false;
    },
    function( params ) // The checker function.
    {
        this.assertEquals( params.value, true, "Hey, params.value should be true!" );
    },
    {
        init: function() { return { value: true }; }, // Reset/Create the params object
        wait: 20 // Wait 20 milliseconds before performing the check
    }
);
Now that we have a test, we need to add it to a suite:
var suite = new ROCKET.TestSuite( "My first test suite." );
suite.addTestCase( test );
And then we create a new test lab to add the suite to:
var lab = new ROCKET.TestLab( "My first test lab." );
lab.addTestSuite( suite );
We could now exercise our test by running the lab. But it wouldn't show the results. What we need is to create a monitor and switch it on. For this example, we are going to use the Console monitor, as it works on both browsers and on node:
var monitor = new ROCKET.monitors.Console();
monitor.switchOn();
That's it, we are now prepared to run our tests. To do that, we simply need to call the run method on our lab:
lab.run();Best practice: Write your test files in a way so that they can be run on both server-side and client-side environments. To do that, you should only prepare your cases, suites and labs in the test file and have another file for each of the environments. In case of the browser this would be an HTML file in which you set up the HTML monitor and run the lab. You can just copy one of the existing tests and modify it:
<!DOCTYPE html>
<html>
    <head>
        <title>RocketScience.js</title>
        <link rel="stylesheet" type="text/css" href="../css/screen.css" />
    </head>
    <body>

        <!-- Load Squiddle.js. RocketScience depends on it. It's part of the package. -->
        <script src="../libs/Squiddle.js/Squiddle.js"></script>

        <!-- Load the RocketScience.js library file -->
        <script src="../RocketScience.js"></script>

        <!-- Change the src to the URL where your test resides: -->
        <script src="MyTest.test.js"></script>

        <script>
            // Set up the monitors you wish to use:
            var monitor, consoleMonitor;
            monitor = new ROCKET.monitors.HTML();
            monitor.switchOn();
            consoleMonitor = new ROCKET.monitors.Console();
            consoleMonitor.switchOn();
            // Run the test. Change this to what ever you called the lab:
            test.run();
        </script>
    </body>
</html>
For node, you would import your test file as a module, create a Console monitor and then run the lab, e.g. like:
var ROCKET, test, monitor;

ROCKET = require("../RocketScience.js"); // Load RocketScience
test = require("./Squiddle.js.test.js"); // Load the test

// Set up the Console monitor:
monitor = new ROCKET.monitors.Console();
monitor.switchOn();

test.lab.run(); // Run the exported lab.
Note: For both examples we assumed that you put your tests inside the "tests" directory of RocketScience. If you put your tests in another directory, you need to change the paths accordingly.
And finally, this is what a test looks like that works on both node and the browser:
var test = ( function( exports )
{
    // Define the vars for your lab, suites and cases:
    var lab, suite, case;

    exports = exports || {}; // If not on node, just mock the exports object.

    // ... Create your test case(s), suite(s) and lab here.

    // Add your cases to their suites and your suites to the lab:
    suite.addTestCase( case );
    lab.addTestSuite( suite );

    exports.lab = lab; // Export your lab for node.

    return lab; // Return the lab (for browsers).

}(
    (typeof exports === "undefined") ? false : exports
));ROCKET.TestCase( [String] name, [Function] fn, [Function] checker+, [Object] args+ );
Constructs a new TestCase.
-
[String] name: A name to identify the test case. -
[Function] fn( [Object] params ): The main testing function. Can be used to both exercise some stuff and assert results. -
[Function] checker( [Object] params ): A function to assert results of asynchronous code. It will be called after the time specified in thewaitproperty ofargs(default: 0 milliseconds). Theparamsparameter is the same object shared with thefnfunction. Note: If you don't test asynchronous code in the test case, you can ommit the checker function and use your assertions directly infn. -
[Object] args: Optional arguments for the test case.[Number] wait: Wait this number of milliseconds before calling the checker function. Default: 0.[Function] init(): A function to construct theparamsobject to be used in both the main testing function and the checker function. The default function just returns a new empty object literal.
ROCKET.TestCase.prototype.assert( [Mixed] value, [String] message+ );
Asserts that value is true. Throws a ROCKET.AssertionError if it's not.
-
[Mixed] value: The value to be tested. It is expected to be=== true. -
[String] message: Optional message to describe what was expected.
ROCKET.TestCase.prototype.assertTruthy( [Mixed] value, [String] message+ );
Asserts that value is truthy. Throws a ROCKET.AssertionError if it's not.
-
[Mixed] value: The value to be tested. It is expected to be== true. -
[String] message: Optional message to describe what was expected.
ROCKET.TestCase.prototype.assertEquals( [Mixed] value, [Mixed] expect, [String] message+ );
Asserts that value is === expect. Throws a ROCKET.AssertionError if that's not the case.
-
[Mixed] value: The actual value. -
[Mixed] expect: The expected value. -
[String] message: Optional message to describe what was expected.
ROCKET.AssertionError( [String] message+ );
Constructs a new throwable assertion error. When an assertion fails, this error is thrown.
[String] message: A message describing the error.
ROCKET.TestSuite( [String] name );
Constructs a new TestSuite.
[String] name: The name of the test suite.
ROCKET.TestSuite.prototype.addTestCase( [ROCKET.TestCase] testCase );
Adds a test case to the suite.
ROCKET.TestLab( [String] name );
Constructs a new TestLab.
[String] name: The name of the test lab.
ROCKET.TestLab.prototype.addTestSuite( [ROCKET.TestSuite] suite );
Adds a test suite to the test lab.
ROCKET.TestLab.prototype.run();
Runs all the test suites added to the lab.
ROCKET.monitors.HTML();
ROCKET.monitors.Console();
Constructs a new monitor.
ROCKET.monitors.HTML.prototype.switchOn();
ROCKET.monitors.Console.prototype.switchOn();
Switches the monitor on so that it actively listens for ongoing tests.
License: BSD 3-Clause License.
Copyright (c) 2012 Jonathan Steinbeck
All rights reserved.

Redistribution and use in source and binary forms, with or without
modification, are permitted provided that the following conditions are met:

* Redistributions of source code must retain the above copyright
  notice, this list of conditions and the following disclaimer.

* Redistributions in binary form must reproduce the above copyright
  notice, this list of conditions and the following disclaimer in the
  documentation and/or other materials provided with the distribution.

* Neither the name RocketScience.js nor the names of its contributors
  may be used to endorse or promote products derived from this software
  without specific prior written permission.

THIS SOFTWARE IS PROVIDED BY THE COPYRIGHT HOLDERS AND CONTRIBUTORS "AS IS" AND
ANY EXPRESS OR IMPLIED WARRANTIES, INCLUDING, BUT NOT LIMITED TO, THE IMPLIED
WARRANTIES OF MERCHANTABILITY AND FITNESS FOR A PARTICULAR PURPOSE ARE
DISCLAIMED. IN NO EVENT SHALL THE COPYRIGHT HOLDERS BE LIABLE FOR ANY
DIRECT, INDIRECT, INCIDENTAL, SPECIAL, EXEMPLARY, OR CONSEQUENTIAL DAMAGES
(INCLUDING, BUT NOT LIMITED TO, PROCUREMENT OF SUBSTITUTE GOODS OR SERVICES;
LOSS OF USE, DATA, OR PROFITS; OR BUSINESS INTERRUPTION) HOWEVER CAUSED AND
ON ANY THEORY OF LIABILITY, WHETHER IN CONTRACT, STRICT LIABILITY, OR TORT
(INCLUDING NEGLIGENCE OR OTHERWISE) ARISING IN ANY WAY OUT OF THE USE OF THIS
SOFTWARE, EVEN IF ADVISED OF THE POSSIBILITY OF SUCH DAMAGE.


