Mystique Unicorn App backend is hosted on Oracle. Recenly one of their devs discovered that AWS offers Amazon Aurora PostgreSQL a fast, scalable, highly available, and fully managed relational database service.
Can you help them migrate from Oracle hosted on prem(or EC2) to Amazon Aurora PostgreSQL?
We will follow an multi-stage process to accomplish our goal. We need the following components to get this right,
- Source Database - Oracle DB
- If in AWS: EC2 instance in a VPC, Security Group, SSH Keypair(Optional)
- Some dummy data inside the database
- Oracle DB & Developer tools pre-installed
- MySQL Workbench pre-installed
- Destination Database - Amazon Aurora PostgreSQL
- Subnet Groups
- VPC Security Groups
- Database Migration Service(DMS) - Replication Instance
- DMS IAM Roles
- Endpoints
- Database Migration Tasks
In this article, we will build an architecture, similar to the one shown above - A simple database running oracle instance running on EC2 (You are welcome to use your own oracle db instead). For target we will build a Amazon Aurora PostgreSQL cluster and use DMS to migrate the data.
In this Workshop you will practice how to migrate your Oracle DB databases to Amazon Aurora PostgreSQL using different strategies.
-
This demo, instructions, scripts and cloudformation template is designed to be run in
us-east-1.- 🛠 AWS CLI Installed & Configured - Get help here
- 🛠 AWS CDK Installed & Configured - Get help here
- 🛠 Python Packages, Change the below commands to suit your OS, the following is written for amzn linux 2
- Python3 -
yum install -y python3 - Python Pip -
yum install -y python-pip - Virtualenv -
pip3 install virtualenv
- Python3 -
As there are a number of components that need to be setup, we will use a combination of Cloudformation(generated from CDK), CLI & GUI.
-
-
Get the application code
git clone https://github.com/miztiik/oracle-to-aurora
cd oracle-to-aurora
NOTE: RUN THIS STACK IN VIRIGINA ONLY.The ORACLE AMI in th stack is from virigin region
-
-
We will need cdk to be installed to make our deployments easier. Lets go ahead and install the necessary components.
# If you DONT have cdk installed
npm install -g aws-cdk

# Make sure you in root directory
python3 -m venv .venv
source .venv/bin/activate
pip3 install -r requirements.txt
The very first time you deploy an AWS CDK app into an environment (account/region), you’ll need to install a
bootstrap stack, Otherwise just go ahead and deploy usingcdk deploy.cdk bootstrap cdk ls # Follow on screen promptsYou should see an output of the available stacks,
oracle-to-aurora-vpc-stack
oracle-to-aurora-database-migration-prerequisite-stack
oracle-to-aurora-oracle-on-client-ec2
oracle-to-aurora-oracle-on-rds-stack
-
We can automate the creation of Amazon Aurora PostgreSQL & DMS using CDK, But since this will be the first time we use these services,let us use the Console/GUI to set them up. We can leverage the excellant documentation from AWS on how to setup our Aurora DB. (Use your best judgement, as docs tend to change over a period of time)
Couple of things to note,
- For VPC - Use our custom VPC
miztiikMigrationVpc - For Security Group - Use
postgres_db_sg_database-migration-prerequisite-stack - Set the admin name as
postgresadmin - Set your
Som3thingSh0uldBe1nVault
NOTE: Amazon RDS for PostgreSQL creates a default database with the name
postgres. We will use this later to connect from SCT & PgadminMake a note of the db endpoint, admin user name and password. We will use it later.
- For VPC - Use our custom VPC
-
Let us walk through each of the stacks,
-
Stack: oracle-to-aurora-vpc-stack This stack will do the following,
- Create an custom VPC
miztiikMigrationVpc(We will use this VPC to host our source Oracle DB, Aurora DB, DMS Replication Instance)
Initiate the deployment with the following command,
cdk deploy oracle-to-aurora-vpc-stack
- Create an custom VPC
-
Stack: oracle-to-aurora-database-migration-prerequisite-stack This stack will create the following resources,
- Aurora PostgreSQL DB & DMS Security groups - (created during the prerequisite stack)
- DMS IAM Roles - (This stack will FAIL, If these roles already exist in your account)
AmazonDMSVPCManagementRoleAmazonDMSCloudWatchLogsRole
- SSH KeyPair using a custom cfn resource
- The key material is stored in SSM Parameter Store
mystique-automation-ssh-key
- The key material is stored in SSM Parameter Store
Initiate the deployment with the following command,
cdk deploy oracle-to-aurora-database-migration-prerequisite-stack
After successful completion, take a look at all the resources and get yourself familiar with them. We will be using them in the future.
-
Stack:
oracle-to-aurora-oracle-on-client-ec2Source Database - Oracle DBWe will be using AWS prepared provided AMI. This AMI comes preinstalled with Oracle SQL Developer, pgadmin and Amazon Schema Conversion Tool(SCT) preinstalled. The stack has been designed to run in
viriginia : us-east-1.This stack will do the following,
- Create an EC2
m5.largeinstance inside our custom VPC(created during the prerequisite stack) - Attach security group with Oracle port(
1521) open within the VPC (For any use-case other than sandbox testing, you might want to restrict it)
Initiate the deployment with the following command,
cdk deploy oracle-to-aurora-oracle-on-client-ec2
As we need to migrate from Oracle to Amazon Aurora, We need to ensure the schema is compatible between two database engine. We will use the Amazon SCT to achieve that.
Prepare Source Oracle Server
-
Log In to the EC2 server.
- To get the Administrator password, Use the SSH key from the SSM Parameter Store.
-
On the EC2 server, open the DMS Workshop folder that is on the Desktop. Then, double-click on AWS Schema Conversion Tool Download to get the latest version of the software. - Continue with the installation
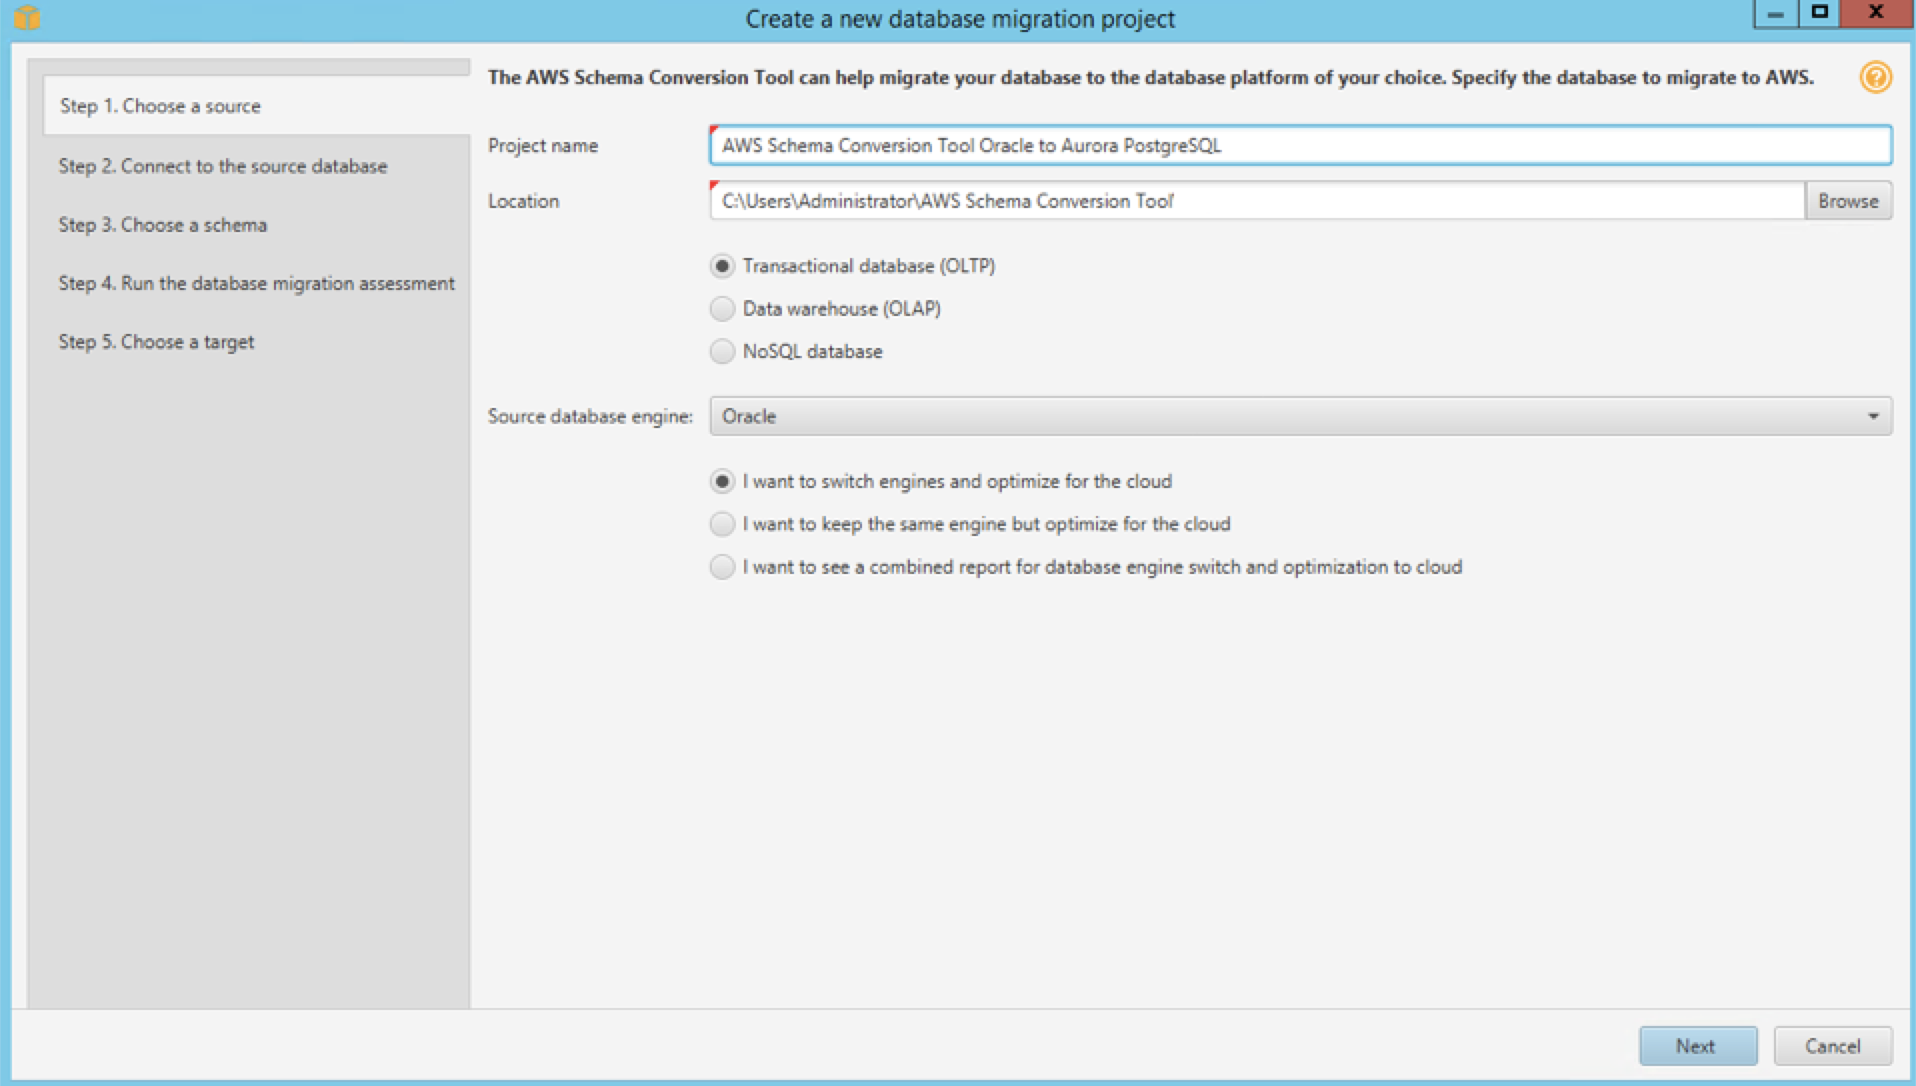
Parameter Value Project Name AWS Schema Conversion Tool Oracle to Aurora PostgreSQL Location C:\Users\Administrator\AWS Schema Conversion Tool Database Type Transactional Database (OLTP) Source Database Engine Oracle / I want to switch engines and optimize for the cloud -
Continue to Next
- Use these values
Parameter Value Type SID Server Name < SourceOracleEndpoint for example or5wj8knyfkdcl.c78dp8rd21bp.us-east-1.rds.amazonaws.com>Server Port 1521Oracle SID ORACLEDBUser Name dbmasterPassword dbmaster123Use SSL Unchecked Store Password Checked Oracle Driver Path C:\Users\Administrator\Desktop\DMS Workshop\JDBC\ojdbc8.jar -
Test Connection
-
You may see a security warning prompot to use SSL. Click on “Accept the Risk and continue” button.
-
Click Next and loading metadata, you may get a warning message saying: Metadata loading was intrupted because of data fetching issues. You can ignore this message for now.
-
SCT will examine in detail all of the objects in the schema of source database. It will convert as much as possible automatically and provides detailed information about items it could not convert. Generally, packages, procedures, and functions are more likely to have some issues to resolve because they contain the most custom or proprietary SQL code. AWS SCT specifies how much manual change is needed to convert each object type. It also provides hints about how to adapt these objects to the target schema successfully.
-
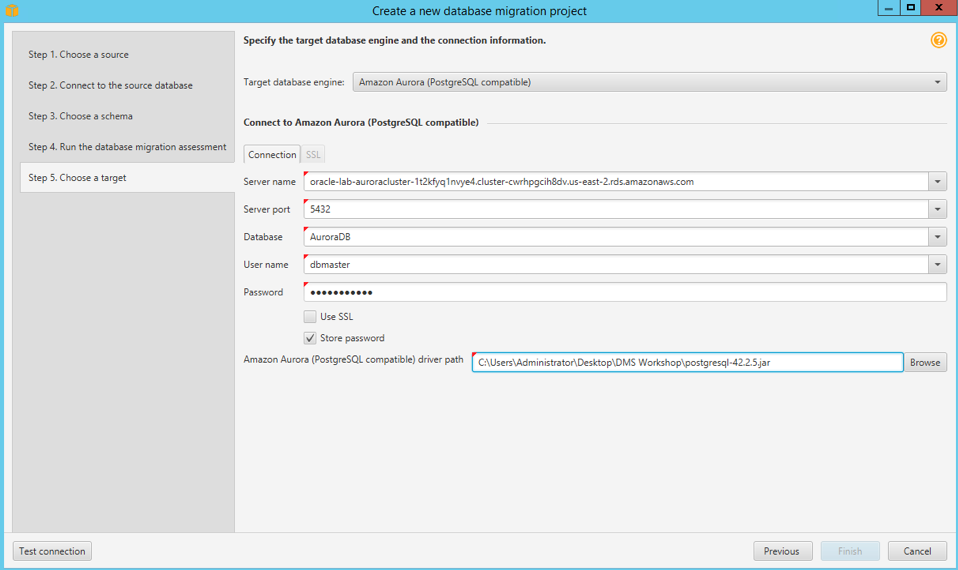
Review the database migration assessment report, click Next. Specify the target database configurations in the form, and then click Test Connection. Once the connection is successfully tested, click Finish.
Parameter Value Target Database Amazon Aurora (PostgreSQL compatible) Server Name < TargetAuroraPostgreSQLEndpoint > Server Port 5432 User Name postgresadminPassword Som3thingSh0uldBe1nVaultUse SSL Unchecked Store Password Checked MySQL Driver Path C:\Users\Administrator\Desktop\DMS Workshop\JDBC\postgresql-42.2.9.jar -
Right-click on the
DMS_SAMPLEschema from Oracle source and select Convert Schema to generate the data definition language (DDL) statements for the target database. You can view the generated DDL in the project console, and edit it before applying it to the target database. You can also choose to save it as an.sqlfile for application later. You may be prompted with a dialog box “Object may already exist in the target database, replace?” Select Yes and conversion will start.
 -
Click on the View button, and choose Assessment Report view.
-
AWS SCT analyses the schema and creates a database migration assessment report for the conversion to PostgreSQL. Items with a red exclamation mark next to them cannot be directly translated from the source to the target. This includes Stored Procedures, and Packages. Items with a blue mark next to them cannot be directly translated from the source to the target. In this case, this includes the stored procedures.

-
Next, navigate to the Action Items tab in the report to see the items that the tool could not convert, and find out how much manual changes you need to make.
-
Check each of the issues listed and compare the contents under the source Oracle panel and the target Aurora PostgreSQL panel. Are the issues resolved? And how?
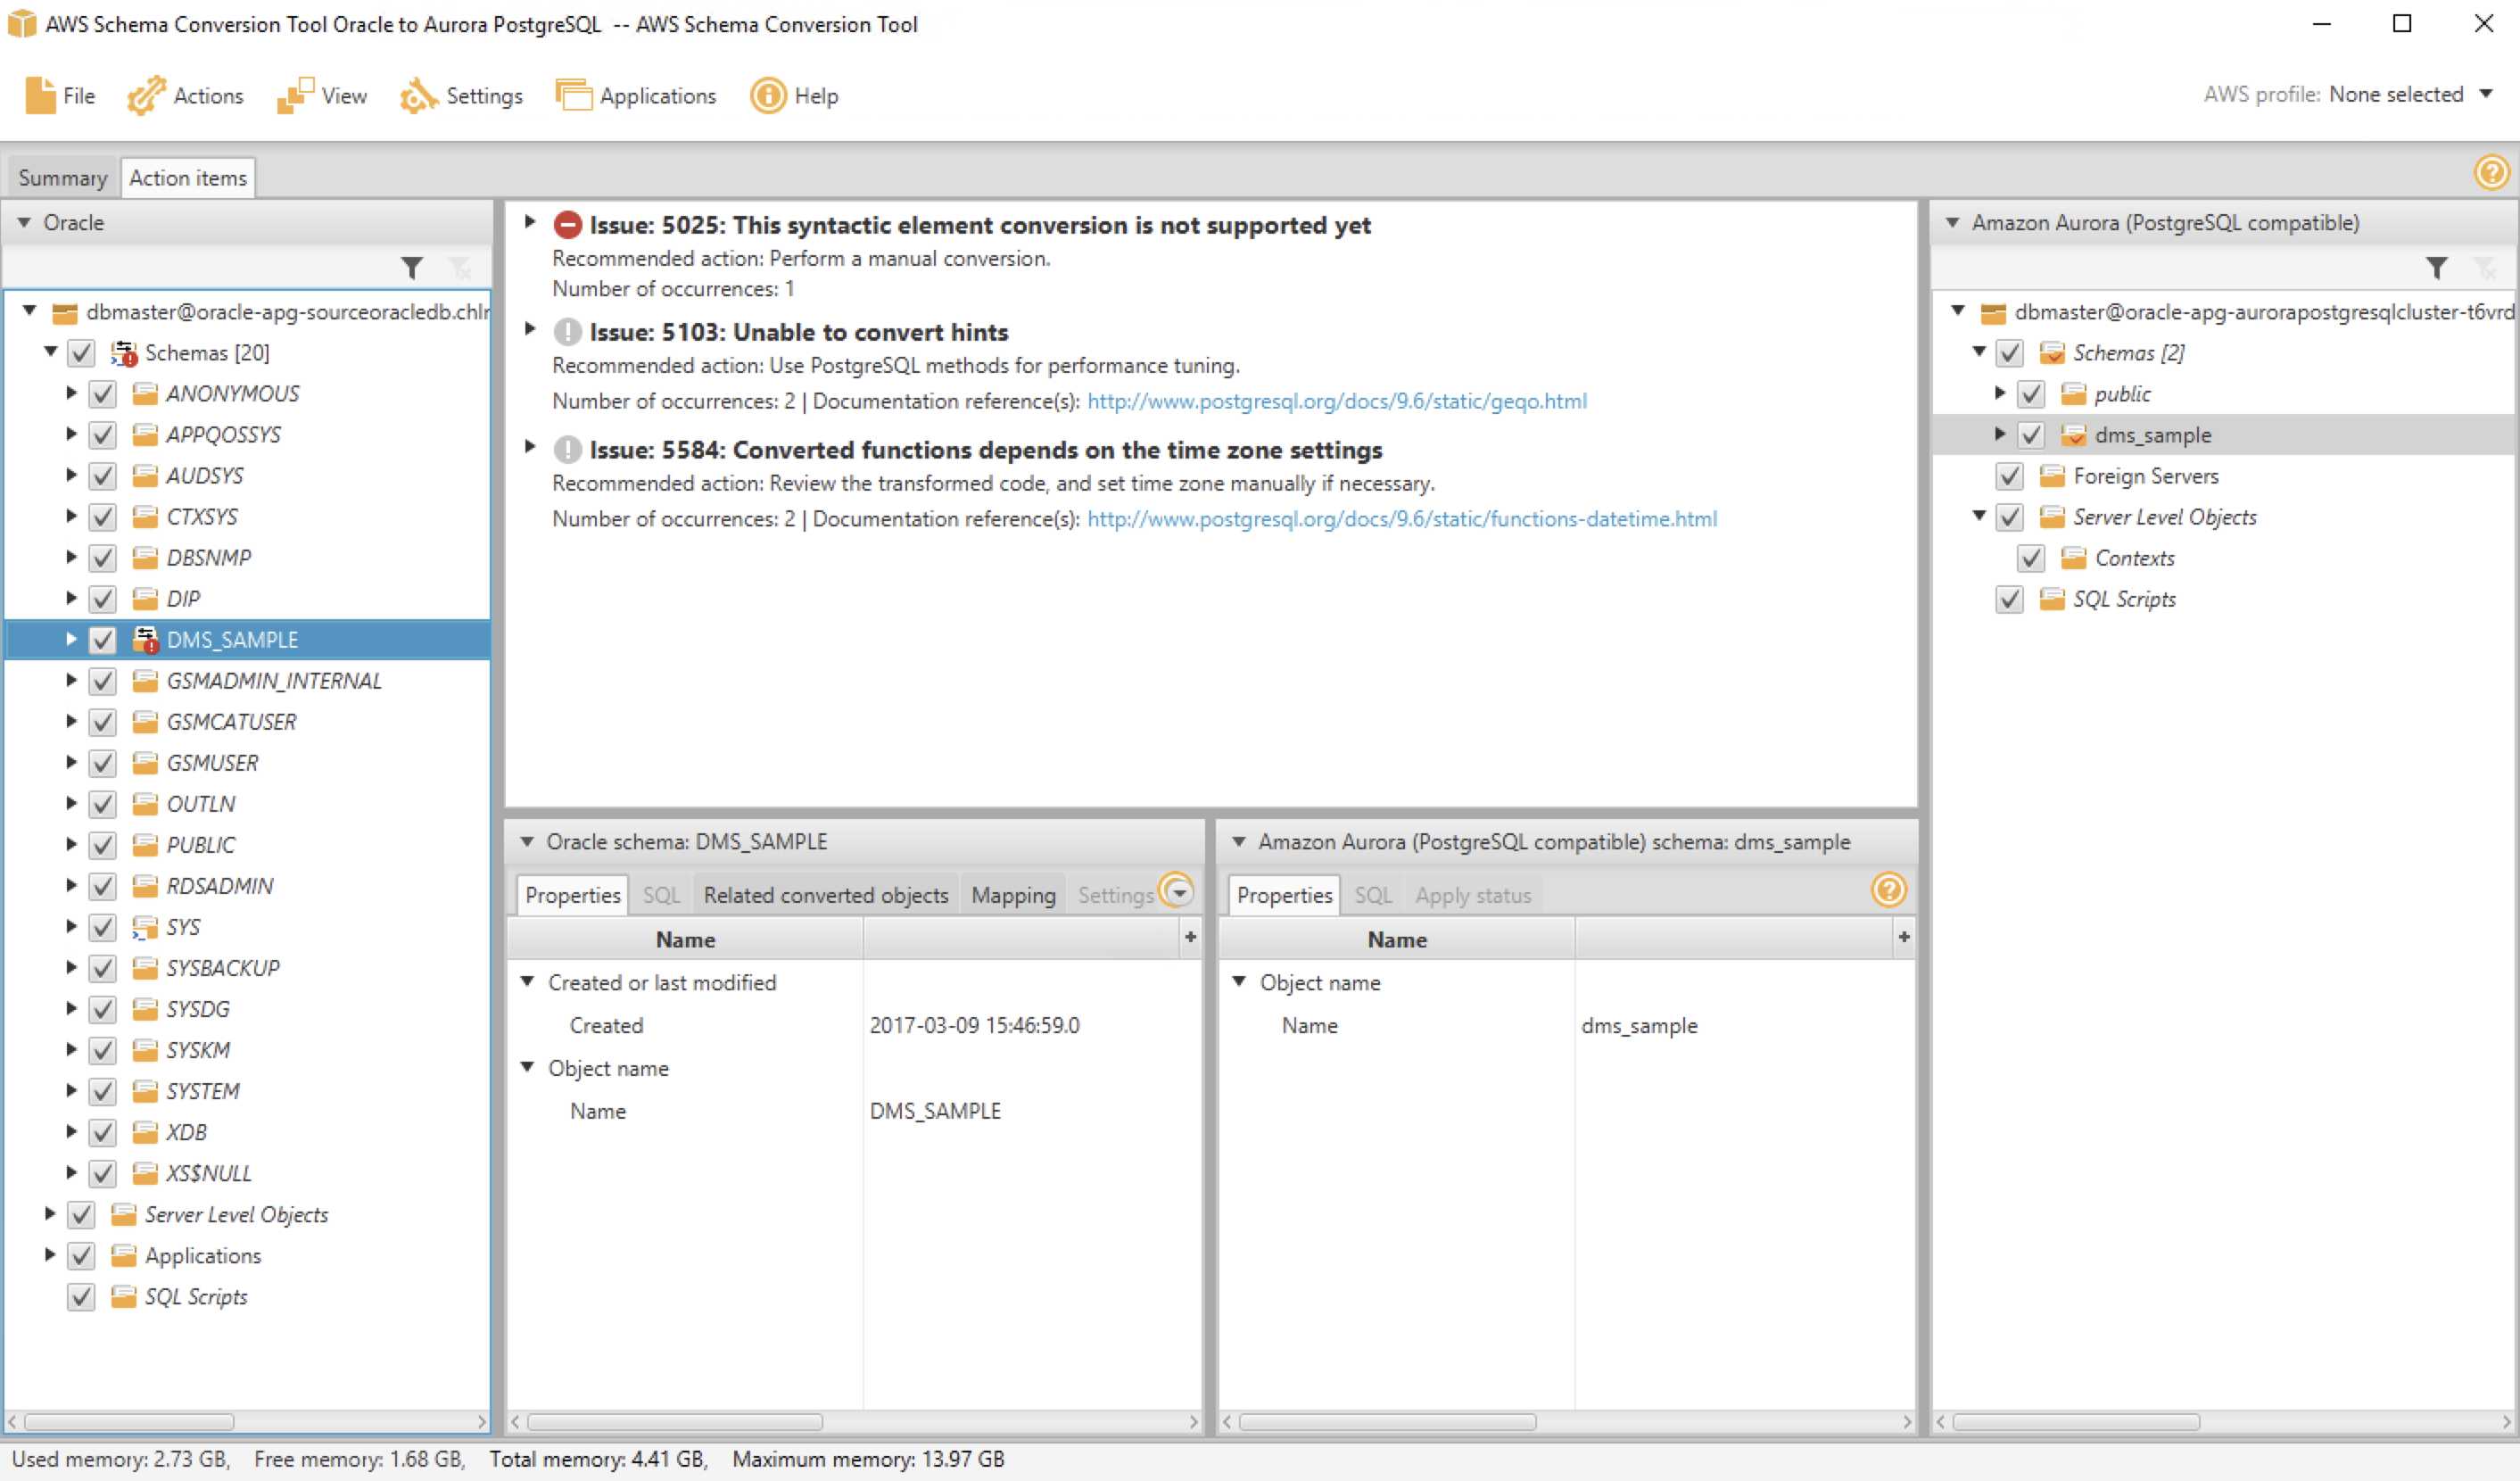 SCT has proposed resolutions by generating equivalent PostgreSQL DDL to convert the objects. Additionally, SCT highlights each conversion issue where it cannot automatically generate a conversion, and provides you with hints on how you can successfully convert the database object.
Notice the issue highlighted in the Private procedures named
SELLRANDOMTICKETS. You’ll see that SCT is unable to automatically convert the assign operation. You can complete one of the following actions to fix the issue:-
Modify the objects on the source Oracle database so that AWS SCT can convert the objects to the target Aurora PostgreSQL database.
-
Instead of modifying the source schema, modify scripts that AWS SCT generates before applying the scripts on the target Aurora PostgreSQL database.
For the sake of time, we skip modifying all the objects that could not be automatically converted. Instead, as an example, you will manually modify one of the stored procedures from within SCT to make it compatible with the target database.
-
-
[Optionally] Manually fix the schema issue. -Then, right-click on the
DMS_SAMPLEschema, and chooseCreate Report. Observe that the schema of the source database is now fully compatible with the target database. -
Right click on the
dms_sampleschema in the right-hand panel, and clickApply to database. When prompted if you want to apply the schema to the database, click Yes.
-
At this point, the schema has been applied to the target database. Expand the
dms_sampleschema to see the tables.- You may see an exclamation mark on certain database objects such as indexes, and foreign key constraints. In the next section we will drop foreign key target database.
You have sucessfully converted the database schema and object from Oracle to the format compatible with Amazon Aurora (PostgreSQL).
Enabling Replication on SOURCE Database:
-
Click on the plus sign from the left-hand menu to create a New Database Connection using the following values.
-
After the you see the test status as Successful, Connect.
Parameter Value Connection Name Source Oracle Username dbmasterPassword dbmaster123Save Password Check Hostname < SourceOracleEndpoint For example or5wj8knyfkdcl.c78dp8rd21bp.us-east-1.rds.amazonaws.com>Port 1521SID ORACLEDBTo use Oracle as a source for AWS Database Migration Service (AWS DMS), you must first provide a user account (DMS user) with read and write privileges on the Oracle database.
You also need to ensure that
ARCHIVELOG MODEis on to provide information to LogMiner. AWS DMS uses LogMiner to read information from the archive logs so that AWS DMS can capture changes.For AWS DMS to read this information, make sure the archive logs are retained on the database server as long as AWS DMS requires them. Retaining archive logs for 24 hours is usually sufficient.
To capture change data, AWS DMS requires database-level supplemental logging to be enabled on your source database. Doing this ensures that the LogMiner has the minimal information to support various table structures such as clustered and index-organized tables.
Similarly, you need to enable table-level supplemental logging for each table that you want to migrate.
-
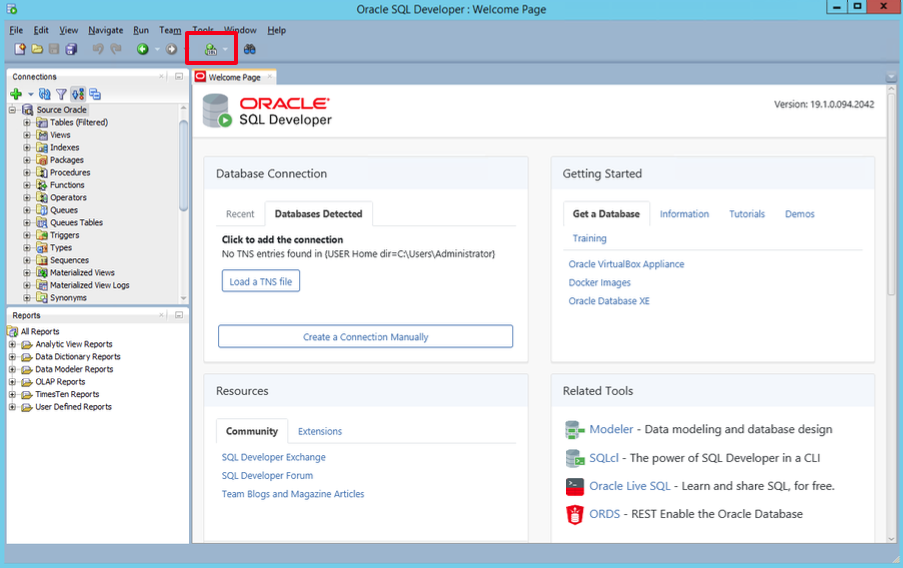
Click on the SQL Worksheet icon within Oracle SQL Developer, then connect to the Source Oracle database.
-
Next, execute the below statements to grant the following privileges to the AWS DMS user to access the source Oracle endpoint:
GRANT SELECT ANY TABLE to DMS_USER;
GRANT SELECT on ALL_VIEWS to DMS_USER;
GRANT SELECT ANY TRANSACTION to DMS_USER;
GRANT SELECT on DBA_TABLESPACES to DMS_USER;
GRANT SELECT on ALL_TAB_PARTITIONS to DMS_USER;
GRANT SELECT on ALL_INDEXES to DMS_USER;
GRANT SELECT on ALL_OBJECTS to DMS_USER;
GRANT SELECT on ALL_TABLES to DMS_USER;
GRANT SELECT on ALL_USERS to DMS_USER;
GRANT SELECT on ALL_CATALOG to DMS_USER;
GRANT SELECT on ALL_CONSTRAINTS to DMS_USER;
GRANT SELECT on ALL_CONS_COLUMNS to DMS_USER;
GRANT SELECT on ALL_TAB_COLS to DMS_USER;
GRANT SELECT on ALL_IND_COLUMNS to DMS_USER;
GRANT SELECT on ALL_LOG_GROUPS to DMS_USER;
GRANT LOGMINING TO DMS_USER;
-
In addition, run the following:
exec rdsadmin.rdsadmin_util.grant_sys_object('V_$ARCHIVED_LOG','DMS_USER','SELECT');
exec rdsadmin.rdsadmin_util.grant_sys_object('V_$LOG','DMS_USER','SELECT');
exec rdsadmin.rdsadmin_util.grant_sys_object('V_$LOGFILE','DMS_USER','SELECT');
exec rdsadmin.rdsadmin_util.grant_sys_object('V_$DATABASE','DMS_USER','SELECT');
exec rdsadmin.rdsadmin_util.grant_sys_object('V_$THREAD','DMS_USER','SELECT');
exec rdsadmin.rdsadmin_util.grant_sys_object('V_$PARAMETER','DMS_USER','SELECT');
exec rdsadmin.rdsadmin_util.grant_sys_object('V_$NLS_PARAMETERS','DMS_USER','SELECT');
exec rdsadmin.rdsadmin_util.grant_sys_object('V_$TIMEZONE_NAMES','DMS_USER','SELECT');
exec rdsadmin.rdsadmin_util.grant_sys_object('V_$TRANSACTION','DMS_USER','SELECT');
exec rdsadmin.rdsadmin_util.grant_sys_object('DBA_REGISTRY','DMS_USER','SELECT');
exec rdsadmin.rdsadmin_util.grant_sys_object('OBJ$','DMS_USER','SELECT');
exec rdsadmin.rdsadmin_util.grant_sys_object('ALL_ENCRYPTED_COLUMNS','DMS_USER','SELECT');
exec rdsadmin.rdsadmin_util.grant_sys_object('V_$LOGMNR_LOGS','DMS_USER','SELECT');
exec rdsadmin.rdsadmin_util.grant_sys_object('V_$LOGMNR_CONTENTS','DMS_USER','SELECT');
exec rdsadmin.rdsadmin_util.grant_sys_object('DBMS_LOGMNR','DMS_USER','EXECUTE');
-
Run the following query to retain archived redo logs of the source Oracle database instance for 24 hours:
exec rdsadmin.rdsadmin_util.set_configuration('archivelog retention hours',24);
-
Run the following query to enable database-level supplemental logging:
exec rdsadmin.rdsadmin_util.alter_supplemental_logging('ADD');
-
Run the following query to enable PRIMARY KEY logging for tables that have primary keys:
exec rdsadmin.rdsadmin_util.alter_supplemental_logging('ADD','PRIMARY KEY');
-
Run the following queries to add supplemental logging for tables that don’t have primary keys, use the following command to add supplemental logging:
alter table dms_sample.nfl_stadium_data add supplemental log data (ALL) columns;
alter table dms_sample.mlb_data add supplemental log data (ALL) columns;
alter table dms_sample.nfl_data add supplemental log data (ALL) columns;
Now we are all done with our source database.
- Create an EC2
Prepare TARGET: Aurora PostgreSQL
During the full load process, AWS DMS as default does not load tables in any particular order, so it might load child table data before parent table data. As a result, foreign key constraints might be violated if they are enabled. Also, if triggers are present on the target database, they might change data loaded by AWS DMS in unexpected ways. To overcome this, we drop the constraints on the target database.
-
Open pgAdmin from within the EC2 server
You may be prompted to set a Master Password. Enter
dbmaster123, then click, OK.
-
Click on the
Add New Servericon, and enter the following values. Then, press Save.Parameter Value General -> Name Target Aurora RDS (PostgreSQL) Connection -> Host Name/Address < TargetAuroraPostgreSQLEndpoint > Connection -> Port 5432 Connection -> Username postgresadminConnection -> Password Som3thingSh0uldBe1nVaultConnection -> Save Password Check -
Right-click on Target AuroraDB database from left-hand menu, and then select Query Tool.

-
In this step you are going to drop the foreign key constraint from the target database:
-
Open
prep_target_postgres_DropConstraintsPostgreSQL.sqlin your favorite text editor. Copy the content of the file to the Query Editor in pgAdmin. Execute the script.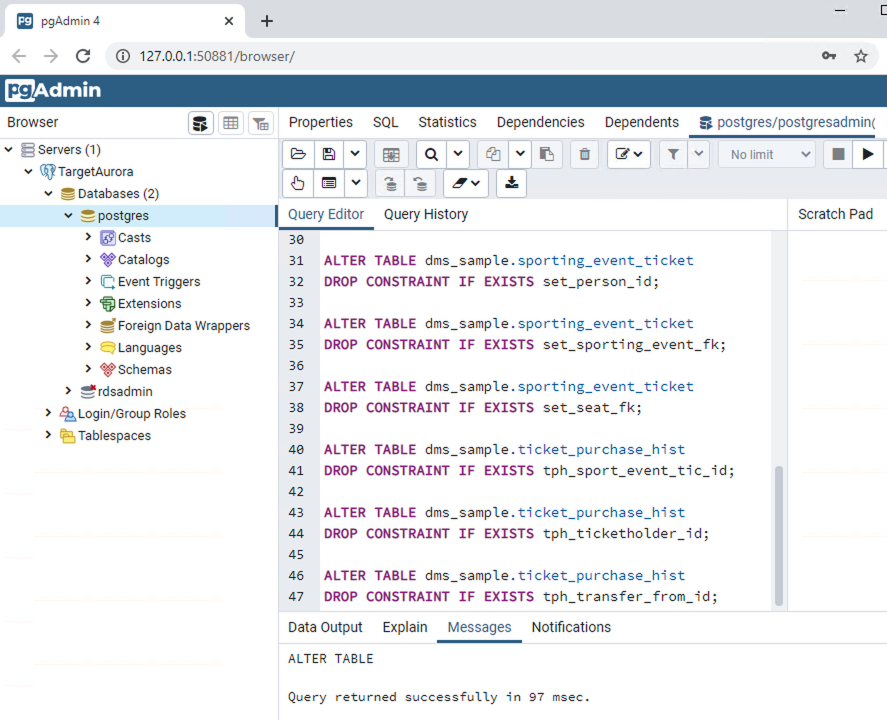
Now we are all done with our target database & ready for migration.
-
-
We can leverage the excellant documentation from AWS on how to setup our DMS Replication Instance.
Couple of things to note,
- For VPC - Use our custom VPC
miztiikMigrationVpc - For Security Group - Use
dms_sg_database-migration-prerequisite-stack
After creating the replication instance, We need to create few more resources to begin our replication. We will use defaults mostly
-
Endpoints for source Oracle DB(custom values listed below)
Parameter Value Endpoint Type Source endpoint Endpoint Identifier oracle-sourceSource Engine oracleServer Name < SourceOracleEndpoint > Port 1521 SSL Mode none User Name dbmasterPassword dbmaster123SID/Service Name ORACLEDBTest endpoint connection -> VPC miztiikMigrationVpcReplication Instance DMSReplication -
Endpoint for destination databases - Amazon Aurora PostgreSQL(custom values listed below)
Parameter Value Endpoint Type Target endpoint Select RDS DB instance Endpoint Identifier aurora-targetSource Engine aurora-postgresql Server Name < TargetAuroraPostgreSQLEndpoint > Port 5432 SSL Mode none User Name postgresadminPassword Som3thingSh0uldBe1nVaultDatabase Name postgresTest endpoint connection -> VPC miztiikMigrationVpcReplication Instance DMSReplication -
Database Migration Task
- Click on Database migration tasks on the left-hand menu, then click on the Create task button on the top right corner.
Parameter Value Task identifier OracleMigrationTask Replication instance DMSReplication Source database endpoint oracle-sourceTarget database endpoint aurora-targetMigration type Migrate existing data Start task on create Checked Target table preparation mode Do nothing Include LOB columns in replication Limited LOB mode Max LOB size (KB) 32 Enable validation Unchecked Enable CloudWatch logs Checked -
Expand the Table mappings section, and select Guided UI for the editing mode.
-
Click on Add new selection rule button and enter the following values in the form:
Parameter Value Schema DMS_SAMPLETable name % Action Include -
Next, expand the Transformation rules section, and click on Add new transformation rule using the following values: Rule 1:
Parameter Value Target Schema Schema Name DMS_SAMPLE Action Make lowercase Rule 2:
Parameter Value Target Table Schema Name DMS_SAMPLE Action Make lowercase Rule 2:
Parameter Value Target Column Schema Name DMS_SAMPLE Action Make lowercase -
Create Task. At this point, the task should start running and replicating data from the
dms_sampledatabase running on EC2 to the Amazon Aurora RDS (MySQL) instance. -
You can check the table statistics for the migration progress
- For VPC - Use our custom VPC
-
Navigate to DMS task, under
Table StatisticsYou should be able observe that the dms has copied the data from source to target database. You can connect to Aurora DB and test the records using the same commands that we used with source earlier.-
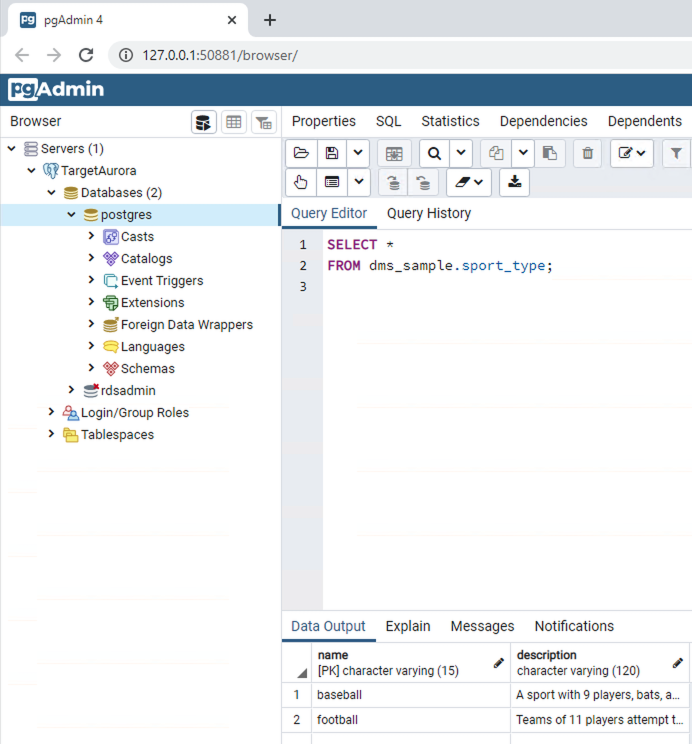
Connect to Aurora from pgadmin and query for data,
SELECT *
FROM dms_sample_dbo.sport_type;
-
AFTER initial load is completed, use the following script to enable the foreign key constraints that we dropped earlier:
- Within pgadmin, click on the File menu, and choose New Query Tab.
- Open
add_constraints_to_target_postgres_AddConstraintsPostgreSQL.sqlwith a text editor on your computer. - Copy the content to pgadmin query editor.
- Execute the script.
Additional Learnings: You can check the logs in cloudwatch for more information or increase the logging level of the database migration task.
-
-
Here we have demonstrated how to use Amazon Database Migration Service(DMS) to migrate data from Oracle DB to Aurora Postgresql DB.
-
- Try and fix the other stored procedure that were excluded.
- You can create another replication task for migrating ongoing changes.
-
If your table has volume transactions, > 100 tps, then you can try these,
- Create muliple replication instances
- Create tasks for each of the tables to be migrated
- Perform full load and CDC
-
If you want to destroy all the resources created by the stack, Execute the below command to delete the stack, or you can delete the stack from console as well
- Resources created during Deploying The Application
- Delete CloudWatch Lambda LogGroups
- Any other custom resources, you have created for this demo
# Delete from cdk
cdk destroy

# Follow any on-screen prompts

# Delete the CF Stack, If you used cloudformation to deploy the stack.
aws cloudformation delete-stack \
    --stack-name "MiztiikAutomationStack" \
    --region "${AWS_REGION}"
This is not an exhaustive list, please carry out other necessary steps as maybe applicable to your needs.
This repository aims to teach api best practices to new developers, Solution Architects & Ops Engineers in AWS. Based on that knowledge these Udemy course #1, course #2 helps you build complete architecture in AWS.
Thank you for your interest in contributing to our project. Whether it's a bug report, new feature, correction, or additional documentation or solutions, we greatly value feedback and contributions from our community. Start here

Level: 300

