doc site https://mlflow-minio-config-doc.streamlit.app/
-
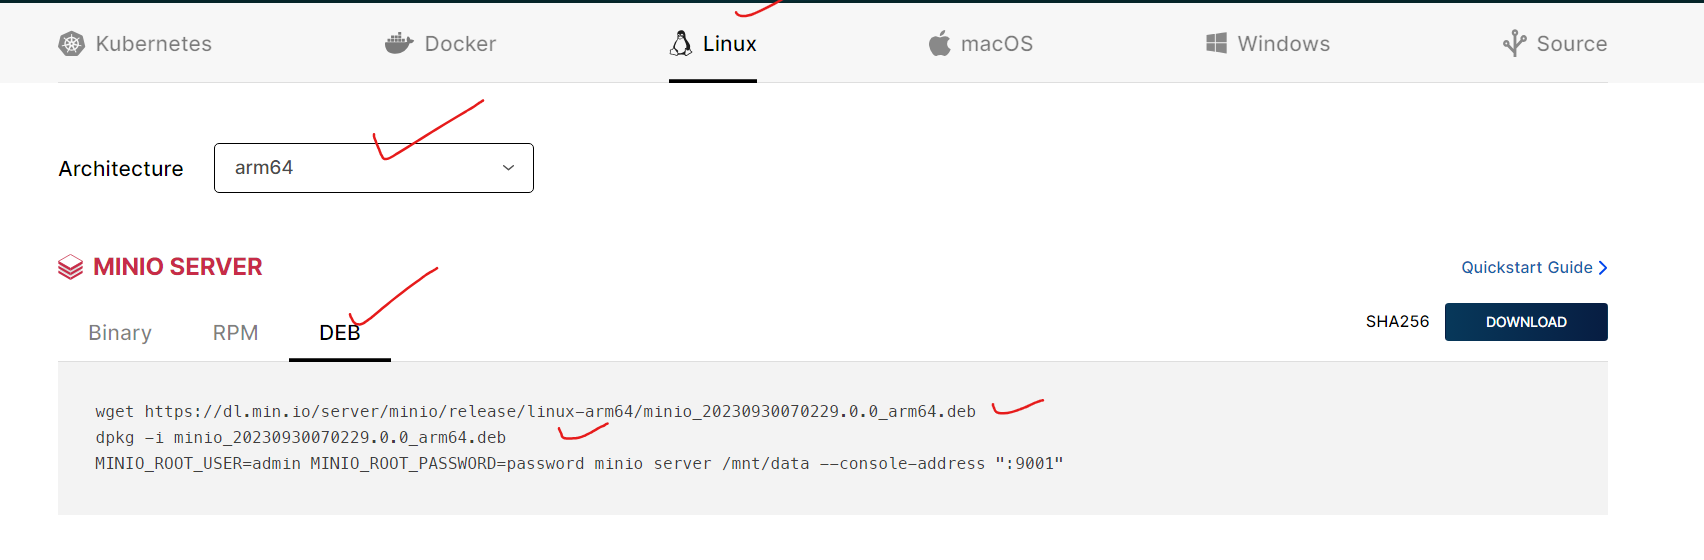
Check minio official site for the available packages
- Browsing for linux vm
-
Download the appropriate version, for my case, I used an ubuntu ARM machine
- I downloaded the file in my software directory with super user privilage
cd ~/software
wget https://dl.min.io/server/minio/release/linux-arm64/minio_20230930070229.0.0_arm64.deb
- Then installed it in my machine
dpkg -i minio_20230930070229.0.0_arm64.deb
- I downloaded the file in my software directory with super user privilage
-
Test the minio storage
- Check if its running properly or not, exposing the /mnt/data directory
MINIO_ROOT_USER=admin MINIO_ROOT_PASSWORD=password minio server /mnt/data --console-address ":9001" - Configure nginx server for my site
minio.mlhub.inport 80server { server_name minio.mlhub.in; #server_name 140.238.227.112; location / { proxy_pass http://localhost:9001/; proxy_set_header Host $host; proxy_set_header Upgrade $http_upgrade; proxy_set_header Connection upgrade; proxy_set_header Accept-Encoding gzip; # pass max_body_size 1024M; 0 for unlimited client_max_body_size 0; } listen 80; listen [::]:80; } - Run the minio and check the browser
MINIO_ROOT_USER=admin MINIO_ROOT_PASSWORD=password minio server /mnt/data --console-address ":9001"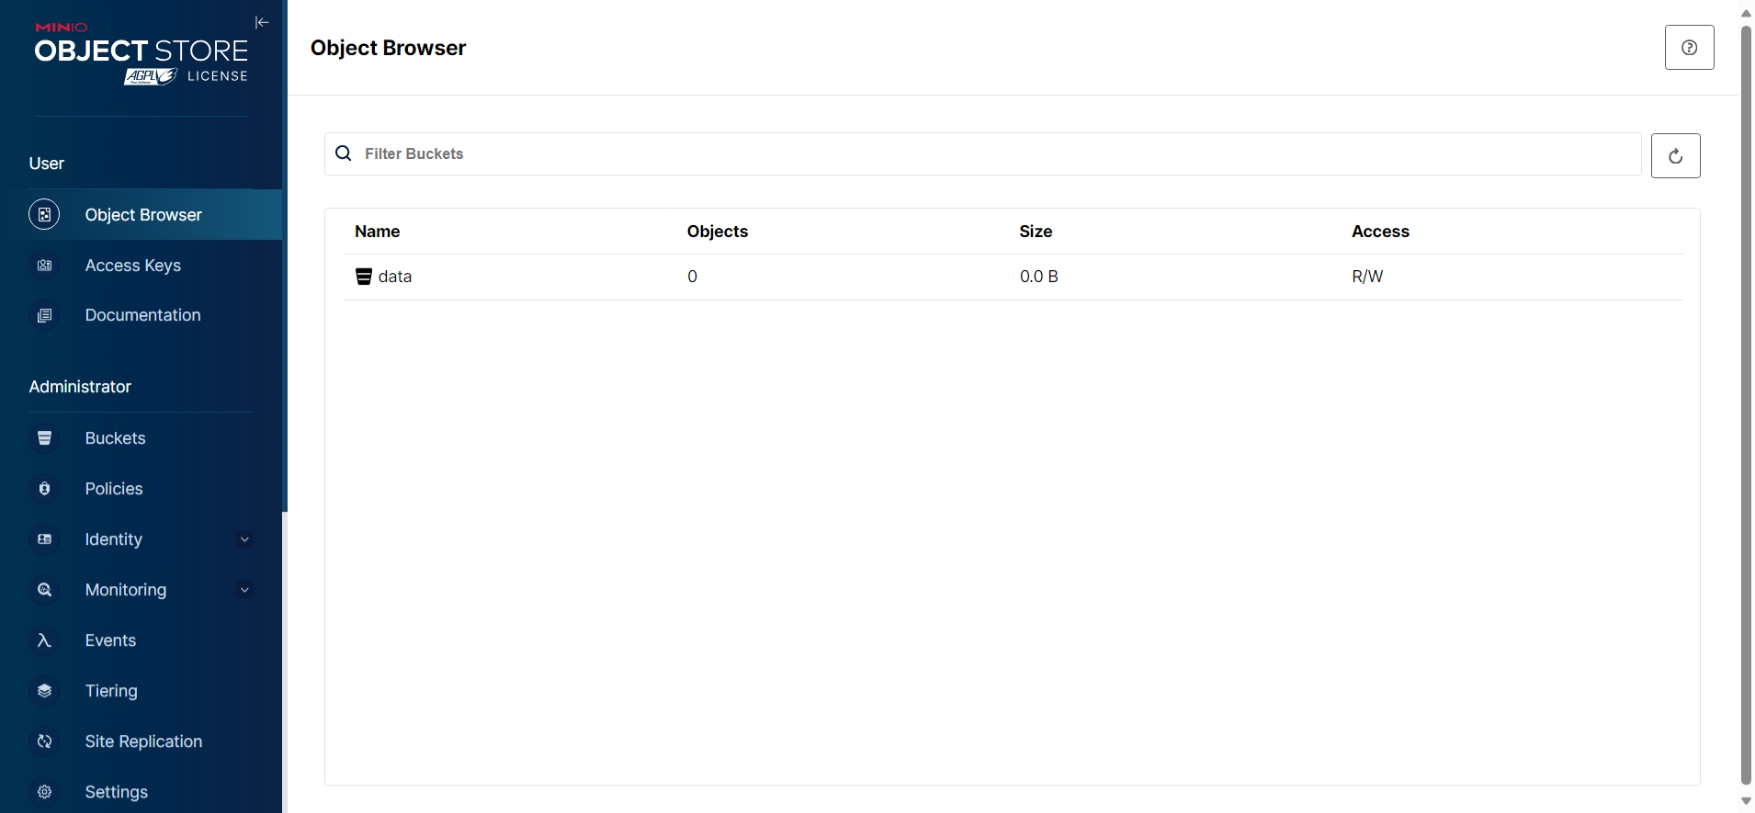
- Check if its running properly or not, exposing the /mnt/data directory
-
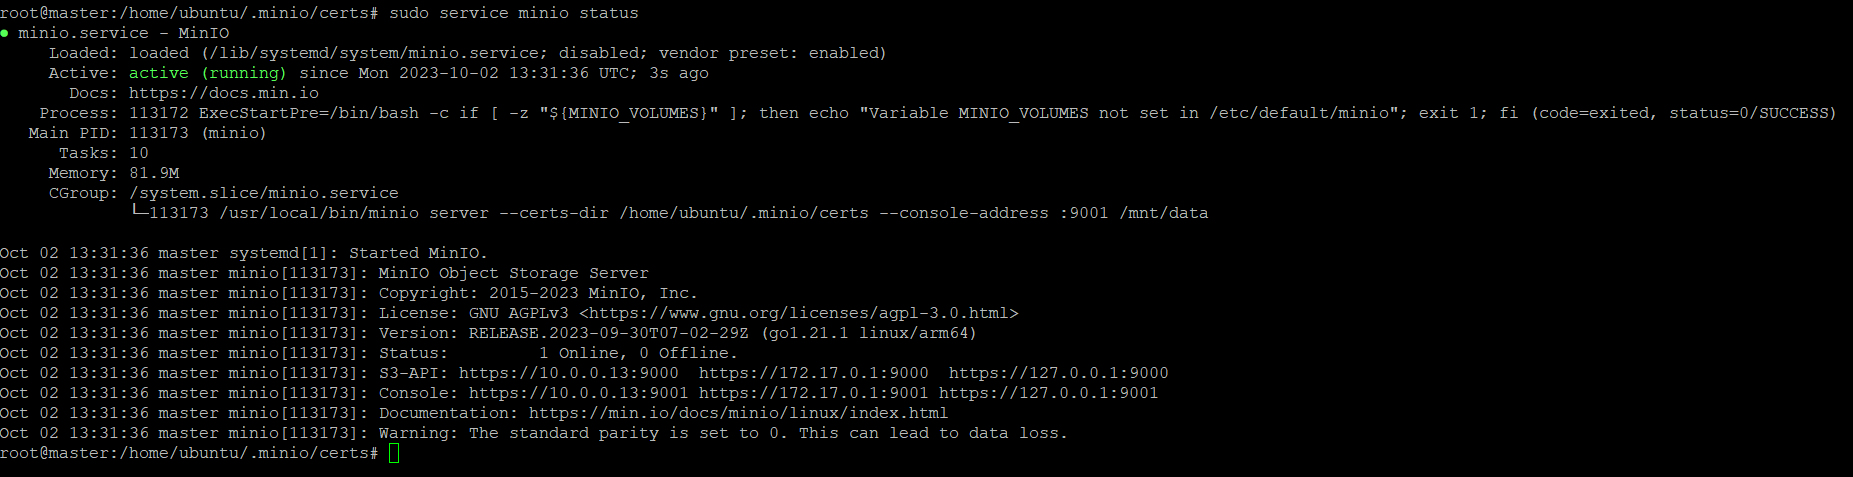
Once installed, we can start the minio server using systemctl/service command
- Upon checking status before starting the minio server
sudo systemctl status minio
# OR
sudo service minio status
- Upon checking status before starting the minio server
-
Create minio user and group
- Create group minio-user
sudo groupadd -r minio-user sudo useradd -M -r -g minio-user minio-user - Create the directory if not available and give minio-user ownership
sudo mkdir /mnt/data sudo chown minio-user:minio-user /min/data - Setup Minio environment and provide ssl certificate directory, username and password
- We are yet to set the certs directory, will do it later
MINIO_VOLUMES="/mnt/data"
MINIO_OPTS="--certs-dir /home/ubuntu/.minio/certs --console-address :9001"
MINIO_ROOT_USER=username
MINIO_ROOT_PASSWORD=password
- Create group minio-user
-
Setup firewall (optional, Required for specific vm)
- Install firewall and give public access to port 9000 and 9001
sudo apt install firewalld
sudo firewall-cmd --zone=public --permanent --add-port=80/tcp
sudo firewall-cmd --zone=public --permanent --add-port=9000/tcp
sudo firewall-cmd --zone=public --permanent --add-port=9001/tcp
sudo firewall-cmd --reload
- Install firewall and give public access to port 9000 and 9001
-
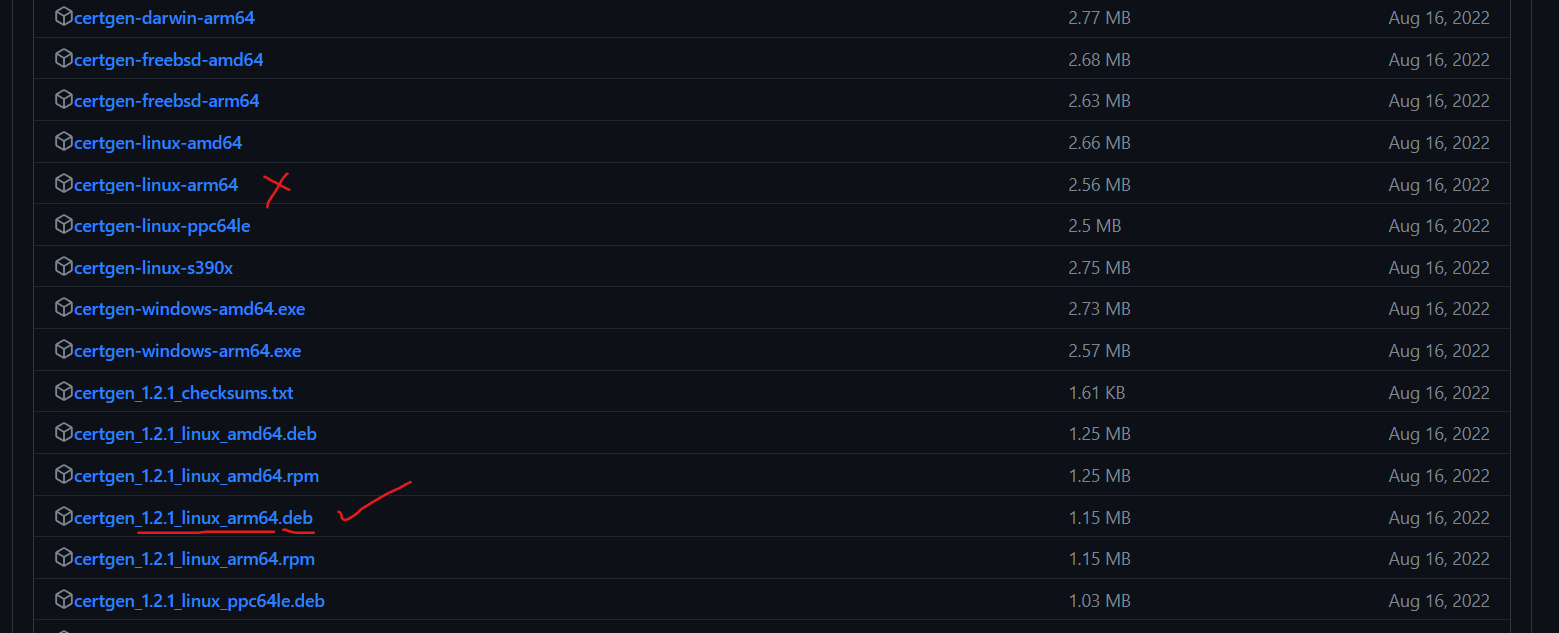
Install certgen from official minio github repository
- Check the site https://github.com/minio/certgen and choose appropriate version
- In my case I am using ubuntu ARM machine
- In my case I am using ubuntu ARM machine
- Download the package in your software (any prefered) directory and install
- In my case the url was https://github.com/minio/certgen/releases/download/v1.2.1/certgen_1.2.1_linux_arm64.deb
cd /home/ubuntu/software
wget https://github.com/minio/certgen/releases/download/v1.2.1/certgen_1.2.1_linux_arm64.deb
dpkg -i certgen_1.2.1_linux_arm64.deb
- Check the site https://github.com/minio/certgen and choose appropriate version
-
Generate certificate in
/home/ubuntu/.minio/certdirectory- I have many subdomains so I will generate an wildcard certificate, applicable to all my sub-domains
If you want to access using IP address, use ip instead
sudo certgen -host *.mlhub.in - It will generate 2 files private.key and public.crt, and minio also look for exactly these files
- Will provide ownership of this two files to minio-user
sudo chown minio-user:minio-user /home/ubuntu/.minio/certs/private.key
sudo chown minio-user:minio-user /home/ubuntu/.minio/certs/public.crt
- I have many subdomains so I will generate an wildcard certificate, applicable to all my sub-domains
If you want to access using IP address, use ip instead
-
Start the minio server
- Using the systemctl/service command we need to enable and start the minio server
sudo systemctl enable minio # OR sudo service minio enable
sudo systemctl start minio # OR sudo service minio start
sudo systemctl status minio # OR sudo service minio status
- Using the systemctl/service command we need to enable and start the minio server
-
Expose the site using nginx
- Looking at the server, we can see 2 ports, One for console exposed to port 9001 and one S3-API exposed to port 9000
- Need to update the nginx config
- Added one file minio-server in sites-available i.e.
/etc/nginx/sites-available/minio-server
server { server_name minio.mlhub.in; #server_name 140.238.227.112; location / { proxy_pass https://127.0.0.1:9001/; proxy_set_header Host $host; proxy_set_header Upgrade $http_upgrade; proxy_set_header Connection upgrade; proxy_set_header Accept-Encoding gzip; client_max_body_size 0; } listen 80; listen [::]:80; } server { server_name s3.mlhub.in; #server_name 140.238.227.112; location / { proxy_pass https://127.0.0.1:9000/; proxy_set_header Host $host; proxy_set_header Upgrade $http_upgrade; proxy_set_header Connection upgrade; proxy_set_header Accept-Encoding gzip; client_max_body_size 0; } listen 80; listen [::]:80; }- Above first server configuration is for minio console and second is for the S3-API
- Added one file minio-server in sites-available i.e.
- Create a symbolic link of our configuration file in sites-enabled directory
sudo ln -s /etc/nginx/sites-available/minio-server /etc/nginx/sites-enabled/
- Restart the nginx server using systemctl/service
sudo service nginx restart
# OR
sudo systemctl restart nginx
-
Get the ssl certificate using certbot/letsencrypt
- Give it a try, running
certbot - It will ask you for the subdomains in a list
- Choose one and repeat for others
- Give it a try, running
-
Test if the S3-API is working or not
- Lets open our minio site (in my case https://minio.mlhub.in)
- Generate new Access key (id and secret)
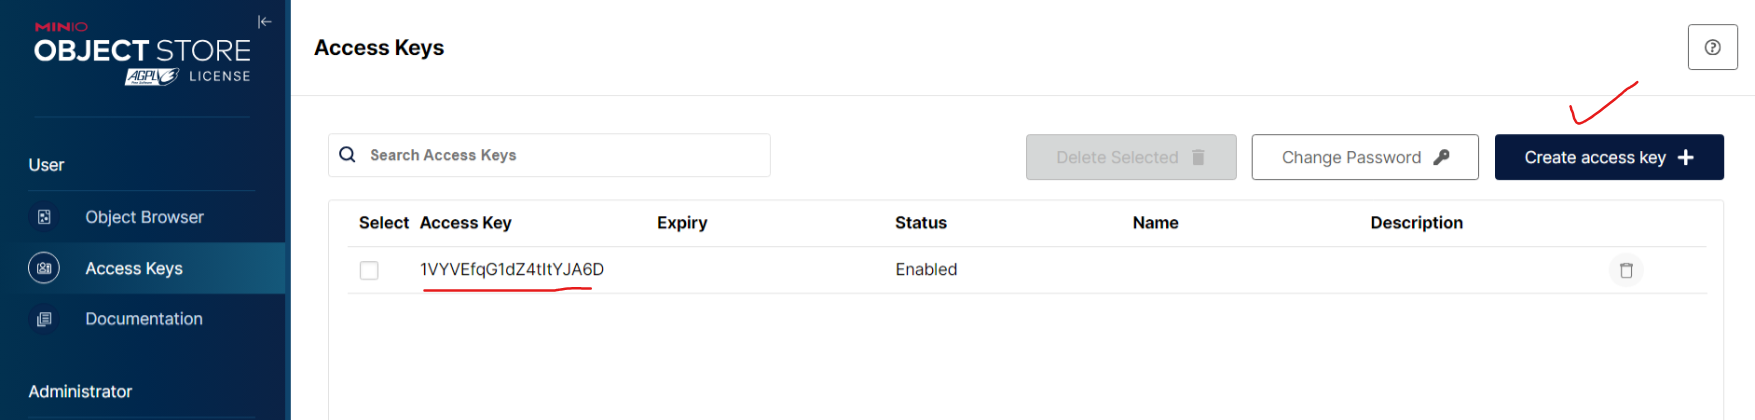
- Create bicket and upload some files
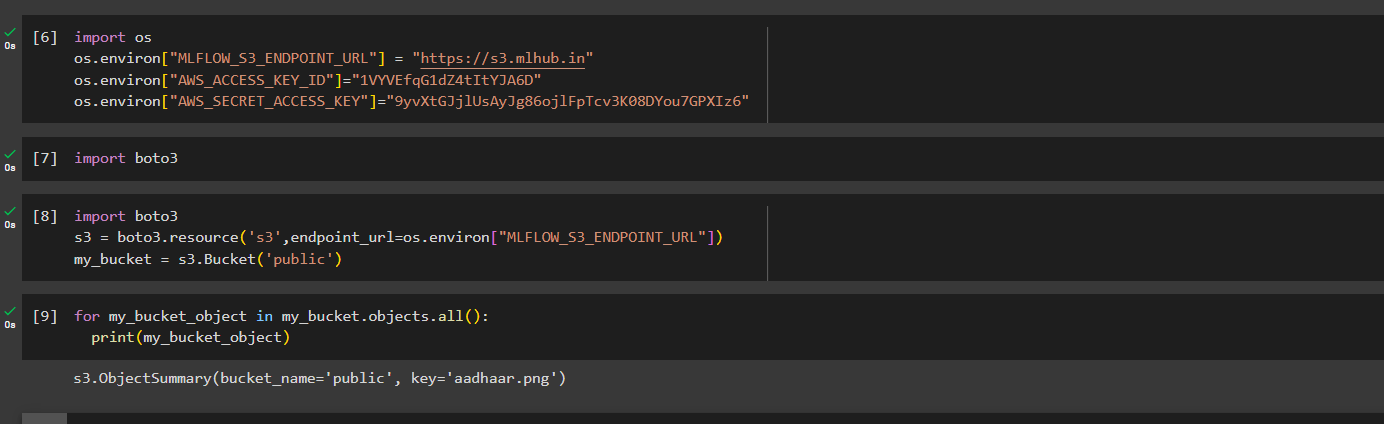
- Open notebook and check for the file through boto3


-
Create a virtual environment, in my case I created a virtual environment with name mlflow in my directory /home/ubuntu/.virtualenvs/
-
Install essential packages in the virtual environment
pip install mlflow boto3
-
Run mlflow locally with minio credentials
export MLFLOW_S3_ENDPOINT_URL=https://s3.mlhub.in
export AWS_ACCESS_KEY_ID=xxxxxxxxxxxxxxxxxxxxxxxxxx
export AWS_SECRET_ACCESS_KEY=xxxxxxxxxxxxxxxxxxxxxxxxxxxxxxxxxxxxxx
# Then run
mlflow server --backend-store-uri sqlite:////home/ubuntu/ml-tracking-server/mlhub.mlflow.sqlite \
              --default-artifact-root s3://private/ml-tracking-server/mlhub-artifacts -p 5000
-
Add basic authentication for your mlflow site
- Install apache2-utils
sudo apt install apache2-utils
- Add user and store it in file /etc/nginx/.htpasswd, suppose my username is mu email id
sudo htpasswd -c /etc/nginx/.htpasswd amanthe001@gmail.com
- It will prompt for New password and Re-type new password, after filling both, new user will be added

-
Expose the port using nginx
- Create a new config file, I created /etc/nginx/sites-available/mlflow-server
- in my mlflow-server config file I have added
auth_basic_user_file /etc/nginx/.htpasswd;to enable Basic auth
server { server_name mlflow.mlhub.in; #server_name 140.238.227.112; location / { proxy_pass http://localhost:5000/; auth_basic "Administrator’s Area"; auth_basic_user_file /etc/nginx/.htpasswd; proxy_set_header Host $host; proxy_set_header Upgrade $http_upgrade; proxy_set_header Connection upgrade; proxy_set_header Accept-Encoding gzip; } listen 80; listen [::]:80; } -
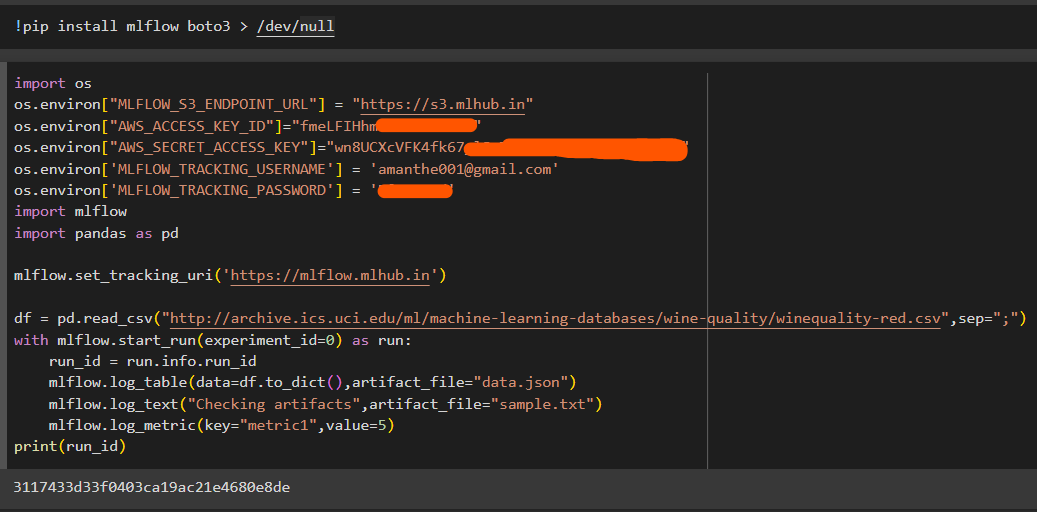
Check for the website and perform some basic mlflow tracking operation e.g. upload dataset, text file
import os
os.environ["MLFLOW_S3_ENDPOINT_URL"] = "https://s3.mlhub.in"
os.environ["AWS_ACCESS_KEY_ID"]="xxxxxxxxxxxxxxxx"
os.environ["AWS_SECRET_ACCESS_KEY"]="xxxxxxxxxxxxxxxxxxxxxxxxxxxxxxxxxxxxxxx"
os.environ['MLFLOW_TRACKING_USERNAME'] = 'amanthe001@gmail.com'
os.environ['MLFLOW_TRACKING_PASSWORD'] = 'xxxxxxxxxxx'
import mlflow
import pandas as pd

mlflow.set_tracking_uri('https://mlflow.mlhub.in')

df = pd.read_csv("http://archive.ics.uci.edu/ml/machine-learning-databases/wine-quality/winequality-red.csv",sep=";")
with mlflow.start_run(run_id = run_id,experiment_id=0) as run:
    run_id = run.info.run_id
    mlflow.log_table(data=df.to_dict(),artifact_file="data.json")
    mlflow.log_text("Checking artifacts",artifact_file="sample.txt")
    mlflow.log_metric(key="metric1",value=5)
- Need to pass all env variables before importing the package
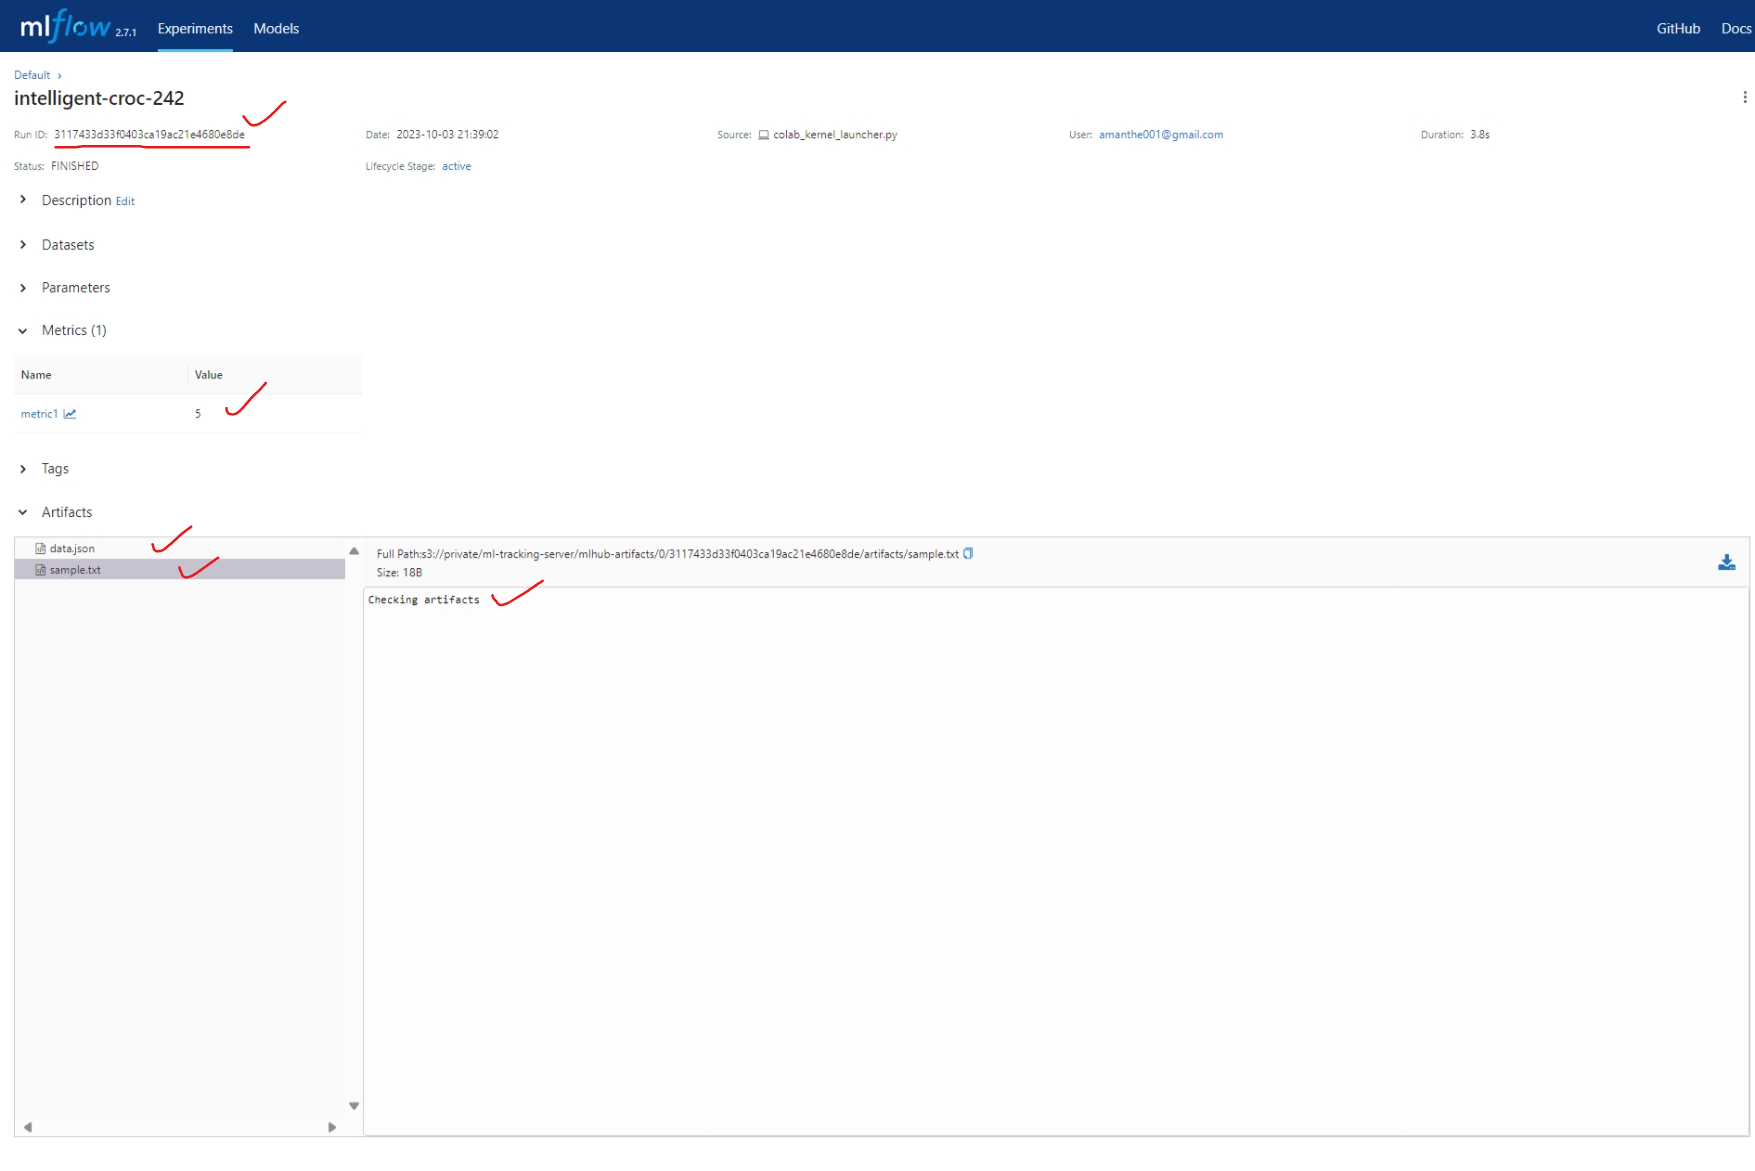
- Verify run in mlflow UI

- Verify the presence of logged metrics, artifact iin mlflow run
- Need to pass all env variables before importing the package
-
Write a custom service file for mlflow
- Create a file
/lib/systemd/system/mlflow.service - Write the required environment variable and run command
- Create a file


[Unit]
Description=MLFlow Server
[Service]
Type=simple

Environment="MLFLOW_S3_ENDPOINT_URL=https://s3.mlhub.in"
Environment="AWS_ACCESS_KEY_ID=xxxxxxxxxxxxxxxxxxxxx"
Environment="AWS_SECRET_ACCESS_KEY=xxxxxxxxxxxxxxxxxxxxxxxxxxxxxxxxxxxxx"

ExecStart=/bin/bash -c 'PATH=/home/ubuntu/.virtualenvs/mlflow/bin/:$PATH exec mlflow server --backend-store-uri sqlite:////home/ubuntu/ml-tracking-server/mlhub.mlflow.sqlite --default-artifact-root s3://private/ml-tracking-server/mlhub-artifacts -p 5000'

User=ubuntu
#Group=<group>
#WorkingDirectory=/home/<username>
Restart=always
RestartSec=10
#KillMode=mixed

[Install]
WantedBy=multi-user.target