is everything you need to get started building decentralized applications on Ethereum! 🚀
|- 📠 Legacy Content - | - 💬 Support Chat -|

required: Node plus Yarn and Git
git clone https://github.com/austintgriffith/scaffold-eth.git
cd scaffold-eth
yarn install
yarn chain
in a second terminal window:
cd scaffold-eth
yarn start
in a third terminal window:
cd scaffold-eth
yarn deploy
🔏 Edit your smart contract YourContract.sol in packages/hardhat/contracts
📝 Edit your frontend App.jsx in packages/react-app/src
💼 Edit and add your deployment scripts in packages/hardhat/deploy - we are using hardhat-deploy
📱 Open http://localhost:3000 to see the app
🏗 scaffold-eth is a hackthon stack for quick product prototyping on Ethereum.
👩🔬 This scaffolding leverages state of the art tooling from the ecosystem.
🧪 It is a free standing dapp so you can learn by making small changes.
After installing, your dev environment should look like this:
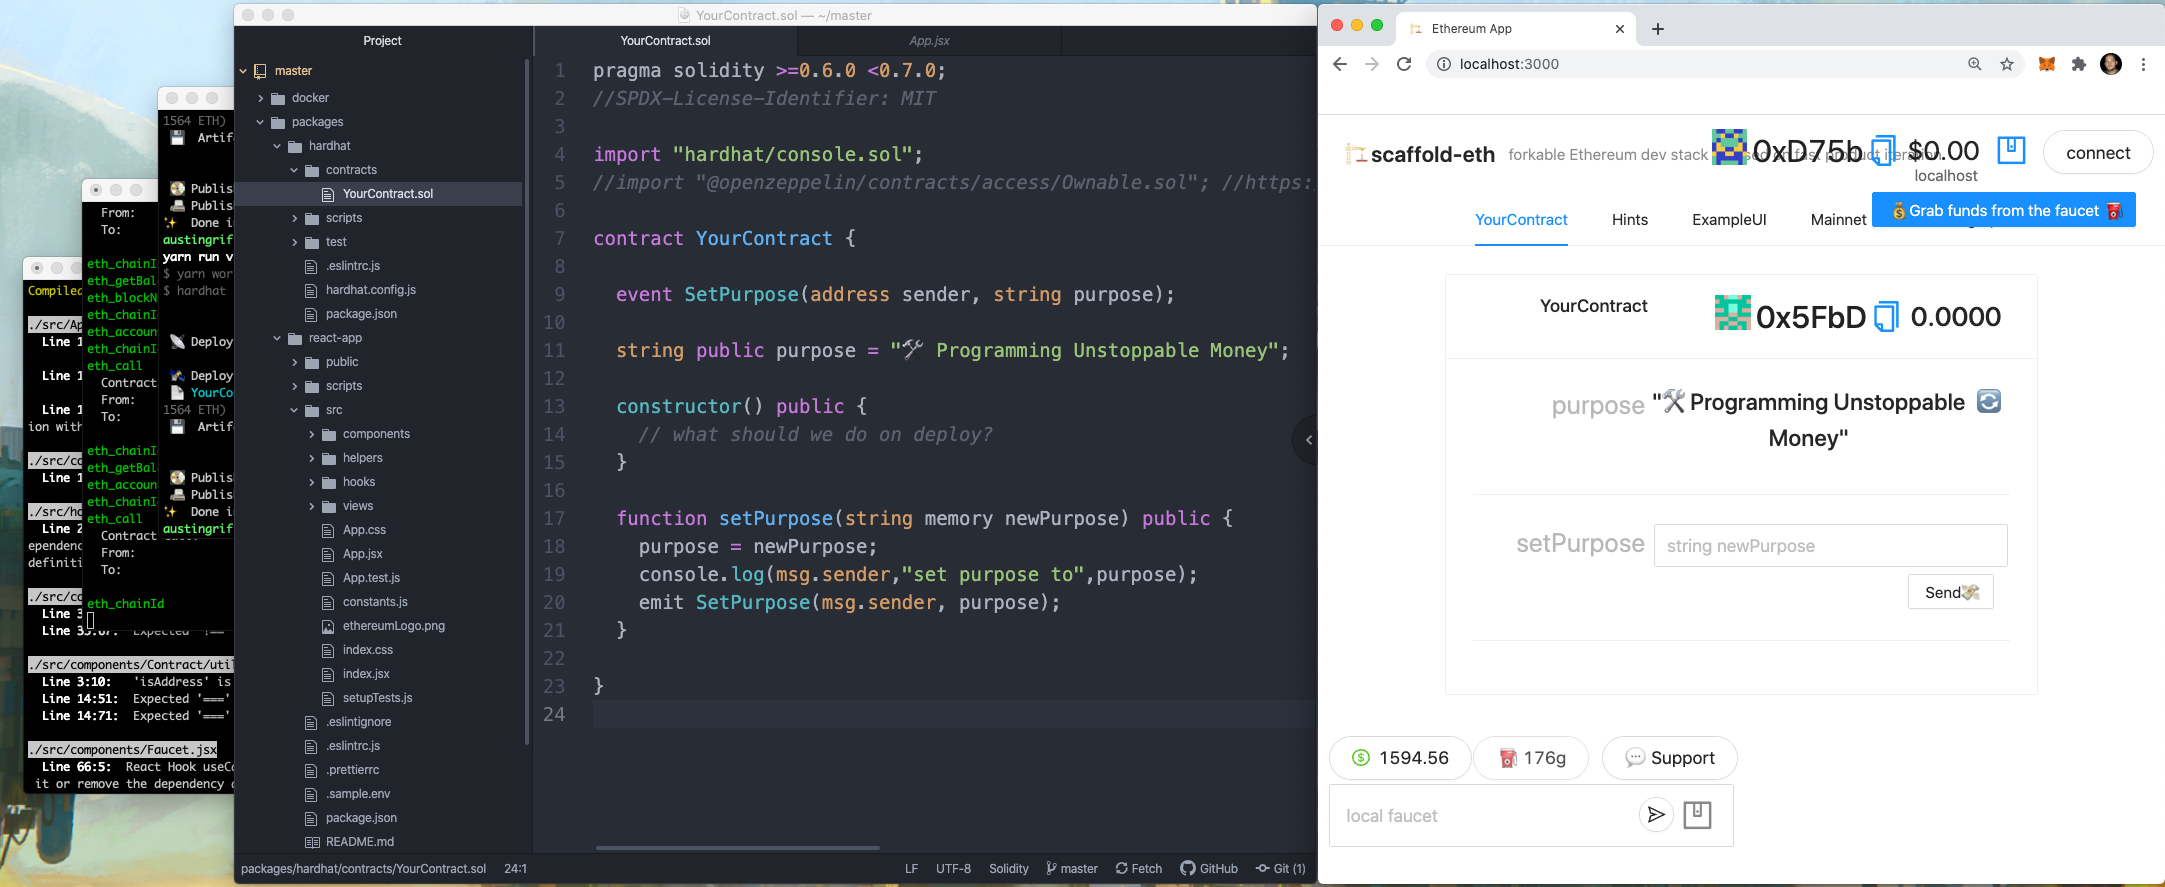
React dev server, HardHat blockchain, deploy terminal, code IDE, and frontend browser.
✏️ Make small changes to YourContract.sol and watch your app auto update!
🔁 You can yarn deploy any time and get a fresh new contract in the frontend:

💵 Each browser has an account in the top right and you can use the faucet (bottom left) to get ⛽️ testnet eth for gas:

🔨Once you have funds, you can call setPurpose on your contract and "write" to the purpose storage:

Look for the HardHat console.log() output in the yarn chain terminal:

⚗️ Spend some time tinkering with
YourContract.sol
===================================================== ⏫ back to the top ⏫
📕 Read the docs: https://docs.soliditylang.org
📚 Go through each topic from solidity by example editing YourContract.sol in 🏗 scaffold-eth
📧 Learn all the Solidity globals and units
👨🏫 Start super simple with a counter: uint8 public count = 1;
⬇️ Then a function dec() public {} that does a count = count - 1;
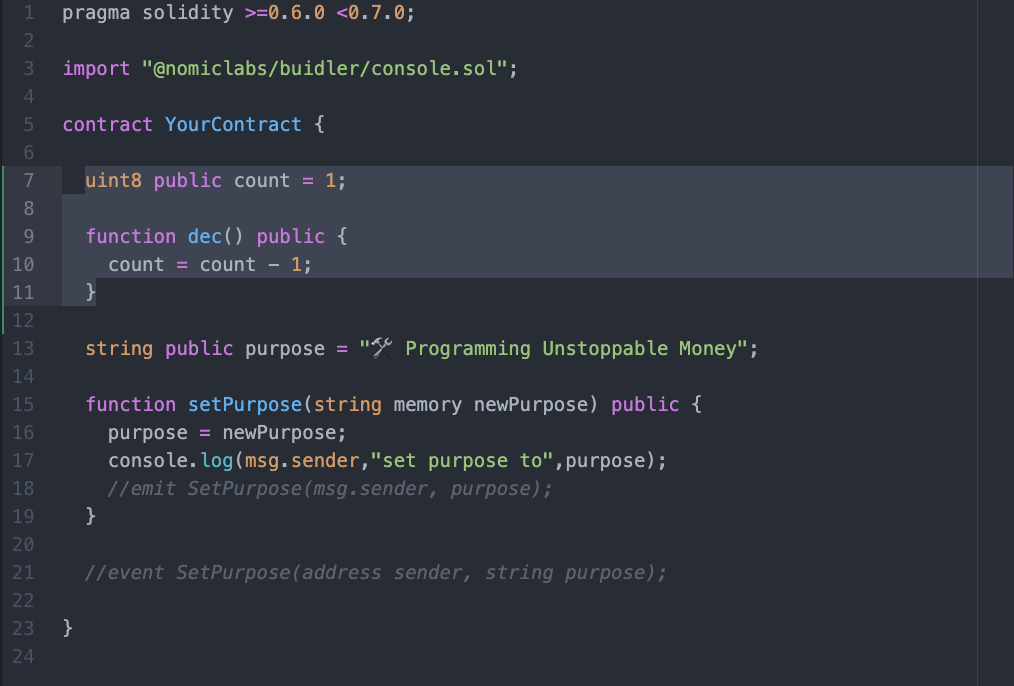
🔬 What happens when you subtract 1 from 0? Try it out in the app to see what happens!

🚽 UNDERFLOW!?! (🚑 Solidity >0.8.0 will catch this!)
🧫 You can iterate and learn as you go. Test your assumptions!
🔐 Global variables like msg.sender and msg.value are cryptographically backed and can be used to make rules
📝 Keep this cheat sheet handy
⏳ Maybe we could use block.timestamp or block.number to track time in our contract
🔏 Or maybe keep track of an address public owner; then make a rule like require( msg.sender == owner ); for an important function
🧾 Maybe create a smart contract that keeps track of a mapping ( address => uint256 ) public balance;
🏦 It could be like a decentralized bank that you function deposit() public payable {} and withdraw()
📟 Events are really handy for signaling to the frontend. Read more about events here.
📲 Spend some time in App.jsx in packages/react-app/src and learn about the 🛰 Providers
formatEther and parseEther (ethers.js) will help with WEI->ETH and ETH->WEI.
🧳 The single page (searchable) ethers.js docs are pretty great too.
🐜 The UI framework Ant Design has a bunch of great components.
📃 Check the console log for your app to see some extra output from hooks like useContractReader and useEventListener.
🏗 You'll notice the <Contract /> component that displays the dynamic form as scaffolding for interacting with your contract.
🔲 Try making a <Button/> that calls writeContracts.YourContract.setPurpose("👋 Hello World") to explore how your UI might work...
💬 Wrap the call to writeContracts with a tx() helper that uses BlockNative's Notify.js.
🧬 Next learn about structs in Solidity.
🗳 Maybe an make an array YourStructName[] public proposals; that could call be voted on with function vote() public {}
🔭 Your dev environment is perfect for testing assumptions and learning by prototyping.
📝 Next learn about the fallback function
💸 Maybe add a receive() external payable {} so your contract will accept ETH?
🚁 OH! Programming decentralized money! 😎 So rad!
===================================================== ⏫ back to the top ⏫
🛰 Ready to deploy to a testnet? Change the defaultNetwork in packages/hardhat/hardhat.config.js
🔐 Generate a deploy account with yarn generate and view it with yarn account
💵 Fund your deployer account (pro tip: use an instant wallet to send funds to the QR code from yarn account)
Deploy your contract:
yarn deployscaffold-eth now uses hardhat-deploy, a hardhat plugin by wighawag that gives your hardhat deployments super-powers!
When you run yarn deploy, the scripts in /packages/hardhat/deploy are run in alphabetical order (by default - more fine-grained controls in the hardhat-deploy docs). You can deploy contracts, interact with contracts & send ETH - whatever you want!
Deployment metadata is stored in the /deployments folder, and automatically copied to /packages/react-app/src/contracts/hardhat_contracts.json via the --export-all flag in the yarn deploy command (see /packages/hardhat/packagen.json).
Crucially, this information is stored by network, so if you redeploy contracts on a new network (e.g. on testnet, after running locally), your local deployments are still tracked.
===================================================== ⏫ back to the top ⏫
Edit your frontend
App.jsxinpackages/react-app/src
📡 Make sure your targetNetwork is the same as 👷♀️ HardHat's defaultNetwork (where you deployed your contracts).

🤡 Adjust your debugging settings as needed:

Providers are your connections to different blockchains. scaffold-eth uses ethers.js providers.
The frontend has three different providers that provide different levels of access to different chains:
mainnetProvider: (read only) Alchemy or Infura connection to main Ethereum network (and contracts already deployed like DAI or Uniswap).
localProvider: local HardHat accounts, used to read from your contracts (.env file points you at testnet or mainnet)
We use ethers.providers.StaticJsonRpcProvider when instantiating providers from RPCs where we are confident that the chainId won't change to save on network calls :)
injectedProvider: your personal MetaMask, WalletConnect via Argent, connected using web3modal.

From the ethers.js docs...
A Signer in ethers is an abstraction of an Ethereum Account, which can be used to sign messages and transactions and send signed transactions to the Ethereum Network to execute state changing operations.
scaffold-eth now uses signers for user operations, either using injectedProvider.getSigner(), or using a Burner Signer created and stored in localStorage (all handled by the useUserSigner hook!)
If you are only reading data, use a provider. If you need to make transactions, or sign things, use a Signer.

Commonly used Ethereum hooks located in packages/react-app/src/:
usePoller(fn, delay): runs a function on app load and then on a custom interval
usePoller(() => {
  //do something cool at start and then every three seconds
}, 3000);
useOnBlock(provider, fn, args): runs a function on app load and then on every new block for a provider
useOnBlock(mainnetProvider, () => {
  console.log(`⛓ A new mainnet block is here!`);
});
useUserSigner(injectedProviderOrSigner, localProvider): returns the signer associated with an injected web3 provider; if injectedProvider is null, generates a burner signer (stored in local storage)
const userSigner = useUserSigner(injectedProvider, localProvider);useBalance(address, provider, [pollTime]): poll for the balance of an address from a provider
const localBalance = useBalance(address, localProvider);useBlockNumber(provider,[pollTime]): get current block number from a provider
const blockNumber = useBlockNumber(props.provider);useGasPrice([speed]): gets current "fast" price from ethgasstation
const gasPrice = useGasPrice();useExchangePrice(mainnetProvider, [pollTime]): gets current price of Ethereum on the Uniswap exchange
const price = useExchangePrice(mainnetProvider);useContractLoader(provider): loads your smart contract interface, for contracts on the provider's chain.
This will use contracts deployed from packages/hardhat (which are exported to src/contracts/hardhat_contracts.json), as well as external contract information, which can be added to src/contracts/external_contracts.js. Note that you can override both of these by passing hardhatContracts or externalContracts to the second config parameter of useContractLoader (see those files for the required format).
const readContracts = useContractLoader(localProvider);
const writeContracts = useContractLoader(injectedProvider);
const writeContracts = useContractLoader(injectedProvider, { chainId: 1 }); // fix the chainId (even if the provider is on a different chain)
const writeContracts = useContractLoader(injectedProvider, {
  networkName: "localhost",
}); // fix the hardhat network name (even if the provider is on a different chain)
const writeContracts = useContractLoader(injectedProvider, {
  customAddresses: { EXAMPLE: "0xADDRESS" },
}); // over-ride the address

// Pass custom contracts
const ERC20ABI = [
  "function balanceOf(address owner) view returns (uint256)",
  "function decimals() view returns (uint8)",
  "function symbol() view returns (string)",
  "function transfer(address to, uint amount) returns (boolean)",
  "event Transfer(address indexed from, address indexed to, uint amount)",
];
const ERC20ContractMetadata = {
  1: {
    contracts: {
      DAI: {
        address: "0x6B175474E89094C44Da98b954EedeAC495271d0F",
        abi: ERC20ABI,
      },
      UNI: {
        address: "0x1f9840a85d5aF5bf1D1762F925BDADdC4201F984",
        abi: ERC20ABI,
      },
    },
  },
};

const writeContracts = useContractLoader(injectedProvider, { chainId: 1
  externalContracts: ERC20ContractMetadata,
});
useContractReader(contracts, contractName, variableName, [pollTime]): reads a variable from your contract and keeps it in the state
const title = useContractReader(props.readContracts, contractName, "title");
const owner = useContractReader(props.readContracts, contractName, "owner");
useEventListener(contracts, contractName, eventName, [provider], [startBlock]): listens for events from a smart contract and keeps them in the state
const ownerUpdates = useEventListener(
  readContracts,
  contractName,
  "UpdateOwner",
  props.localProvider,
  1
);
Your commonly used React Ethereum components located in packages/react-app/src/:
📬 <Address />: A simple display for an Ethereum address that uses a Blockie, lets you copy, and links to Etherescan.
  <Address value={address} />
  <Address value={address} size="short" />
  <Address value={address} size="long" blockexplorer="https://blockscout.com/poa/xdai/address/"/>
  <Address value={address} ensProvider={mainnetProvider}/>
🖋 <AddressInput />: An input box you control with useState for an Ethereum address that uses a Blockie and ENS lookup/display.
  const [ address, setAddress ] = useState("")
  <AddressInput
    value={address}
    ensProvider={props.ensProvider}
    onChange={(address)=>{
      setAddress(address)
    }}
  />
💵 <Balance />: Displays the balance of an address in either dollars or decimal.
<Balance
  address={address}
  provider={injectedProvider}
  dollarMultiplier={price}
/>
👤 <Account />: Allows your users to start with an Ethereum address on page load but upgrade to a more secure, injected provider, using Web3Modal. It will track your address and localProvider in your app's state:
const [address, setAddress] = useState();
const [injectedProvider, setInjectedProvider] = useState();
const price = useExchangePrice(mainnetProvider);<Account
address={address}
setAddress={setAddress}
localProvider={localProvider}
injectedProvider={injectedProvider}
setInjectedProvider={setInjectedProvider}
dollarMultiplier={price}
/>
💡 Notice: the
<Account />component will callsetAddressandsetInjectedProviderfor you.
===================================================== ⏫ back to the top ⏫
🐜 Ant.design is a fantastic UI library with components like the grids, menus, dates, times, buttons, etc.
Transactor: The transactor returns a tx() function to make running and tracking transactions as simple and standardized as possible. We will bring in BlockNative's Notify library to track our testnet and mainnet transactions.
const tx = Transactor(props.injectedProvider, props.gasPrice);Then you can use the tx() function to send funds and write to your smart contracts:
tx({
  to: readContracts[contractName].address,
  value: parseEther("0.001"),
});tx(writeContracts["SmartContractWallet"].updateOwner(newOwner));☢️ Warning: You will need to update the configuration for
react-app/src/helpers/Transactor.jsto use your BlockNative dappId
🔑 Create wallet links to your app with yarn wallet and yarn fundedwallet
⬇️ Installing a new package to your frontend? You need to cd packages/react-app and then yarn add PACKAGE
⬇️ Installing a new package to your backend? You need to cd packages/hardhat and then yarn add PACKAGE
You can deploy your app with:
# packge up the static site:

yarn build

# ship it!

yarn surge

OR

yarn s3

OR

yarn ipfs
🚀 Good luck!
===================================================== ⏫ back to the top ⏫
===================================================== ⏫ back to the top ⏫
(todo: insert all the cool active branches)
| tenderly |
|---|
| simple-nft-example |
^^^ ⛏ PR your 🏗 scaffold-eth branch!!! 🙏🙏🙏 ^^^
The Graph lets you process on-chain events to create a Subgraph, an easy to query graphQL endpoint!
scaffold-eth comes with a built in demo subgraph, as well as a local docker setup to run a graph-node locally.

🎥 here is another Graph speed run tutorial video
** Requires Docker **
🚮 Clean up previous data:
yarn clean-graph-node
📡 Spin up a local graph node by running
yarn run-graph-node
📝 Create your local subgraph by running
yarn graph-create-local
This is only required once!
🚢 Deploy your local subgraph by running
yarn graph-ship-local
🖍️ Edit your local subgraph in packages/subgraph/src
Learn more about subgraph definition here
🤩Deploy your contracts and your subgraph in one go by running:
yarn deploy-and-graph
/services is a new (!) scaffold-eth package that pulls in backend services that you might need for local development, or even for production deployment.
graph-node lets you run a node locally.
run-graph-node // runs the graph node
remove-graph-node // stops the graph node
clean-graph-node // clears the local data
scaffold-eth uses submodules to pull in other repositories. These first need to be initiated.
yarn workspace @scaffold-eth/services submodule-init
optimism.io is an Optimistic Rollup. This submodule (of the Optimism monorepo) runs a local chain, with an optimistic rollup.
To run the local setup...
** Requires Docker **
yarn workspace @scaffold-eth/services run-optimism
The first time may take a while as the services build!
The underlying services are run in the background, so you won't see anything in the terminal, but you can use Docker Desktop to inspect them.
You can stop local optimism at any time by running:
yarn workspace @scaffold-eth/services stop-optimism
The local L1 and the Rollup are configured in both /hardhat and /react-app as localOptimism and localOptimismL1, so you can deploy and build out of the box!
Learn more about building on Optimism here.
Arbitrum is an Optimistic Rollup. This submodule (of the Arbitrum monorepo) runs a local chain, with an optimistic rollup.
To run the local setup...
** Requires Docker **
In one terminal:
yarn workspace @scaffold-eth/services arbitrum-init
yarn workspace @scaffold-eth/services arbitrum-build-l1
yarn workspace @scaffold-eth/services arbitrum-run-l1
In a second terminal:
yarn workspace @scaffold-eth/services arbitrum-init-l2
yarn workspace @scaffold-eth/services arbitrum-run-l2
The first time may take a while as the services build!
To stop the processes, you can just run CTRL-C
The local L1 and the Rollup are configured in both /hardhat and /react-app as localArbitrum and localArbitrumL1, so you can deploy and build out of the box!
Learn more about building on Arbitrum here.
===================================================== ⏫ back to the top ⏫
Paintings come to life as you "ink" new creations and trade them on Ethereum. A deep dive into 🖼 NFTs, 🐳 OpenSea, 🖍 react-canvas-draw, 🎨 react-color, and 🛬 onboarding user experience.
🏃♂️ SpeedRun 📹 (TODO)
An instant wallet running on xDAI insired by xdai.io.
Poll your holders! Build an example emoji voting system with 🏗 scaffold-eth. 🔏 Cryptographically signed votes but tracked off-chain with 📡 Zapier and 📑 Google Sheets.
^^^ ⛏ PLEASE PR your 🏗 scaffold-eth project in above!!! 🙏🙏🙏 ^^^
===================================================== ⏫ back to the top ⏫
Tenderly is a platform for monitoring, alerting and trouble-shooting smart contracts. They also have a hardhat plugin and CLI tool that can be helpful for local development!
Hardhat Tenderly announcement blog for reference.
scaffold-eth includes the hardhat-tenderly plugin. When deploying to any of the following networks:
["kovan","goerli","mainnet","rinkeby","ropsten","matic","mumbai","xDai","POA"]
You can verify contracts as part of a deployment script.
let verification = await tenderly.verify({
  name: contractName,
  address: contractAddress,
  network: targetNetwork,
});
Once verified, they will then be available to view on Tenderly!

One of Tenderly's best features for builders is the ability to upload local transactions so that you can use all of Tenderly's tools for analysis and debugging. You will need to create a tenderly account if you haven't already.
Exporting local transactions can be done using the Tenderly CLI. Installing the Tenderly CLI:
brew tap tenderly/tenderly
brew install tenderly
See alternative installation steps here
You need to log in and configure for your local chain (including any forking information) - this can be done from any directory, but it probably makes sense to do under /packages/hardhat to ensure that local contracts are also uploaded with the local transaction (see more below!)
cd packages/hardhat
tenderly login
tenderly export init
You can then take transaction hashes from your local chain and run the following from the packages/hardhat directory:
tenderly export <transactionHash>
Which will upload them to tenderly.co/dashboard!
Tenderly also allows users to debug smart contracts deployed to a local fork of some network (see yarn fork). To let Tenderly know that we are dealing with a fork, run the following command:
tenderly export init
CLI will ask you for your network's name and whether you are forking a public network. After choosing the right fork, your exporting will look something like this:
tenderly export <transactionHash> --export-network <networkName>
Note that tenderly.yaml file stores information about all networks that you initialized for exporting transactions. There can be multiple of them in a single file. You only need the --export-network if you have more than one network in your tenderly.yaml config!
A quick note on local contracts: if your local contracts are persisted in a place that Tenderly can find them, then they will also be uploaded as part of the local transaction export, which is one of the freshest features! We are using hardhat-deploy, which stores the contracts & meta-information in a deployments folder, so this should work out of the box.
Another pitfall when dealing with a local network (fork or not) is that you will not see the transaction hash if it fails. This happens because the hardhat detects an error while eth_estimateGas is executed. To prevent such behaviour, you can skip this estimation by passing a gasLimit override when making a call - an example of this is demonstrated in the FunctionForm.jsx file of the Contract component:
let overrides = {}
// Uncomment the next line if you want to skip the gas estimation for each transaction
// overrides.gasLimit = hexlify(1200000);
const returned = await tx(contractFunction(...args, overrides));
One gotcha - Tenderly does not (currently) support yarn workspaces, so any imported solidity contracts need to be local to packages/hardhat for your contracts to be exported. You can achieve this by using nohoist - this has been done for hardhat so that we can export console.sol - see the top-level package.json to see how!
"workspaces": {
  "packages": [
    "packages/*"
  ],
  "nohoist": [
    "**/hardhat",
    "**/hardhat/**"
  ]
}
hardhat-deploy lets you easily verify contracts on Etherscan, and we have added a helper script to /packages/hardhat to let you do that. Simply run:
yarn etherscan-verify --network <network_of_choice>
And all hardhat's deployed contracts with matching ABIs for that network will be automatically verified. Neat!
You will need to update the constants.js in packages/react-app/src with your own Infura ID.
update the
BLOCKNATIVE_DAPPIDinpackages/react-app/src/constants.jswith your own Blocknative DappID
===================================================== ⏫ back to the top ⏫

Learn the basics of 🏗 scaffold-eth and building on Ethereum. 👷♂️ HardHat, 📦 create-eth-app, 🔥 hot reloading smart contracts, 🛰 providers, 🔗 hooks, 🎛 components, and building a decentralized application. 🎥 Guided Tutorial
Learn about tokens. [coming soon] What is a token? Why is it cool? How can I deploy one? Exotic mechanisms? (todo)
Learn the basics of Automated Market Makers like 🦄 Uniswap. Learn how 💰Reserves affect the 📉 price, ⚖️ trading, and 💦 slippage from low liquidity.
Build a simple IPFS application in 🏗 scaffold-eth to learn more about distributed file storage and content addressing. 🎥 Live Tutorial
Learn about to provide your users with better UX by abstracting away gas fees and blockchain mechanics. (todo)
Learn how to deploy your smart contract to a production blockchain. Then deploy your applicaton to Surge, S3, and IPFS. Finally, register an ENS and point it at the decentralized content! 🎥 Live Tutorial
Join the telegram support chat 💬 to ask questions and find others building with 🏗 scaffold-eth!
===================================================== ⏫ back to the top ⏫