Snakemake Workflow: Microbiome Amplicon (16S, 18S and ITS) sequence analysis using Qiime2 and PICRUSt2.
This workflow performs microbiome analysis using QIIME2 and PICRUSt2 for functional annotation. Functional annotation is only performed for 16S amplicon sequences.
Please note the following:
- I analyze my data with qiime2 version 2020.6 so that's what I have tested this pipeline with.
- I have not tested the pipeline using deblur or vsearch even though I have implemented them, so use these methods at your own risk. I have tested the dada2 pipeline and it works great. Hence, I advice you run the dada2 pipeline.
- I provide 3 Snakefiles: Snakefile (16S, 18S and ITS), Snakefile.16S (16S and 18S) and Snakefile.ITS (ITS alone).
- I will be be happy to fix any bug that you migth find, so please feel free to reach out to me at obadbotanist@yahoo.com
Please do not forget to cite the authors of the tools used.
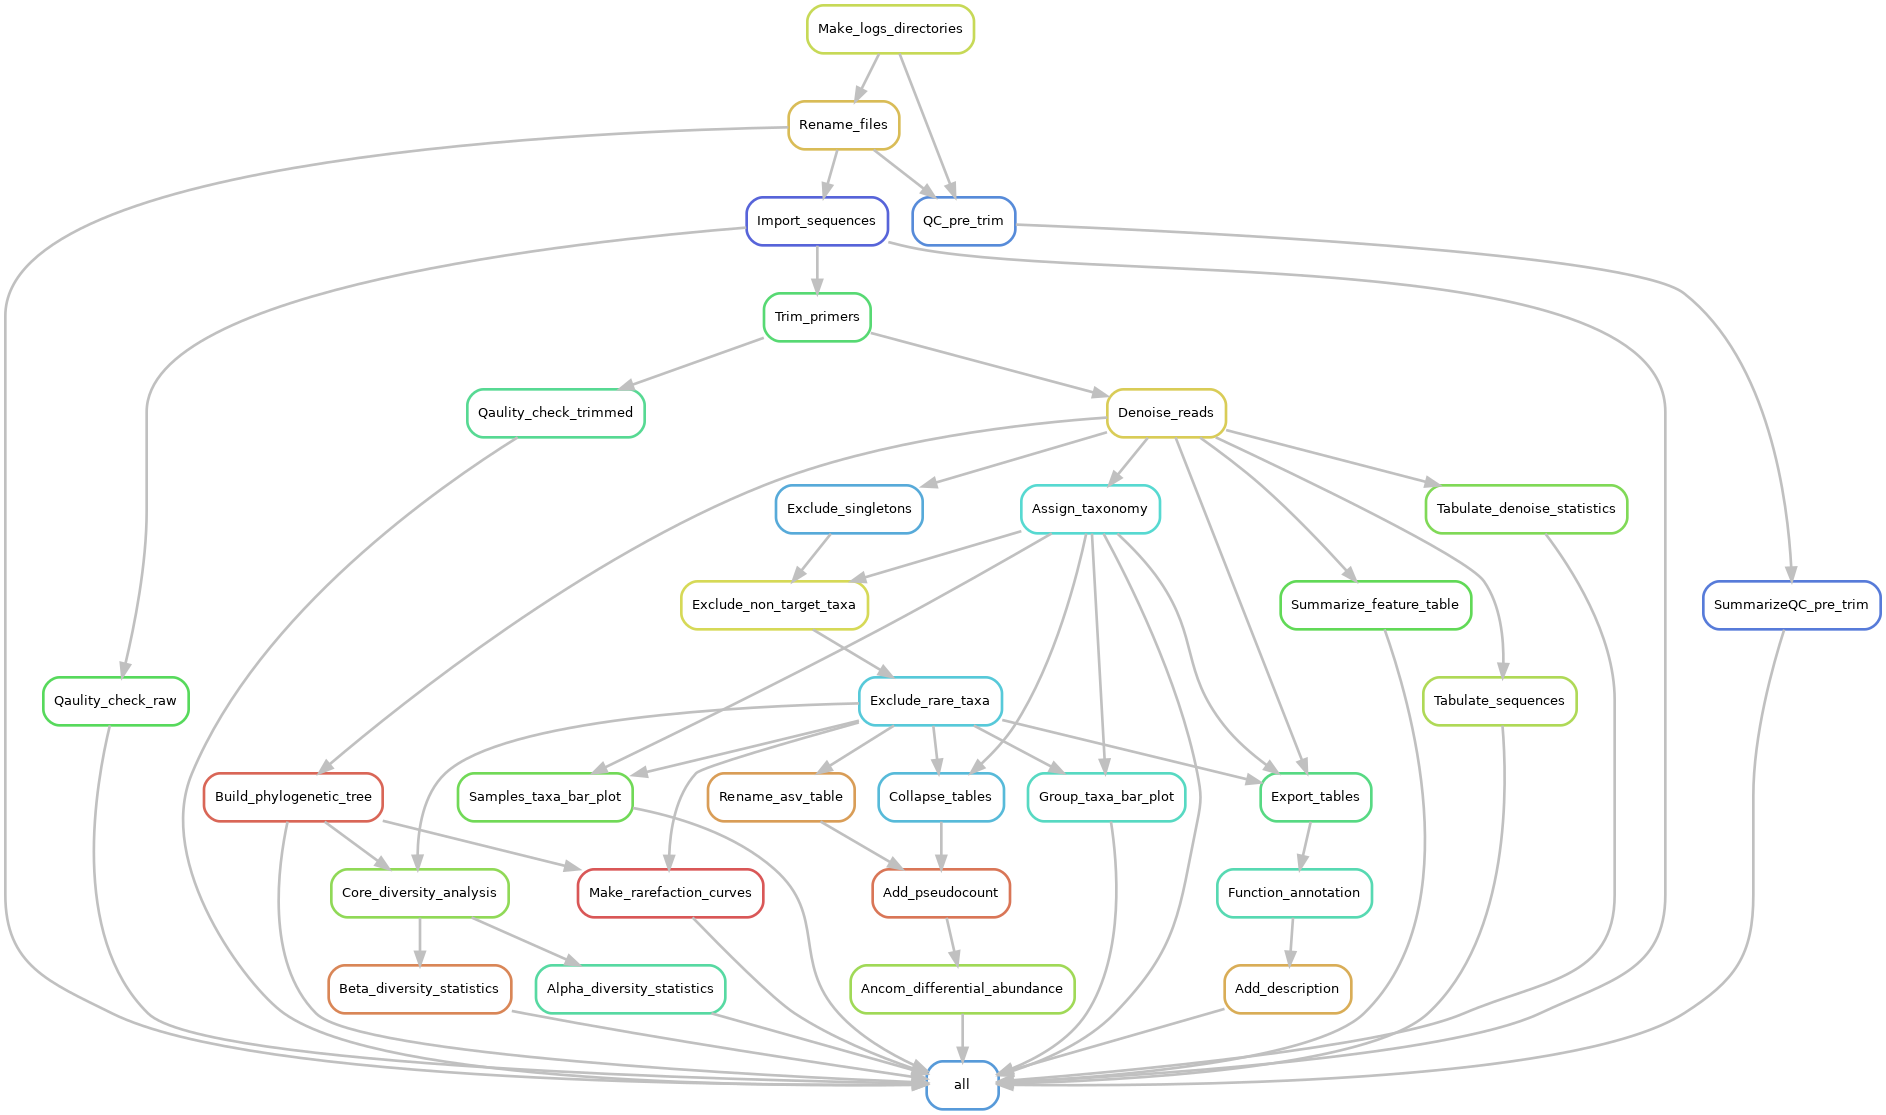
The Pipeline does the following:
- It renames your input files (optional) so that it conforms with the required input format i.e. 01.raw_data/{SAMPLE}_R{1|2}.fastq.gz for paired-end or 01.raw_data/{SAMPLE}.fastq.gz for single-end reads
- Quality checks and summarizes the input reads using FASTQC and MultiQC
- Imports the reads into Qiime2
- Quality checks the input artifact using Qiime2
- Trims the imported arfifact for primers and adaptors using cutadapt implemented in qiime2
- Quality checks the trimmed input artifact using Qiime2
- Denoises (filtering, chimera checking and ASV table generation) the reads using dada2 (default)
- Asigns taxonomy to the representative sequences using sci-kit learn and your provided database. see the folder Create__DB for a pipeline that can be used to create the required databases
- Excludes singletons and non-target taxa such as Mitochondria, Chloroplast etc. The taxa to be filtered can be set from within the Snakefile file by editing the "taxa2filter" variable.
- Excludes rare ASV i.e. ASVs with sequences less than 0.005% of the total number of sequences (Navas-Molina et al. 2013)
- Builds a phylogenetic tree
- Generates sample and group taxa plots
- Performs core diversity analysis i.e alpha and betadiversity analysis along with the related statistical tests
- Performs differential abundance testing using ANCOM
- Perform functional anaotation using PICRUSt2 for 16S sequences.
- Olabiyi Obayomi (@olabiyi)
Before you start, make sure you have miniconda, qiime2, picrust2 and snakemake installed. You can optionally install my bioinfo environment which contains snakemake and many other useful bioinformatics tools.
See instructions on how to do so here
See instuctions on how to do so here
STEP 3: Install Snakemake in a separate conda environment or install my bioinfo environment which contains snakemake(optional)
Install Snakemake using conda:
conda create -c bioconda -c conda-forge -n snakemake snakemake
For installation details, see the instructions in the Snakemake documentation.
git clone https://github.com/olabiyi/sankemake-workflow-qiime2.git
Configure the workflow according to your needs by editing the files in the config/ folder. Adjust config.yaml to configure the workflow execution, and samples.tsv to specify your sample setup. Make sure your sample.tsv file does not contain any error as this could lead to potentially losing all of your data when renaming the files.
If you would like to use my bioinfo environment:
conda env create -f envs/bioinfo.yaml
source activate bioinfo
[ -d 00.mapping/ ] || mkdir 00.mapping/
[ -d 01.raw_data/ ] || mkdir 01.raw_data/
# Delete anything that may be present in the rawdata directory
rm -rf  mkdir 01.raw_data/*
# Move your read files to the rawa data directory - Every sample in its own directory - see the example in this repo
mv  location/rawData/16S/* 01.raw_data/
You need two metadata files: a general metadata file called metadata.tsv and a treatment-treatment.tsv file. Thes files can be createda nd editted with excel. Make sure to save the names as metadata.tsv and treatment-metadata.tsv. The treatment-metadata is used for makeing grouped bar plots while the metadata.tsv is used for corediversity analysis and general statistics. Please see the examples provided in this repository for specific formats.
# Get the sample names. This assumes that the folders in the 01.raw_data/ directory are named by sample.
SAMPLES=($(ls -1 01.raw_data/ | grep -Ev "MANIFEST|seq" - |sort -V))

# Get sample names for "samples" field in the config file

(echo -ne '[';echo ${SAMPLES[*]} | sed -E 's/ /, /g' | sed -E 's/(\w+)/"\1"/g'; echo -e ']')

# Generate the MANIFEST file
(echo "sample-id,absolute-filepath,direction"; \
for SAMPLE in ${SAMPLES[*]}; do echo -ne "${SAMPLE},$PWD/01.raw_data/${SAMPLE}/${SAMPLE}_R1.fastq.gz,forward\n${SAMPLE},$PWD/01.raw_data/${SAMPLE}/${SAMPLE}_R2.fastq.gz,reverse\n";done) \
> 01.raw_data/MANIFEST
(echo -ne "SampleID\tType\tOld_name\tNew_name\n"; \
for SAMPLE in ${SAMPLES[*]}; do echo -ne "${SAMPLE}\tForward\t01.raw_data/${SAMPLE}/${SAMPLE}_R1.fastq.gz\t01.raw_data/${SAMPLE}/${SAMPLE}_R1.fastq.gz\n${SAMPLE}\tReverse\t01.raw_data/${SAMPLE}/${SAMPLE}_R2.fastq.gz\t01.raw_data/${SAMPLE}/${SAMPLE}_R2.fastq.gz\n";done) \
> config/sample.tsv
gzip fastq files if they are not already gziped as required by this pipeline. It also helps to save disk memory.
find 01.raw_data/ -type f -name '*.fastq' -exec gzip {} \;
snakemake -pr --cores 10 --keep-going "04.QC/trimmed_reads_qual_viz.qzv" "04.QC/raw_reads_qual_viz.qzv"
Denoise reads - chimera removal, reads merging, quality trimming and ASV feature table generation take a good look at 05.Denoise_reads/denoise_stats.qzv to see if you didn't lose too many reads and if the reads merged well. If the denoizing was not sucessful, adjust the parameters you set for dada2 and then re-run
snakemake -pr --cores 15 --keep-going "05.Denoise_reads/denoise_stats.qzv" "05.Denoise_reads/table_summary.qzv" "05.Denoise_reads/representative_sequences.qzv"
Filter taxa - Examine "08.Filter_feature_table/taxa_filtered_table.qzv" to determine the threshold for filtering out rare taxa
snakemake -pr --cores 15 --keep-going "06.Assign_taxonomy/taxonomy.qzv" "07.Build_phylogenetic_tree/rooted-tree.qza" "08.Filter_feature_table/taxa_filtered_table.qzv"
snakemake -pr --cores 15 --keep-going "08.Filter_feature_table/filtered_table.qzv" "09.Taxa_bar_plots/group-bar-plot.qzv" "09.Taxa_bar_plots/samples-bar-plots.qzv"
Get the rarefation depth for diversity analysis after viewing "08.Filter_feature_table/filtered_table.qzv" and run the complete pipeline
snakemake -pr --cores 15 --keep-going
- 05.Denoise_reads/denoise_stats.qza -> Denoising statistics
- 06.Assign_taxonomy/taxonomy.qza -> Taxonomy assignments of the representative sequences
- 07.Build_phylogenetic_tree/rooted-tree.qza -> Phylogenetic tree for phylogenetic alphadiversity measurements
- 08.Filter_feature_table/filtered_table.qza -> ASV table
- 10.Diversity_analysis_{RAREFACTION_DEPTH}/bray_curtis_pcoa_results.qza -> Bray Curtis pcoa results
- 10.Diversity_analysis_{RAREFACTION_DEPTH}/bray_curtis_distance_matrix.qza -> Bray Curtis distance matrix
- 15.Function_annotation/picrust2_out_pipeline/pathways_out -> Picrust2 pathway output
- 15.Function_annotation/picrust2_out_pipeline/KO_metagenome_out -> Picrust2 KO / genes output
