Overview • Data Architecture Diagram • Data Visualization • Main Concepts • Prerequisites • Set-up • Where to go from here• Contact •
This project looks to leverage multiple tools to create a data architecture that could help serve as the backend for a business and even the frontend (more on this in due time). While the initial focus was simply only creating a data pipeline to move the data from one source x to a data warehouse y to run some analyses, the project has evolved to include a number of supplementary technologies/features partially due to problems that arose out of the blue. Fortunately while there may not always be meer solutions to everything there's always a nice trade-off i.e. compromise.
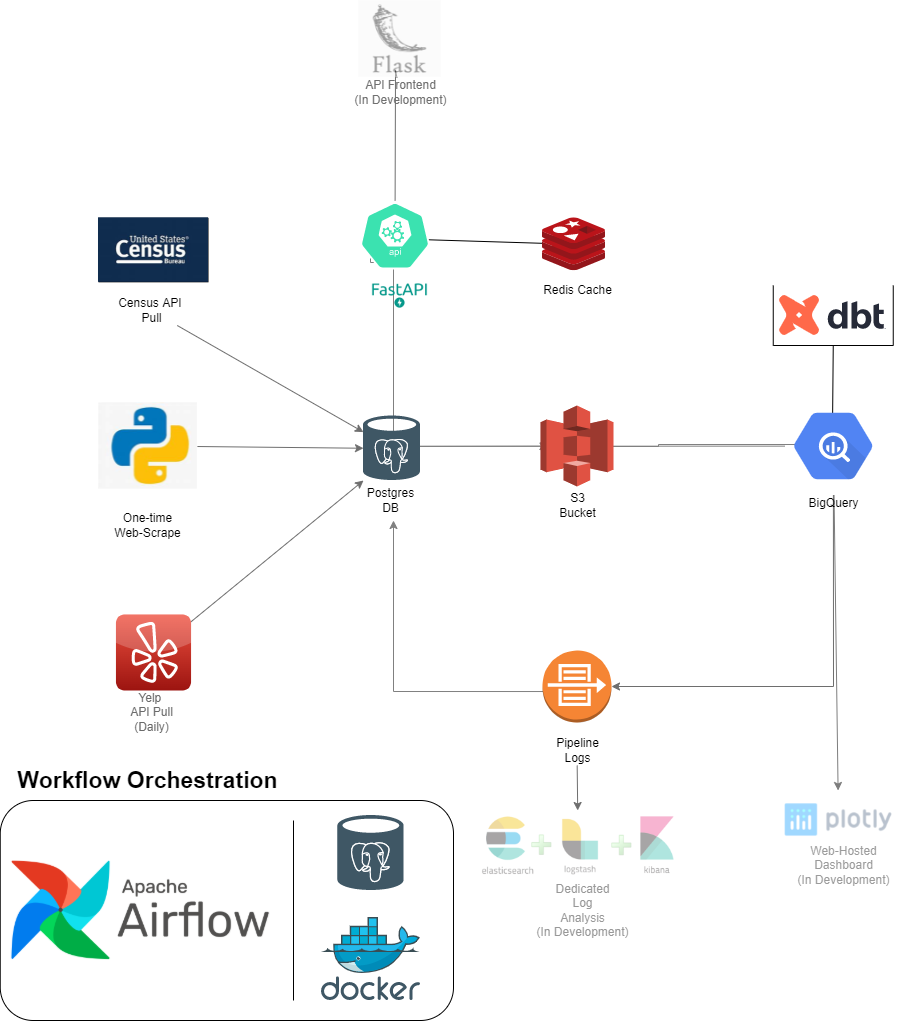
To begin we'll extract data from 3 sources ,namely, the Census API , a web page via webscrape, and the Yelp API and push this to a Postgres database.
Initially this will be used to simulate a source db using dbt to normalize the data as would be expected in most OLTP dbs.
With that setup data from yelp will be pulled daily and inserted into this source db.
From there the data will be extracted to an S3 Bucket which will serve as our de-facto data lake.
Subsequently the data will be pulled from the S3 Bucket and ingested into some staging tables in Google Big Query ,that will serve as our data warehouse, where we'll make use of dbt to denormalize the data into a Snowflake Model.
Once this is done some simple data validation checks will be carried out and we'll log these results and route them back to our Postgres db to create some metrics with them and send notifications via flask in the event of any issues.
To orchestrate our recurring data workflow we'll use Apache Airflow with a Postgres Instance that is ran in a Docker container.
Note: Now the code has been updated to run Apache Airflow completely in Docker with the CeleryExecutor 😀. So now this provides more scalibility if we plan on working with a multi-node setup. I just have yet to update the directions in this code.
Also using the FastAPI framework we'll be able to create an API on top of our source database with Redis to cache certain responses.
Note: The our API has been fully dockerized and integrated as such with the CI/CD pipeline.
Since our goal is ultimately run some analyses we will then look to carry this out.
There are also other plans to extend this project which can be seen in the following data architecture diagram.
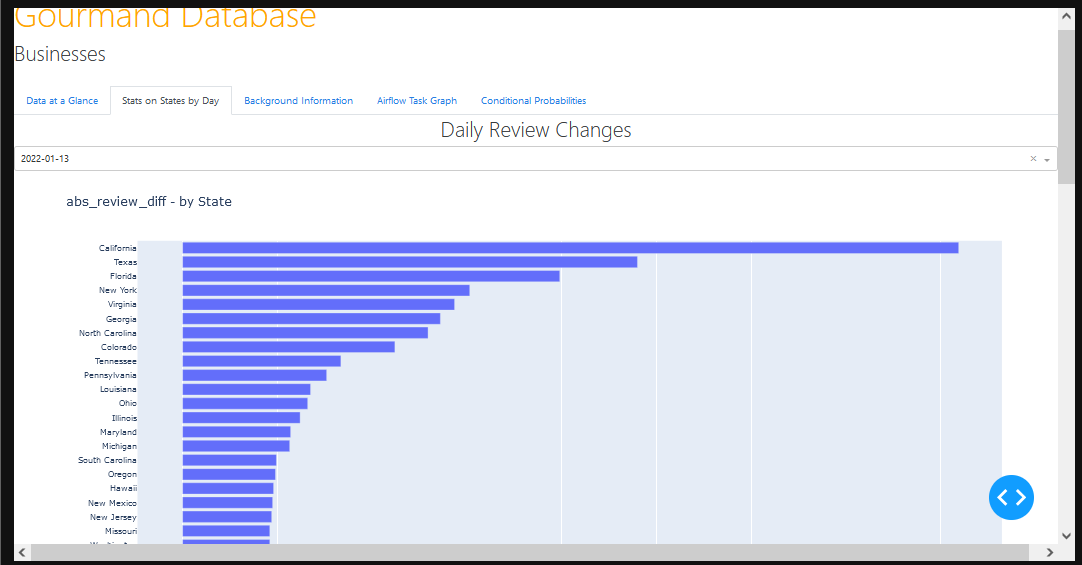
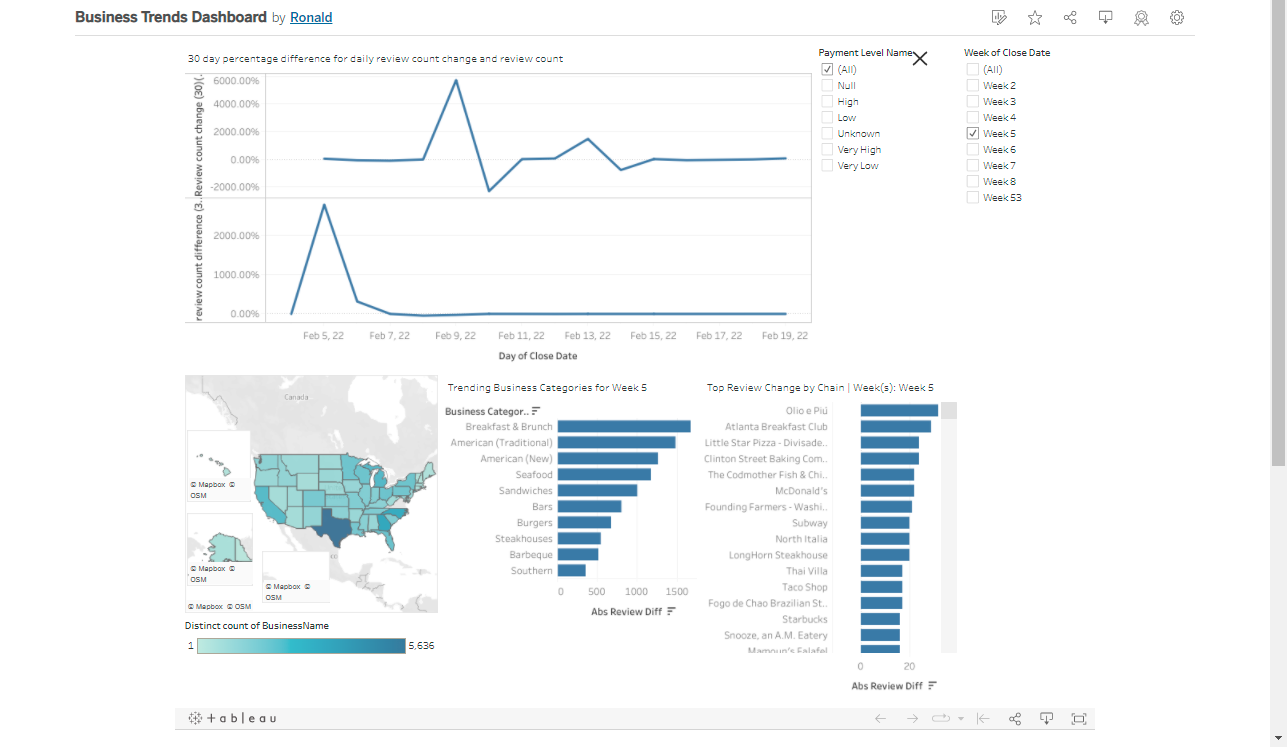 This dashboard you can observe here.
It serves to show some of the trends for certain time periods.
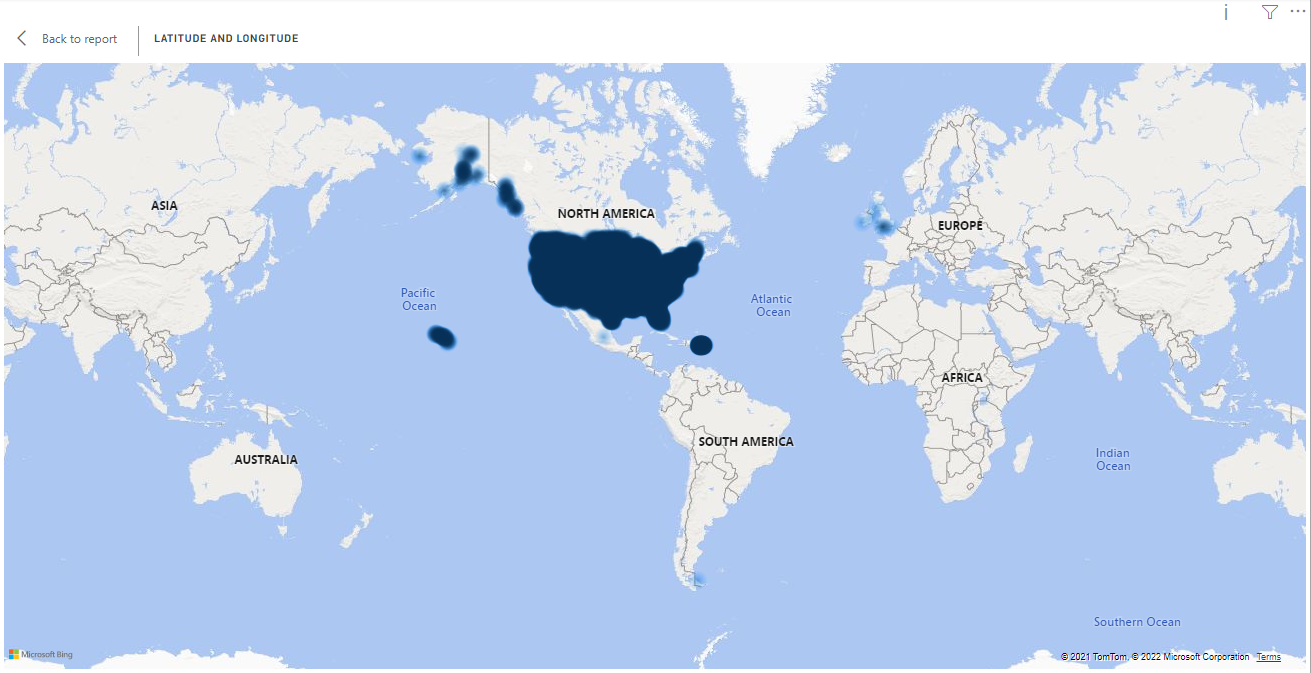 Above you can see the businesses that we're tracking which will be crucial to take into account upon evaluating external validity during any analysis.
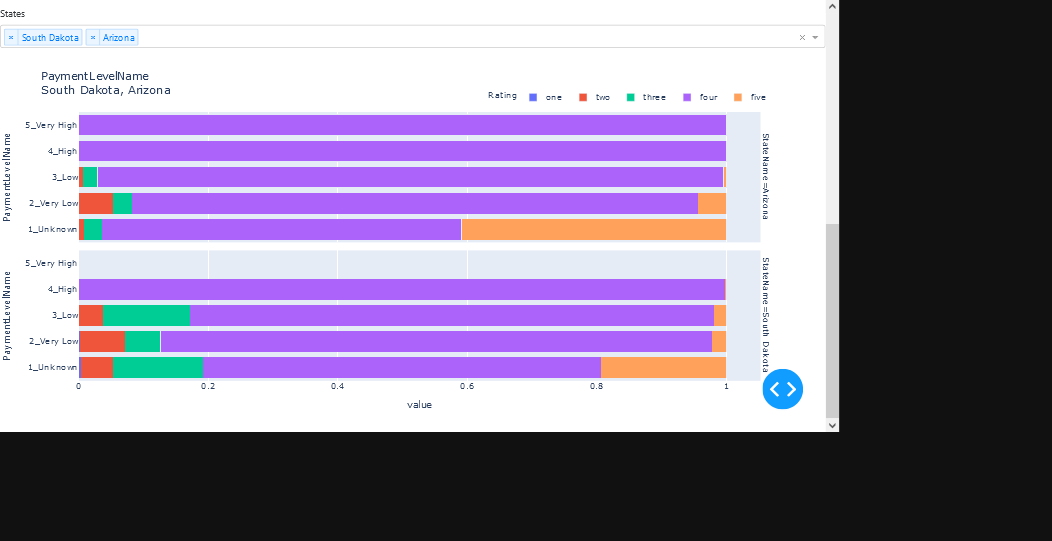
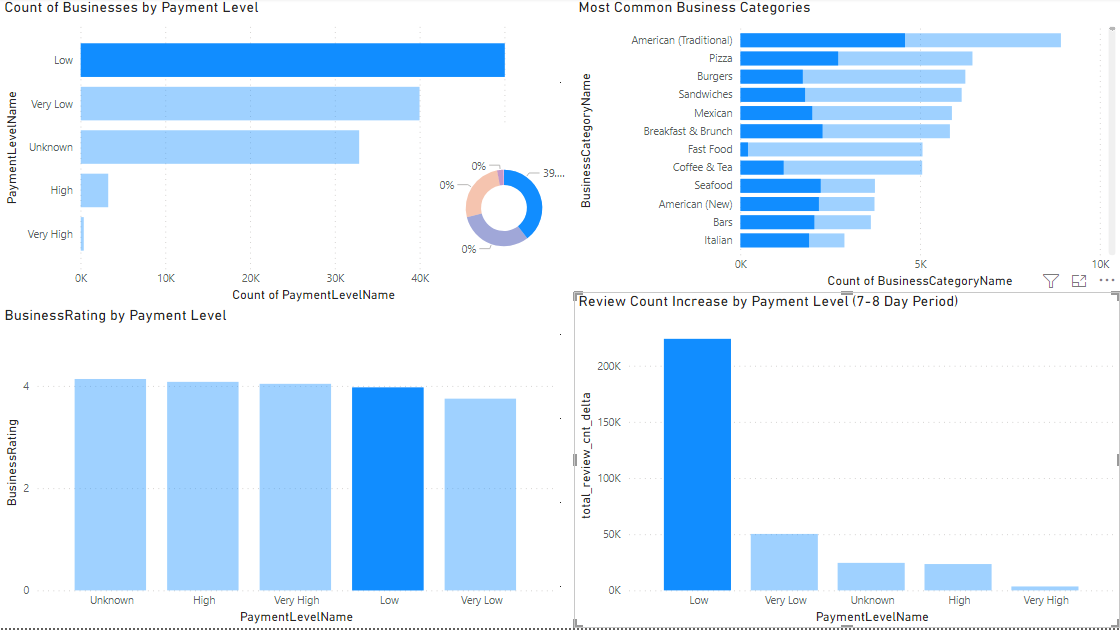 A simple dashboard showing the benefits of creating a business that caters to providing low-cost food.
Note: There are more than just restaurants included
- Low-cost businesses generate the most amount of reviews (this can lightly be taken for customer traffic)
- The fact that a business is a low-cost has little to no impact on it's business rating
The majority of our businesses are in the U.S. and low-cost. This puts in perspective a statement I heard a french guy say "On dit qu'ici (c'est-a-dire la france) on vit pour manger mais eux (c'est-a-dire les Amèricains) ils mangent pour vivre" 😅.
- Data Pipeline
- Database Migration
- Data Modeling
- Data Validation
- Application Programming Interface (API)
- Workflow Orchestrations
- Cache
- Key/Value Store
- Logging
- Containers
- Data Lake
- Data Analysis
- Docker
- Docker Compose
- Census API Key
- Yelp API Key
- Postgres Database w/ PGAdmin (psql may work fine)
- AWS S3 Bucket
- Google Big Query
- Redis
- Python (needed libraries will be contained in requirements.txt)
- Python Virtuals Environment/s
At the moment this project spans several git repositories. Partially because a service-oriented architecture seemed more desirable and also as explained in the Overview the project naturally evolved as I incorporated other concepts and technologies that I've learned.Nonetheless I certainly have plans to condense these repos into only in the future so both a grouped repo and the individual ones will remain available.
For the time being here is the totality of the repositories that will be referenced
- Source DB Creation
- DWH Modeling
- API Creation
- Data Pipeline
- Data Analysis
- Data Orchestration with Apache Airflow
-
Setting up the OLTP database
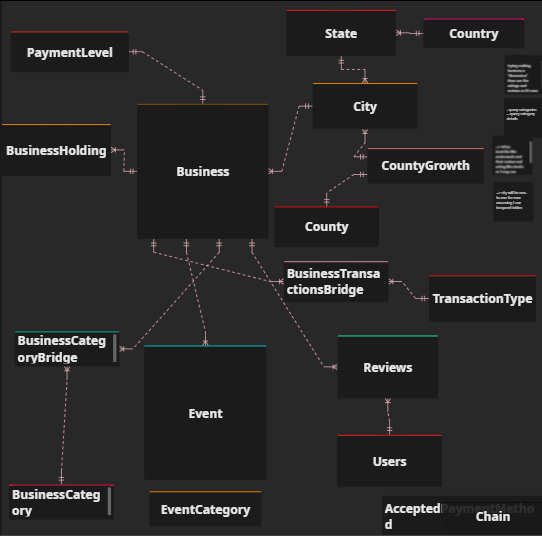
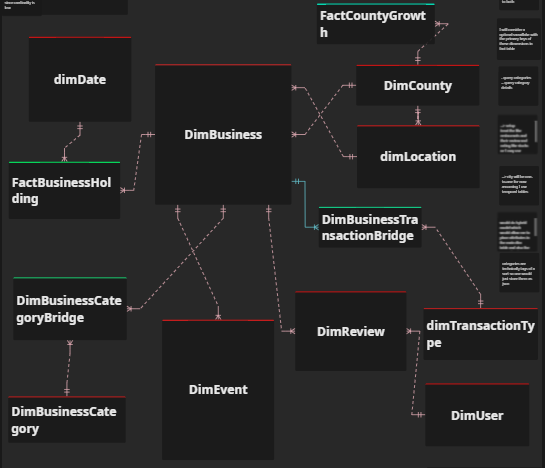
Initially I was planning on creating this db using Microsoft SQL Server but fortunately I was able to use Alembic to help with the db migration and it has the benefit of also helping set up this project. The goal is to end up with the following normalized data model shown with a very well designed ERD editor which you can find hereNote: The table EventCategory isn't connected to event. We'll use this scenario in the future to show how to solve schema evolution problems
- First clone the repo by doing
git clone https://github.com/raindata5/Gourmand-OLTP.git - Now go into the directory of this repo if you're not already there
- Here you're going to want to activate your virtual env and run
pip install -r requirements.txt - Now you can run
alembic upgrade headand this will create the db staging tablesNote: Going forward when using alembic you can always delete my alembic config file and revision folder and run
alembic initto have your own revison history - To begin with ingesting the data leave your current directory and run
git clone https://github.com/raindata5/gourmand-data-pipelines, change into this directory Now create a .conf file containing your yelp_credentials and census_credentials in your current directory - With your python virtual environment enabled the following commands in the following order
python census-api.pypython abreviaturas_de_estados.pypython yelp-api-scrape.py not_daily
- With the data contained in our local file system we can ingest it with the help of the following sql file /gourmand-data-pipelines/initial-postgres-load.sql which uses the COPY command
- Head over to your user home directory and create a
profiles.ymlfile Refer to the following documentation from dbt to set it up properly - Return Gourmand-OLTP and run
dbt testjust to make sure everything has gone well up until now
if they're no errors you can now rundbt run.Note: Some tests are included but these may be modified, it is your option whether to run
dbt testor not. - The tables in _Production are not quite done yet as they need some modifcations such as indexes ,etc.
Now we'll open the sql file gourmand-data-pipelines/ddl-postgres.sql and run everything here EXCEPT the last 2 statements under the asterisks.
These were added because it seemed there was an extra businessid getting added which was not adhering to the FK constraint so it was simpler to just remove it from our bridge table since it doesn't refer to any business in particularOLTP dbs are not the best fit for many indexes so care was taken to use them sparingly
- First clone the repo by doing
-
Setting up Big Query
-
Before continuing with any more data movement we're going to have to create some tables in our DWH as we will be using a mixture of incrementals loads and also full refresh for other models
After having set up a project and dataset(schema) you can run these DDL commands and also the following DDL for the date dimension. You'll notice that our DWH more closely ressembles a Snowflake Model\ -
Now we'll head back to our user home directory and swap out our
profiles.ymlfile using this template from dbt and also following their instructions to get access to our DWH in BQ{ "type": "service_account", "project_id": "gourmanddwh", "private_key_id": "**", "private_key": "****", ..... }It would be best to use the service account json method of authentication as this makes our python scripts easier to implement when authenticating with Big Query
-
-
First Data Extraction from Postgres to S3 to Big Query
-
Before extracting the data from Postgres you'll want to make sure also that you've set up your S3 bucket with the proper credentials
[aws_boto_credentials] access_key = '****' secret_key = '****' bucket_name = '****' account_id = '****' -
Now go in to the gourmand-data-pipelines directory and run the following scripts in order
python postgres-to-s3.py
python s3-to-bigquery.py
-
-
First Data Models in BQ
Here we are going to want out data model to look like the followingNote: This is a regular denormalized data model and considering the options we have when it comes to storage we can always create views of more wide tables on top of these tables to facilitate analytical querying.
- The data in BQ we can now run
git clone https://github.com/raindata5/gourmand-dwh.git - Switch into this directory now and having deactivated your previous virtual environment, activate one for this directory and run
pip install -r requirements.txt - Run
dbt debugto make sure everything is working well connection-wise then rundbt testto maje sure your source tables are fine.
From here you can run the following
dbt snapshot
dbt run
dbt test --store-failures > dbt-test-file.txt
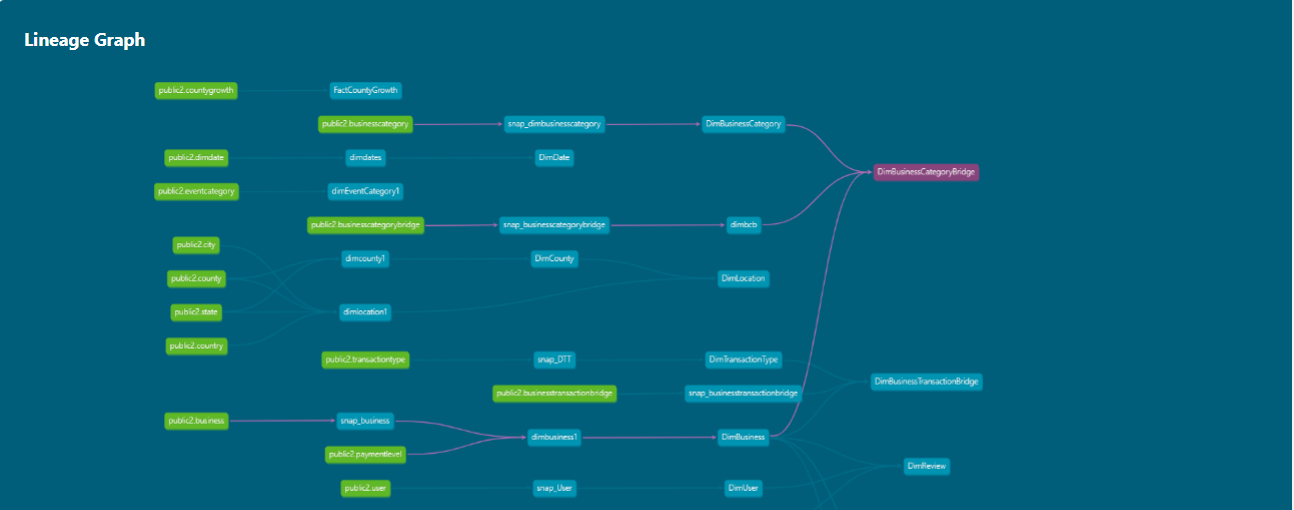
Now you should have a fully denormalized dwh 😀. It should look like the following in the dbt lineage graph
- The data in BQ we can now run
-
Setting Up Apache Airflow w/ docker
-
To begin we'll run
git clone https://github.com/raindata5/pipeline-scripts.git -
Having already set up docker and docker-compose and being going into this directory you can now run
docker-compose up -dto start the database that Airflow will use -
Now you change into this directory, create a new virtual environment and run
pip install -r requirements.txt, then create a new directory for all your apache airflow files and change into this directory. -
To set up Apache Airflow we're going to first follow their instructions here . After you have it functioning we are going to follow these instructions next to change our executor and the database we use for Airflow as well.
 executor = LocalExecutor
 sql_alchemy_conn = postgresql+psycopg2://user:pass@host:port/db
The database connection info will mirror that of the information we specified in our docker-compose file
-
Run the following commands to spin up Airflow
airflow webserver -D --port 8080
airflow scheduler -D\ now you'll just have to wait a bit for them both to spin up
-
-
Setting up the Airflow Workflow
- After having initialized Apache Airflow it should have created a dags folder in your airflow directory you created previously. Now you'll just want to use both pipeline-scripts/apache-airflow/dags/ssh_dag.py and pipeline-scripts/apache-airflow/dags/aa_pipeline_perf_dag.py as a template
Since the absolute paths will be a bit different to yours you'll want to make som adjustments there.Also specifically for pipeline-scripts/apache-airflow/dags/ssh_dag.py since this is connecting to an Ubuntu VM on DigitalOcean , if you decide to run this locally then you'll have to switch to the bash operator.
These have also been set up with a web hook using slack so that's a feature that can be omitted as well.
Note: The python files postgres_bq_data_validation_task and bq_dbt_validation_task also use the slack webhook so to avoid having to make too many changes here then I reccommend just placing a random url in since in these files the slack function used has error handling so it shouldn't break anything in the pipeline. But this is only if you prefer not to use the slack webhook which you could easily set up here
- After having following the previous instructions then you should now be able to run your dag
Tip: To test out your pipeline the python file gourmand-data-pipelines/yelp-api-scrape-daily.py provides the option to pass in the argument "test" which will only carry out 300 pulls from the yelp api. In my case I would just edit the task in the dag in the following way
yelp_business_api_pull_task = SSHOperator( ssh_hook=sshhook, task_id='yelp_business_api_pull', command=f"cd /home/ubuntucontributor/gourmand-data-pipelines/; {gdp_ve}/python {gdp_dir}/yelp-api-scrape-daily.py test;", dag=dag) - After having initialized Apache Airflow it should have created a dags folder in your airflow directory you created previously. Now you'll just want to use both pipeline-scripts/apache-airflow/dags/ssh_dag.py and pipeline-scripts/apache-airflow/dags/aa_pipeline_perf_dag.py as a template
-
Setting up Redis
- The data pipeline being now managed by Apache Airflow, we will continue and set up Redis on our machine as a way of caching for our API.
One just needs to simply follow these installaton instructions then just run (if on WSL or Ubuntu respectively)
sudo service redis-server restartorsystemctl restart redis-server.service
- The data pipeline being now managed by Apache Airflow, we will continue and set up Redis on our machine as a way of caching for our API.
One just needs to simply follow these installaton instructions then just run (if on WSL or Ubuntu respectively)
-
API deployment through CI/CD pipeline with Github Actions
-
With redis working you can now clone the repo for our api by running
git clone https://github.com/raindata5/gourmand-api.git, changeing into this directory, creating a new virtual environment and then runningpip install -r requirements.txt. -
Then you will need to create a
.envfile which will look something like the following using information for our Postgres dbpg_oltp_api_user=*** pg_oltp_api_password=*** pg_oltp_api_host=*** pg_oltp_api_port=*** pg_oltp_api_db=*** SECRET_KEY=dsfssdfsfs2342342234dsfdasdssfdssWqBdMXA3YJXfZTljfdsffs ALGORITHM=*** ACCESS_TOKEN_EXPIRE_MINUTES=120 pg_oltp_api_db_test=testdb -
Now we can start up the api with a command such as
uvicorn gourmandapiapp.main:app --reloadNote: Only use the --reload parameter in a test environment
-
Now if you want to enable running tests on your API using pytest then we can leverage alembic to create a new test database.
If you keep the username, password, host, and port the same for this new test database then all you have to do is runalembic upgrade head -c ./alembic2.iniand this will create a copy of your previous db made in the Postgres previously. Which is pretty awesome to say the least 😀. But it gets even better and cooler. From this directory we run tests using a command likepytest -vsx --disable-warnings gourmandapiapptests/*which will run all the tests in this folder and allow us to make sure our API works as expected when making changes.Note: When testing the API the endpoints with update/create/delete functionality actually will be persisted in the test database. Fortunately we have 2 workarounds for this.
One: In our conftest file gourmand-api/gourmandapiapptests/conftest.py we are actually able to run alembic commands from inside our python file here is what we have there
 # alembic_cfg = Config("/mnt/c/Users/Ron/git-repos/gourmandapi/alembic2.ini")
 # alembic_cfg.set_main_option('script_location', "/mnt/c/Users/Ron/git-repos/gourmandapi/g_test_db")
 # alembic_cfg.set_main_option("sqlalchemy.url", f"postgresql://{settings.pg_oltp_api_user}:{settings.pg_oltp_api_password}@{settings.pg_oltp_api_host}/{settings.pg_oltp_api_db_test}")
 # command.downgrade(alembic_cfg, "base")
 # command.upgrade(alembic_cfg, "head")
This permits us to teardown the database on each test and then build it up immediately
Tradeoff: This can make our tests take a while to runTwo: Another option is to use the gourmand-api/postgres-table-truncates.sql file in the following manner
 ps_conn = psycopg2.connect(dbname=settings.pg_oltp_api_db_test, user=settings.pg_oltp_api_user, password=settings.pg_oltp_api_password, host= settings.pg_oltp_api_host, port=settings.pg_oltp_api_port)
 ps_cursor = ps_conn.cursor()
 sql_file = open('postgres-table-truncates.sql','r')
 ps_cursor.execute(sql_file.read())
 ps_conn.commit()
 ps_cursor.close()
 ps_conn.close()
This permits us to simply truncate the tables which is far quicker then tearing down the database and then recreating it Tradeoff: Due to the Autoincrementing nature of the PKs if you do not specify the id when creating insertin certain rows then the id will continue to rise one each test. However there are simple workarounds for this that can be seen in the code.
Either way you could always alternate between the two when needed.
Concerning the Redis Store only one option is needed which is the following
 for key in r1_client.scan_iter("*"):
     r1_client.delete(key)
This will remove all the keys and their values.
-
Also this API has a workflow with Github Actions to create a CI/CD pipeline where it automatically tests your api making sure all the tests succeed before pushing it out to production (Ubuntu VM via SSH in my case)
-
-
Data Analysis
- As the name suggests we can actually put our data to use. First you will need to run
git clone https://github.com/raindata5/data-analysis-business-economics-policy.git - Once in this directory you will just have to create a new virtual environment and run
pip install -r requirements.txt(who would've thought 😅) - Specifically for the data we stored in this project you can navigate to data-analysis-business-economics-policy/gourmand_data_analysis/ and check out the analyses carried out there.
- As the name suggests we can actually put our data to use. First you will need to run
There are some features of this main project that I still want to implement in the directly in the code as well was in the documentation. They are the following in no particular order:
- Refactor a bunch of the data pipeline code
- CI/CD Pipeline for data pipeline itself
- End-to-End test
- Web Frontend for the API using simple HTML
- Web-Hosted Dashboard using Plotly and Dash framework
- For the Business data as well as the pipeline monitoring
- Dedicated Log Analysis and Storage using ELK stack
- While able to implement this on my local computer for sending the Postgres logs to ElasticSearch my current Ubuntu VM most likely dont't have enough ram for this
- Make more use of Docker
- Currently only the API supports deployment with Docker as can be seen in it's respective repository
- Use Apache Spark for transformations and possibly ingestions
- Replicate database using Debezium and pair that with Kafka to send those to a DWH
- Add gifs to the documentation to facilate understanding
- Set up a virtual network with Azure for facilitating access to directly to database
As I am still editing this project and it's documentation there may be some flaws noticed or any suggestions which I'm always open to 😀!
So feel free to message me at via one of the following options :
