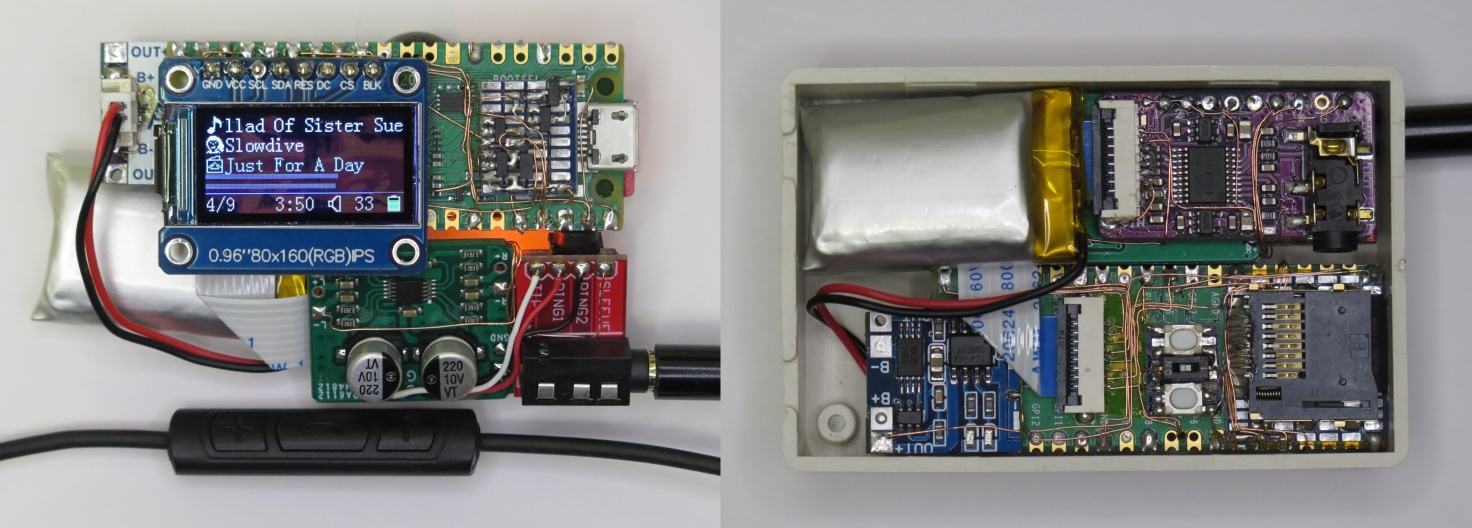
RPi_Pico_WAV_Player is WAV player for Raspberry Pi Pico.
This project features:
- Playback for 44.1KHz 16bit Stereo WAV format
- SD Card interface (exFAT supported)
- 160x80 LCD display
- UI Control by 3 GPIO buttons or Headphone Remote Control Buttons
- Display Tag information by LIST chunk in WAV File
- Display Coverart image by JPEG file
- Volume Control Function by fully utilizing 32bit DAC range
- Raspberry Pi Pico
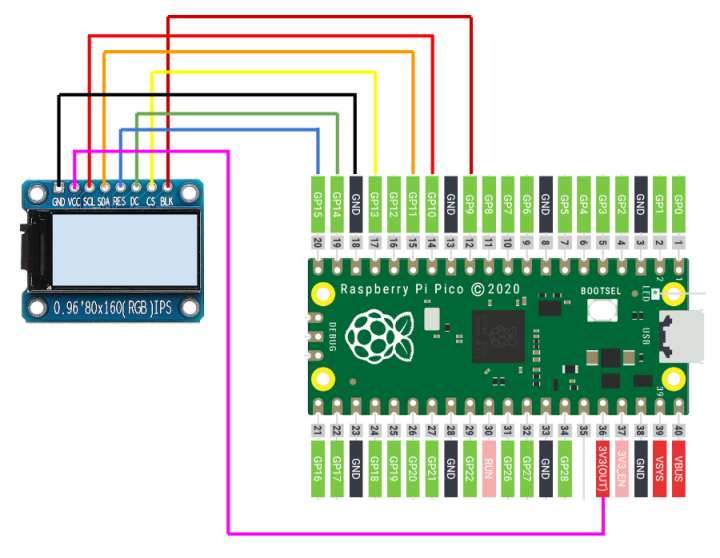
- ST7735S 0.96" 160x80 LCD
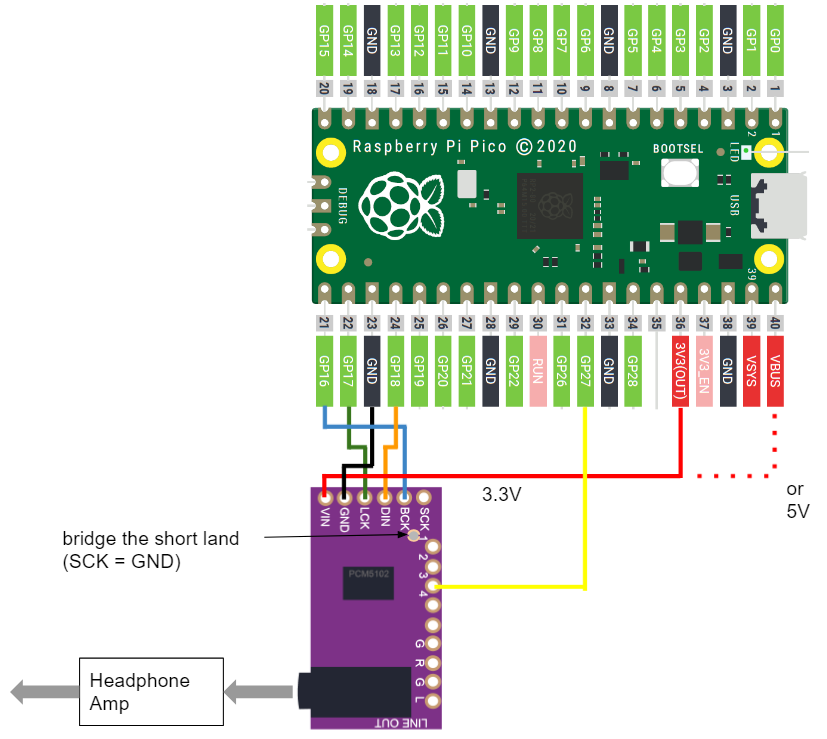
- PCM5102 32bit I2S Audio DAC
| Pico Pin # | GPIO | Function | Connection |
|---|---|---|---|
| 21 | GP16 | BCK | to PCM5102 BCK (13) |
| 22 | GP17 | LRCK | to PCM5102 LRCK (15) |
| 23 | GND | GND | GND |
| 24 | GP18 | SDO | to PCM5102 DIN (14) |
| 32 | GP27 | AUDIO_DAC_ENABLE | to PCM5102 XSMT (17) |
| 36 / 40 | 3V3(OUT) / VBUS | VCC | to VIN of PCM5102 board |
From DAC noise's point of view, it is recommended to provide the power of PCM5102 from VBUS (5V). For battery operation, use 3V3(OUT) pin as described in schematic.
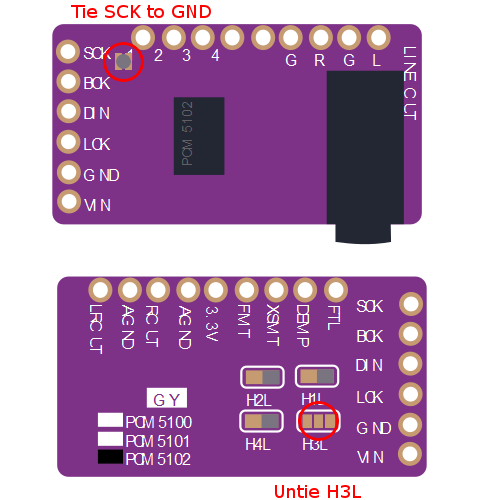
- tie PCM5102 SCK (12) to low (bridge short land)
- H1L (FLT) = L
- H2L (DEMP) = L
- H3L (XSMT): Remove the bridge to H and connect GP27
- H4L (FMT) = L
| Pico Pin # | GPIO | Function | Connection |
|---|---|---|---|
| 12 | GP9 | GPIO | BLK |
| 14 | GP10 | SPI1_SCK | SCL |
| 15 | GP11 | SPI1_TX | SDA |
| 17 | GP13 | SPI1_CSn | CS |
| 18 | GND | GND | GND |
| 19 | GP14 | GPIO | DC |
| 20 | GP15 | GPIO | RES |
| 36 | 3V3(OUT) | 3.3V | VCC |
| Pico Pin # | GPIO | Function | Connection |
|---|---|---|---|
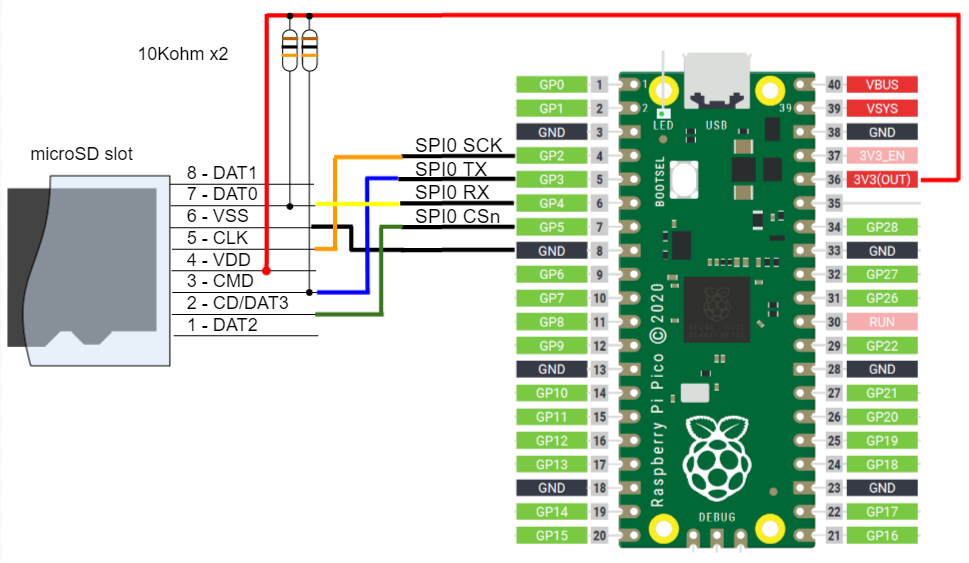
| 4 | GP2 | SPI0_SCK | CLK (5) |
| 5 | GP3 | SPI0_TX | CMD (3) |
| 6 | GP4 | SPI0_RX | DAT0 (7) |
| 7 | GP5 | SPI0_CSn | CD/DAT3 (2) |
| 8 | GND | GND | VSS (6) |
| 36 | 3V3(OUT) | 3.3V | VDD (4) |
- SPI0_TX and SPI0_RX needs to be pull-ed up with 10Kohm.
- Wire length between Pico and SD card is very sensitive. Short wiring as possible is desired, otherwise access errors will occur.
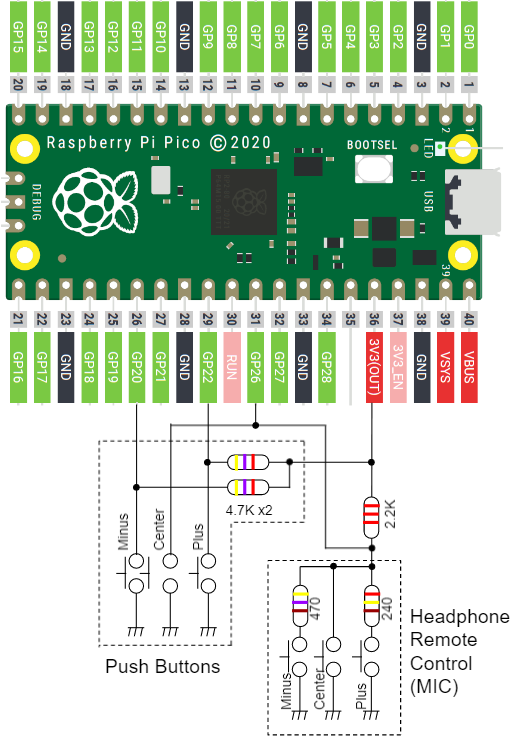
At least either of GPIO Push Buttons or Headphone Remote Control Buttons need to be implemented.
| Pico Pin # | GPIO | Function | Connection |
|---|---|---|---|
| 26 | GP20 | GPIO | Push Button (Minus) |
| 29 | GP22 | GPIO | Push Button (Plus) |
| 31 | GP26 | ADC0 | Headphone Remote Control (MIC pin) and/or Push Button (Center) |
- When GPIO Push Buttons are not implemented, pull up GP20 and GP22 with 4.7Kohm x 2.
- When Headphone Remote Control Buttons are not implemented, pull up GP26 with 2.2Kohm.
Additional power control circuit and battery voltage monitoring circuit are described in schematic for battery operation.
RPi_Pico_WAV_Player_schematic.pdf
- See "Getting started with Raspberry Pi Pico"
- Build is confirmed only in Developer Command Prompt for VS 2019 and Visual Studio Code on Windows enviroment
- Put "pico-sdk", "pico-examples", "pico-extras" and "pico-playground" on the same level with this project folder.
> git clone -b master https://github.com/raspberrypi/pico-sdk.git
> cd pico-sdk
> git submodule update -i
> cd ..
> git clone -b master https://github.com/raspberrypi/pico-examples.git
>
> git clone https://github.com/raspberrypi/pico-extras.git
> cd pico-extras
> git submodule update -i
> cd ..
> git clone https://github.com/raspberrypi/pico-playground.git
>
> git clone -b main https://github.com/elehobica/RPi_Pico_WAV_Player.git
- Lanuch "Developer Command Prompt for VS 2019"
> cd RPi_Pico_WAV_Player
> mkdir build
> cd build
> cmake -G "NMake Makefiles" ..
> nmake
- Put "RPi_Pico_WAV_Player.uf2" on RPI-RP2 drive
UI Control is available with GPIO 3 push switches or 3 button Headphone Remote Control. For Headphone Remote Control, Connect MIC pin to GP26 of Raspberry Pi Pico. GP26 also needs to be pulled-up by 2.2Kohm from 3.3V. See schematic for detail.
- Plus/Minus button to go up/down for file selection
- Center 1 click to get into the folder
- Center 1 click to play WAV file (go to Play Mode)
- Center 2 click to go parent folder
- Center 3 clicks to Random album play (go to Play Mode)
- Long push Center button to go to Config Mode
- 1 min passed without any button after play finished: Sequential/SequentialRepeat/Repeat/Random album play (go to Play Mode)
- Plus/Minus button for volume up/down
- Center 1 click to pause/play
- Center 2 click to stop (go back to FileView Mode)
- Center 3 clicks to Random album play
- Long push Center button to go to Config Mode
- Plus/Minus button to go up/down to select config items
- Center 1 click to determine config values
- Center 2 clicks to go back to previous Mode (FileView or Play)
- Long push to Power Off (Optional: additional circuit needed)
- Long push Center button of Headphone Remote Control
- Put "logo.jpg" on root Folder of SD Card
- File Format: JPEG format (Progressive JPEG not supported)
- logo.jpg example
- Put JPEG file on same folder where WAV files are located
- File Format: JPEG format (Progressive JPEG not supported)
