ASP.NET Core Progressive Web Apps
A Progressive Web App (PWA) is a set of technologies that can be applied to any type of website and web application, and it consist of 3 components:
- Any website served over HTTPS
- A Web App Manifest (simple JSON file)
- A Service Worker JavaScript file
This components makes Web App Manifest a natural and integrated part of any ASP.NET Core web application and it comes with pre-built service workers so you don't have to write your own.
Building Progressive Web Apps have never been easier!
Install
To add the PWA service to your ASP.NET Core 2.0 application, simply add the NuGet package WebEssentials.AspNetCore.PWA.
Either do that through Visual Studio's NuGet Package Manager or the command line like this:
dotnet add package WebEssentials.AspNetCore.PWAGetting started
You need to do a few things to turn your website into a PWA:
- Add two image icons to your project (192x192 and 512x512)
- Add a
manifest.jsonfile in the root of thewwwrootfolder - Register a service in
Startup.cs - Make sure it works
Step 1 - Icons
Get as many icons in various sizes as you want, but you MUST have both a 192x192 and a 512x512 size icon. Use PNG or JPEG.
Place the icons somewhere in the wwwroot folder.
Listing the size in the file names makes them easy to identify. Example:
wwwroot/img/icon192x192.pngConsider using Real Favicon Generator to generate images for different platforms and sizes.
Step 2 - manifest JSON file
Add the file wwwroot/manifest.json to your project and fill it in. It could look like this:
{
  "name": "Awesome Application",
  "short_name": "Awesome",
  "description": "The most awesome application in the world",
  "icons": [
    {
      "src": "/img/icon192x192.png",
      "sizes": "192x192"
    },
    {
      "src": "/img/icon512x512.png",
      "sizes": "512x512"
    }
  ],
  "display": "standalone",
  "start_url": "/"
}
Read more about the various properties in the W3C specificiation.
Now your file structure will look something like this:
Step 3 - register the service
Inside the ConfigureServices method in Startup.cs, add a call to services.AddProgressiveWebApp() like so:
public void ConfigureServices(IServiceCollection services)
{
    services.AddMvc();
    services.AddProgressiveWebApp();
}
A
WebManifestobject is now available in the Dependency Injection system in ASP.NET Core that allows you to access the contents of the manifest.json file through the strongly typed object.
You are now done converting your website into a PWA!
Step 4 - verify it works
If you've followed steps 1-3 then it's time to run your app in the browser and test that it is in fact a PWA. Here's how to verify it works:
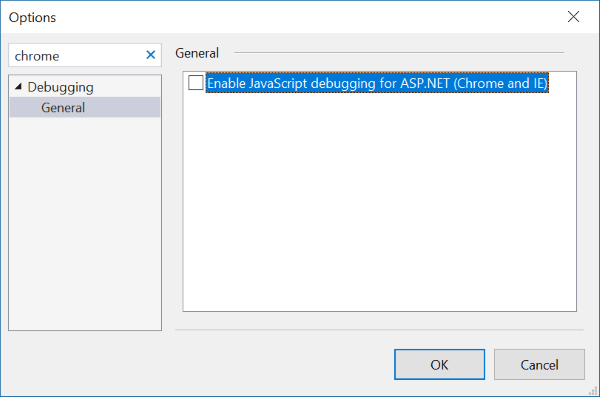
Turn off JavaScript debugging in Visual Studio for the service worker to successfully register or follow this workaround.
Turn of JavaScript debugging from Tools > Options:
Launch the app in the Chrome browser.
View source and ensure the following element is present in <head>:
<link rel="manifest" href="/manifest.webmanifest" />The file name is manifest.webmanifest and not manifest.json because this component is handling the request instead of serving manifest.json directly as a static file.
If you filled in the property theme_color in manifest.json then you'll also see this meta tag:
<meta name="theme-color" content="#ffffff" />Just before the </body> end tag you'll see a script tag registering the service worker:
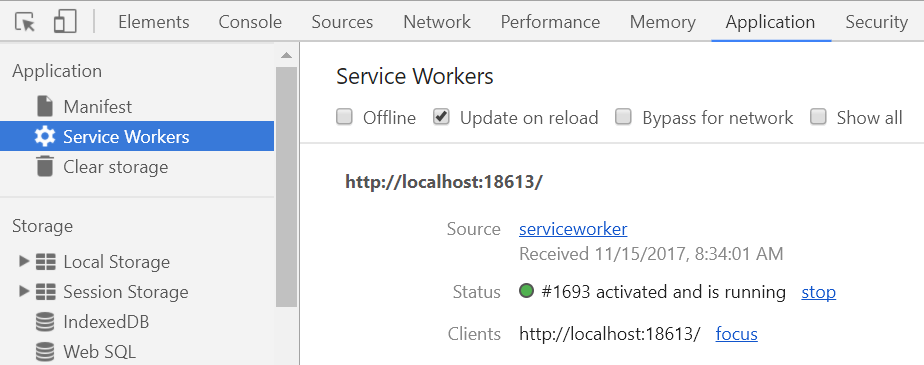
<script>'serviceWorker'in navigator&&navigator.serviceWorker.register('/serviceworker')</script>Open the Chrome developer tools (F12) and navigate to the Application tab and select Service Workers. It should look somehting like this:
If you see a service worker listed, then it was registered successfully. You may have to refresh the page in the browser to see it.
Pro tip: Make sure to check the checkbox name Update on reload for a better development time experience.
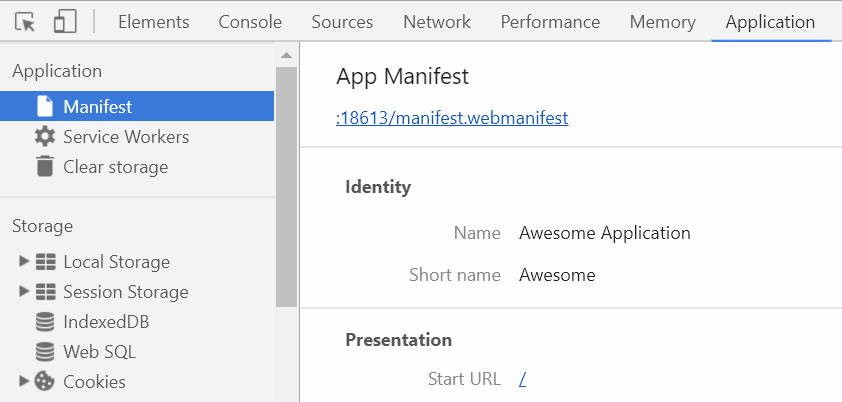
Clicking Manifest should show something like this:
If you see both the service worker and the manifest information then it's all working and you have now successfully converted your site to a PWA!
Customize
You can customize various settings related to both the service worker and the Web App Manifest by passing in a PwaOptions object.
public void ConfigureServices(IServiceCollection services)
{
    services.AddMvc();
    services.AddProgressiveWebApp(new PwaOptions
    {
        RoutesToPreCache = "/, /contact.html, data.json",
        Strategy = ServiceWorkerStrategy.CacheFirst
    });
}
The same options can be set through the ASP.NET Core configuration system in appsettings.json:
{
  "pwa": {
    "registerWebmanifest":  true,
    "routesToPreCache": "/, /contact.html, data.json",
    "strategy": "cacheFirst"
  }
}
This means you can have settings specific to each of your environments (development, staging, production, etc.) by using various appsettings.<environment>.json files or by using environment variables.
If you use Visual Studio then you should get full Intellisense inside the
pwaobject in appsettings.json.
Customizing the Web App Manifest
You can use the Web App Manifest alone without the service worker by calling services.AddWebAppManifest() instead of services.AddProgressiveWebApp().
public void ConfigureServices(IServiceCollection services)
{
    services.AddMvc();
    services.AddWebAppManifest();
}
By default it looks for a file named manifest.json in the wwwroot folder, but you can change the file name to whatever you like - just make sure it is located in the root of the wwwroot folder.
If you name it manifest.webmanifest then you are bypassing the middleware that handles the serving of the file and instead using the Static File middleware like it was any other static file. This can be desired for certain cases, but if you're in doubt then don't name it manifest.webmanifest.
Customizing the service worker
You can use the service worker alone without the Web App Manifest by calling services.AddServiceWorker() instead of services.AddProgressiveWebApp().
public void ConfigureServices(IServiceCollection services)
{
    services.AddMvc();
    services.AddServiceWorker();
}
Configure the service worker
The options can be configured either in Startup.cs:
public void ConfigureServices(IServiceCollection services)
{
    services.AddMvc();
    services.AddServiceWorker(new PwaOptions
    {
        CacheId = "v3",
        RoutesToPreCache = "foo.css, bar.js"
    });
}
...or in appsettings.json:
{
  "pwa": {
    "cacheId": "v1.0",
    "routesToPreCache": "foo.css, bar.js"
  }
}
Caching strategies
Specify which caching strategy you want to use if you want a different one than the default (CacheFirstSafe):
public void ConfigureServices(IServiceCollection services)
{
    services.AddMvc();
    services.AddServiceWorker(new PwaOptions
    {
        Strategy = ServiceWorkerStrategy.CacheFirst
    });
}
...or in appsettings.json:
{
  "serviceworker": {
    "strategy": "cacheFirst"
  }
}
The options are:
CacheFirst
This strategy will add all requested resources to the service worker cache and serve it from the cache every time. If the cache doesn't have the requested resource it will fall back to the network and if that succeeds it will put the response in the cache.
CacheFirstSafe (default)
This strategy, like CacheFirst, will add all requested resources to the service worker cache. Unlike CacheFirst, it has special handling for HTML files and fingerprinted resources (resources with a v querystring parameter such as site.css?v=8udsfsaufd09sud0809sd_ds).
It will always attempt the network for HTML files (content type text/html) and fall back to the cache when the user is offline. That way the user always gets the latest from the live Internet when online.
For fingerprinted resources (the ones with a v querystring parameter) it will always try the cache first and fall back to the network.
CacheFingerprinted
This strategy only adds fingerprinted resources (resources with a v querystring parameter such as `site.css?v=8udsfsaufd09sud0809sd_ds) to the cache.
It will always try the cache for fingerprinted resources, then fall back to the network. For all other resources, it will use the network.
This strategy is useful for scenarios in which you don't wish to cache certain resources -- large video or audio files, for example -- but still wish to cache the app core assets (HTML, CSS, JS).
Minimal
The minimal strategy does nothing and is good for when you only want a service worker in order for browsers to suggest installing your Progressive Web App. For this to work, you need to add a web manifest file.
NetworkFirst
This strategy will always try the network first for all resources and then fall back to the cache when offline. When the network call succeeds, it will put the response in the cache.
This strategy is completely safe to use and is primarily useful for offline-only scenarios since it isn't giving any performance benefits.


