This workshop is important because:
- Local and cloud based version control are fundamental tools of every developer
- Git and Github are the most popular
- Proficient use of Git and Github allows collaboration on projects from small teams to hundreds or thousands of developers.
- Github Pages allows for simple, quick deployment of front end apps.
After this lesson, students will be able to:
- Fork, clone, and make pull requests to repositories
- Create, merge and delete branches on local and remote repositories
- Use git, GitHub and branches to collaborate with other developers
- Deploy a project to Github Pages
Before this lesson, students should already be able to:
- Use the command line
- Use a text editor
- Explain basic git commands like init, add, commit, push, pull and clone
- Fork and clone remote repositories
What is the difference between Git and GitHub?
Git is a software version control tool that works on your local machine. It allows you to `init`, `add`, `commit`, and `fork` project 'repos'. It also has methods `push`, `pull`, and `fetch` which are designed to interact with a git server or cloud based service like GitHub.
Github is a cloud based git server and social network which uses Git under the hood for its version control system.
Version control is a kind of software used to track changes to files so that a comprehensive history of the file content can be reviewed.
There are two main types of version control:
- Centralized: All changes are kept on a single server
- Distributed: Changes can be tracked on individual computers, and synched using the cloud
- Git and GitHub together form a distributed version control system
There are also a lot of commands you can use in git. You can take a look at a list of the available commands by running:
$ git help -aEven though there are lots of commands, in this course we will really only need about 10.
To understand how Git works, we need to talk about the lifecycle of a Git-tracked file.
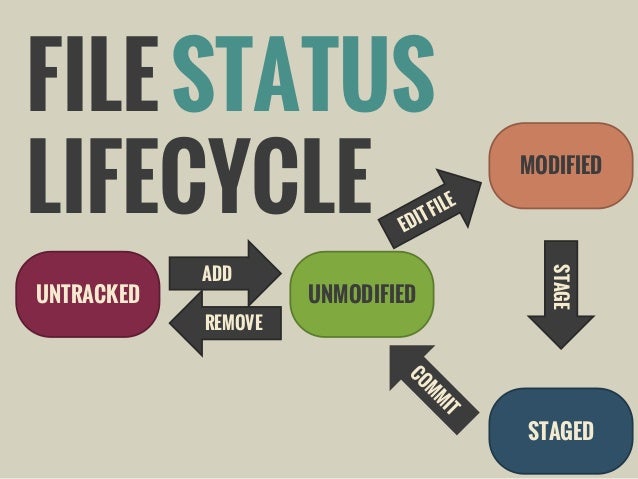
Git lifecycle
Image from Daniel Kummer's slide deck on LinkedIn
There are 4 main stages of Git version controlled file:
- Untracked: The file will not be added in the next commit
- Staged: Staged files have not yet been committed to memory but they are "on deck" so to speak for your next commit
- Unmodified: The file has already been committed and has not changed since the last commit
- Modified: You have changes in the file since it was last committed, you will need to stage them again for the changes to be added in the next commit
Once you have committed a file and it becomes "unmodified" then it's contents are saved in Git's memory.
- Not saved in git memory: Your file is not saved until you commit the file to Git's memory
- Saved in git memory: Only once you have committed a file, it becomes saved in Git's memory
First, create a directory on your Desktop:
$ cd ~/Desktop
$ mkdir hello-world
You can place this directory under Git revision control using the command:
$ git initGit will reply:
Initialized empty Git repository in <location>You've now initialized the working directory.
If we look at the contents of this empty folder using:
ls -AWe should see that there is now a hidden folder called .git this is where all of the information about your repository is stored. There is no need for you to make any changes to this folder. You can control all the git flow using git commands.
Let's create a new file:
$ touch file.txtA small cross should show next to your prompt!
git:(master) ✗If we run git status we should get:
On branch master

Initial commit

Untracked files:
  (use "git add <file>..." to include in what will be committed)

	file.txt

nothing added to commit but untracked files present (use "git add" to track)
This means that there is a new untracked file. Next, tell Git to take a snapshot of the contents of all files under the current directory (note the .)
$ git add . (or git add -A)What is the difference?
This snapshot is now stored in a temporary staging area which Git calls the "index".
To permanently store the contents of the index in the repository, (commit these changes to the HEAD), you need to run:
$ git commit -m "Adds file.txt"You should now get:
[master (root-commit) b4faebd] Adds file.txt
 1 file changed, 0 insertions(+), 0 deletions(-)
create mode 100644 file.txtIf we want to view the commit history, we can run:
git logYou should see:
* b4faebd (HEAD, master) Adds file.txtTo exit this view, you need to press:
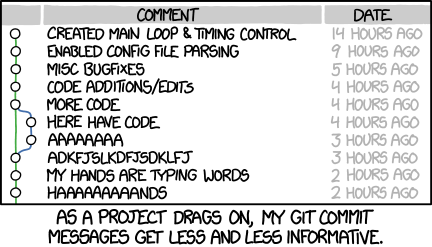
qA good commit message is:
- in present tense
- describes what the commit contributes
| Good | Bad |
|---|---|
| "Adds signup and login" | "Added logout stuff" |
| "Creates upvote counter" | "Upvotes!" |
| "Fixes merge conflict" | "conflict" |
| "Fixes typo" | "stupid f***ing typos" |
| "Fixes issue #347" | commit logs from last night |
Maybe just take a break.
Now let's open file.txt in Sublime:
$ subl file.txtInside the file, write something.
If you press return in the terminal, you will now see that you have untracked changes.
Running git status again will show you that file.txt has been modified.
Let's now make a second commit.
$ git add .
$ git commit -m "Adds content to file.txt"
Checking git log will show you 2 commits with different ids:
* 6e78569 (HEAD, master) Adds content to file.txt
* b4faebd Adds file.txt
We can revert the file back to the first commit using it's specific commit id with:
$ git reset --soft b4faebdThis will do a soft reset, where the changes in the file we made are still there - the changes are staged but not committed anymore.
If we want to revert the file back and disregard any changes (dangerous!), we can use almost definitely do not use:
$ git reset --hard b4faebdLet's do this together:
- Go to your Github account
- In the top left, hit the + button and select
New repository - Name your repository
hello-world - Initialize this repository with a README (So that we can
git pull) - Click the big green Create Repository button


We now need to connect our local Git repo with our remote repository on GitHub. We have to add a "remote" repository, an address where we can send our local files to be stored.
git remote add origin git@github.com:github-name/hello-world.gitIn order to send files from our local machine to our remote repository on Github, we need to use the command git push. However, you also need to add the name of the remote, in this case we called it origin and the name of the branch, in this case master.
git push origin masterThis should fail due to new files on the remote repo.
As we added the README.md in our repo, we need to first pull that file to our local repository to check that we haven't got a 'conflict'.
git pull origin masterOnce we have done this, you should see the README file on your computer. Now you can push your changes:
git push origin masterRefresh your GitHub webpage, and the files should be there.
Cloning allows you to get a local copy of a remote repository.
Navigate back to your Desktop and delete your hello-world repository:
cd ~/Desktop
rm -rf hello-world
Now ask the person sitting next to you for their github name and navigate to their repository on github:
https://www.github.com/<github-username>/hello-worldOn the right hand side you will see:

Ensure that you have SSH checked and copy this url.
To retrieve the contents of their repo, all you need to do is:
$ git clone git@github.com:alexpchin/hello-world.gitGit should reply:
Cloning into 'hello-world'...
remote: Counting objects: 3, done.
remote: Total 3 (delta 0), reused 3 (delta 0), pack-reused 0
Receiving objects: 100% (3/3), done.
Checking connectivity... done.
You now have cloned your first repository!
The fork & pull model lets anyone fork an existing repository and push changes to their personal fork without requiring access be granted to the source repository.
Most commonly, forks are used to either propose changes to someone else's project or to use someone else's project as a starting point for your own idea.
When you fork a repository, you make a new remote repository that is exactly the same as the original, except you are the owner. You can then clone your new fork and push and pull to it without needing any special permissions.
When you clone a repository, unless you have been added as a contributor, you will not be able to push your changes to the original remote repository.
When you want to propose a change to a repository (the original project) that you have forked, you can issue a pull request. This basically is you saying:
"I've made some changes to your repository, if you want to include them in your original one then you can pull them from my fork!"
Use the internet and what you've learned today to answer the following questions with a partner:
- How do I send changes to the staging area?
- How do I check what is going to be committed?
- How do I send the commits to Github?
- How do I go back to the previous commit?
- How do I check the configuration on a specific machine?
- How does github know that I am allowed to push to a specific repo?
Branching: How developers collaborate on projects
Think of making a new branch like spinning up an alternate universe to play with. Each branch exists like a parallel dimension, side by side, for you to hack on.

You create a branch anytime you want to work on a new feature, fix a bug, or refactor some code. Any changes you make in a branch stay on that branch, so it won't ruin any other versions you have sitting in other branches.
By default, as soon as you make your first commit, you have and are on a master branch, and that's where your most production-ready, least experimental code lives.
Any time you're tasked with building a new feature, you make a branch named something obvious, switch to it, write some code, and then eventually merge it into master. Hopefully after someone's double-checked your work.
But let's see what this all looks like from scratch. Just watch and absorb for now, you'll practice it in a minute.
We're working with a new dummy repo just for an example.
$ mkdir branching-is-awesome
$ cd branching-is-awesome/
$ git init
$ touch readme.md
$ git add readme.md
$ git commit -m 'initializes repository with an empty readme'Now, let's say we have a feature we're about to work on. Something simple for now - let's say we want someone to know what this project is all about if they find it on Github, so we should make a readme.
Writing a readme. That's a new feature, so we should make a new branch.
$ git branch writing-our-readmeGit created it, but let's double check by listing all our branches:
$ git branch
  writing-our-readme
* master
Nice. The * tells us which one we're on (your terminal may or may not color it differently, too), and we see from the list of all our branches we have a new one. Let's switch to it so we can change some stuff without affecting master.
$ git checkout writing-our-readme
Switched to branch 'writing-our-readme'
Nice. git checkout is a beautiful command – you can use it to check out an old piece of history, another branch, even a specific file or a folder from an old piece of history on another branch.
Now we're working in alternate universe. We can make whatever changes we need. Let's pretend we filled that sucker up with the best readme you've ever read. Obviously we should save our history with a commit, but we're still on our writing-our-readme branch, that hasn't changed.
$ git add -A
$ git commit -am 'adds incredible writing to readme'
You can really start to see this idea of parallel universes once you have a commit like this in a branch.
When we switch back and forth, like so:
$ git checkout master
$ git checkout writing-our-readme
# etc etc
We can actually see the changes:

- On
master,readme.mdhas no text in it. - On
writing-our-readme,readme.mdis full of text.
You can literally switch between those branches in your terminal, switch back to your text editor, and see the text appear and disappear. Because in one universe, the text exists, and in another it doesn't.
The very last step of this process is to merge your changes from one branch back into your master. In a few weeks, when you work on your group projects, we'll show you how to use Github to merge changes in a more collaborative, central way.
But before Github existed, when you're working on a solo project, or maybe just because you love Terminal, let's look at how to merge your own branches back into your production-ready master.
We've gone through the whole process – you're starting a new feature, so you make a new branch, make a bunch of commits on that branch as you work on it, and now you're satisfied it's ready to ship.
You navigate to the branch you want to merge into – most often master, but it could be any branch.
$ git checkout master
And you simply tell it to merge:
$ git merge writing-our-readme
Updating 5da20b7..62b3656
Fast-forward
 readme.md | 7 +++++++
 1 file changed, 7 insertions(+)
This analyzes all the changes you've made on your feature branch, brings them into your master branch, and commits them to master.
And now that your master looks just like your writing-our-readme branch, you can delete it.
$ git branch -d writing-our-readme
Deleted branch writing-our-readme (was 62b3656).
Don't worry – just like most things in git, it's not gone forever. You could always checkout the last piece of history before you deleted the branch, and your branch would be there. Consider that timehopping to the past, where in the present it's gone and you don't need it.
Your most recent code ready to ship is in master, and you're a flipping pro.
Since you're getting to be experts with Github, you should know you can store branches on Github, too, not just your local git repo. While this will totally come into play on your group projects in a different way, it might be useful to you now for the simple purpose of backing up your work.
Maybe you're in the middle of a feature or a bug fix and you're just not done, but it's time for bed. Make your commits, of course, but if you've set up your repo to connect with Github, you can easily push your branch up there.
While you've seen this:
$ git push origin master
What you should know is that origin is simply an alias. We could call it github if we wanted, or zebra or fnarf or bagel. It would then be:
$ git push zebra master
And you've now learned that master is just your special, default, production-ready branch. So, assuming you're using the default alias of origin (and not zebra), guess how you push a branch?
$ git push origin my-new-but-unfinished-feature-branch
You can push and pull those branches easily to save your work up in the cloud.
"Real programmers don't edit
master." – Dave, the Programmer
Team up with the person next to you, and go through the following commands we've reviewed in class.
- git branch
- git checkout
- git merge
Based on what we've talked about, and before you jump into your terminal, discuss the correct commands you would have to use - and the correct order you would need to use them in - to repeat the process of creating a readme. Be aware of the "why" and that you may have to use some commands more than once.
Time for you to try it. With your partner, walk through the steps necessary together, catching each other if either makes any missteps.
Start by mimicking our example – create a branch to write another readme.
git initgit add&git commit- Create a new branch for the feature you're about to work on
- Switch to that branch
- Write some code
git mergethat branch back into yourmaster
Once you've got it down, do the same process again for a bug fix (aka a typo), so you get in the habit of creating branches whenever you need to make changes.
Before you can open a pull request, you must create a branch in your local repository, commit to it, and push the branch to a repository or fork on GitHub.
-
Visit the repository you pushed to
-
Click the "Compare, review, create a pull request" button in the repository

-
You'll land right onto the compare page - you can click Edit at the top to pick a new branch to merge in, using the Head Branch dropdown.
-
Select the target branch your branch should be merged to, using the Base Branch dropdown
-
Review your proposed change
-
Click "Click to create a pull request" for this comparison
-
Enter a title and description for your pull request
-
Click 'Send pull request'
Now that you have had some good practice at branching and merging it's time to deploy using GitHub pages.
We strongly encourage checking out the official docs and practice more at home.
It's super easy and - basically - all that needs to happen is the creation of a new branch called gh-pages.
From our readme project:
git branch gh-pages
git checkout gh-pages
As long as there is an index.html in your root directory of your gh-pages branch...
echo "<h1> GitHub pages! </h1>" >> index.html...you'll be able to navigate to http://YOURUSERNAME.github.io/REPOSITORYNAME to view the rendered html. You can also point a new domain name to this URL; this would give you a fully deployed project with a custom URL.
As a developer, you'll have to use Git pretty much everyday, the learning curve is steep and all the principles of version control can be a bit blurry sometimes, hence why we ask students to push their homework everyday and to commit regularly during project time.
Don't be frustrated by all the new commands because we will definitely have the time to practice during this course.
- Explain the difference between forking and cloning.
- Describe the steps to initialize a Git repository and link your local repository to a GitHub remote location.
- What's a branch in git? When do you use it?
- How do you create a branch?
- How do you switch between branches?
- How do you merge & delete a branch?
Refine the skills covered in this workshop with this lab