Environmental reporting and control for sheds or similar spaces.
First version is simply to control the induction fan on my shed to only run when the humidity outside is dryer than the humidity inside the shed to keep the enviroment as dry as possible. The fan pin should be run through a transistor and not directly connected for current/dynamic loading reasons. A transistor is required instead of a relay to support the PWM speed control.
- Open-meteo API lookup for local area weather conditions
- All code is compatible with AsyncIO
- BME280 local environment sensing (temperature, humidity, pressure)
- GPIO on/off/PWM fan control based on comparisons of local area vs environment humidity conditions
- Debug logging capability - inherited from top fan class - shows free memory on each entry
- Basic network status feedback via onboard LED
- Fan fails to 100% speed if no network to assess outdoor humidity
- Ensures network connectivity for API calls with configurable retries
- Hysteresis on fan state change to prevent flapping of fan on/off for high polling speeds
- PWM fan speed control based on humidity differential
- Disable PWM option for relays or fans that don't support it
- Configurable fan startup test with LED feedback
- Pico display pack support (tested with Pico Display Pack 240x135 and also Pico Display pack 2 320x240 which currently has a noise border and same smaller usable area)
- Startup information (Can configure screen pause delay to extract startup output such as MAC)
- Indoor humidity
- Outdoor humidity
- Fan speed
- Network status
- Battery voltage
- Web UI state and IP:port
- Configurable backlight timeout
- If the backlight is off, only enable backlight on first press of a button and don't execute button function
- Async button class provides ability to detect button presses and map to function execution
- PIR detector allows motion controlled lights with configurable timeout
- Web interface
- Home screen shows status of humidity, fan speed, battery voltage, light brightness, light state and motion state
- Light control page allows control of light on, off or auto (motion detect) using buttons on the web page
- API navigate to /api for list of functions and how to use
- GET
- Indoor humidity
- Outdoor humidity
- Fan speed
- Battery voltage
- Light brightness
- Light state
- Motion detection state
- PUT
- Light brightness
- Light state
- GET
- HomeAssistant integration
- This is very Beta but I have a PoC with basic light control and further development planned at pico-environment-ha
This code requires the Pimoroni MicroPython firmware and was written on v1.21.0.
Copy the python files including any folders containing python files to the pico and reset.
All configuration occurs in config.py, the options have clear names and comments where necessary to explain their functions, with sensible defaults or example data set.
The default log level is set to 2, with options of: 0 = Disabled, 1 = Critical, 2 = Error, 3 = Warning, 4 = Info. This is set in the init section of each module as an argument, this is inherited from each calling module, so the simplest approach is to enable for all modules by adjusting the log_level parameter of the Environment object instantiation in main.py.
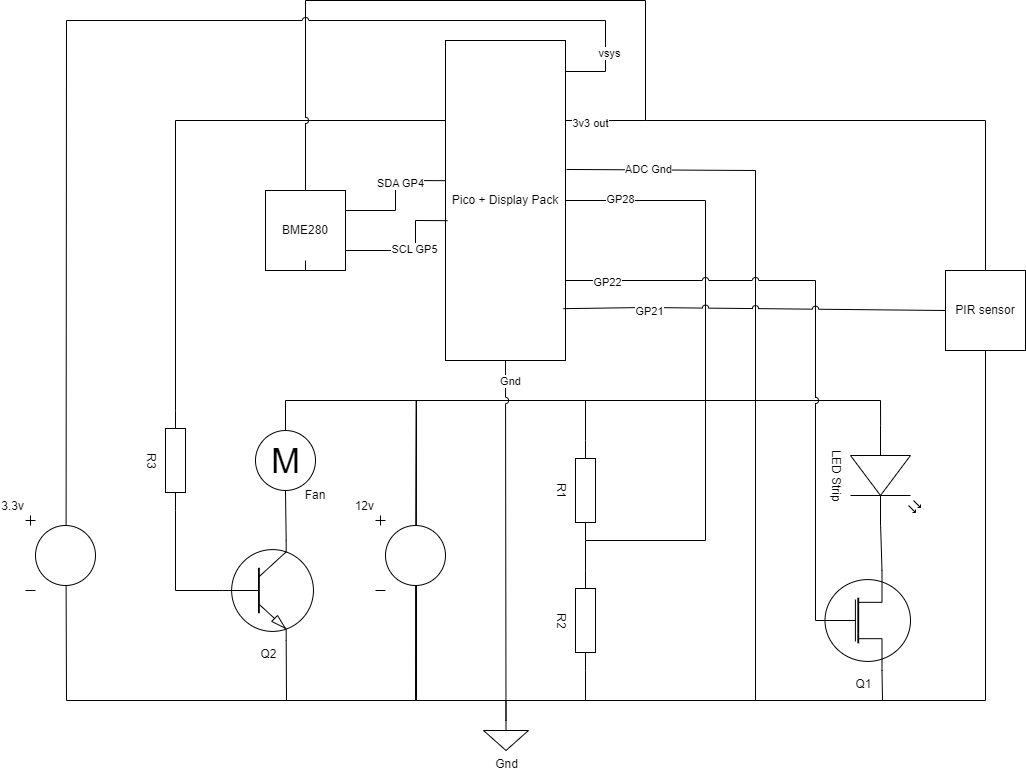
Pico W with standard header pins is attached via the stacking headers (to allow easy removal of the Pico) to a pico display, sandwiching a pico proto board between allowing breakout of the I2C and GPIO output controls.
- Pico W
- Pico Display Pack
- Pico Proto
- Pico stacking headers
- BME280
- JST connectors
- 1x Power FET for LED strip supporting PWM dimming (Q1)
- Power FET heatsinks
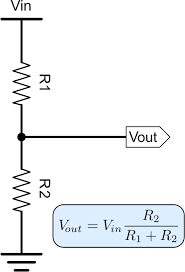
- 2x resistors for voltage divider for measuring battery voltage (22kOhm and 5.1kOhm work well for 12 volts, see voltage monitoring section below) (R1, R2)
- 1x current limiting resistor for fan BJT transistor 1kOhm (R3)
- 1x 2N2222 NPN BJT transistor for fan driver (as BJT, GPIO must be protected by current limiting resistor as above) (Q2)
The voltage monitoring is achieved with the onboard ADC that is limited to measuring a maximum of 3.3v, so for higher voltages (I am using a 12v battery), a voltage divider is required. Connect the battery ground to ADC ground (pin 33) to improve accuracy and the output of the voltage divider (Vout) to the ADC ping defined in config.py (GP 26-28). Construct the voltage divider according to this circuit diagram and ensure that Vout is safely under 3.3v for the maximum voltage you will be monitoring. Double check and ideally test with a multimeter before connecting up, microcontrollers are not friends with large voltages. I am using a 12v battery that will go up to a maximum of 15v when charging. As such I have used values of R1 = 22k and R2 = 5.1k. Enter the values of the resistors (If possible, measure with a multimeter and add precise values for improved accuracy) into config.py to correctly scale the battery monitor and also optionally apply an offset if the measured voltage differs from the reported voltage due to ADC reference inaccuracies.
- Fan test
- Fan speed evaluation
- Network connection
- Attempt connection
- If failure to connect, retry for back off period and attempt reconnect
- Repeat backoff and reconnect up to retry count
- If failure to connect after retry count, set fan to 100% speed, skip API poll and fan speed adjustment
- Poll Open-Meteo API
- Calculate appropriate fan speed and adjust PWM output
- Poll various services such as battery monitor
- Network connection
- Sleep and loop back to fan speed evaluation
The LED shows the status of the board, which combined with the execution order above and activity output tables below will tell you what is going on without a display attached.
| Activity | Output | Meaning |
|---|---|---|
| Fan test | 4 flashes @ 2Hz | 10% duty cycle |
| Fan test | 10 flashes @ 5Hz | 50% duty cycle |
| Fan test | 20 flashes @ 10Hz | 100% duty cycle |
| Fan speed evaluation | 4 flashes @ 4Hz | Waking up to evaluate humidity for fan speed |
| Network connection | 1 flash @ 2Hz | Connected successfully |
| Network connection | 2 flashes @ 2Hz | Failed to connect |
| Network connection back off | Flash @ 4Hz for backoff duration in config file | Waiting to retry connection |
| Set fan speed | 1 flash @ 1Hz | Fan turned on |
| Set fan speed | 2 flashes @ 1Hz | Fan turned off |
If you are adding a new module that should be made available to the website API or have a startup service, add an instance of the module class to the modules dict in the init of environment.py
This will make it available to the website app.
The module will also need to have an init_service function even if it just contains "pass" as all modules in the dict have this function called to initialise any one off or coroutine functions.

