Allow Java Mission Control to connect to Jolokia enabled JVMs over the network or in kubernetes
- If you have not already, download eclipse IDE
- Install Java Mission Control 8.1 or newer from update site : https://github.com/AdoptOpenJDK/openjdk-jmc-overrides/releases/download/8.1.0/org.openjdk.jmc.updatesite.ide-8.1.0.zip
- Download
- Help \ Install New Software ... \ Add ... \ Archive ... \ Select the downloaded file
- Select Java Mission Control and any other features you want
- Add Jolokia JMC plugins from the plugin site: https://skarsaune.github.io/jolokia-jmc-update-site
- If Jolokia and Kubernetes features do not show up, deselect "Group items by category"
- Install Jolokia and Kubernetes plugins
- Open the JVM Browser view
- New Connection
- Select Custom JMX service URL
- Enter
service:jmx:jolokia://host:port/path/
- Open the JVM Browser view
- New Connection
- Select Custom JMX service URL
- Enter
service:jmx:kubernetes:///kubnernetes-namespace/(http/https:)podname(:portnumber)/path-to-jolokia/Entries in parenthesis are optional. - http is default protocol
- if the pod has only one port that will be used if portnumber is omitted
- Regular expression may be used as part of podname, if you are happy to connect to any pod matching a given pattern. This can be useful if you want to store a connection string that will work even after redeploys. Example:
service:jmx:kubernetes:///jfr/petclinic-.+:8778/jolokia/
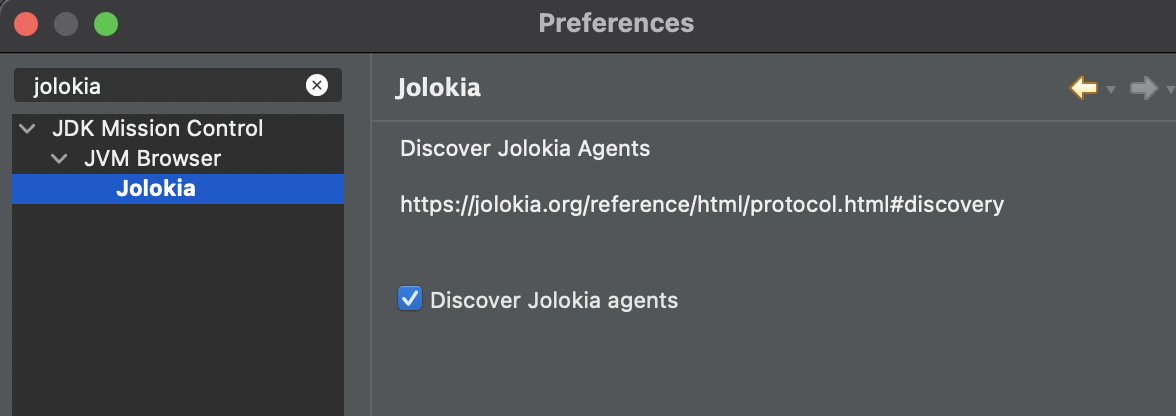
To use Jolokia Discovery to detect JVMs running with Jolokia
Under JDK Mission Control \ JVM Browser \ Jolokia , check "Discover Jolokia Agents". A process will run in the background and update the list of JVMs every 30 seconds
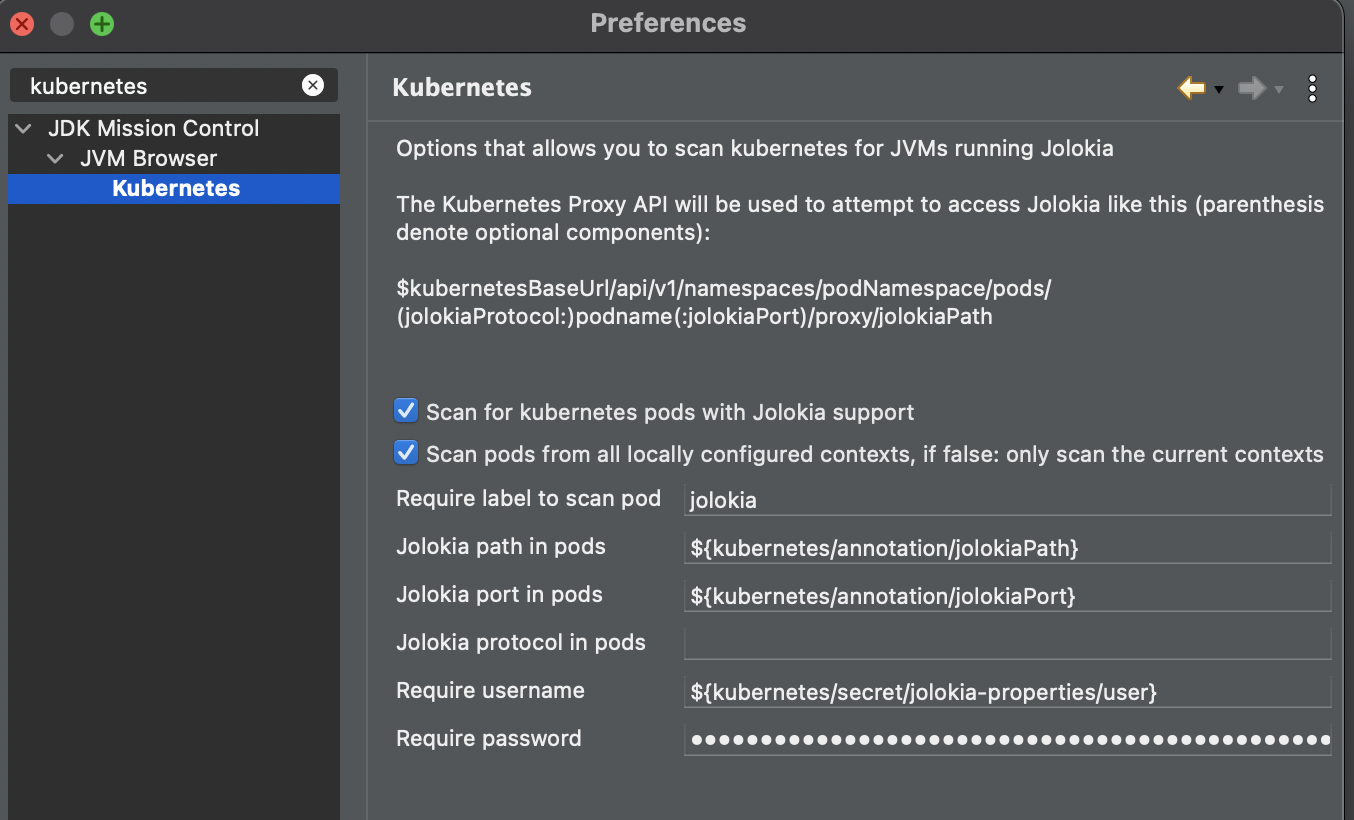
Under JDK Mission Control \ JVM Browser \ Kubernetes , check "Scan for kubernetes pods with Jolokia support". A process will run in the background and update the list of JVMs every 30 seconds
- Scan pods from all locally configured contexts: If you have configured several context in your kubernetes config, it will iterate over all the contexts and scan for pods in each of them. If not checked only the currently configured context will be scanned
- Jolokia path in pods : Either hardcode if the path is consistent in all pods. Alternatively you may allow the individual pods to declare with an attribute what path to use by a special syntax: example
${kubernetes/annotation/jolokiaPath} - Jolokia port in pods : Hardcode to a numeric value if it is consistent across all pods. Alternatively delegate to a pod attribute with the same syntax as for jolokia path. Example:
${kubernetes/annotation/jolokiaPort} - Jolokia protocol in pods : http or https, leave blank to default to http. Can also be delegated to pod attribute
- Require username / password : Leave blank for no authentication. Can be hardcoded if it is consistent over pods. It is also possible to refer to a kubernetes secret in the same namespace as the pod. The secrect can either be a basic auth secret or an opaque secret that contains a java.util.Properties file contents. The username and password must then refer to items within that secret. Examples:
${kubernetes/secret/jolokia-properties/user}and${kubernetes/secret/jolokia-properties/password}
Any pods that are successfully probed will show up in the JVM Browser hierarchy under kubernetes/context/namespace : 
Example snippet of a helm chart of a deployment that declares properties suitable for scanning from JMC:
kind: Deployment
apiVersion: apps/v1
metadata:
  name: petclinic
  namespace: jfr
  labels:
    jolokia: 'true'
    k8s-app: petclinic
  annotations:
    deployment.kubernetes.io/revision: '3'
spec:
  replicas: 2
  selector:
    matchLabels:
      k8s-app: petclinic
  template:
    metadata:
      name: petclinic
      annotations:
        jolokiaPath: 'jolokia/'
        jolokiaPort: '8778'
      labels:
        k8s-app: petclinic
        jolokia: 'true'
    spec:
      volumes:
      - name: jolokia-properties
        secret:
          secretName: jolokia-properties
      containers:
        - name: petclinic
          image: kantega.azurecr.io/petclinic:latest
          ports:
          - name: http
            containerPort: 8080
            protocol: TCP
          - name: jolokia
            containerPort: 8778
            protocol: TCP
          volumeMounts:
          - name: jolokia-properties
            readOnly: true
            mountPath: "/etc/jolokia"
          env:
            - name: JAVA_TOOL_OPTIONS
              value: "-javaagent:/jolokia-jvm-agent.jar=config=/etc/jolokia/jolokia.properties "
- Clone jmc
git clone git@github.com:openjdk/jmc.git - Follow instructions to build
- Open the projects in an Eclipse workspace
- Clone this repo or a fork of it
- Run
mvn dependency:copy-dependenciesin subfoldersorg.openjdk.jmc.jolokiaandorg.openjdk.jmc.kubernetes - Open the projects in the same workspace as where you have the jmc projects
- Debug JMC or Eclipse with JMC with one of the Jolokia or Kubernetes launchers
- Feel free to register issues with suggestions or problems in this repo
#Visual VM plugin
- Download plugin https://skarsaune.github.io/jolokia-jmc-update-site/visualvm/org-jolokia-jmx-plugin.nbm
- Add downloaded plugin and choose install


