Intro
For practice and proof of concept, I will go through several tutorials about TensorFlow Object Detection API.
https://github.com/tensorflow/models/tree/master/object_detection https://github.com/tensorflow/models/blob/master/object_detection/g3doc/installation.md https://github.com/tensorflow/models/blob/master/object_detection/g3doc/running_pets.md
From a high-level perspective, the example shows
- Test the Object Detection API (just run the test)
- Apply the API to a pet classification dataset (37 classes)
- Train and validate the model on Google Cloud Platform, which consists of
- Host your data on Google Cloud Storage
- Call Cloud ML API provided by Google Cloud to train your model
- Use TensorBoard to monitor the model training
- Convert model from Cloud ML API to TensorFlow
This example assumes that you have no experience in Google Cloud Platform.
Task 1: Test the API locally
In case you are also new to Python, you can bear with me and use Anaconda to save your time on survey and installing Python.
If you are a seasoned Python developer, I believe you know how to convert the following Conda style commands for your environment (e.g. virtual env, Docker, etc).
Create conda environment
# create an environment named as tf-api, and use Python 3.5 (or 3.6 if you prefer)
conda install -n tf-api python=3.5
source activate tf-api
Install Python packages
# For CPU (if you need to test gpu, use tensorflow-gpu)
pip install tensorflow
pip install pillow lxml jupyter matplotlib
Compile the Protobuf before use
It converts the *.proto in the directory for Python use.
I have donwloaded the directory into this example repository; you can just clone and cd to its offical repository
protoc object_detection/protos/*.proto --python_out=.
NOTE
Without doing this, later you may encounter error like
cannot import name 'anchor_generator_pb2**
Set Python environment
Let you Python detect the modules needed.
# so your Python can import libraries from . and ./slim
export PYTHONPATH=$PYTHONPATH:`pwd`:`pwd`/slim
Run the test
python object_detection/builders/model_builder_test.py

.......
----------------------------------------------------------------------
Ran 7 tests in 0.058s

OK
Now it's time for real example (apply it on images)
Task 2: Pet classification on Google Cloud
Here I will use Cloud SDK (all command-line)
You need to
- Register a Google Cloud Platform account
- Download and install Cloud SDK
In this example, I will use tf-api-test for both project and configuration name.
Create project
Currently, Cloud SDK does not provide API to create a project, you need to create it from
https://cloud.google.com/resource-manager/docs/creating-managing-projects
Enable ML Engine APIs for the project
Again, you need to use this link to allow your project to use ML Engine APIs
Set Cloud SDK configuration
# Just the instruction
gcloud init

# Check the configuration
gcloud config list
You may see something like
[core]
account = YOUR-GMAIL
disable_usage_reporting = False
project = tf-api-test
Set up Google Cloud Storage (GCS) bucket
https://cloud.google.com/storage/docs/creating-buckets
The data will be uploaded to this cloud storage accessed by the code.
First, I will name the bucket as my-tf-bucket
The simplest way to create a bucket is just like this
gsutil mb gs://my-tf-bucket


Creating gs://my-tf-bucket/...
Alternatively, you can also to specify three parameters
- p: project name
- c: storage class
- l: location
gsutil mb -p tf-api-test -c coldline -l eu gs://my-tf-bucket
Get the Pets Dataset and Upload to GCS
wget http://www.robots.ox.ac.uk/~vgg/data/pets/data/images.tar.gz
wget http://www.robots.ox.ac.uk/~vgg/data/pets/data/annotations.tar.gz
tar -xvf images.tar.gz
tar -xvf annotations.tar.gz
Convert the dataset for Tensorflow Object Detection API
The data has to be TFRecord, use the provided script to convert them.
python object_detection/create_pet_tf_record.py \
    --label_map_path=object_detection/data/pet_label_map.pbtxt \
    --data_dir=`pwd` \
    --output_dir=`pwd`

# ignore the warrings :)
You will get your training and validation set ready as
- pet_train.record
- pet_val.record
Upload the dataset up GCS
gsutil cp pet_train.record gs://my-tf-bucket/data/pet_train.record
gsutil cp pet_val.record gs://my-tf-bucket/data/pet_val.record
gsutil cp object_detection/data/pet_label_map.pbtxt gs://my-tf-bucket/data/pet_label_map.pbtxt
Download COCO-pretrained Model for Transfer learning
Transfer learning is a way to give your model a better initialization by loading a pre-trained model (usually from other tasks and domains). By doing this, we can hopefully spend less time training and get better result (because we stand on the shoulder on giant).
This pretrained model is: Faster R-CNN with Resnet-101 on COCO dataset
We will download it and upload to our GCS directory
(Accurately, gs://my-tf-bucket/data/)
wget http://storage.googleapis.com/download.tensorflow.org/models/object_detection/faster_rcnn_resnet101_coco_11_06_2017.tar.gz
tar -xvf faster_rcnn_resnet101_coco_11_06_2017.tar.gz
gsutil cp faster_rcnn_resnet101_coco_11_06_2017/model.ckpt.* gs://my-tf-bucket/data/
Configure the Object Detection pipeline
Finally the technical part. We need to set our configuration in a file to let TensorFlow Object Detection API to work. In this example, we use the provided config example: faster_rcnn_resnet101_pets.config
Open the config file and use you editor to replace PATH_TO_BE_CONFIGURE with gs://my-tf-bucket/data/
Note
In this repository, I have edited. You can get the raw template at
object_detection/samples/configs/faster_rcnn_resnet101_pets.config
Then upload the config to the bucket
gsutil cp faster_rcnn_resnet101_pets.config gs://my-tf-bucket/data/faster_rcnn_resnet101_pets.config
Check the data on GCS
gsutil ls gs://my-tf-bucket/data/

# you should see these
gs://my-tf-bucket/data/faster_rcnn_resnet101_pets.config
gs://my-tf-bucket/data/model.ckpt.data-00000-of-00001
gs://my-tf-bucket/data/model.ckpt.index
gs://my-tf-bucket/data/model.ckpt.meta
gs://my-tf-bucket/data/pet_label_map.pbtxt
gs://my-tf-bucket/data/pet_train.record
gs://my-tf-bucket/data/pet_val.record
You can also check the file via browser
Start Training and Evaluation Jobs on Google Cloud ML Engine
In order to start a job on Google Cloud ML Engine, we need
- Package the code
- Writer cluster configuration
Use the provided script the pack (two files)
python setup.py sdist
cd slim && python setup.py sdist
You should see these packed files
- dist/object_detection-0.1.tar.gz
- slim/dist/slim-0.1.tar.gz
The provided cluster configuration look like this
# cloud.yml
trainingInput:
  runtimeVersion: "1.0"
  scaleTier: CUSTOM
  masterType: standard_gpu
  workerCount: 5
  workerType: standard_gpu
  parameterServerCount: 3
  parameterServerType: standard
Which set 5 workers (1 master, 4 slaves), 3 parameter servers, leave the others as stardard.
Submit the Training job
gcloud ml-engine jobs submit training `whoami`_object_detection_`date +%s` \
    --job-dir=gs://my-tf-bucket/train \
    --packages dist/object_detection-0.1.tar.gz,slim/dist/slim-0.1.tar.gz \
    --module-name object_detection.train \
    --region europe-west1 \
    --config cloud.yml \
    -- \
    --train_dir=gs://my-tf-bucket/train \
    --pipeline_config_path=gs://my-tf-bucket/data/faster_rcnn_resnet101_pets.config
You may see something like
Job [spencer_object_detection_1500567100] submitted successfully.
Your job is still active. You may view the status of your job with the command

  $ gcloud ml-engine jobs describe spencer_object_detection_1500567100

or continue streaming the logs with the command

  $ gcloud ml-engine jobs stream-logs spencer_object_detection_1500567100
jobId: spencer_object_detection_1500567100
Note
- The job name is
MYACCOUNT_object-detection_DATE, change anything you like. - I set my region to
europe-west1, you can of course change it. - The weird line between --config and --train_dir is necessary!
Meanwhile the training task is running/queing, we can submit another job for evaluation
gcloud ml-engine jobs submit training `whoami`_object_detection_`date +%s` \
    --job-dir=gs://my-tf-bucket/train \
    --packages dist/object_detection-0.1.tar.gz,slim/dist/slim-0.1.tar.gz \
    --module-name object_detection.eval \
    --region europe-west1 \
    --config cloud.yml \
    --scale-tier CUSTOM \
    -- \
    --checkpoint_dir=gs://my-tf-bucket/train \
    --eval_dir=gs://my-tf-bucket/eval \
    --pipeline_config_path=gs://my-tf-bucket/data/faster_rcnn_resnet101_pets.config
Note:
The scale-tier has to match the config in cloud.yml
The valid choices are [BASIC, BASIC_GPU, CUSTOM, PREMIUM_1, STANDARD_1].
You can monitor the jobs with ML Engine Dashboard
Monitor the tasks from local
Now we connect TensorBoard to the bucket.
gcloud auth application-default login
tensorboard --logdir=gs://my-tf-bucket/
You then can check some results on your localhost:6006
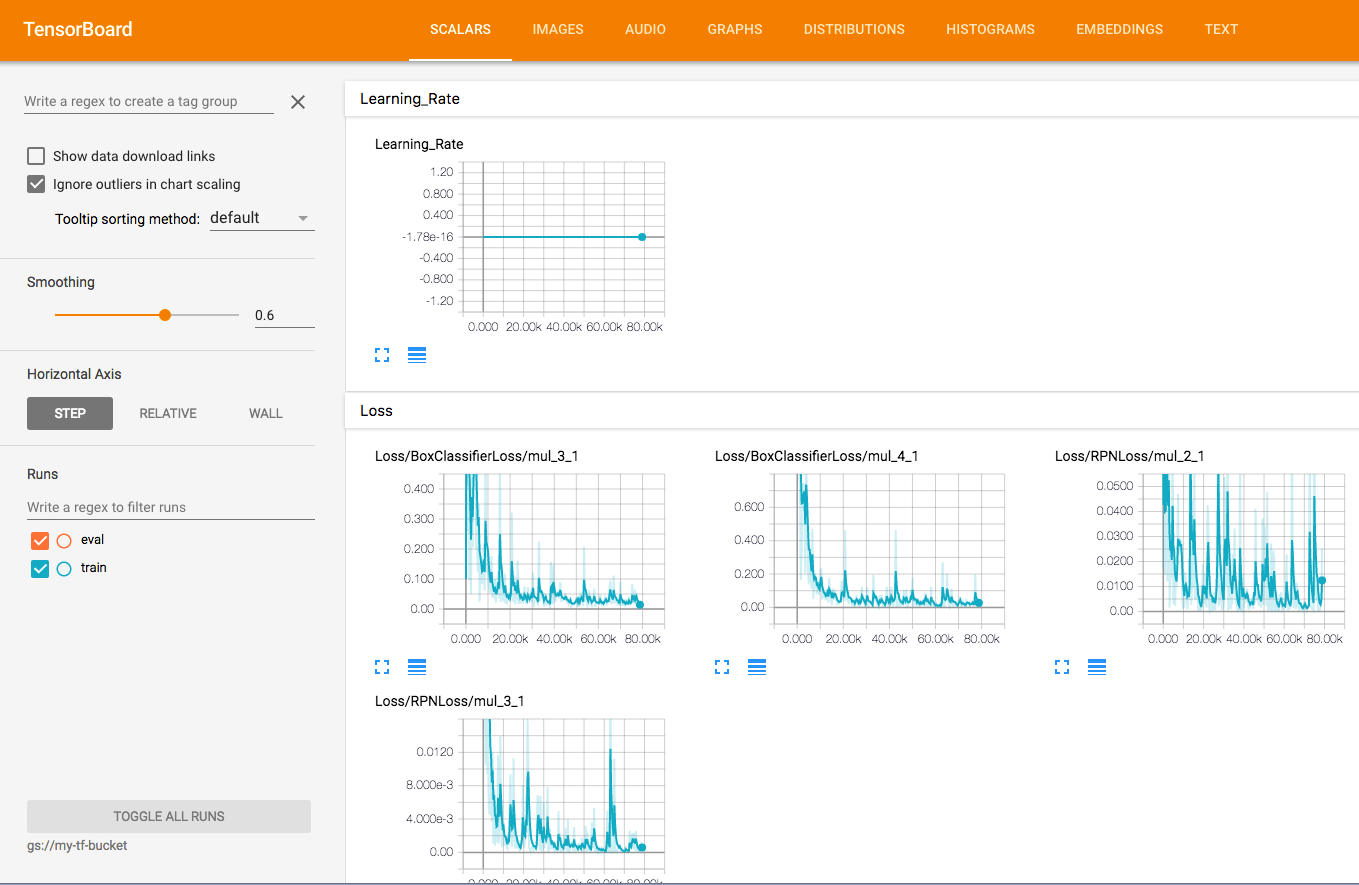
From SCALAR tab you can see statistics about training

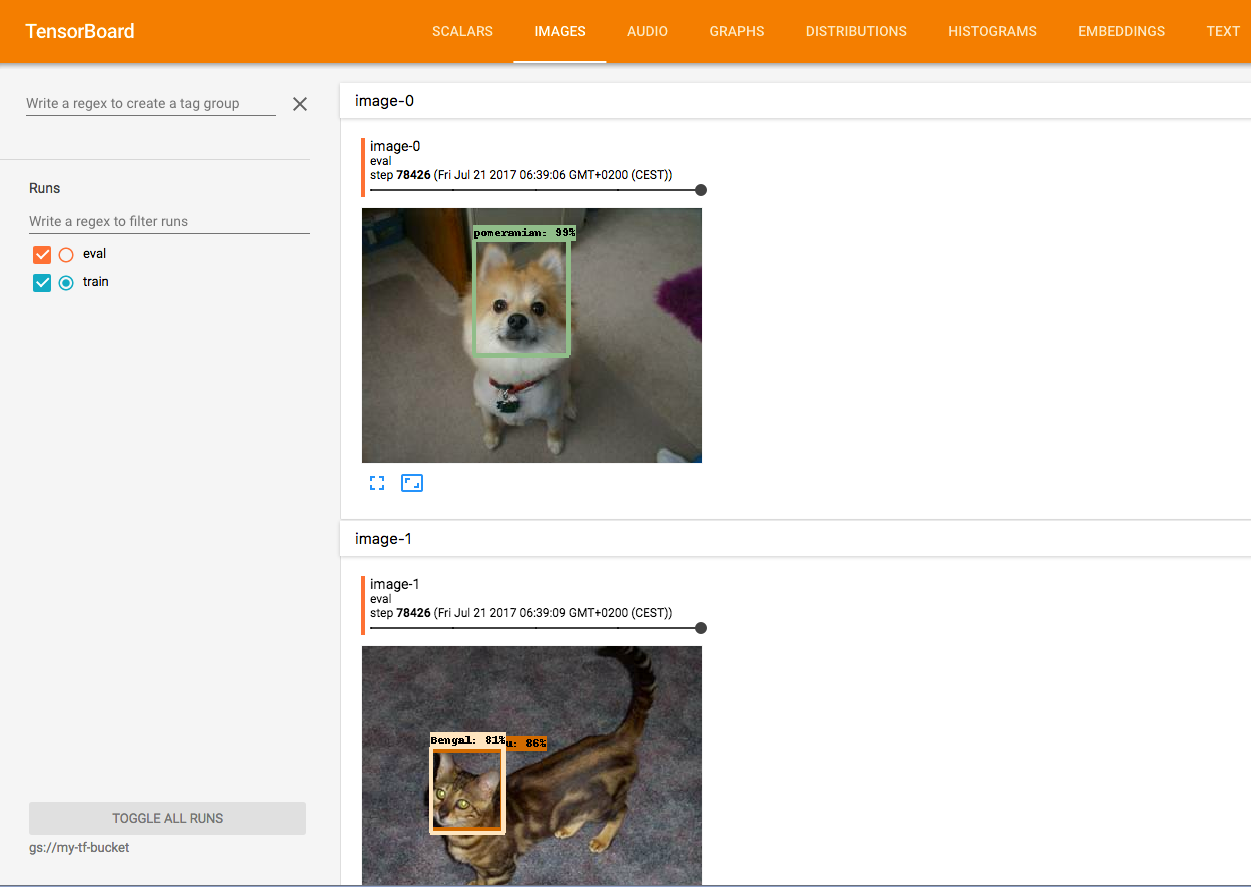
From IMAGES tabs you can see examples of evaluation (prediction)

Note
While the document claims that we can see the information while the jobs are running, in my case, I have to stop the jobs, otherwise I cannot see anything.
Export the trained TensorFlow model
If you have done training via Google ML Engine, now it's time to get the model and use it in your production. In TensorFlow, the model is called a graph.
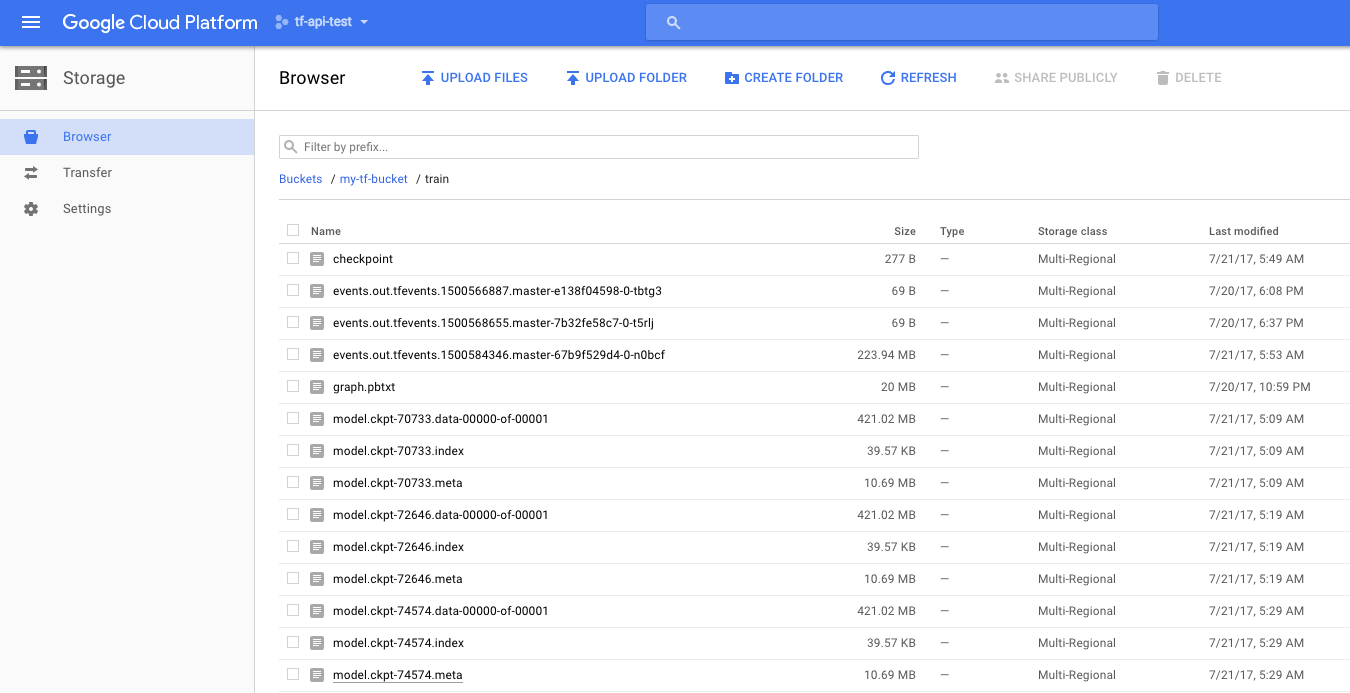
Browse you GCS bucket and pick up a checkpoint (model copy). A checkpoint typicall consists of three files
- model.ckpt-YOUR_CHECKPOINT_NUMBER.data-00000-of-00001
- model.ckpt-YOUR_CHECKPOINT_NUMBER.index
- model.ckpt-YOUR_CHECKPOINT_NUMBER.meta
You can check your available checkpoint numbers via Google Cloud Storage Browser
In this example, I will choose CHECKPOINT_NUMBER as 74574 (just because I believe the lastest one is the best model since it has been trained longer)
Download the graph files to current directory
gsutil cp gs://my-tf-bucket/train/model.ckpt-74574.* .
If you encounter error like zsh: no matches found: gs://my-tf-bucket/train/model.ckpt-74574.*
then just type in the specific file names
gsutil cp gs://my-tf-bucket/train/model.ckpt-74574.data-00000-of-00001 .
gsutil cp gs://my-tf-bucket/train/model.ckpt-74574.index .
gsutil cp gs://my-tf-bucket/train/model.ckpt-74574.meta .
Use the provided script to convert them
python object_detection/export_inference_graph.py \
    --input_type image_tensor \
    --pipeline_config_path faster_rcnn_resnet101_pets.config \
    --checkpoint_path model.ckpt-74574 \
    --inference_graph_path output_inference_graph.pb
The graph is named as output_inference_graph.pb
You may download the graph here (184 MB)
Now you are ready to use the graph in your TensorFlow pipeline!
