This is a Galaxy tool that imports sequence data from IRIDA to Galaxy. Data is imported as a series of links (instead of directly copying the files from IRIDA to Galaxy). This requires that the IRIDA and Galaxy instance both share the same filesystem.
- 1. Usage
- 2. Install Instructions
- 3. Development and Testing
This tool lets you import data from IRIDA into Galaxy (via a Galaxy Dataset Library, which links to the files instead of making copies).
Detailed instructions are available in the IRIDA Documentation. But, for a quick overview, please see below:
In Galaxy, please find the IRIDA tool, likely under the Get Data section in the Tool Panel.
Clicking this tool will redirect you to IRIDA.
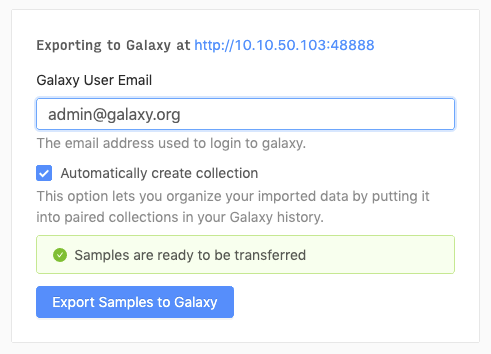
From the cart, you can export the selected samples to Galaxy.
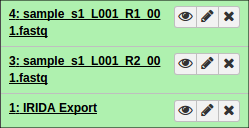
You should be redirected to Galaxy, where the export tool will run and load up the data (fastq files) within your Galaxy History.
This is a DataSource tool in Galaxy, which is a special type of tool used to integrate data from external sites into a local Galaxy instance. In the case of IRIDA, this requires configuration of connection details directly in the tool so that it can contact the correct IRIDA server with the appropriate API details. This means that installation requires a bit more manual steps then regular Galaxy tools to fill in these connection details.
There are overall two different methods to install this tool, through a Galaxy ToolShed or directly from GitHub (you only have to choose one of these options).
The easiest way to install this tool is via a Galaxy ToolShed. The specific ToolShed this tool is located within is the IRIDA ToolShed. You will want to install the tool located at http://irida.corefacility.ca/galaxy-shed/view/irida/irida_galaxy_importer/d82238b091f2.
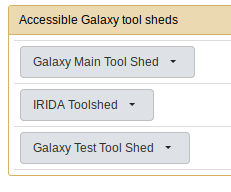
If your Galaxy instance is not configured to make use of the IRIDA ToolShed you will have to modifiy it.
Please find the tool_sheds_conf.xml file in the galaxy/config/ directory.
If you do not have this file, you can make a copy from the sample file provided by Galaxy cp tool_sheds_conf.xml.sample tool_sheds_conf.xml.
Add the following line to this file:
<tool_shed name="IRIDA Toolshed" url="https://irida.corefacility.ca/galaxy-shed/"/>Now, restart Galaxy. You should see the IRIDA ToolShed available from Admin then Install new tools.
From within the IRIDA ToolShed, find the irida_galaxy_importer tool and install to Galaxy.
Once installed, you should see it show up in your list of installed tools (Admin > Mange tools).
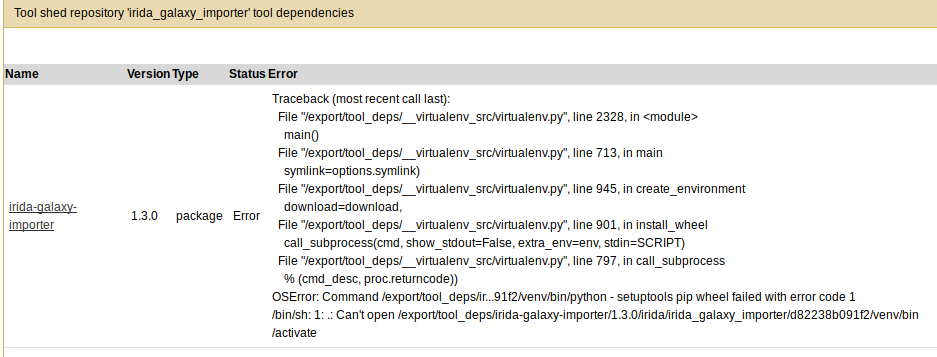
If the tool reports an error like missing tool dependencies, you can click on the tool for more details. For example:
Here, it looks like the Python virtual environment did not load properly. So, let's fix this.
First, login to the machine running Galaxy and navigate to the directory shown in the error
(here it's /export/tool_deps/irida-galaxy-importer/1.3.0/irida/irida_galaxy_importer/d82238b091f2/).
cd /export/tool_deps/irida-galaxy-importer/1.3.0/irida/irida_galaxy_importer/d82238b091f2/
Now, we'll just delete the venv directory and re-create it.
rm -rf venv

virtualenv venv
Now, let's activate the virtual environment and re-install the dependencies.
source venv/bin/activate
pip2 install -r requirements.txt
If everything worked, great. We can move on to configuring the tool and Galaxy.
If, instead, you wish to install the tool via GitHub (e.g., to use the latest code), please follow the instructions below.
Note: If you've already installed the tool from the ToolShed, you can skip this step.
The Galaxy tools/ directory contains tools that come with the Galaxy code. You can add your own to this directory and configure Galaxy to load them up. We will do this for the IRIDA Import Tool.
cd galaxy/tools/

git clone -b master https://github.com/phac-nml/irida-galaxy-importer.git
cd irida-galaxy-importer

# Optional. Checkout specific release from https://github.com/phac-nml/irida-galaxy-importer/releases
#git checkout [LATEST_RELEASE]This tool requires Python 2 and a number of Python libraries. You must make sure these are installed and available on all machines this tool will be run with (e.g., if you are submitting to a cluster, these must be available on all cluster nodes).
If you are only running Galaxy on a single machine, please install Python 2 and use pip2 to install the dependencies:
pip2 install bioblend requests-oauthlibYou may need to also install the Python and YAML development libraries. On Ubuntu, you can install them with:
sudo apt-get install python-dev libyaml-devIf you are using Python 2.6, argparse must be installed too. If you are not installing from a toolshed invoke:
pip2 install argparseIn order to configure Galaxy to see the tool, please find the galaxy/config/tool_conf.xml file which is located in the galaxy/config directory.
If the galaxy/config/tool_conf.xml you can copy the sample from this same config/ directory. An example of this file can also be found in the Galaxy code.
Once you've found the file, please add the following line:
<tool file="irida-galaxy-importer/irida_import/irida_import.xml" />You likely want to add this to the Get Data section, so your modification will likely look like:
<toolbox monitor="true">
  <section id="getext" name="Get Data">
    <!-- Add below line to your file -->
<tool file="irida-galaxy-importer/irida_import/irida_import.xml" />No matter which way you install the code (ToolShed or GitHub), you will have to set some configuration options in Galaxy to get this tool to work.
This tool works by making links to the IRIDA data files (instead of directly copying them). In order to do this, you will
have to enable the following options in the Galaxy galaxy/config/galaxy.yml file. An example of this file can be found on the Galaxy GitHub page.
Please enable the following:
allow_path_paste: TrueOnce the tool is installed in Galaxy, we can move on to configuring the connection details for the tool with both IRIDA and Galaxy.
The tool makes use of linking to files via a Galaxy Dataset Library. This requires you to configure an API key in Galaxy linked to an administrator account to be used by the tool. You will first have to setup a Galaxy Admin User to be used by this tool (it can be the same account as your normal Galaxy Admin user if you wish).
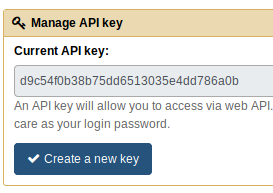
You will also have to create an API key for this user by going to User > Preferences > Manage API key.
In this case, the Galaxy API key is:
- Galaxy API Key:
d9c54f0b38b75dd6513035e4dd786a0b
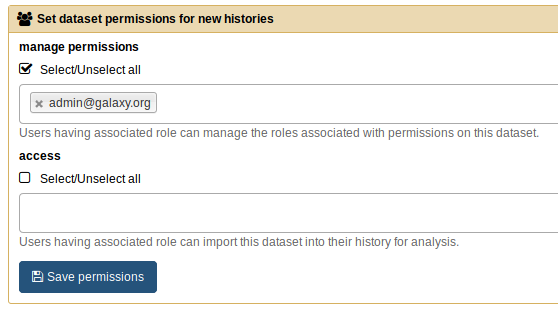
You will also have to make sure that the access permissions are blank in User > Preferences > Set dataset permissions for new histories, otherwise files may not import correctly.
On the IRIDA end, you will have to setup an IRIDA client id and key so that the IRIDA Import Tool can communicate with IRIDA.
To do this, please follow the Creating a New System Client instructions in the IRIDA documentation.
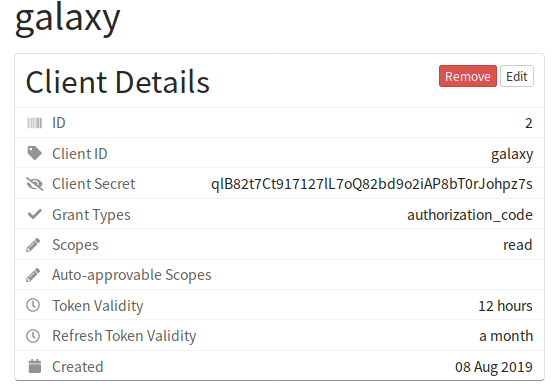
You will want to create a client with Grant Types set to authorization_code and with Read access (you do not need write access).
Please make sure to remember the Client ID and Client Secret. In this case they would be:
- Client ID:
galaxy - Client Secret:
qlB82t7Ct917127lL7oQ82bd9o2iAP8bT0rJohpz7s
WARNING: The tool is currently set to ALLOW unsecured connections to IRIDA. This option MUST be disabled if the tool
will be used over the internet. Set os.environ['OAUTHLIB_INSECURE_TRANSPORT'] to 0 in irida_import.py to disable it, or delete that line.
Once we have all the connection information for both IRIDA and Galaxy, we can move onto configuring the tool to connect to IRIDA and Galaxy.
You will first want to find the directory containing the config.ini.sample file. If installed via GitHub, see section 2.1.2.1 to find this directory.
If installed via the ToolShed, you will have to find the Galaxy shed_tools/ directory and navigate to a directory named something like shed_tools/irida.corefacility.ca/galaxy-shed/repos/irida/irida_galaxy_importer/d82238b091f2/irida_galaxy_importer/.
The shed_tools/ directory is often one directory up from the main Galaxy installation (e.g., galaxy/../shed_tools/). But, this may change depending on your instllation.
Once you have found the directory containing the config.ini.sample file, please copy this file to config.ini:
cp config.ini.sample config.iniYou will next want to make the appropriate changes with your connection information. For example:
[Galaxy]

### MODIFY THESE ###
admin_key: d9c54f0b38b75dd6513035e4dd786a0b
galaxy_url: http://localhost:48888
####################

illumina_path: /illumina_reads
reference_path: /references
xml_file: irida_import.xml
max_waits: 120
max_client_http_attempts: 10
client_http_retry_delay: 30

[IRIDA]

### MODIFY THESE ###
client_secret: qlB82t7Ct917127lL7oQ82bd9o2iAP8bT0rJohpz7s
client_id: galaxy
irida_url: http://localhost:8080
####################

initial_endpoint_suffix: /projects
token_endpoint_suffix: /api/oauth/token
You will want to modify the URL values and connection information (for both IRIDA and Galaxy).
That is, for Galaxy, modify admin_key, and galaxy_url. For IRIDA modify irida_url, client_id, and client_secret.
It is also possible to configure the folders in which sample files and reference data are stored, and the endpoints at which the tool expects to access IRIDA resources (but the defaults are fine).
Once you've set the appropriate connection details in the config.ini file, please run:
python2 irida_import.py --configThis should print out:
Successfully configured the XML file!
And you should now see a irida_import.xml file in the directory which contains the proper details to connect between your IRIDA and Galaxy instances.
*Note: Depending on how you've installed the tool, to run this command you may also have to either install additional Python dependencies(e.g., like in section 2.1.2.2) or load up the appropriate virtual environment with the dependencies (like in section 2.1.1.3).
Once you've made the above changes, please restart Galaxy. The IRIDA Import Tool should now appear in your Galaxy tool panel.
Congratulations! You should now be able to use the tool to transfer data from the configured IRIDA to Galaxy.
If you wish to make additions to the code, the below instructions can be used to test out your additions in our test suite.
Note: It is not necessary to install the tool in Galaxy to run the below tests. These will automatically configure a Galaxy and IRIDA instance with the tool to test it out.
The script run-tests.sh can be used to run the tests. This should check for some of the dependencies and let you know which is missing. However, you will have to have the following dependencies installed:
- Python 2
- Java 8
- Maven
- MySQL/MariaDB (Server and Client)
- PostgreSQL (Server and Client)
- Git
- Chrome (or Chromium) and Chromedriver
- Xvfb
On Ubuntu, you can install these with:
sudo apt-get install python2.7 openjdk-8-jdk maven mariadb-client mariadb-server postgresql git chromium-chromedriver xvfbMySQL must be configured to grant all privileges to the user test with password test for the databases irida_test. MySQL must also be configured to disable ONLY_FULL_GROUP_BY mode.
echo "grant all privileges on irida_test.* to 'test'@'localhost' identified by 'test';" | mysql -u root -p

mysql -u root -e "SET GLOBAL sql_mode=(SELECT REPLACE(@@sql_mode,'ONLY_FULL_GROUP_BY',''));"To run all the test, you can run:
./run-tests.shIf you just want to run the unit tests (much quicker) you can do:
source .ci/install_deps.sh
cd irida_import
pytest tests/unit/*.py

