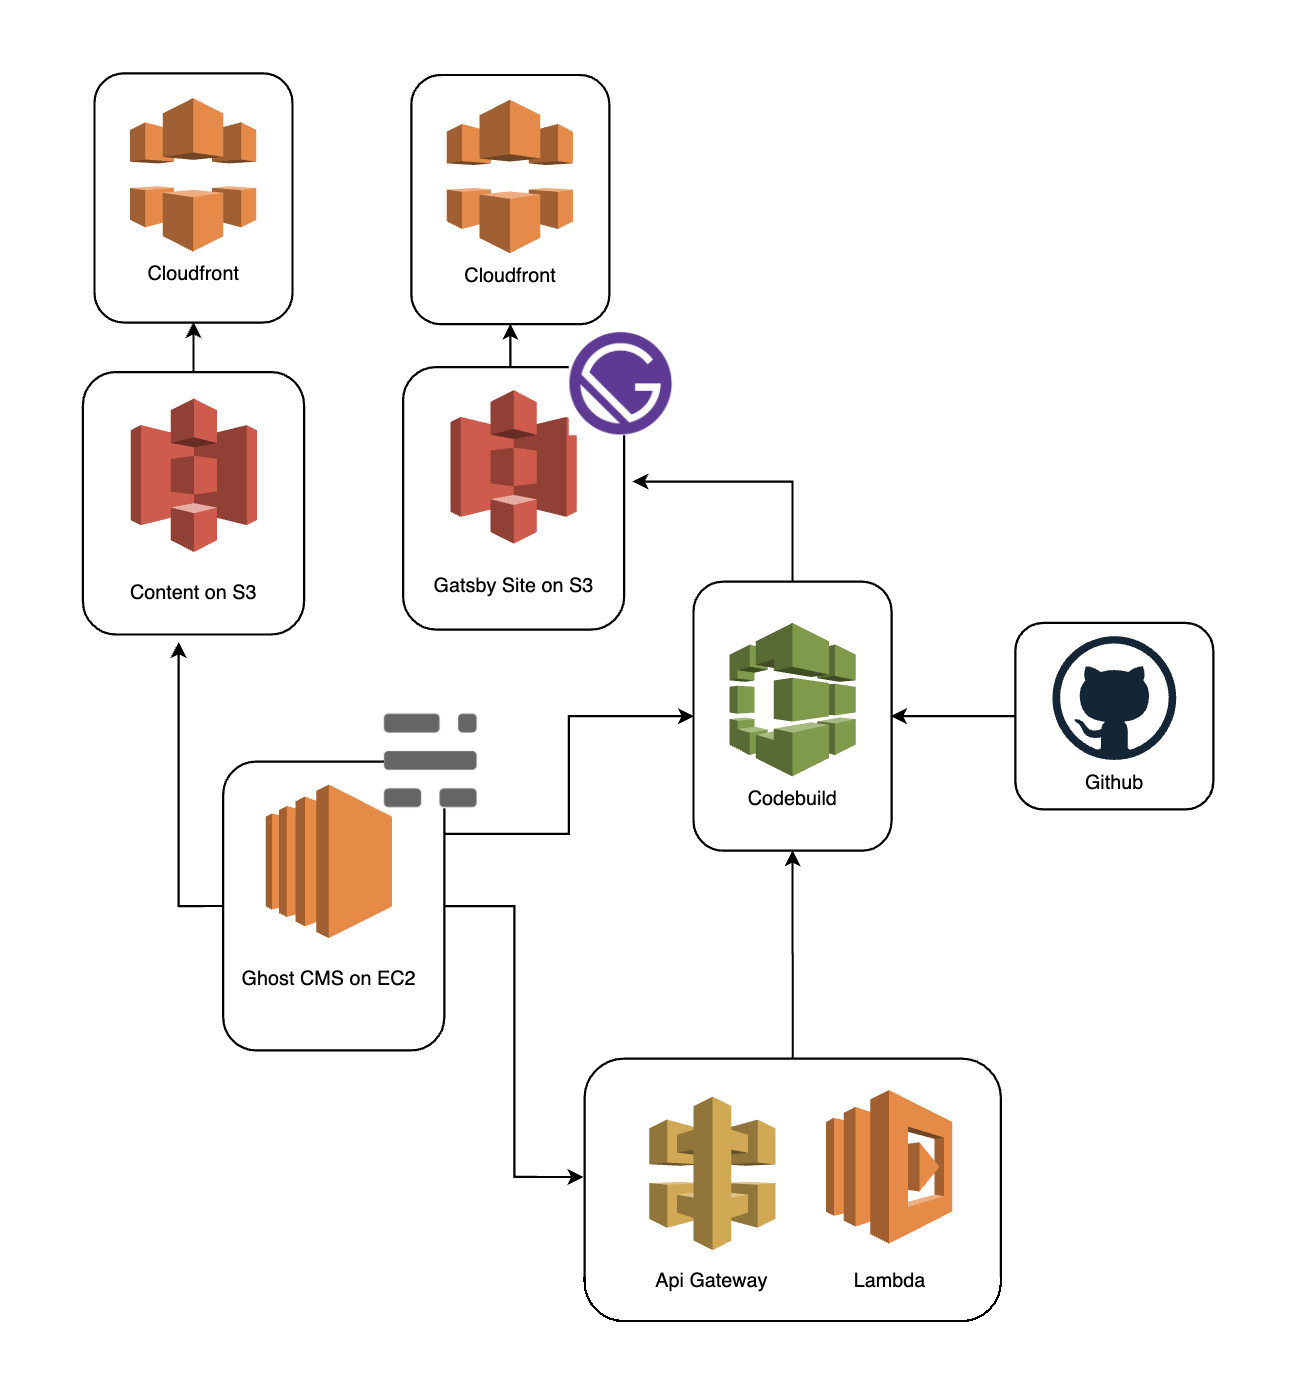
This project creates an end to end solution for a self hosted blog. After set up, a user will have a server-side rendered blog built with React, a password protected CMS with GUI for content creation, and a continuous delivery pipeline that deploys the updated content on creation and/or edit.
- Frontend - Gatsby
- CMS - Ghost
- Hosting - AWS EC2, S3 and Cloudfront
- CI/CD - AWS Codebuild, API Gateway and Lambda
- Infrastructure as Code - AWS Cloudformation and Secrets Manager
Create a file named .env in the root of the project and add these variables with updated values:
ENV=update
PROJECT_NAME=update
SSH_KEY_NAME=update
GITHUB_TOKEN=update
GITHUB_REPO_URL=update
AWS_PROFILE=update
Run these commands locally to get the AWS resources deployed and configured:
make create-bucketsmake install-buildmake package-functionmake upload-functionmake create-rolesmake create-servicemake create-build
- If you have used codebuild with Github before, you will likely get an error about the
SourceCredentialalready being defined for typeGITHUB. To fix, open the cloudformation/build.json, remove theSourceCredentialand the{Ref: SourceCredential}, delete the failed stack in Cloudformation via the AWS console, and locally runmake create-buildagain.
Get the EC2 instance Public DNS (IPv4) Address via the aws console. It looks something like this: ec2-55-55-55-555.compute-1.amazonaws.com
ssh into the EC2 instance:
ssh -i "~/path/to/file.pem" ubuntu@<EC2 Public DNS Address>
More information about accessing your EC2 instance here.
Now follow these instructions to install and configure Ghost: https://ghost.org/docs/install/ubuntu/
Also on the EC2 instance within the /var/www/ghost/ directory, install the S3 ghost plugin and configure it: https://github.com/colinmeinke/ghost-storage-adapter-s3. You will need the AWS access keys for the Content User (found in the IAM section of the AWS console). As well you need the Content bucket name, "${ProjectName}-content-${env}", and the cloudfront url to add as the assetHost. This config is to be added to the configuration json file in the /var/www/ghost/:
"storage": {
  "active": "s3",
  "s3": {
    "accessKeyId": "CONTENT_USER_ACCESS_KEY_ID",
    "secretAccessKey": "CONTENT_USER_SECRET_ACCESS_KEY",
    "region": "us-east-1",
    "bucket": "CONTENT_BUCKET_NAME",
    "assetHost": "CONTENT_CDN_URL" # remember to add the https://
  }
}
Create an Integration in the Ghost admin UI and name it "Build" (you can actually name it whatever you want). While in this modal, also copy the Content API Key. Back in this project code add it to the file frontend/.ghost.json. Push your changes up to github (and make sure they are in master).
Back in the Ghost admin UI in the "Build" integration that you just created, add a custom webhook that will invoke the lambda via API Gateway. It is formated like this: {api-gateway-url}/{env}/build. The API Gateway URL can be obtained in the AWS console.
This webhook will trigger a build when the content changes in the Ghost CMS. This is accomplished via API Gateway backed by a Lambda that will trigger a build and deploy process via Codebuild.
In the AWS console navigate to the recently created Codebuild project and ensure that your frontend github repo is successfully linked. To verify, navigate to the Codebuild project, find Edit in the top right area of the screen, select Source from the dropdown and ensure the Source data includes this sentence
"Connection status: You are connected to GitHub using a personal access token".
Now locally, kick of a new build:
$ make start-buildNavigate back to the Codebuild UI and confirm that a new build is in progress. If successful, your frontend will be added to the Site S3 bucket and available at the Cloudfront endpoint.
Remember: merging to master or saving content on the Ghost admin UI will also kick off a build.
- add scheduled ec2 backups to cloudformation
