This is a simple but flexible inline keyboard generator that works as an add-on to PyTelegramBotAPI package. With keyboa you can:
- quickly create buttons with complex callback,
- create keyboards directly from lists,
- easily combine multiple keyboards into one,
- many other cool things...
📖 This guide applies to Keyboa version 3 and above. If you are using Keyboa version 2 and below, please use The guide for version 2.
📌 IMPORTANT NOTICE:
Version 3 isn't compatible with version 2. If decide to update from 2 to 3 version, be aware that you will need to adjust your code.
Keyboa is compatible with Python 3.7 and higher. You can install this package with pip as usual:
$ pip install keyboaAfter that, just import:
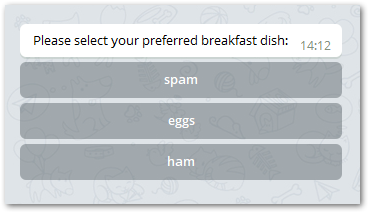
from keyboa import KeyboaThe simplest telegram keyboard can be created like this:
menu = ["spam", "eggs", "ham"]
keyboard = Keyboa(items=menu)
bot.send_message(chat_id=chat_id, text=text, reply_markup=keyboard())If you need to create a keyboard with a predefined structure, do the following:
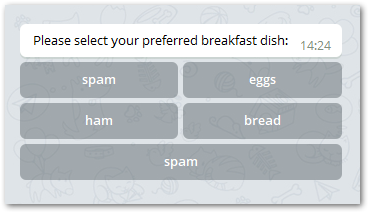
menu = [["spam", "eggs"], ["ham", "bread"], "spam"]
keyboard = Keyboa(items=menu)
bot.send_message(chat_id=chat_id, text=text, reply_markup=keyboard())
That's a good start, but let's take a closer look at how it works and what additional features we can use.
The Keyboa class provides two options for creating pyTelegramBotAPI compatible keyboards with InlineKeyboardMarkup type: method slice() and property keyboard.
Use the Keyboa class description below as a reference to understand the nuances and limitations of the module or see the following examples.
The easiest way to create a keyboard is to init Keyboa object with a list of items and get keyboard property.
menu = ["spam", "eggs", "ham"]
keyboard = Keyboa(items=menu)
bot.send_message(chat_id=chat_id, text=text, reply_markup=keyboard())
By default, each item in the list becomes a separate row, but it's easy to change by combining the items into groups.
menu = [["spam", "eggs"], ["ham", "bread"], "spam"]
keyboard = Keyboa(items=menu)
bot.send_message(chat_id=chat_id, text=text, reply_markup=keyboard())
Now you see that the keyboard buttons are arranged according to how we grouped them in the list.
Note that the last "spam" has become a separate row, although we have not put it on a separate list.
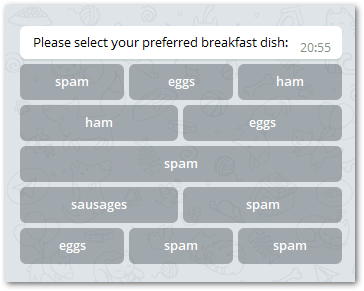
And of course you can create more complex structures, for example:
menu = [["spam", "eggs", "ham"], ["ham", "eggs"], ["spam", ] ["sausages", "spam"], ["eggs", "spam", "spam"]]
keyboard = Keyboa(items=menu)
bot.send_message(chat_id=chat_id, text=text, reply_markup=keyboard())
Due to Telegram API limitation you can add up to 8 buttons per row and up to 100 for the entire keyboard.
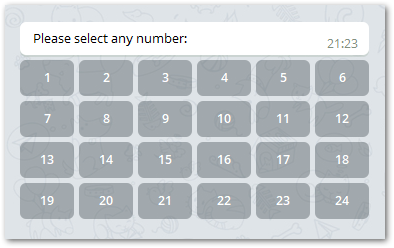
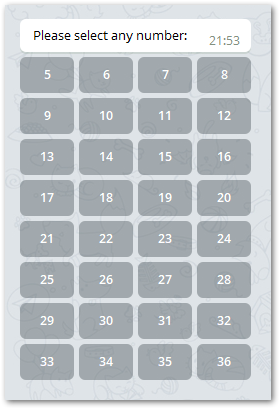
Let's go deeper. Suppose you have a list of 24 items, and you would like to divide it into rows of 6 buttons each. Here is what you need to do:
numbers = list(range(1, 25))
keyboard = Keyboa(items=numbers, items_in_row=6)
bot.send_message(chat_id=chat_id, text=text, reply_markup=keyboard())
💡 You can easily make 3, 4 or even 8 buttons in a row, changing the items_in_row parameter only.
Now we will try to use more attributes to see how they will affect the result:
keyboa = Keyboa(items=list(range(0, 48)), alignment=True)
keyboard = keyboa(slice(5, 37))
bot.send_message(chat_id=chat_id, text=text, reply_markup=keyboard)
As you can see, this keyboard consists of a [5:37] slice. In addition, although we did not specify the items_in_row attribute, the function divided list into equal rows, because of enabled alignment attribute.
💡 There is usually no need to create separate buttons as they will be created automatically from their source data when the keyboard is created.
But if there is such a need, it can be done as follows.
Import Button class (detailed description), create button object from various data types, such as str, int, tuple, dict and call button property to get InlineKeyboardButton:
from keyboa import Button
spam = Button(button_data="spam").buttonspam = Button(button_data="spam").button{'text': 'spam', 'callback_data': 'spam'}spam = Button(button_data=("spam", "eggs"), front_marker="ham_", back_marker="_spam").button{'text': 'spam', 'callback_data': 'ham_eggs_spam'}💡 Notice that in this example we also used front_marker and back_marker to add some data to button's callback_data.
spam = Button(button_data={"spam": "ham_eggs_spam"}).button{'text': 'spam', 'callback_data': 'ham_eggs_spam'}spam = Button(button_data={"text": "spam", "url": "https://ya.ru/", "callback_data": "eggs"}).button{"text": "spam", "url": "https://ya.ru/", "callback_data": "eggs"}Sometimes it is necessary to combine several keyboard blocks into the big one. The Keyboa class method combine() does just that!
This method has only one input parameter - keyboards. It should be a sequence of InlineKeyboardMarkup objects. Also could be presented as a standalone InlineKeyboardMarkup.
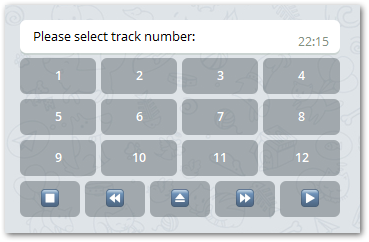
Here is how it works:
controls = [["⏹️", "⏪️", "⏏️", "⏩️", "▶️"], ]
tracks = list(range(1, 13))

keyboard_controls = Keyboa(items=controls).keyboard
keyboard_tracks = Keyboa(items=tracks, items_in_row=4).keyboard

keyboard = Keyboa.combine(keyboards=(keyboard_tracks, keyboard_controls))
bot.send_message(chat_id=user_id, text=text_tracks, reply_markup=keyboard)
As you see, we merged two keyboards into one.
A few words about how to create complex callbacks for buttons.
Often it is necessary to read and pass through the callback options that the user has sequentially selected. For example, determining the address: city, street, house, apartment number.
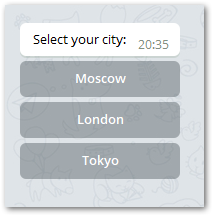
Suppose we offer the user several cities to choose from. Create a simple keyboard:
kb_cities = Keyboa(
    items=["Moscow", "London", "Tokyo", ],
    front_marker="&city=",
    back_marker="$"
)
bot.send_message(chat_id=user_id, text="Select your city:", reply_markup=kb_cities())
By doing so, we get the following inside the keyboard:
{'inline_keyboard': [
    [{'text': 'Moscow', 'callback_data': '&city=Moscow$'}],
    [{'text': 'London', 'callback_data': '&city=London$'}],
    [{'text': 'Tokyo', 'callback_data': '&city=Tokyo$'}]
]}
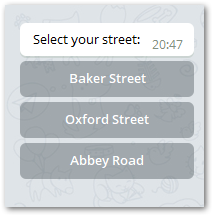
Suppose a user selects London. We would like to remember this, and let him choose from several streets:
received_callback = call.data  # "&city=London$"
streets = ["Baker Street", "Oxford Street", "Abbey Road", ]
kb_streets = Keyboa(
    items=streets,
    front_marker="&street=",
    back_marker=received_callback  # we added existing data to the end
)
bot.send_message(chat_id=user_id, text="Select your street:", reply_markup=kb_streets()){'inline_keyboard': [
[{
'text': 'Baker Street',
'callback_data': '&street=Baker Street&city=London$'}],
[{
'text': 'Oxford Street',
'callback_data': '&street=Oxford Street&city=London$'}],
[{
'text': 'Abbey Road',
'callback_data': '&street=Abbey Road&city=London$'}]
]}💡 Notice that we used a front_marker to specify the type of current items, and a back_marker to attach existing information.
As you can see, the variant selected by the user in the previous step was also saved.
If the user selects a street, for example, Baker Street, we will receive the call.data as '&street=Baker Street&city=London$'. Of course we are able to parse it easily.
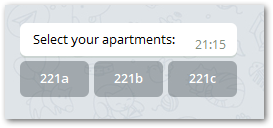
Finally, let him to choose an apartment:
received_callback = call.data  # '&street=Baker Street&city=London$'
apartments = ["221a", "221b", "221c", ]
kb_apartments = Keyboa(
    items=apartments,
    front_marker="&apartments=",
    back_marker=received_callback  # we added existing data to the end
)
bot.send_message(chat_id=user_id, text="Select your apartments:", reply_markup=kb_apartments()){'inline_keyboard': [[
{'text': '221a',
'callback_data': '&apartments=221a&street=Baker Street&city=London$'},
{'text': '221b',
'callback_data': '&apartments=221b&street=Baker Street&city=London$'},
{'text': '221c',
'callback_data': '&apartments=221c&street=Baker Street&city=London$'}
]]
}And if the user selects button 221b, we will assume that 🕵🏻♂️ Mr. Sherlock Holmes uses our bot too!
| Attribute | Type | Description |
|---|---|---|
items |
BlockItems | Mandatory. List of items for the keyboard. The total number should not be more than 100 due to the Telegram Bot API limitation. |
items_in_row |
Integer | Optional. The number of buttons in one keyboard row. Must be from 1 to 8 due to the Telegram Bot API limitation. The default value is None, which means that by default the keyboard structure depends on the grouping of items elements. |
copy_text_to_callback |
Boolean | If True, and button_data is a str or an int, function will copy button text to callback data (and add other markers if they exist).The default value is True. |
front_marker |
CallbackDataMarker | Optional. Front part of callback data, which is common for all buttons. |
back_marker |
CallbackDataMarker | Optional. Back part of callback data, which is common for all buttons. |
alignment |
Boolean or Iterable | If True, will try to split all items into equal rows in a range of 3 to 5.If Iterable (with any int in the range from 1 to 8), will try to find a suitable divisor among them.Enabled attribute replaces the action of items_in_row attribute, but if a suitable divisor cannot be found, function will use the items_in_row value if provided.The default value is None. |
alignment_reverse |
Boolean | If True, will try to find the divisor starting from the end of the auto_alignment variable (if defined) or from the default range.Enabled attribute works only if auto_alignment is enabled.The default value is None. |
# structureless sequence of InlineButtonData objects
FlatSequence = List[InlineButtonData]

# structured sequence of InlineButtonData objects
StructuredSequence = List[Union[FlatSequence, InlineButtonData]]

# unified type that allows you to use any available data types for the keyboard
BlockItems = Union[StructuredSequence, InlineButtonData]| Attribute | Type | Description |
|---|---|---|
button_data |
InlineButtonData | An object from which the button will be created. See detailed explanation below. |
front_marker |
CallbackDataMarker | Optional. An object to be added to the left side of callback. |
back_marker |
CallbackDataMarker | Optional. An object to be added to the right side of callback. |
copy_text_to_callback |
Boolean | If True, and button_data is a str or an int, function will copy button text to callback data (and add other markers if they exist).The default value is False. |
All acceptable types combined into InlineButtonData type:
InlineButtonData = Union[str, int, tuple, dict, InlineKeyboardButton]Also there is a CallbackDataMarker type for callback data:
CallbackDataMarker = Optional[Union[str, int]]For button_data object --
- If it is a
stror anint, it will be used for text (and callback, ifcopy_text_to_callbackis not disabled). - If it is a
tuple, the zero element [0] will be the text, and the first [1] will be the callback. - If it is a
dict, there are two options:- if there is no "text" key in dictionary and only one key exists, the key will be the text, and the value will be the callback.
In this case no verification of the dictionary's contents is performed! - if the "text" key exists, function passes the whole dictionary to
InlineKeyboardButton, where dictionary's keys represent object's parameters and dictionary's values represent parameters' values accordingly. In all other cases theValueErrorwill be raised.
- if there is no "text" key in dictionary and only one key exists, the key will be the text, and the value will be the callback.


