An automatic robot car project for EIE3106 student study in PolyU.
This repo contains the program code of the demo.
Project date: Sem 02, 2021/2022
Upload date: 2/11/2023
Last update: 4/11/2023
This project is an integrated hardware-software project, that covers soldering to programming. Student is required to implement the program to complete specific tasks with the given robot car autonomously.
MCU for robot car: STM32F103C8T6 Download the hex file to the car: STM32flash Power source for robot car: Li-ion battery (18650) MCU for joypad: Arduino (atmega328p) Communication between joypad and robot car: Bluetooth module(HC05 and HC06)
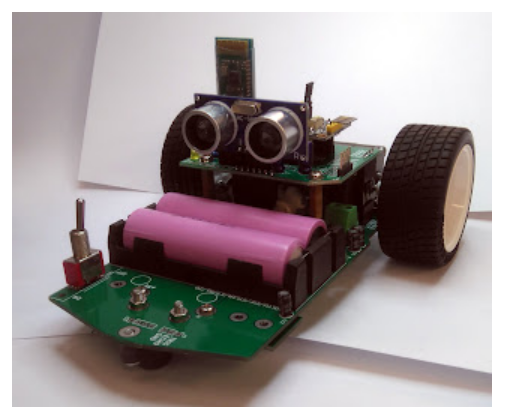
This is the picture captured from Mr Lam's website:https://eie3105p2.blogspot.com/2021/02/programming-robot-car.html
A part of mark in this demonstration 1 is for hardware development, some PCB soldering is needed for the robot car and the remote control. Another mark is for software development, and there is two product in this demo.
Program code to show that you can remotely control the movement for the car.
Need to write a program for the joypad, the joypad can sense the button which is pressed, and send a command remotely to the car.
Another program is needed to write for control the movement of the car according to the command from the remote control.
You can find the source code from demo01-remoteControl-AVR for the joypad and demo01-remoteControl-ARM for the robot car.
For the PWM control
| Function | Device | Pin |
|---|---|---|
| Left wheel (Forward) | TIM1_CH1 | PA8 |
| Left wheel (Backward) | TIM1_CH1N | PB13 |
| Right wheel (Forward) | TIM1_CH2N | PB14 |
| Right wheel (Backward) | TIM1_CH2 | PA 9 |
| Counter (Left wheel) | TIM4_CH2 | PB7 |
| Counter (Right wheel) | TIM2_CH2 | PA1 |
If you want to control the car move forward, set values to TIM1_CH1 for left wheel and TIM1_CH2N for right wheel, vice versa.
Turn Direction:
if(( left-wheel speed > right-wheel speed) and (two wheel move forward both))
then turn right and move forward
if(( right-wheel speed > left-wheel speed) and (two wheel move forward both))
then turn left and move forward
For another hardware configuration, you might observe the silkscreen on the PCB and refer to the note.
| Function | Device | Pin |
|---|---|---|
| LED (yellow) | LED_YELLOW | PA0 |
| LED (blue) | LED_BLUE | PB12 |
| LED (Green) | LED_GREEN | PB6 |
| Button | BUTTON | PA12 |
| SPI1 | SPI1_SCK | PA5 |
| SPI1 | SPI1_MISO | PA6 |
| SPI1 | SPI1_MOSI | PA7 |
| USART 3 | USART3_TX | PB10 |
| USART 3 | USART3_RX | PB11 |
| SR04 Trigger | TIM1_CH3N | PB15 |
| SR04 Echo | TIM1_CH3 | PA10 |
| USART2 | USART2_TX | PA2 |
| USART2 | USART2_RX | PA3 |
Program code to show that you can get a reading from the ultrasonic sensor when you put an object in front of the car, and then Tera Term will show the distance between the object and the ultrasonic sensor. You can find how the ultrasonic sensor works in the internet. Here is a simple explanation of getting distance from ultrasonic sensor. You may find the program code from demo01-testDistance.
Based on the formula Distance = speed * time, the ultrasonic wave speed at room condition is 330 m/s, and the ultrasonic sensor can get the time from sending the US wave to receiving the wave (This part please refers to the resource from the internet and the course note). Therefore, now you can get the distance. In the project, I use PWM input capture to get the time.
The task is to track the specific path.
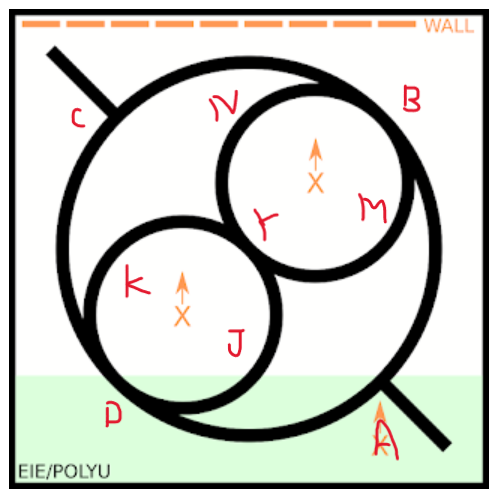
Route: A-> B-> C-> D-> A-> B-> Y-> D-> Y-> B-> C-> D-> A
To achieve the goal of following the path automatically, the robot car should be able to detect the track. Thus, the MCU can use the information collected by the Infrared phototransistors to control the robot car. The MCU also use the timer to determine the position of the car.
Demo video: Video Link
The module of infrared LED and phototransistors is used to perform track detection. When the ground is white, the IR ray is reflected to phototransistors and the signal ‘0’ is generated. When the ground is black, the IR ray is absorbed and the signal ‘1’ is generated. Therefore, the ground information can be collected precisely by this module. And using shift register 74HC299, the 8-bit data generated by the module is shifted to the MCU via SPI serial port.
After the reading from phototransistors is acquired through SPI communication, the wheel speed should be adjusted by modifying the PWM of the motor control signal. If the duty cycle of the PWM pulse increase, the motor speed increases, and vice versa. Hence, the robot car can control its moving direction by adjusting the difference between left and right motors’ duty cycle. For this task, the duty cycle is controlled by the following strategy.
- The MCU will check the data from the module and get the error value. The error value for PD controller is computed as the following table. This table reflects the derivation between the current location and target location, i.e., if the moving direction is correct, the error value should be smaller. Due to the reason of the track is wide enough for three phototransistors to detect, the position value will use combination to present.
| Position Value (Hex) | 80 (Most left) | C0 | E0 | 70 | 38 | 1C | 0E | 07 | 03 | 01 (Most right) | FF | |
|---|---|---|---|---|---|---|---|---|---|---|---|---|
| Error | -12 | -9 | -6 | -3 | -1 | 0 | 3 | 6 | 9 | 12 | -11 |
-
0xFF is for point A and point C, because error value could be ‘0’ if I do not add this if-conditional statement. It can optimize the performance in task 2 effectively.
-
Then, the duty cycle is calculated by using the formula.
PWMleft = basic speedleft + 𝑘𝑝 ×𝑒𝑟𝑟𝑜𝑟 + 𝑘𝑑×(𝑒𝑟𝑟𝑜𝑟−𝑙𝑎𝑠𝑡 𝑒𝑟𝑟𝑜𝑟)
PWMright = basic speedright − 𝑘𝑝 ×𝑒𝑟𝑟𝑜𝑟 − 𝑘𝑑×(𝑒𝑟𝑟𝑜𝑟−𝑙𝑎𝑠𝑡 𝑒𝑟𝑟𝑜𝑟)
If the car deviates to left, the sensor will return a value of ‘01’ and the corresponding error is ‘12’. To return the line, the speed of left wheel could be larger while the right wheel’s speed could be smaller. Thus, the formula can follow this logic, i.e., duty cycle of left wheel is larger, and vice versa. The basic speed can confirm the car can forward if there is no error. The kp-term of PD controller decides the adjustment strength according to the error. The kd-term of PD controller can increase the response.
In this task, with the given SR04 ultrasonic module, the MCU can get the distance between the robot car and the wall. Then, the car can move forward at different speed according to the distance. When putting the car in three specific positions, MCU can control the car to get close to the wall but not hit the wall. You can get the code from demo03-carParking.
The flowchart for this task is shown in Figure 1.
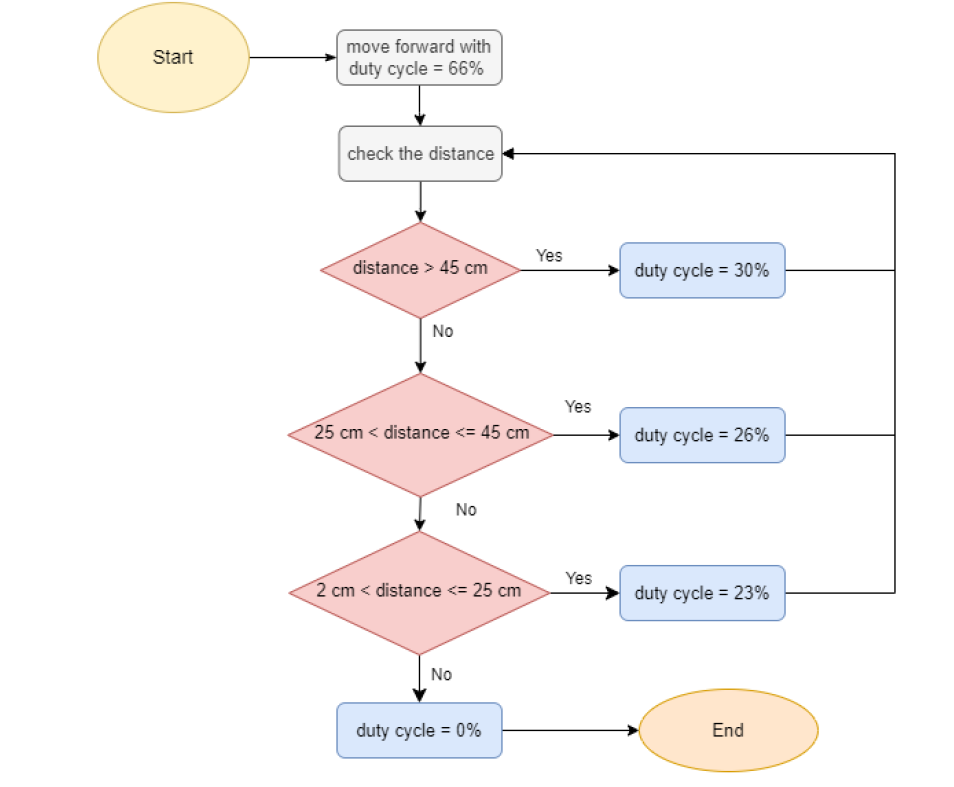
Figure. 1: The flowchart for car parking
Car 1 (at A): A-> B-> C-> D
Car 2 (at D): D-> E-> F-> G-> H-> A-> B-> C-> D
Car 1 (at D): D-> E-> F
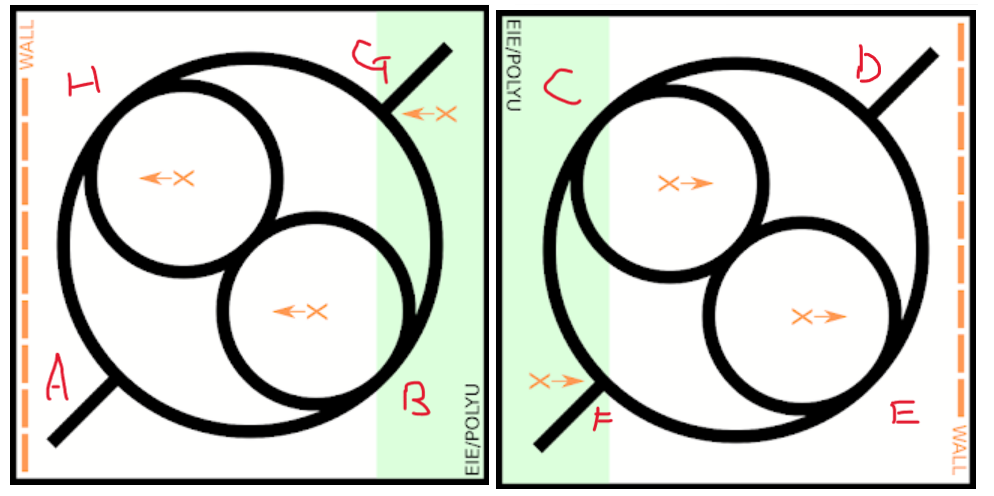
In this task, I combined the method of “Line Tracking” and “Car parking”.
For car 1, it follows the track at the beginning until the counter reaches a specific value. The car can cross the map and continue tracking the path for a distance. Then, it waits for car 2 to exit by using the SR04 module to detect. After car 2 exits, car 1 can move and turn to wait for car 2 to come. When it detects car 2 coming, it can turn and finish the track.
For car 2, it waits for car 1 to come and turn anticlockwise for specific wheel counter value. And it follows the line as same as car 1.
You can find the code from demo04-relayRace-car01 and demo04-relayRace-car02.
Demo video: Video link 1 Video link 2
I found that there are some uncontrollable factors when doing this task. For example, motor damage and battery power. To solve them, I try to use PID controller to control the car speed. This is the algorithm for PID controller shown in Figure 2. This effectively improves the performance and stability of the robot car, compare with “Line tracking”. Its speed is not easily affected by battery life.
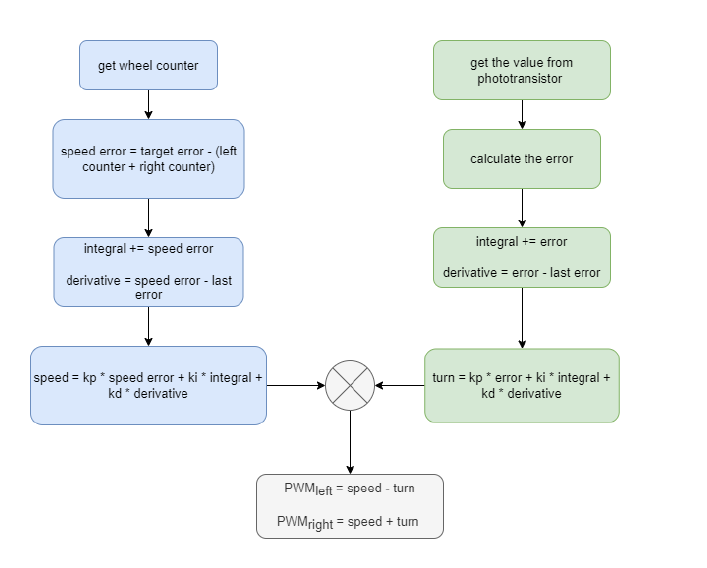
Figure2. algorithm for PID controller
Unlike “Line Tracking”, the robot car mainly uses the counter to determine which position it is at. Because I found that using timer cannot determine the position in particular. This can also reduce the influence of the map more effectively.
You may get another reference and code for this project, by searching keywords EIE3105 or EIE3106 in GitHub.
These are other useful website.
- https://jackedu.blogspot.com/2015/06/ardublockmotoduino.html for the principle of how the two-wheel car move and turn direction.
- https://mbotandstem.blogspot.com/2017/04/mbot-line-follow-car.html
For the joypad, you might need to apply the knowledge of debouncing the switches by using software and how the keyboard works.
For the car, just use the knowledge that you have learned in class. If you have finished the lab exercise, this part could be easy to you. And remember not to configure too large value to the motor, the car will run too fast and crash into the wall, the component on the car may be damaged.
If you need to configure the Bluetooth module, you may try to use Arduino IDE. This is more convenient than using Tera Term and has more resource found in the internet.
I did this part not well. My car is definitely not controlled by a PID controller, because the car would be affected by battery life and motor damage, etc. The car could not be adjusted based on the above factors. And I use flag and state to estimate the car position. The program will change the control strategy in each state. Besides, I found a lot of uncontrollable factors in this demo. The car could not run probably every time. Fortunately, I finished this part.
Not much experience can provide. I used different speed according to the distance between the car and the wall. In the procedure, the car uses SR04 to detect the distance and change the speed when closing the wall.
But I think the PID controller can be applied, the distance can be estimated as an error. If the car is far from the wall, the error could be larger so that the car will run faster until the car is close to the wall. In this progress, the car will adjust its speed automatically and dynamically.
(Have another idea on this, maybe based on the distance, the program can count how many counts are needed for the wheel counter, and control the car to move forward faster until the car runs for the calculated counts.)
Mr Lam helped me a lot in this part. In my opinion, you should use the wheel counter to measure and predict the position where the car is at. And reduce to use timer, because the timer may be affected by the car's speed, battery life related to speed, etc. You may find a spot on the wheel, when the spot goes for a revolution, the counter would be 60, depending on the motor. You may ask for Mr. Lam or other tutors.
Unlike demo02, I did not use states to check the position. This program uses counter to estimate the position. For example, this program uses bool check_count(unsigned int counter) to find whether the car goes to a specific position during line tracking. Because the length of the route is fixed if you put the car and the car track the line probably. When it returns true, it means that it runs a fixed distance and the car position could be fixed every time.
This program just focuses on the wheel counter and the procedure of route, not flag and states.
- Thanks for Mr Lam's help and suggestion during this project!
- Please try by yourselves first, this will be an interesting and amazing experience for you.
- This report is just for reference only. Please do not directly copy or modify without acknowledgement may result in paragrism.
- Have a fun and enjoy this project!!
