This project is a learning result of a training on Meachine Learning. It's a simple(is or is not) image classify framework, using deep learning Convolutional Neural Network, contains tools for:
- gathering dataset images for training
- single or batch model training -- this step consume most of your time
- examine and deploy trained model with http access
This project was create with Python 2.7.14, and not checked on Python 3.x
It's recommand to create a virtual environment for the experiment, to keep your local machine clean, to create virtual environment, please check the User Guide of virtualenv.
All required package were listed in the requirements.txt, use this command in the root folder of project to install them:
pip install -r requirements.txt
That's it, you've prepared.
-
Read the
getDataSet.md, to obtain URL lists for both is and is not images -
Download them into different directories, for a list with name
yes-urls.txt, the command can be:python download_images.py -u yes-urls.txt -o images/yes hello from download_images.py gonna save to: images/yes file line count: 10 url count: 6 [INFO] downloaded: images/yes/00000005.jpg [INFO] downloaded: images/yes/00000000.jpg [INFO] downloaded: images/yes/00000002.jpg [INFO] downloaded: images/yes/00000003.jpg [INFO] downloaded: images/yes/00000001.jpg [INFO] downloaded: images/yes/00000004.jpg 3 in 6 files removed. -
Do the same on the
no-urls.txt, only save them into another directory asideyes -
Check all your dataset images, to remove invalid images, non-target image in
yesdirectory, and target image in other directories.
- The only MUST BE directory name is
yes, it'll be used by the training step to determine the target object, the others directory can benoor anything you want. - The downloader script will remove those invalid images if they:
- Can not be
imreadby cv2 - Have a same MD5 hash value with existing image
- Can not be
The Neural Network was defined in the nn/mycnn.py, you should edit it or use another python module to create your own Neural Network, don't forget to edit train_network.py for importing Neural Network from your own module, if you do have your own module.
To train your network can use the train_network.py with this command:
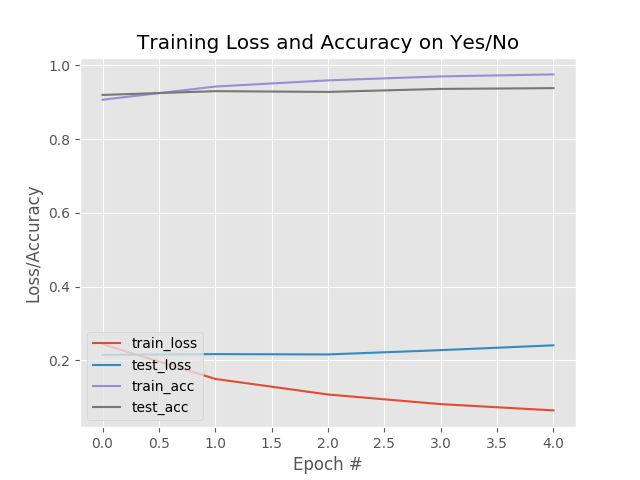
python train_network.py -d images/ -m guitar_modelafter training, if you didn't changed the default output path, the model will be stored in folder output, along the training information plot image:

Or you can edit the batch_train.py, all editable variables are obvious, just insert your desired values, and the command is a little shorter:
python batch_train.pythe models stored in the same output location of train_network.py, but with this script, you get all models with combination of those variables, I just run this command and sleep, and check the result plot images on the morning.
To test the trained model, you can use the test_network.py script, just specify the trained model, yes label, and image for testing:
python test_network.py  -m output/guitar -l Guitar -i images/testing/no/00000200.jpg
Using TensorFlow backend.
[INFO] loading network...
prob is:0.99967110157, 0.000328877591528
Not Guitar: 99.97%
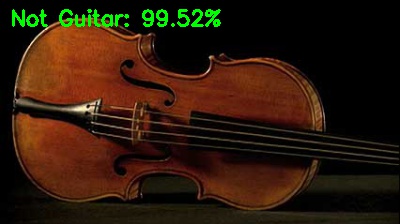
you can read the probability of both yes and no on the command line, and the label choosed by model on the result image like this:
 to close the image, click on the image, and press any key on the keyboard.
- If you choosed a different
train_image_sizeother then default value28, don't forget to specify it with the option-s.
It's tolerable to test with command line, but not convenient, to drag & drop image for testing, you can use the web_test.py script:
python web_test.py -m output/guitar_EPOCHS5_LR0.001_BS32_TIS28_DSS1952 -l GuitarThe options are same as test_network.py, just no image path needed, and this start a web server on http://127.0.0.1:5000/, open it with your favourite web browser, just drag a test image, and drop in to the red square with Drop Here in it, the result image will be shown on the right side of it.
With the web_test.py script, we have a web server listening on the 5000 port on the localhost interface, the only thing you need to publish it is a reverse proxy server like Nginx or Apache, that's beyond the topic of this project, please search and check related documents.
- How to create a deep learning dataset using Google Images
- Image classification with Keras and deep learning
I can't understand these tutorials Without the knowledge learning from this training, the core concept of this project is the same as those tutorials, but I adapted them, to make it generic, not only used on the Santa Clause recognizing.