Building a Continuous Deployment GitOps Pipeline to EKS
This tutorial describes how to set up a basic GitOps deployment pipeline with Flux and GitHub actions. It uses the Kubernetes Guestbook application and also adapts a GitHub Actions pipeline originally developed by Jeremy Adams and John Bohannon of GitHub.
Note: This tutorial is now updated with Flux version 2. You can find instructions for that here
What do we need for GitOps on AWS?
These are the tools that you’ll be working with in order to create a basic GitOps pipeline for application deployments or even for cluster components. If running this in production, you might also need an additional component to scan your base images for added security.
| Component | Implementation | Notes |
|---|---|---|
| EKS | EKSctl | Managed Kubernetes service. |
| Git repo | https://github.com/abuehrle/guestbook | A Git repository containing your application and cluster manifests files. |
| Continuous Integration | GitHub Actions | Test and integrate the code - can be anything from CircleCI to GitHub actions. |
| Continuous Delivery | Flux | Cluster <-> repo synchronization |
| Container Registry | AWS ECR Container Registry | Can be any image registry or even a directory. |
| GitHub secrets management | ECR | Can use Sealed Secrets or Vault.In this case we are using Elastic Container Registry (ECR) which provides resource level security. |
Before you begin:
You will need to sign up for the following services:
- AWS account with the ability to create EKS clusters
- GitHub account
- ECR Container Registry (we'll step through this below)
In this example, you will install the standard Guestbook sample application to EKS. Then you’ll make a change to the look of the buttons and deploy it to EKS with GitOps.
Part 1: Fork the Guestbook app repository
You will need a GitHub account for this step.
- Fork and clone the repository:
abuehrle/guestbook - Keep the repo handy as you’ll be adding a deployment key to the repo that Flux requires as well as a few credentials once you have your ECR AWS container registry set up.
Part 2: Create an EKS cluster and install Weave Flux:
- Set up permissions for eksctl:
-
Authenticate your cli and ensure your IAM credentials are set up properly before running eksctl:
- Use at least version 1.17 of the AWS cli
- Run:
aws configureto set up your credentials and the AWS region
-
To pull images from the ECR registry, you’ll need to set the correct IAM permissions for the same user that set up your cluster. You can set this from the console or from the command line:
- The AWS-managed
AmazonEC2ContainerRegistryPowerUserpolicy - must be set tocreateand topush/pull
- The AWS-managed
- Stand up the cluster:
- Download and install or update the command line tool, eksctl.
- Run
. <(eksctl completion bash) - Run
eksctl create cluster - The cluster will take a few minutes to come up.
- Once the cluster creation is completed, run:
kubectl get pods -A
You should see something like this:
NAMESPACE     NAME                       READY   STATUS    RESTARTS   AGE
kube-system   aws-node-284tq             1/1     Running   0          20m
kube-system   aws-node-csvs7             1/1     Running   0          20m
kube-system   coredns-59dfd6b59f-24qzg   1/1     Running   0          27m
kube-system   coredns-59dfd6b59f-knvbj   1/1     Running   0          27m
kube-system   kube-proxy-25mks           1/1     Running   0          20m
kube-system   kube-proxy-nxf4n           1/1     Running   0          20m
- Install Flux
Next, set up and install Flux and connect it to your repo. Once complete, this will automatically deploy the application to the cluster. However, since we haven’t set the URI for container registry in the frontend manifest, the Guestbook UI will not be deployed. You’ll do that in the next section.
Note: This example demonstrates how to install a stand-alone version of Flux. If you want to use Helm, you can also install Flux and Helm with eksctl, see eksctl and GitOps for instructions.
- Flux needs its own namespace. Create one with:
kubectl create namespace flux
- Check the cluster for the namespace:
kubectl get namespaces
NAME              STATUS   AGE
default           Active   28m
flux              Active   2m33s
kube-node-lease   Active   28m
kube-public       Active   28m
kube-system       Active   28m
- Configure Flux for the cluster. First specify the
git-usernameenvironment variable by running:
export GHUSER="git-username"
Where,
Git-username is your Github user name.
Next, run the following to connect your forked git repo to Flux:
fluxctl install --git-user=${GHUSER} \
--git-email=${GHUSER}@users.noreply.github.com \ --git-url=git@github.com:${GHUSER}/guestbook \
--namespace=flux | kubectl apply -f -
Before Flux can update and check the manifests back into Git, get Flux’s public ssh key with:
fluxctl identity --k8s-fwd-ns flux
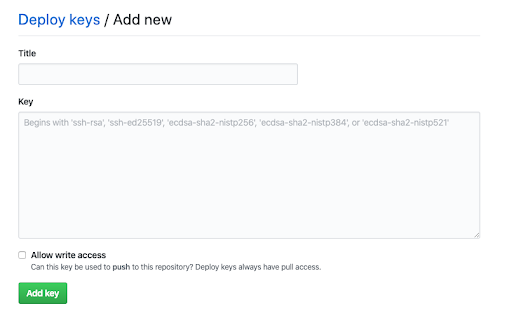
Paste the key that appears in your forked Guestbook repo by selecting Settings → Deploy Keys from GitHub. Ensure that you enable Allow write access.
If you’ve set everything up correctly, after a few minutes you should begin to the redis servers deploying and running in the cluster. Check that with:
kubectl get pods -A
Where you should see something like the following:
NAMESPACE     NAME                            READY   STATUS    RESTARTS   AGE
default       redis-master-545d695785-cjnks   1/1     Running   0          9m33s
default       redis-slave-84548fdbc-kbnj      1/1     Running   0          9m33s
default       redis-slave-84548fdbc-tqf52     1/1     Running   0          9m33s
flux          flux-75888db95c-9vsp6           1/1     Running   0          17m
flux          memcached-86869f57fd-42f5m      1/1     Running   0          17m
kube-system   aws-node-284tq                  1/1     Running   0          41m
kube-system   aws-node-csvs7                  1/1     Running   0          41m
kube-system   coredns-59dfd6b59f-24qzg        1/1     Running   0          48m
kube-system   coredns-59dfd6b59f-knvbj        1/1     Running   0          48m
kube-system   kube-proxy-25mks                1/1     Running   0          41m
kube-system   kube-proxy-nxf4n                1/1     Running   0          41m
Flux troubleshooting tips
To ensure that Flux is retrieving the images run:
kubectl logs -n flux
To see all of the commands you can run with fluxctl, for example, listing available images and workloads or changing the amount of time it takes to synchronize run:
fluxctl --help
Part 3: Setup GitHub Actions Workflow and connect to ECR container registry
In this section we will set up an ECR container registry and a mini CI pipeline with GitHub Actions. The actions build a new container on a git push and push it to the ECR registry. Once the new image is in the repository, and the URL for the manifest is setup, Flux does two things:
-
Updates the deployment manifest to point to the new image tag;
-
Delivers the new manifest to the cluster.
-
Open an ECR (Elastic Container Registry) account
Open an ECR account in the same region that your cluster is running. You can call the repository guestbook.
- Specify secrets for ECR
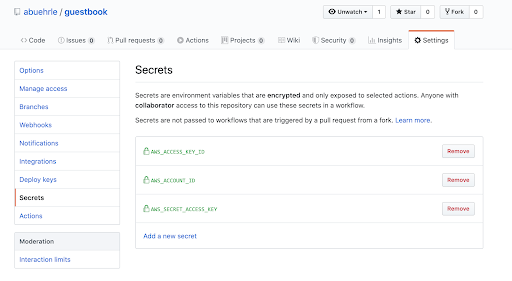
ECR is an encrypted repository and as a result any images pulled to and from it need to be authenticated. You can specify secrets for ECR in the Settings→ Secrets tab on your forked guestbook repository.
Create the following three secrets:
AWS_ACCOUNT_ID
AWS_ACCESS_KEY_ID
AWS_SECRET_ACCESS_KEY
The secret access key is found on your AWS account ID and is obtainable from the AWS console or by running aws sts get-caller-identity and the new user’s key ID and the secret key (found in your ~/.aws/credentials file).
- Configure the GitHub actions workflow
View the workflow in your repo under .github/workflows/main.yml. Make sure you have the environment variables on lines 16-20 set up properly.
16 AWS_DEFAULT_REGION: eu-west-1
17 AWS_DEFAULT_OUTPUT: json
18 AWS_ACCOUNT_ID: ${{ secrets.AWS_ACCOUNT_ID }}
19 AWS_ACCESS_KEY_ID: ${{ secrets.AWS_ACCESS_KEY_ID }}
20 AWS_SECRET_ACCESS_KEY: ${{ secrets.AWS_SECRET_ACCESS_KEY }}
Ensure that line 16 is set to the region where your EKS cluster resides. This should match the region in your ~/.aws/config or the region you specified when you ran aws configuration.
- Make a change to the app and then
git push
Let’s make a simple change to the buttons on the app and push it to Git:
Open the index.html file and change line 15:
<button type="button" class="btn btn-primary btn-lg" ng-click="controller.onRedis()">Submit</button>
To:
<button type="button" class="btn btn-primary btn-lg btn-block" ng-click="controller.onRedis()">Submit</button>
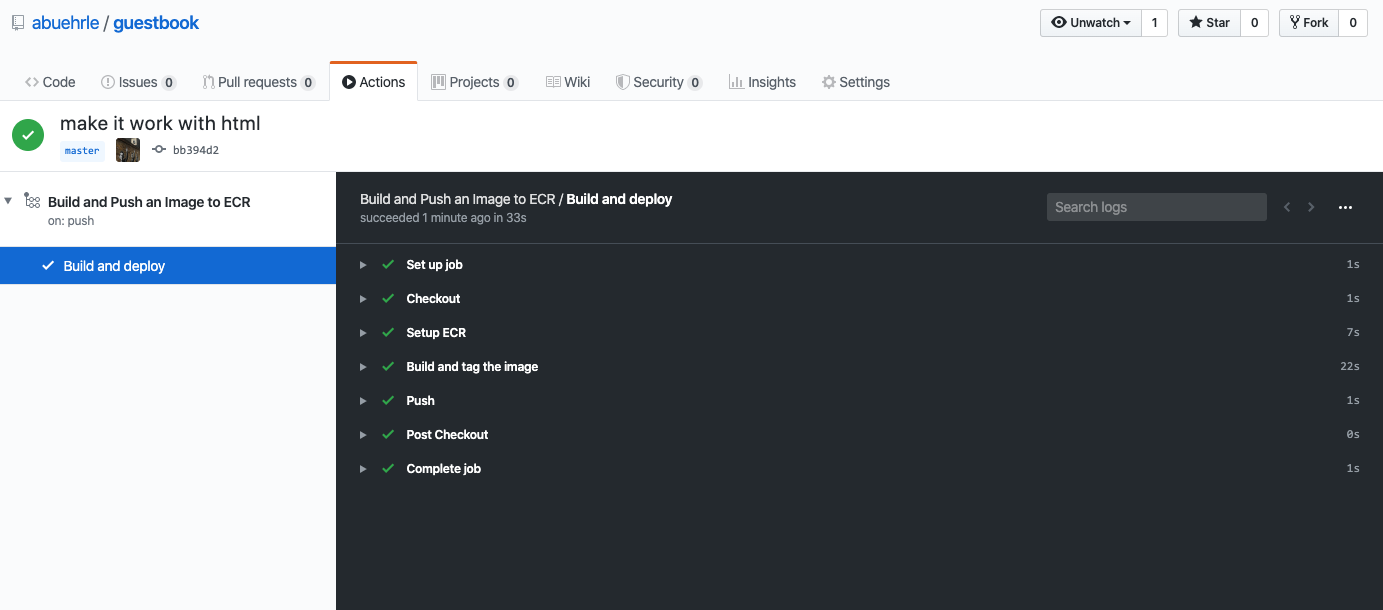
We’ll need to push an initial image to the repository and get a URI with an image to set up Flux. Once you’ve made the change to the buttons do a, git add, git commit and git push the change. Click on the Actions tab to watch the pipeline test and build the image.
- Update the frontend-deployment manifest
Update the front-end manifest to point to the initial image URI in your guestbook ECR registry.
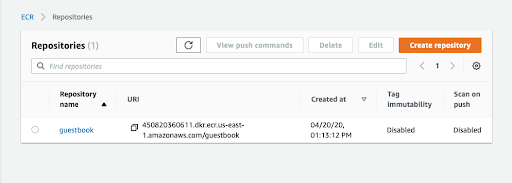
You can find the URI and an initial tag from your newly pushed image by clicking on the repository name:
Open the frontend-deployment.yaml file and add the Image URI from your ECR registry on line 22.
After you’ve made an update to the manifest, git add, git commit and git push the change.
To see the change immediately, sync Flux with the updated repo:
fluxctl sync --k8s-fwd-ns flux
And check to see that the new image is deploying:
kubectl get pods -A
NAMESPACE     NAME                            READY   STATUS    RESTARTS   AGE
default       frontend-6f9b84d75d-g48hf       1/1     Running   0          95s
default       frontend-6f9b84d75d-ncqj6       1/1     Running   0          84s
default       frontend-6f9b84d75d-v5pfs       1/1     Running   0          107s
default       redis-master-545d695785-r8ckm   1/1     Running   0          58m
default       redis-slave-84548fdbc-nk4mf     1/1     Running   0          58m
default       redis-slave-84548fdbc-vvmws     1/1     Running   0          58m
flux          flux-75888db95c-pnztj           1/1     Running   0          61m
flux          memcached-86869f57fd-hhqnk      1/1     Running   0          61m
kube-system   aws-node-bcw7j                  1/1     Running   0          67m
kube-system   aws-node-gt52t                  1/1     Running   0          67m
kube-system   coredns-6f6c47b49d-57w8q        1/1     Running   0          74m
kube-system   coredns-6f6c47b49d-k2dc5        1/1     Running   0          74m
kube-system   kube-proxy-mgzwv                1/1     Running   0          67m
kube-system   kube-proxy-pxbfk                1/1     Running   0          67m
- Display the Guestbook application
Display the Guestbook frontend in your browser by retrieving the URL from the app running in the cluster with:
kubectl get service frontend
The response should be similar to this:
  NAME       TYPE        CLUSTER-IP      EXTERNAL-IP        PORT(S)        AGE
  frontend   ClusterIP   10.51.242.136   109.197.92.229     80:32372/TCP   1m
Now that you have Flux set up, you can keep making changes to the UI, and run the change through GitHub Actions to build and push new images to ECR. Flux will automatically update the manifest with the new image tag and deploy the new image with your changes to your cluster and ramp up your software development into overdrive.
Cleaning up
To delete the cluster, run:
eksctl delete cluster --name [name of your cluster]


