A single ROM image containing six distinct tests that will aid you in developing your own CHIP-8, SCHIP or XO-CHIP interpreter (or "emulator")
Download the ROM here, give it a spin and see if your interpreter is doing the right thing! 😄
Or run the test suite in Octo to see what it should be doing 🙄 (set to "Cosmac VIP" CHIP-8 mode)
- CHIP-8 splash screen
- IBM logo
- Corax89's opcode test (improved version)
- Flags test
- Quirks test
- Keypad test
I found it hard to find reliable sources on what is the right behaviour and what is not, especially with the subtle differences between the original "Cosmac VIP" CHIP-8 and the HP84's SCHIP (or "superchip"). Now that I have written and ported a couple of interpreters as well as a few programs and games for the platform, I thought it was time to put that knowledge into code.
If you're having issues with your interpreter, you can find help in the EmuDev
discord channel #chip-8. If you discover a
problem with this test ROM, feel free to file an issue or open a pull request.
It's open source, licensed under the GPLv3, and you're welcome to contribute.
The ROM has a graphical menu to select the test you wish to run. But if you're just starting out and you have very few opcodes implemented, or if you're trying to automate your tests, you can force the ROM to immediately start a specific test. It will skip waiting for a keypress and the menu entirely. To do so:
- Load the ROM file in memory at address
0x200(512) like you normally do - Set the specific test you wish to run by loading a value between 1 and 5 in
memory at address
0x1FF(511) - Start execution of the ROM from address
0x200like you normally do
The first test is a very simple splash screen. It is very similar to the often
used IBM ROM, but it is actually a bit easier to get running. First, it doesn't
use the "add value to register" opcode (7XNN) and second it only draws aligned
sprites to the screen, so you don't have to shift the bits of the sprite to
align with your display buffer.
This first test can tell you if you're interpreting these opcodes properly:
00E0- Clear the screen6XNN- Load normal register with immediate valueANNN- Load index register with immediate valueDXYN- Draw sprite to screen (only aligned)
Run the ROM for 39 cycles to see this splash screen on the display:
The first test that is in the menu is the classic IBM ROM. If the splash screen works as expected, this test should be pretty easy to pass, but it is a rite of passage for any CHIP-8 developer.
I did not write this ROM, it's probably decades old and I'm not sure who wrote it so I can't really credit them. The code in this suite is a re-implementation in Octo-mnemonics by my own hand, but it compiles to the exact same bytes as the original.
To auto-start, load the value 1 into memory at 0x1FF, load the ROM in memory
starting from 0x200 and start your interpreter. Run the ROM for 64 cycles to
see the IBM logo on the display.
If you can see the IBM logo on the screen, you are properly interpreting these additional opcodes:
- To get to the IBM logo code from the CHIP-8 splash screen:
1NNN- JumpFX65- Load register from memory4XNN- Skip next instruction if unequal
- To show the IBM logo:
7XNN- Add immediate value to normal registerDXYN- Draw sprite to screen (un-aligned)
This ROM is also a famous one, written by Corax89. Many people use this ROM to prove to themselves that their interpreter runs as it should. However, there are a couple of minor issues with the ROM and Corax89 doesn't really seem to be maintaining this ROM anymore. So I've taken the liberty to include it in this suite, with those issues fixed and some minor cosmetic improvements.
To auto-start, load the value 2 into memory at 0x1FF, load the ROM in memory
starting from 0x200 and start your interpreter.
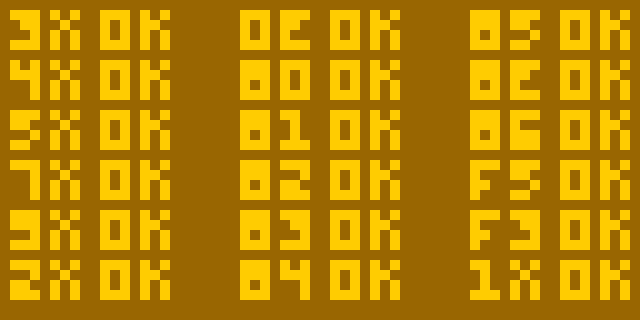
The codes on the screen correspond to the functioning of these opcodes:
3XNN	00EE	8XY5
4XNN	8XY0	8XYE
5XY0	8XY1	8XY6
7XNN	8XY2	FX55
9XY0	8XY3	FX33
2NNN	8XY4	1NNN
If you see OK, they're at least somewhat functional in the happy path. If you
see NO you can be sure that you have an issue with that opcode.
This test is an adaptation of the maths tests I
wrote for my interpreter
Silicon8. It checks to see if your math
operations function properly, but more importantly: it checks to see if you set
the flag register vF properly when running those opcodes. This is often an
issue as the flags are pretty unintuitive and fairly hard to debug.
To auto-start, load the value 3 into memory at 0x1FF, load the ROM in memory
starting from 0x200 and start your interpreter. You should see something like
this:
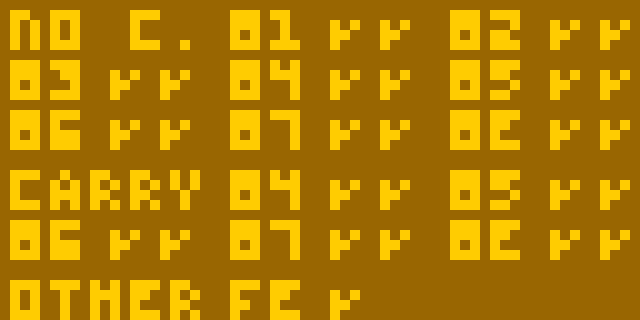
Each code on the screen corresponds to an opcode, and shows if the output value is correct (first checkmark) and if the flag is correct (second checkmark). If you see a cross instead of a checkmark in any of these spots, you have an issue in your interpreter logic.
The top part (that starts with "no c." for "no carry") checks the output values and flags of the following opcodes, in the case where we don't expect an overflow, carry or shifted out bit:
No c.  8XY1   8XY2
8XY3   8XY4   8XY5
8XY6   8XY7   8XYE
8XY1-vX |= vY8XY2-vX &= vY8XY3-vX ^= vY8XY4-vX += vY8XY5-vX -= vY8XY6-vY >>= vXorvX >>= vXdepending on version8XY7-vY =- vX8XYE-vY <<= vXorvX <<= vXdepending on version
The bottom part (that starts with "carry") checks the output values and flags of the following opcodes, in the case that there is an overflow, carry or shifted out bit:
Carry  8XY4   8XY5
8XY6   8XY7   8XYE
8XY4-vX += vY8XY5-vX -= vY8XY6-vY >>= vXorvX >>= vXdepending on version8XY7-vY =- vX8XYE-vY <<= vXorvX <<= vXdepending on version
Finally, as an added bonus, it also checks that the opcode FX1E properly adds
the value of register vX to the index register, on the row that starts with
"other".
CHIP-8, SCHIP and XO-CHIP have subtle differences in the way they interpret the bytecode. We often call these differences quirks. This test detects which quirks your interpreter implements, and if those quirks match the platform you're trying to target. This is one of the hardest parts to "get right" and often a reason why "some games work, but some don't".
To auto-start this test, load the value 4 into memory at 0x1FF and load the
ROM in memory starting from 0x200. Additionally, you can also force the target
platform by loading a value between 1 and 3 into memory at the address 0x1FE
(510). Otherwise the test asks you to choose one:
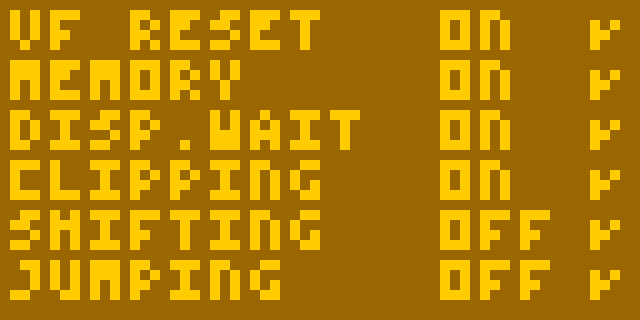
The test will now run through a couple of steps, which you will see on the screen as some garbage and a bunch of smiley faces. After about two seconds, you should see this screen:
The screen shows you if the following quirks are detected as active ("on", "off" or "err" if inconsistent or broken) and if that matches your chosen target platform (a checkmark or a cross).
vF reset- The AND, OR and XOR opcodes (8XY1,8XY2and8XY3) reset the flags register to zeroMemory- The save and load opcodes (FX55andFX65) increment the index registerDisplay wait- Drawing sprites to the display waits for the vertical blank interrupt, limiting their speed to max 60 sprites per secondClipping- Sprites drawn at the bottom edge of the screen wrap around to the top of the screenShifting- The shift opcodes (8XY6and8XYE) only operate onvXinstead of storing the shifted version ofvYinvXJumping- The "jump to some address plusv0" instruction (BNNN) doesn't usev0, butvXinstead whereXis the highest nibble ofNNN
Note that you need timer support for this test to run.
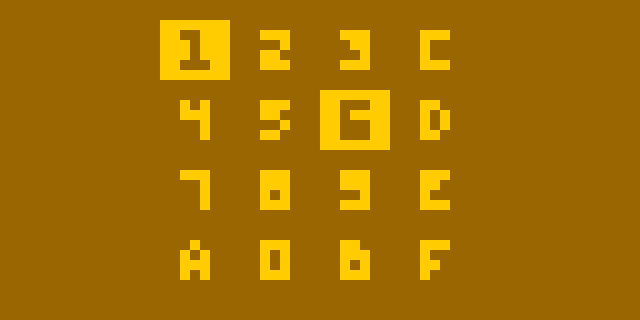
This is an implementation of a keypad test. When you press a key, the corresponding value lights up on the screen. There are more implementations of something like this, but I thought it was a valuable addition to this suite, so I wrote one.
Note that you can start any of the tests from the main menu by pressing the
corresponding number on the keypad, except for this one. That's because pressing
5 on your PC keyboard is often not mapped to any CHIP-8 keys and pressing 5 on a
CHIP-8 keyboard is generally used as an "up" key. You can however move the
cursor down to the item (usually S on PC keyboard or 8 in CHIP-8 keypad) and
select it (usually E on PC keyboard or 6 on CHIP-8 keypad).
I wanted to allow users with limited keys (like a game controller) to be able to use this ROM too, so I wanted to have the cursor and I had to make this concession. So just so you know, this is not a bug, it's a feature 😄
To auto-start this test, load the value 5 into memory at 0x1FF, load the ROM
in memory starting from 0x200 and start your interpreter.

