please read the disclaimer first. i don't want anyone to be responsible for breaking any hardware.
amigahid is a firmware for avr chips with the max 3421e usb host controller. it will enumerate keyboard devices, listen for keypresses, translate them to amiga scancodes, and send them via the amiga 500 keyboard header connector on the motherboard. no cia adapters required, it should work straight across the kbdata, kbclock and kbreset lines.
it was developed with an arduino mega 2560 adk, but if you have one of the wonderful uhs2 boards connected to the icsp port it should work on other models. i strongly suspect it will work on other atmega avr models other than the 2560 (1280 very likely). the only requirements are: max3421e on pb1/pb2/pb3, 5V avr, a 16-bit timer on timer1. it's very likely the source will only work on the mega range right now until the registers are made configurable.
it was developed with the amiga 500 in mind with the purpose of allowing an external keyboard (actually a mechanical keyboard) to be attached, and specifically since my use case is for a rehomed amiga 500 in a desktop computer case with an atx power supply. i can't recall at the time of writing whether or not the amiga 500 keyboard header is compatible with other machines but i have a strong suspicion the amiga 1000 and amiga 2000 are somewhat compatible.
this firmware uses the excellent usb host shield library, which in turn depends on the arduino library. it was developed using an arduino board and requires platformio to build. ensure python3 is installed and run:
$ pip install -U platformio
$ pio run
the firmware should be output in .pio/build/megaADK/firmware.hex and can be flashed with avrdude:
$ avrdude -U flash:w:.pio/build/megaADK/firmware.hex:i -D -P /dev/ttyUSB0 -b 115200 -p atmega2560 -c wiringif you wish to change the pins which you use to connect the arduino to the amiga, look near the top of the source (in src/amigahid.cpp). there are AMIGAHW_ definitions which declare which pins to attach the amiga 500 keyboard header to. carefully read these and attach using dupont wires or whatever your favourite patching mechanism is. if you want to relocate to pins more convenient for you, then adjust the pins but do not forget to adjust the corresponding _PORT (defines Port Output RegisTer) and _DIRREG (DDR, Data Direction Register) definitions. connect a common ground between the amiga keyboard header and the avr/arduino. this may magically spring to life.
the default mapping is: PL0 for amiga keyboard clock signal, PL2 for amiga keyboard data signal, and PL4 for amiga keyboard reset signal. if you want a simple life, just keep these defaults.
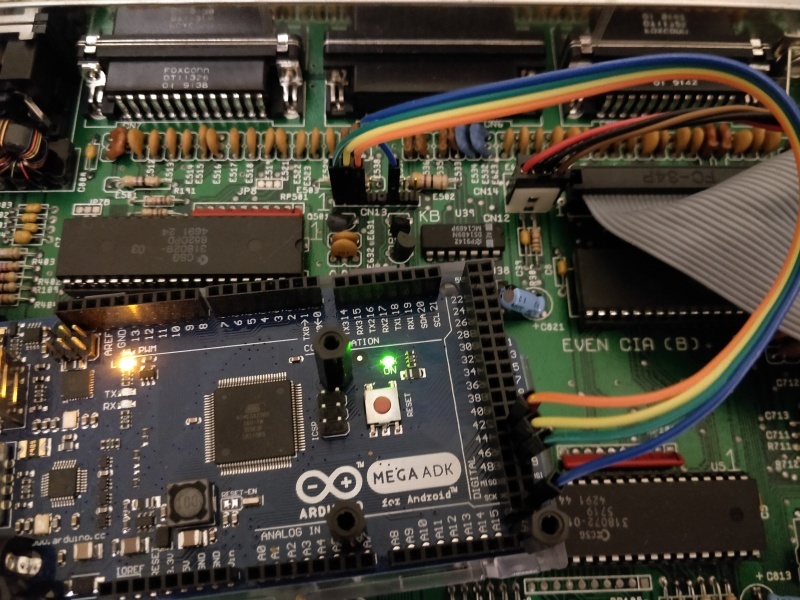
attach PL0 to amiga 500 keyboard pin 1, PL2 to pin 2 and PL4 to pin 3. attach ground on your board to pin 6.
after connecting, it may look like this:
for reference, the amiga 500 keyboard header has these mappings:
| pin# | signal | meaning | notes |
|---|---|---|---|
| 1 | kclk | clock | |
| 2 | kdat | data | |
| 3 | /res | reset | issues a hard reset |
| 4 | +5v | 5v power | |
| 5 | nc | nc | not connected (often physically absent) |
| 6 | gnd | ground | though if powering arduino/avr from psu, may be able to use that ground line |
| 7 | pwr | power | provides power to keyboard power led to indicate amiga is on/audio filter status |
| 8 | drv | drive | indicates floppy drive activity |
i do not recommend attempting to power the arduino from the keyboard header. the floppy drive header may be more suitable but i have not tested this.
this may well not work. it may cause the amiga, arduino, keyboard and your desk, curtains and walls to catch fire. the USER accepts any and all responsibility for any loss of hardware or data. the author accepts no responsibility. be careful out there. really, i'm not kidding here. amigas, particularly the venerable amiga 500, are in dwindling supply and at 30 years plus of age it makes sense to think of their safety. take whatever precautions you need to, double/triple/quadruple check EVERYTHING and then get a friend to double/triple/quadruple check everything.
you have been warned. seriously, i hope it works.
my utmost thanks to:
- the arduino project: homepage
- the authors of the usb host shield library: homepage
- teemu leppänen's wireless-amiga-keyboard source, for which i owe a debt of gratitude: homepage
- platformio for their excellent framework to help grow larger projects outside of the arduino ide: homepage
this software builds on the backs of giants. originally, this was ~650 lines of mashed up C++-ish code but the real heroes are the people who wrote the libraries i used. the amount of effort put into this pales in comparison to their contribution, so it stands to reason (to me, at least) that this remain GPL v2.
nine <nine@aphlor.org>
i make no apology for the waffling comments in the source code: hopefully someone will one day read them and think "actually, that may be useful". or turn them into a book. or use them as an example of what not to do in source code. or all of the previous things.
