Trapster Community is a low-interaction honeypot designed to be deployed on internal networks. It is built to monitor and detect suspicious activities, providing a deceptive layer to network security.
Visit the Trapster website to learn more about our commercial product, which includes advanced features like pre-configured hardened OS, automatic deployment, webhook, and SIEM integration.
- Deceptive Security: Mimics network services to lure and detect potential intruders.
- Asynchronous Framework: Utilizes Python's
asynciofor efficient, non-blocking operations. - Configuration Management: Easily configurable through
trapster.conf. - Expandable Services: Add and configure as many services as needed with minimal effort.
- HTTP Honeypot Engine with AI capabilities: Clone any website using YAML configuration, and use AI to generate responses to some HTTP requests.
Trapster uses a configuration file located at data/trapster.conf. Ensure the configuration file is correctly set up before running the daemon.
You can add as many services as you want, even multiple services of the same type.
You should also change the interface name, Trapster uses that to discover the IP address it should bind to. On linux, you can type ifconfig or ip a.
To install Trapster, clone the repository and use setup.py to install the dependencies:
git clone https://github.com/0xBallpoint/trapster-community/
cd trapster-community
python -m venv venv
source ./venv/bin/activate
python setup.py install

python3 main.py -h
python3 main.pyTo create & start a Trapster service, you need to run the following commands.
It will download the project in /opt/trapster-community, and create a config directory in /etc/trapster-community.
You can then start and stop the service using the service command.
git clone https://github.com/0xBallpoint/trapster-community/ /opt/trapster-community
cd /opt/trapster-community
python -m venv venv
source venv/bin/activate
python3 setup.py install

mkdir /etc/trapster-community/
cp /opt/trapster-community/trapster/data/trapster.conf /etc/trapster-community/

echo '[Unit]
Description=Trapster Community
After=network-online.target

[Service]
Type=simple
ExecStart=/opt/trapster-community/venv/bin/python3 /opt/trapster-community/main.py -c /etc/trapster-community/trapster.conf
Restart=always
RestartSec=20

StandardOutput=append:/var/log/trapster.log
StandardError=append:/var/log/trapster.log

[Install]
WantedBy=multi-user.target' > /etc/systemd/system/trapster-community.service

service trapster-community start
service trapster-community statusYou can also use docker compose to run and start trapster. It will use you host network.
git clone https://github.com/0xBallpoint/trapster-community/
cd trapster-community
docker compose up --buildEach module can generate up to four types of logs: connection, data, login, and query.
connection: Indicates that a connection has been made to the module.data: Represents raw data that has been sent, logged in HEX format. This data is unprocessed.login: Captures login attempts to the module. The data field is in JSON format and contains processed information.query: Logs data that has been processed and does not correspond to an authentication attempt. The data field is in JSON format and contains processed information.
By default, each log entry is printed on the standard output, in JSON format. You can change the way logs are generated by changing the logger name in the config file.
For example, to log entries to a file, you can use the FileLogger class:
{
  ...
  "logger":{
    "name": "FileLogger",
    "kwargs":{
        "logfile": "/var/log/trapster-community.log"
    }
  }
  ...
}
You can then run an ELK (Elasticsearch, Logstash, Kibana) stack to explore them efficiently.
It is also possible to send the logs to an API using
{
  ...
  "logger":{
    "name": "ApiLogger",
    "kwargs":{
        "url": "http://1.2.3.4:8000/api/v1/log",
        "headers": {
            "SpecialHeader1": "header value"
        }
    }
  }
  ...
}
The HTTP module can emulate any website. It works with YAML configuration files to match requests using regular expressions, and can generate responses using either a template or an AI model.
The configuration are stored in trapster/data/http, each folder represent a website. An example of the functionnalities can be found at trapster/data/http/demo_api/config.yaml
Structure:
- config.yaml: contains the configuration for the website.
- files/: contains the static files for the website.
- templates/: contains the templates for the website, it supports jinja2 syntax.
To generate responses, you can use the ai field in the configuration. For now, it uses OVHCloud AI Endpoints as it is still free, and in alpha.
The file trapster/modules/libs/ai.py contains the code to generate responses using the AI model. It is still very basic, and will be improved in the near future.
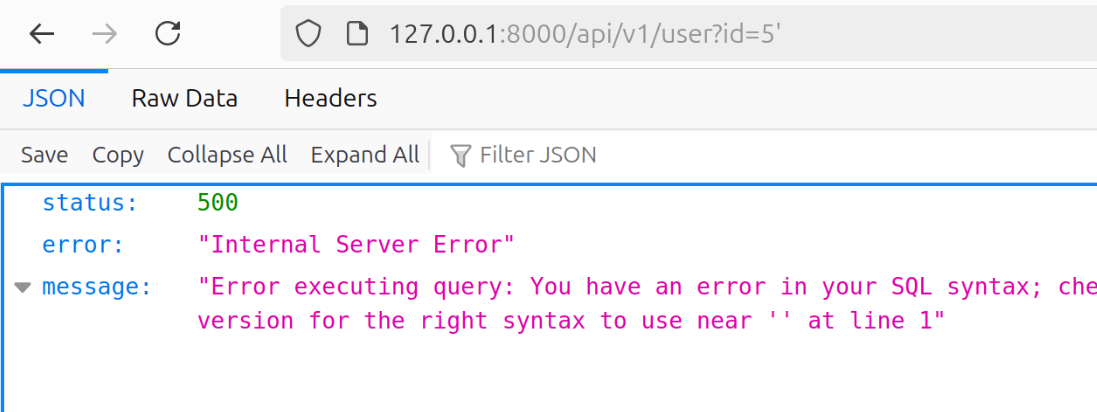
For example, this image show a request to capture SQLi attempts, and the response generated by the AI model.
Contributions are welcome! Please follow these steps:
- Fork the repository.
- Create a new branch (git checkout -b feature-branch).
- Make your changes.
- Commit your changes (git commit -m 'Add new feature').
- Push to the branch (git push origin feature-branch).
- Create a pull request.
Trapster is licensed under the GNU Affero General Public License v3 or later (AGPLv3+). See the LICENSE file for more details.


