Live data from your PSA vehicle (Peugeot, Citroën) on your smartphone or tablet, directly from the VAN bus.
- Screenshots
- Description
- Technical Details
- Schematics
- Building the Project
- Hints and tips
- Used Libraries
- Work to be Done
- Frequently Asked Questions
- References
- License
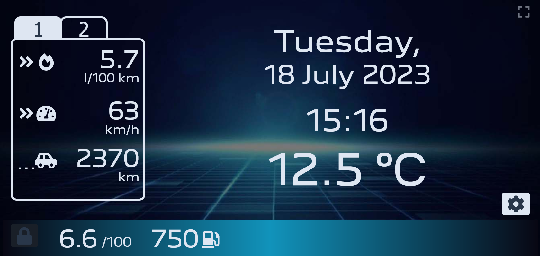
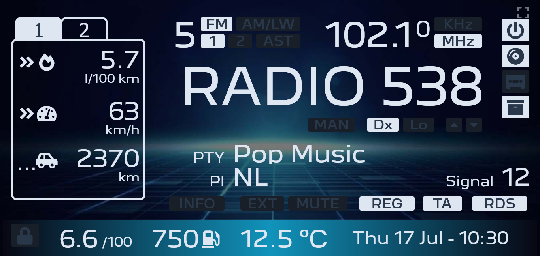
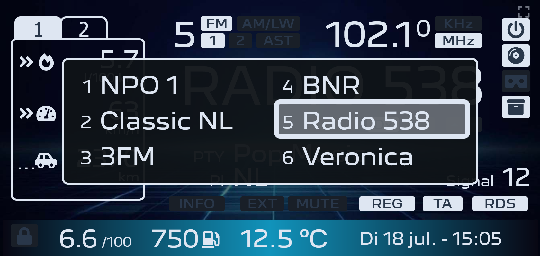
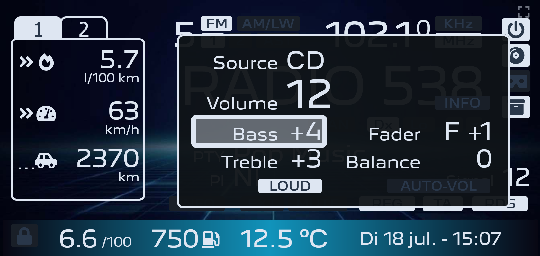
Don't bore us, give us the screenshots!
👉 See some exciting live videos and pics at https://drive.google.com/drive/folders/1PScPrWulKUc7Rnl3Ug-_TO_tbdkDwQCP !
Main entry screen:
Tuner:
Tuner presets popup:
Audio settings:
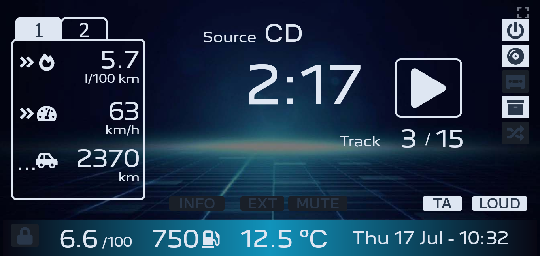
CD player:
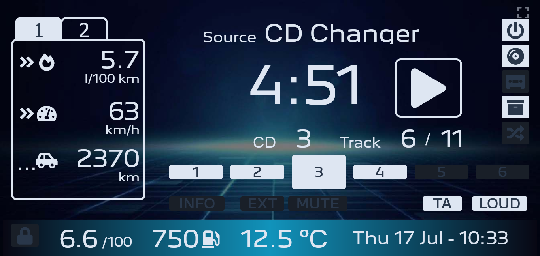
CD changer:
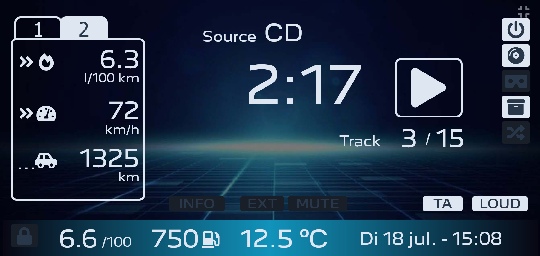
Second trip counter:
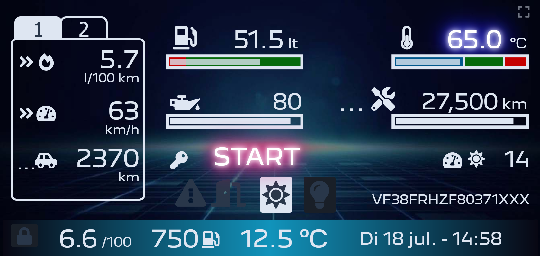
"Pre-flight" checks:
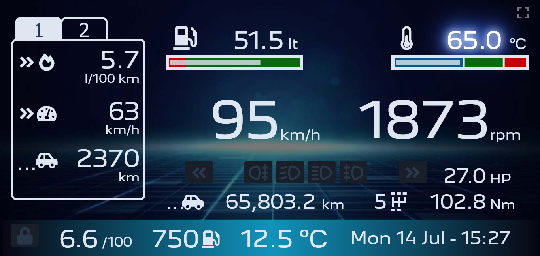
Instrument cluster (YMMV 🤣):
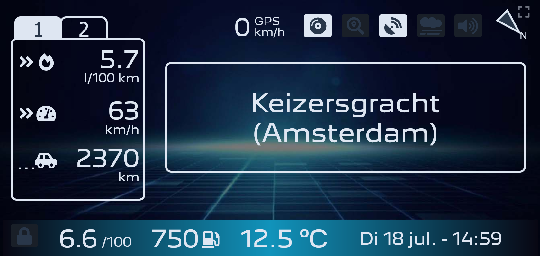
Current location:
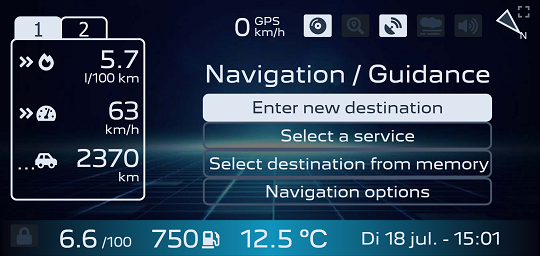
Sat nav main menu:
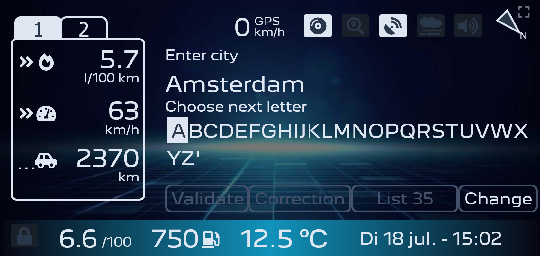
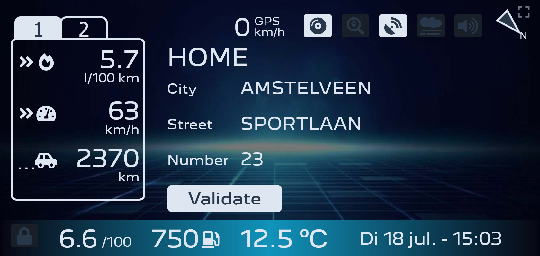
Sat nav enter destination - city:
Sat nav - personal address entry (not mine!):
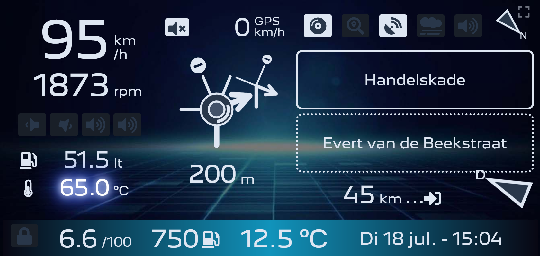
Sat nav guidance:
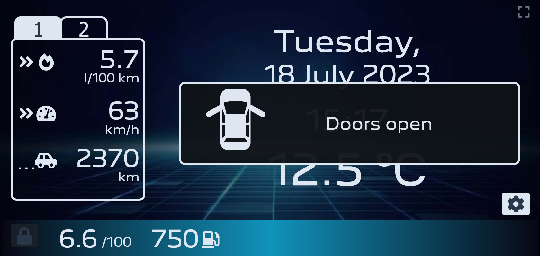
Door open popup:
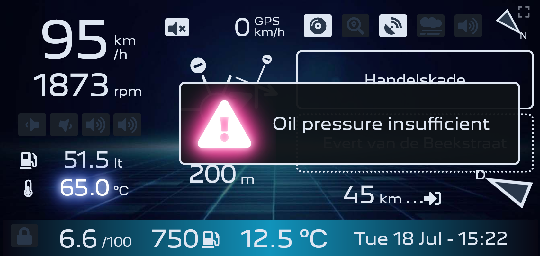
Warning popup:
This application creates a Wi-Fi access point to which you can connect with your smartphone. It contains a captive portal so as soon as you are connected a message gets displayed on your phone to log in. If you tap the message, a browser opens, giving a live visual display of the data as read from the VAN bus.
- The SSID of the Wi-Fi access point is: "PSA display AP" (with the spaces, without the quotes)
- No password is needed.
Of course you can modify the SSID and choose your own password by editing the Config.h
file.
See also the screenshots above.
- Clock with exterior temperature
- Instruments (speed, RPM, fuel level, engine temperature, lights and indicators)
- "Pre-flight" checks (oil and fuel level, engine temperature)
- Odometer and trip counters
- Live fuel data (consumption, remaining distance)
- Radio (tuner)
- Cassette tape player (well... even CD is vintage these days 😉)
- Head unit internal CD player
- CD changer unit
- Notifications and warnings
- Satellite Navigation (maps are out of date but it's a nice gimmick 😇)
- Multiple languages: English, French, German, Spanish, Italian and Dutch
- Setting color theme and brightness
- Setting format and units
👉 Note: availability will depend on your vehicle's configuration.
Will not support:
- Setting date and time: your smartphone already knows...
In the beginning of 2000's the PSA group (Peugeot and Citroën) used "VAN" bus as a communication protocol between the various comfort-related equipment. Later, around 2005, they started to replace this protocol in their newer cars with the CAN bus protocol, however some models had VAN bus inside them until 2009. This overview lists vehicles that are supposedly fitted with a VAN (comfort) bus.
The application will tap in on the vehicle's VAN bus and visualize the captured data in a browser on your smartphone, tablet, laptop or any other device that runs a web browser. The application will run on any ESP8266 / ESP8285 based board, e.g. Wemos/Lolin D1 mini is supported.
The application will host a HTML web page on standard port 80. It will also host a WebSocket server on standard port 81. The served web page comes with some JavaScript that connects to this WebSocket server in order to stream the live data to be visualized.
The web page itself, as served by this sketch, uses and self-hosts the following open-source bundles:
- jQuery v3.5.1 - compressed, production version - original download here.
- FontAwesome v5.15.2 - original download here.
As said, the served web page self-hosts all resources. No Internet connection is needed!
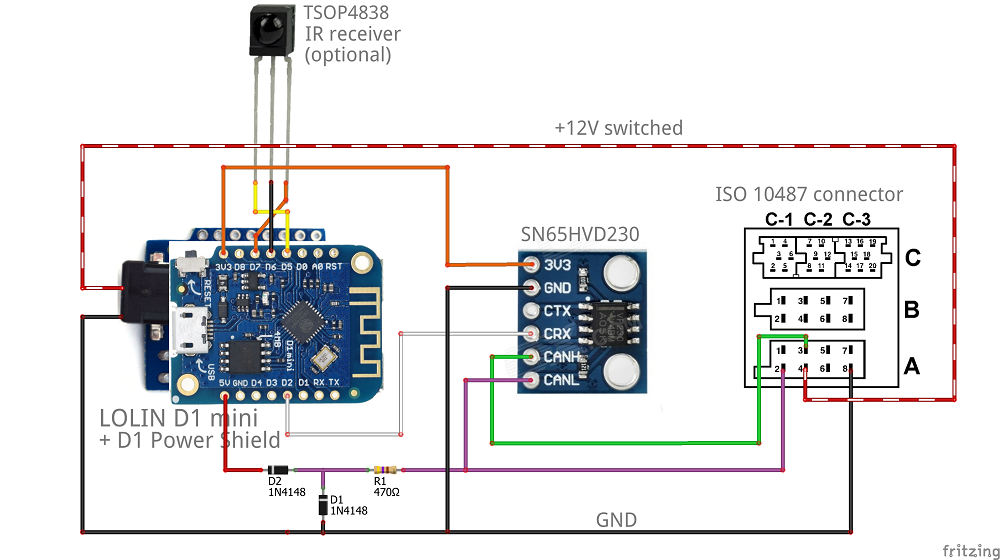
You can usually find the VAN bus on pins 2 and 3 of ISO block "A" of your head unit (car radio). See https://en.wikipedia.org/wiki/Connectors_for_car_audio and https://github.com/morcibacsi/esp32_rmt_van_rx#schematics .
There are various possibilities to hook up a ESP8266 based board to your vehicle's VAN bus:
-
Use a MCP2551 transceiver, connected with its CANH and CANL pins to the vehicle's VAN bus. As the MCP2551 has 5V logic, a 5V ↔ 3.3V level converter is needed to connect the CRX / RXD / R pin of the transceiver, via the level converter, to a GPIO pin of your ESP8266 board.
A board with the MCP2551 transceiver can be ordered e.g. here or here.
Two variants are possible:
- Using +12 Volt switched line (pin 4 of the "A" block of the ISO connector):
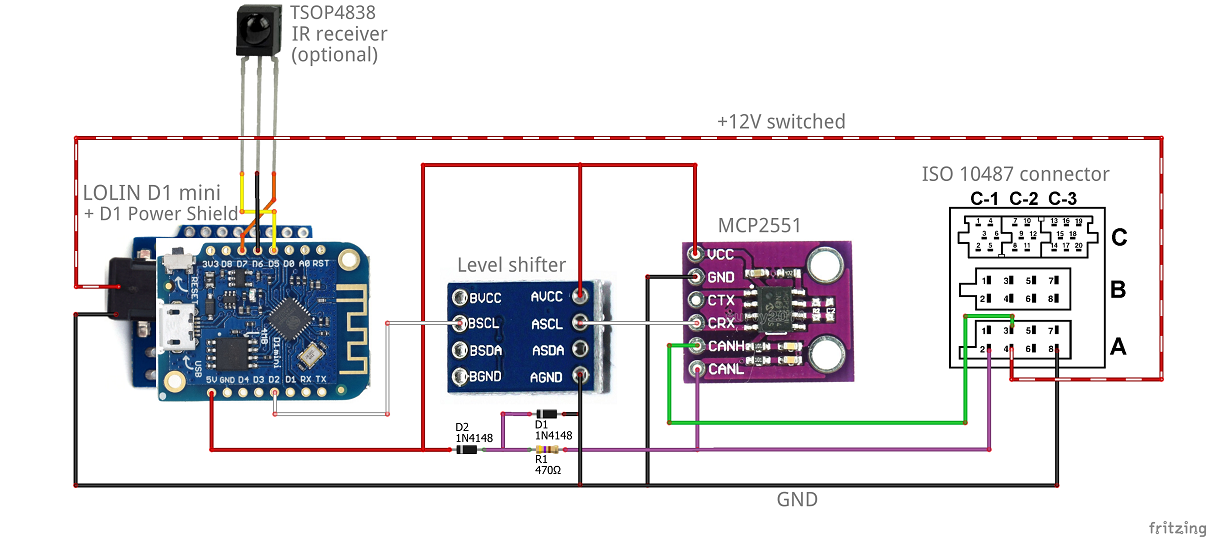
- Using +12 Volt permanent line (pin 7 of the "A" block of the ISO connector). To prevent battery drain,
the ESP board will go to sleep after 5 minutes (configurable in
Config.h). This setup requires GPIO line D1 to be connected, so that the ESP board wakes up as soon as any activity occurs on the VAN bus.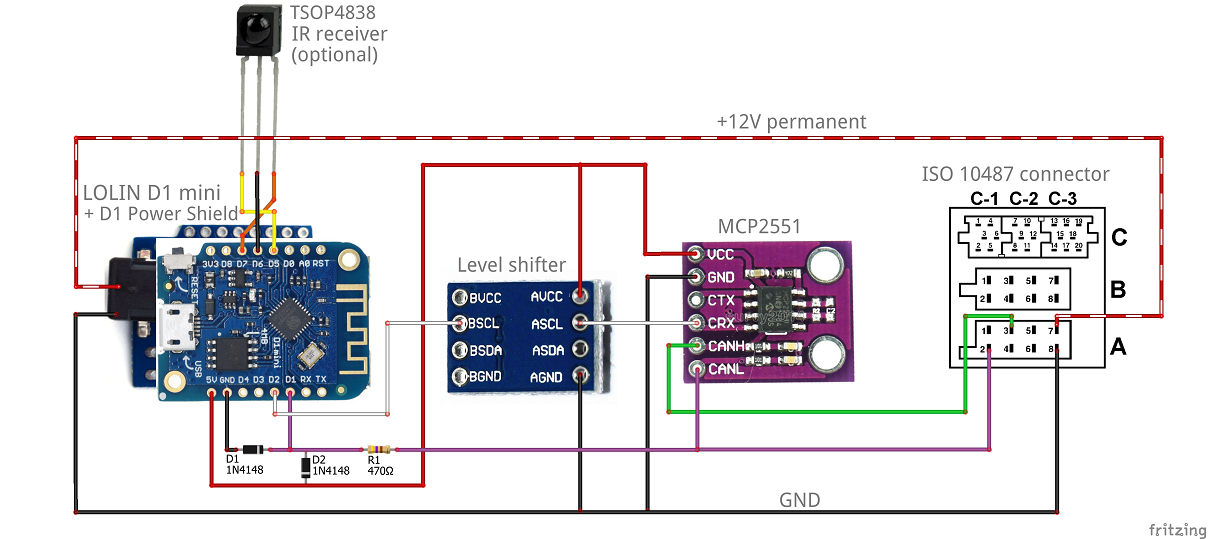
- Using +12 Volt switched line (pin 4 of the "A" block of the ISO connector):
👉 Notes:
The two terminator resistors R3 and R4 (2 x 100 Ohm, near the CANH and CANL pins) on this transceiver board are meant for operating inside a CAN bus network, but are not necessary on a VAN bus. In fact, they may even cause the other equipment on the bus to malfunction. If you experience problems in the vehicle equipment, you may want to remove (unsolder) these terminator resistors. See also this issue.
- CANH of the transceiver is connected to VAN BAR (DATA B), CANL to VAN (DATA). This may seem illogical but in practice it turns out this works best.
- The clamping circuit (D1, D2, R1) seems to (somehow) help in reducing the amount of bit errors (packet CRC errors).
-
Use a SN65HVD230 transceiver, connected with its CANH and CANL pins to the vehicle's VAN bus. The SN65HVD230 transceiver already has 3.3V logic, so it is possible to directly connect the CRX / RXD / R pin of the transceiver to a GPIO pin of your ESP8266 board.
A board with the SN65HVD230 transceiver can be ordered e.g. here or here.
The "+12 Volt permanent" variant as described above is possible for this setup too.
👉 Notes:
The terminator resistor R2 (120 Ohm, near the CANH and CANL pins) on this transceiver board is meant for operating inside a CAN bus network, but is not necessary on a VAN bus. In fact, it may even cause the other equipment on the bus to malfunction. If you experience problems in the vehicle equipment, you may want to remove (unsolder) the R2 terminator resistor. See also this issue.
- CANH of the transceiver is connected to VAN BAR (DATA B), CANL to VAN (DATA). This may seem illogical but in practice it turns out this works best.
- The clamping circuit (D1, D2, R1) seems to (somehow) help in reducing the amount of bit errors (packet CRC errors).
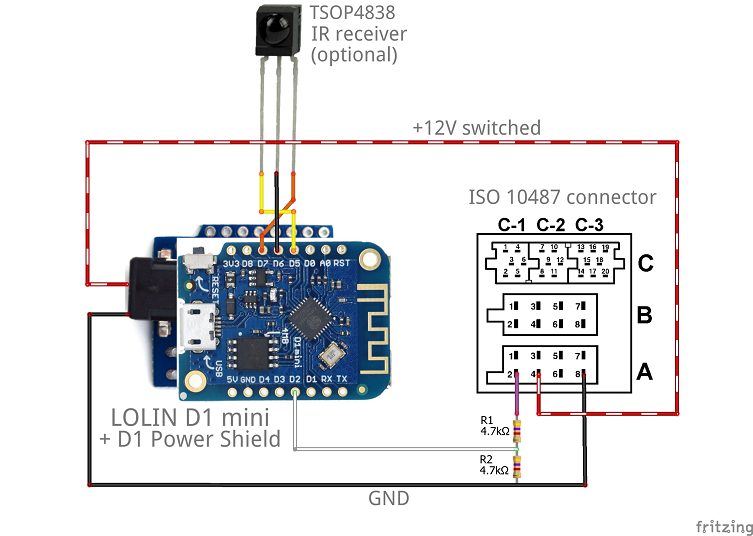
- The simplest schematic is not to use a transceiver at all, but connect the VAN DATA line to GrouND using two 4.7 kOhm resistors. Connect the GPIO pin of your ESP8266 board to the 1:2 voltage divider that is thus formed by the two resistors. Results may vary.
👉 Note: I used this schematic during many long debugging hours, but I cannot guarantee that it won't ultimately cause your car to explode! (or anything less catastrophic)
When the IR remote control is used to navigate, e.g. through the sat nav menus, this is usually not reflected on the comfort bus. So, reading the VAN comfort bus is not enough to detect e.g. scrolling through the menus or lists presented.
To see the navigation through the menus and lists also on the browser screen, simply connect an infra-red receiver, e.g. like this one, on pins D5, D6 and D7, facing outward; see also the above schematics.
👉 Notes:
- Don't remove or unsolder the infra-red receiver (PCB) from the original MFD type C display. The original MFD needs that to receive the commands you send to it, in order to generate the correct VAN bus packets.
- The infra-red receiver is not needed to switch screens. If you turn on the head unit (radio, CD player, ...) the screen will automatically switch to it. You can also switch screens on your smartphone or tablet simply by tapping the center of the screen. The smartphone or tablet will cycle only through the applicable screens, i.e., if the head unit is not powered on, the head unit screen will be skipped.
Before proceeding with this project, make sure you check all the following prerequisites.
See Arduino IDE. I am currently using version 1.8.19 but other versions may also be working fine.
We’ll program the ESP8266 using Arduino IDE, so you must have the ESP8266 add-on installed. You will need:
- Arduino IDE, with
- ESP8266 Board Package installed. I am currently using version 3.1.2 but other versions seem to be also working fine (I tested with versions 2.6.3 ... 3.1.2).
Follow the next tutorial to install the IDE and the ESP8266 Board Package:
In the Arduino IDE, go to the "Sketch" menu → "Include Library" → "Manage Libraries...". Make sure to install:
- Arduino Library for the ESP8266 VAN Bus - Tested with versions 0.2.4 and higher. Best to use latest.
- ESPAsyncTCP library by me-no-dev, fork by dvarrel - Tested with version 1.2.4 .
- ESPAsyncWebSrv library by me-no-dev, fork by dvarrel - Tested with version 1.2.6 and 1.2.7 . Skip version 1.2.8: it does not compile on the ESP8266.
For more explanation on using the Arduino library manager, you can browse to:
- this tutorial from Arduino, and
- this explanation from Adafruit
👉 Note: for best performance and stability, make sure to copy all the patched files inside and under the VanLiveConnect/Patches/ directory to the indicated directories in your system. In my experience, these patched files significantly improve the stability of the WebSocket (TCP/IP over Wi-Fi) communication.
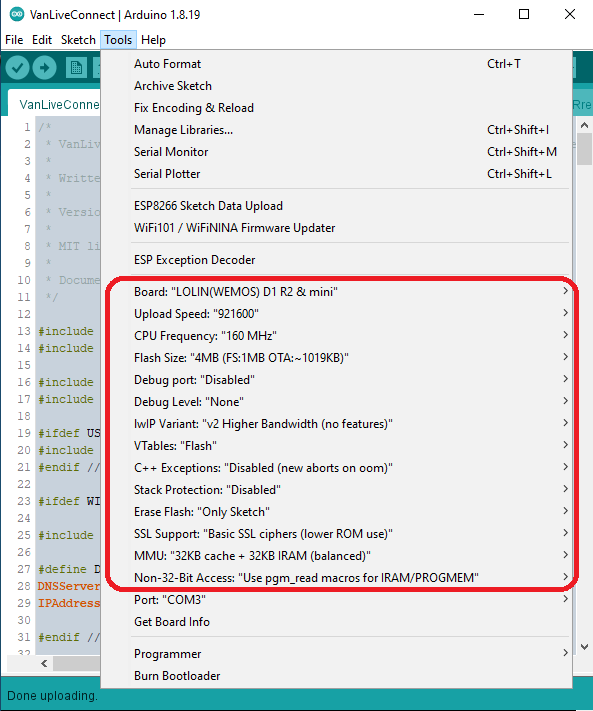
In the Arduino IDE, go to the "Tools" menu, and choose:
- CPU frequency: 160 MHz, and
- lwIP variant: "v2 Higher Bandwidth (no features)".
Here is a picture of board settings that have been tested to work:
I seem to have better Wi-Fi performance by setting the variable build.sdk to:
build.sdk=NONOSDK22x_191122
inside the following file:
%LOCALAPPDATA%\Arduino15\packages\esp8266\hardware\esp8266\3.1.2\platform.txt (Windows)
$HOME/.arduino15/packages/esp8266/hardware/esp8266/3.1.2/platform.txt (Linux)
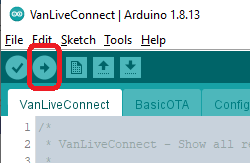
To upload the compiled project you will need the following:
- COM port driver for uploading via the serial port over USB.
First time upload is always via the serial port over USB. After that, the "Over The Air" (OTA) update function will allow uploading via Wi-Fi using a "network port" in the Arduino IDE. See this documentation for help on using the OTA feature of the arduino-esp8266.
If you have no experience in compiling and uploading, have a look at this excellent tutorial for the Wemos D1 mini board
When the compiled sketch is started for the first time on fresh hardware, it will take a few seconds to initialize the flash-based file system. In my experience, a sketch binary uploaded to fresh hardware sometimes causes the board to crash the very first time, but after that it works (uploads) fine.
Android does not like a Wi-Fi connection that does not have an Internet connection.
When connecting to the Wi-Fi access point as offered by the ESP, your android device will present a system notification "PSA display AP has no Internet connection. Tap for options.", similar to this:
When tapping, a popup like this appears:
Make sure to check-mark "Don't ask again for this network", then tap "Yes".
The Wi-Fi icon at the top is now shown, but it has a small "X" in it. This small "X" indicates that the Wi-Fi connection does not offer an Internet connection. Even though, the landing page 'http://<...>/MFD.html' of the ESP can be accessed successfully.
However, it now becomes impossible for the Android device to access the Internet. All network access is routed towards the Wi-Fi connection, which does not offer Internet. This prevents any apps from accessing the Internet.
A commonly suggested option is to turn on the Android developer-option "Settings > System > Developer options > Mobile data always active". But it doesn't work: all apps will still try to use the Wi-Fi connection for their Internet connection. Moreover, having "Mobile data always active" turned on, decreases battery life, so it is a bad idea anyway.
Ideally, we would like all the Android apps to be able to connect to the Internet via mobile data, while at the same time the Android client device is showing the vehicle data as coming in via the (non-Internet) "PSA display AP" Wi-Fi connection
To make the latter possible with mobile data enabled on the Android device, the web server ("WebServer.ino") in the ESP offers a special feature: it will respond to any request for '.../generate_204'. This makes make Android believe that the Wi-Fi connection has an Internet connection, and therefore it chooses Wi-Fi as the preferred medium.
However, even though "Internet access" via Wi-Fi seems now enabled to the Android device, it still sees that the connection is pretty limited. Android tries to access all kinds of other Internet addresses, which (obviously) fails. Therefore, the Android device now presents a different system notification: "PSA display AP has limited connectivity. Tap to connect anyway.":
Make sure to check-mark "Don't ask again for this network", then tap "Yes":
The Wi-Fi icon at the top is now shown without the small "X" in it. The landing page of the ESP can now be accessed via Wi-Fi, even with mobile data enabled.
Unfortunately, the effect is still the same as above: all apps will try to use the (non-Internet) Wi-Fi connection, so all apps still fail to access the Internet.
The solution is to have the web server in the ESP stop responding to requests for '.../generate_204' as soon as a data (WebSocket) connection between the ESP and the Android device is well established.
In this way, the following sequence of events takes place:
- As soon as the ESP powers up (or wakes up from sleep), it starts to offer its "PSA display AP" Wi-Fi access point.
- The Android device connects to the Wi-Fi access point. The Wi-Fi icon at the top is now shown without the small "X" in it (because the ESP is responding to the '.../generate_204' requests).
- The landing page 'http://<...>/MFD.html' of the ESP can be accessed by the browser on the Android device, using Wi-Fi to connect.
- The JavaScript code in the landing page sets up a WebSocket connection: vehicle data is sent to the Android device and displayed in its browser.
- About 7 seconds after the WebSocket connection is established, the web server on the ESP stops responding to the '.../generate_204' requests.
- After a few retries, Android now thinks that the Wi-Fi access point is no longer offering Internet connectivity. As a result, it switches to its mobile connection. However, the WebSocket (TCP/IP) connection remains established!
- The apps on the Android device can now access the Internet via the mobile connection, while the vehicle data is coming in on the just established WebSocket (TCP/IP) connection.
More background information and explanation can be found here and here.
If you are using OpenVPN for Android in "Always-on VPN" mode, you will need to add a route to the local network. Without this route, your smartphone or tablet device will not be able to find the ESP device after it connects to the ESP's Wi-Fi access point.
To add the route:
- Open the "OpenVPN for Android" app
- Tap the 'pen' icon next to your connection profile
- Tap the 'ROUTING' tab
- Under the 'IPv4' section:
- Untick 'Use default route'
- Tap 'Excluded Networks'
- Enter
192.168.244.0/24(note: the"192.168.244."part must match with the IP address as specified inConfig.h). - Tap 'OK'
- Tap the 'ADVANCED' tab
- Make sure 'Persistent tun' is not checked
Then press the Android 'Back' button to go back to the overview of connection profile.
It is possible (and very convenient!) to automate all actions that are needed to start displaying your vehicle information on your smartphone or tablet as soon as you enter the vehicle. An excellent app that offers all necessary functions is MacroDroid - Device Automation
Below are screenshots that show two macros which perform all the necessary actions:
 |
|
|---|---|
 |
 |
Upon connection to the Wi-Fi SSID "PSA display AP", performs the following actions:
- Set the screen timeout value to 500 minutes, to prevent the screen from going black while driving
- Browse to the main screen (http://192.168.244.1/MFD.html)
- Set the screen brightness to 100%
- Go "full-screen"
Upon disconnection from "PSA display AP", performs the following actions:
- Set the screen brightness back to 88%
- Set the screen timeout value back to 2 minutes
- Go back to the system home (launcher) screen
Of course, the above actions are just a suggestion. Customize as you like!
In the Arduino IDE, the following libraries are used:
- Arduino Library for the ESP8266 VAN Bus - Need at least version 0.2.4 .
- ESPAsyncTCP library by me-no-dev, fork by dvarrel - Tested with version 1.2.4 .
- ESPAsyncWebSrv library by me-no-dev, fork by dvarrel - Tested with version 1.2.6 and 1.2.7 .
The application itself embeds:
-
Javascript library jQuery v3.5.1 (compressed, production version) by John Resig is licensed under the MIT License
-
Font/icons Font Awesome v5.15.2 by Dave Gandy is licensed under the following licenses:
- Icons: CC BY 4.0 License
- Fonts: SIL OFL 1.1 License
- Code: MIT License
-
Font Peugeot New by Emmanuel Benoist for Peugeot Design Lab (http://www.peugeotdesignlab.com)
License: unknown
- No plans 😊
Question: Will this work on my vehicle?
Answer: I have only tested with one vehicle: a 406 from year 2003 DAM number / Build Code: 9586; see also this page (in Dutch). My vehicle has a so-called "type C" Multi-Functional Display (MFD).
It will work (at least to some extent) if you have a Peugeot of around 1996-2004, fitted with a VAN comfort bus.
As mentioned, VAN bus was used in the beginning of 2000's by the PSA group (Peugeot and Citroën) as a communication protocol between the various comfort-related equipment. Later, around 2005, they started to replace this protocol in their newer cars with the CAN bus protocol.
This overview lists vehicles that are supposedly fitted with a VAN (comfort) bus.
Question: Do I still need the original multi-functional display (MFD)?
Answer: Yes, you do. But you do not need its (crappy) LCD to be working. The MFD is only needed to generate the necessary VAN-bus packets to drive the equipment (Tuner, CD-changer, Sat nav, etc.). Maybe in a later stage, I will be able to reverse-engineer the higher-level protocols and state machines that the MFD implmements. But that will take time...
Question: Which web browsers will this work with?
Answer: I have tested successfully on:
- Windows Desktop
- Firefox, any recent version
- Chrome, any recent version
- Mobile
- Android Firefox 68.11.0 and higher
- Android Chrome 88.0 and higher
For background reading:
- Vehicle Information Service Specification - defines a WebSocket based API for a Vehicle Information Service (VIS) to enable client applications to get, set, subscribe and unsubscribe to vehicle signals and data attributes.
This application is open-source and licensed under the MIT license.
Do whatever you like with it, but contributions are appreciated!


