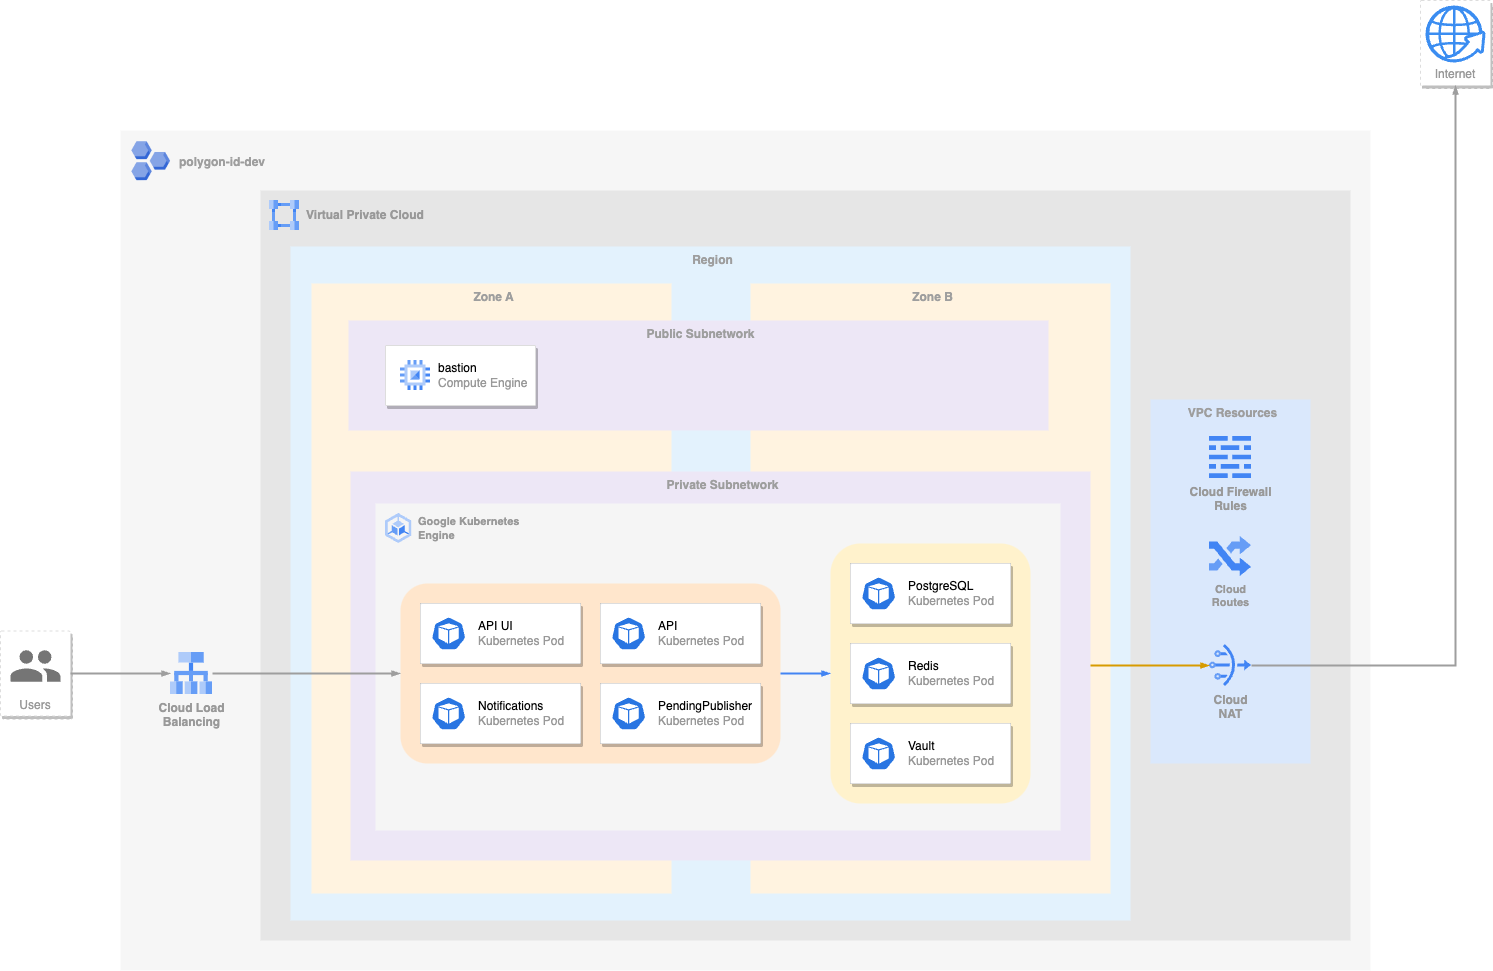
Polygon ID issuer refers to the entity responsible for issuing unique identifiers, known as Polygon IDs, on the Polygon network. The Polygon network is a popular Layer 2 scaling solution for Ethereum, designed to improve scalability and reduce transaction costs.
To learn more about Polygon ID issuer, see this.
Get up and running with a few clicks! Install this Polygon Issuer Node app to a Google Kubernetes Engine cluster using Google Cloud Marketplace. Follow the on-screen instructions.
You can use Google Cloud Shell or a local workstation to complete the following steps.
Make sure you have these tools installed.
Configure gcloud as a Docker credential helper:
gcloud auth configure-dockerIf you have an existing GKE cluster you can use that otherwise you can create a new cluster from the command line.
export CLUSTER=YOUR_CLUSTER_NAME
export PROJECT=YOUR_PROJECT_ID
export REGION=YOUR_REGION
export ZONE=YOUR_ZONE

gcloud container clusters create $CLUSTER --region=$REGION --project $PROJECT
Configure kubectl to connect to the new cluster.
gcloud container clusters get-credentials $CLUSTER --region=$REGION --project $PROJECTFor zonal clusters, use --zone=ZONE instead of --region=REGION.
git clone https://github.com/0xPolygonID/polygonid-issuer-marketplace
cd polygonid-issuer-marketplaceAn Application resource is a collection of individual Kubernetes components, such as Services, Deployments, and so on, that you can manage as a group.
To set up your cluster to understand Application resources, run the following command:
kubectl apply -f "https://raw.githubusercontent.com/GoogleCloudPlatform/marketplace-k8s-app-tools/master/crd/app-crd.yaml"You need to run this command once. The Application resource is defined by the Kubernetes SIG-apps community. The source code can be found on github.com/kubernetes-sigs/application.
Choose the instance name and namespace for the app:
export APP_INSTANCE_NAME=polygon-id-issuer  #Sample name for the application
export NAMESPACE=default #Namespace where you want to deploy the application
Set the values for the domains where you want to access to your application and privatekey,static IP.
export APP_DOMAIN=app.example.com                       # Domain for the API UI
export UI_DOMAIN=ui.example.com                         # Domain for the UI
export API_DOMAIN=api.example.com                       # Domain for the API
export PRIVATE_KEY='YOUR PRIVATE KEY'                   # Private key of the wallet.
export STATIC_IP='YOUR STATIC IP'                       # Provide the Static IP if you have any otherwise leave this field.
export UI_PASSWORD='ui password'                        # Password to login the UI
export ISSUER_NAME='YOUR DESIRED ISSUER NAME'           # Provide the Issuer Name.
export MAINNET='true'                                   #'False' if you want to use testnet.
export ETHEREUMURL='URL LINK OF BLOCKCHAIN NETWORK'
export VAULT_PASSWORD="PASSWORD TO ACCESS VAULT SEVER"  # Vault password that will be used by application to access vault server
export RHSMODE="None"                                   # None| OnChain | OffChain
export RHSURL="https://rhs-staging.polygonid.me/"       # Reuired if RHSMODE is OffChain
Remove the --set staticip="$STATIC_IP" if you don't have static IP; ingress resource will automatically creates an IP address.
If you static ip name is polygon-id-issuer-ip and the value is 34.149.28.163 you can setup the domain as below.
export APP_DOMAIN=app.34.149.28.163.nip.io  #Domain for the API UI
export UI_DOMAIN=ui.34.149.28.163.nip.io    #Domain for the UI
export API_DOMAIN=api.34.149.28.163.nip.io #Domain for the APIhelm install "$APP_INSTANCE_NAME" chart/polygon-id-issuer \
--create-namespace --namespace "$NAMESPACE" \
--set appdomain="$APP_DOMAIN" \
--set uidomain="$UI_DOMAIN" \
--set apidomain="$API_DOMAIN" \
--set privatekey="$PRIVATE_KEY" \
--set staticip="$STATIC_IP" \
--set issuerName="$ISSUER_NAME" \
--set uiPassword="$UI_PASSWORD" \
--set mainnet="$MAINNET" \
--set ethereumUrl="$ETHEREUMURL" \
--set vaultpwd="$VAULT_PASSWORD" \
--set rhsmode="$RHSMODE" \
--set rhsurl="$RHSURL"Retrieve IP address of both the Ingress using this command
kubectl get ingress app-ingress -o jsonpath='{.status.loadBalancer.ingress[0].ip}'Add the DNS records for all the domains to the above IP, if you are using staticip as parameter above you can directly map to that IP instead of retrieving from ingress.

