TunneLS is a TLS wrapper/proxy in go. Wrap existing connections in TLS to bypass annoying DPI (deep packet filtering) from blocking your connections in other protocols or just secure insecure connections. It can also act as a proxy for an application that doesn't use TLS.
If you're a newbie, read all of the documentation I've wrote specifically for you to get you to not only use it effectivley but also understand how it works!
Go 1.5 only so make sure you have it installed and configured correctly.
go get -u github.com/nhooyr/TunneLS
Will install it into $GOPATH/bin. Make sure your $GOPATH/bin is in your $PATH.
If so you should be able to launch it as
TunneLS
Use the -c flag to point it to a config file, the default location it looks for is /usr/local/etc/TunneLS/config.json.
####How It Works High level overview of how the TunneLS works with some neat diagrams.
####Configuration Learn how to configure the program options as well as how to get it to run as a daemon on linux/mac.
####Configuring Certificates and Keys If you want to understand how certificates work and how to generate your own certificates to use.
####Example An easy to follow example to understand how the program works. Works along side the included config.json and certificate/key.
Do not actually use this cert in a real scenerio, please generate a new one, its described in the above section
-
--- represents plain data
-
### represents the TLS tunnel around the plain data
+----------+                                                    +----------+
|          |                                                    |          |
|  client  +----------------------------------------------------+  server  |
|          |                                                    |          |
+----------+                                                    +----------+
The link between the client and server is either insecure or maybe it uses SSH as the protocol which is picked up by deep packet filtering and thus blocked. You can tunnel it instead through a TunneLS tunnel which is encrypted via TLS, which makes it much less likely to be blocked by DPI as the entire web uses TLS, its far too restrictive for most networks and you should be able to get through.
+----------+      +---------------+      +---------------+      +----------+
|          |      |               +######+               |      |          |
|  client  +------+  gTLS client  |------|  gTLS server  +------+  server  |
|          |      |               +######+               |      |          |
+----------+      +---------------+      +---------------+      +----------+
Now the difference is that whatever the client sends to the gTLS client is forwarded over to the gTLS server and then finally over to the real server. The advantage here is that the gTLS client and gTLS server communicate via TLS thus protecting the data if the client/server communicate insecurely and also likely bypassing any DPI as TLS is almost never blocked.
Now that you understand how it works, also know that its pure TLS, know that no other protocol is being used other than TLS to tunnel so its not necessary to use both the server and client. If a application communicates via TLS but the other does not, you only need to wrap insecure one. Thus it can also act as just a proxy.
Here is a diagram of how SSH tunneling can be tunneled through TunneLS. If you do tunnel ssh through TunneLS, use dynamic port forwarding and bam, you got yourself a SOCKS5 proxy being tunneled through TLS, perfect for web browsing without any restrictions!
Basically the client listens on it's Accept address for plain connections and proxies them to its Connect address via TLS.
Basically the server does the exact opposite. Listens on it's Accept address for TLS connections and proxies them to its Connect address via a plain connection.
###config.json
The configuration file's syntax is JSON and it consists of an array of the nodes structs each with their own fields. Then its followed by StdErrLogging/StdErrPrefix/LogPath all of which are explained further below. Here is the example file included.
{
	"Nodes": [
		{
			"Name": "nc",
			"Mode": "client",
			"Accept": "localhost:5002",
			"Connect": "localhost:5001",
			"CA": "tls/cert.pem",
			"InsecureSkipVerify": true
		},
		{
			"Name": "nc -l",
			"Mode": "server",
			"Accept": "localhost:5001",
			"Connect": "localhost:5000",
			"Cert": "tls/cert.pem",
			"Key": "tls/key.pem"
		}

	],
	"StdErrLogging": true,
	"StdErrPrefix": true
}
Note: read example for a hands on tutorial on using config.json and the rest of the program.
First is the Nodes array which consists of structs that represent the nodes to run followed by StdErrLogging and StdErrPrefix, the first of which is self explainatory. StdErrPrefix just means to add the date and time in the logging (wouldn't need this with the systemd journal).
###Fields
You can use relative file paths, relative to the config file. eg say the config file is in /usr/local/etc/TunneLS. If the value of the Cert field is "cert.pem" that really means "/usr/local/etc/TunneLS/cert.pem"
When it says int just put a integer such as 10 for the value with no quotes, otherwise the value is implied as a string, eg whatever value with quotes.
Don't bother with the optional fields if you don't care, they aren't necessary. Most people likely only want to use the required fields.
####Required
Mode -- sets node as client/server
Name -- name for logging
Accept -- listen address; format is host:port. If host is missing, localhost is assumed
Connect -- dial address; format is host:port. If host is missing, localhost is assumed
####Optional
Timeout -- int -- duration to sleep in seconds after network errors, default is 15
TCPKeepAliveInterval -- int -- interval between TCP keep alives in seconds, default is 15
LogData -- bool -- determines whether or not to log the actual reading/writing of data
Ciphers -- array of ciphers to use, see this for a list. Add the name without the "TLS_" part. If you only want to use "TLS_RSA_WITH_RC4_128_SHA" then it should look like
"Ciphers": [
	"RSA_WITH_RC4_128_SHA"
]
####Required Server Fields
Cert -- path to the certificate that the server presents to clients
Key -- path to the key file of the Cert
####Optional Server fields
SessionTicketKeyRotationInterval -- int -- interval between session key rotation in seconds, default is 28800 or 8 hours.
ClientAuth -- type of client authentication. see this for the list. Just set it to one of the names. Json should look like
"ClientAuth": "RequireAndVerifyClientCert"
CRL -- path to certificate revocation list for client authentication (read every single time a client authenticates)
####Optional Client Options Cert -- path to the RootCA for the certificate from the server. Useful when using self signed certificates (like below) that are not in the operating systems store, you must use this option to point to the RootCA in those cases or you'll get a nasty error about the certificate not being trusted.
InsecureSkipVerify -- skip trust checks on the certificate (please only use this when testing)
####LogPath Points to the file to log to.
The format for logging is:
TunneLS: year/month/date hour/minute/second mode name message
When logging is global, the mode is global and name is empty
For example
TunneLS: 2015/09/03 07:04:42 global starting client node nc
TunneLS: 2015/09/03 07:04:42 client nc initializing
####StdErrPrefix StdErrPrefix controls whether to add the date and time to stderr logging.
year/month/date hour/minute/second <log stuff>
This lets TunneLS's logging play nice with integrated system logging such as systemd's journal which have their own timestamp information as you can disable the logging prefix.
This field only applies to the stderr logging and is off by default. LogPath's file will always have the prefix information.
###Run at boot In order to launch TunneLS at boot with your OS of choice follow the instructions. The boot files are located in the boot folder.
####Linux I've included a TunneLS.service file for systemd in linux. First copy it into /etc/systemd/system/
Next change the ExecStart field in TunneLS.service to the absolute path of the TunneLS executable on your system. Next remove the -c flag if the TunneLS config file is in /usr/local/etc/TunneLS/config.json, otherwise please add in the absolute path to the config file.
Now reload systemd with
sudo systemctl daemon-reload
Finally enable it to start at boot with
sudo systemctl enable TunneLS
####Mac I've included the TunneLS.plist launch daemon file for launchd in osx. First copy it into /Library/LaunchDaemons. Next change the first string tag of the ProgramArguments array to the absolute path of the TunneLS executable on your system.
Now if you need to specify the location of the config file, please do so on the third tag. Otherwise delete the second and third tags.
Finally load it with
sudo launchctl load -w /Library/LaunchDaemons/TunneLS.plist
##Configuring Certificates and Keys TLS works with certificates and asymmetric cryptography. Lets first understand what that means. Skip this section if you already know how it all works and just want to get to generating the cert/key.
####Certificates? This is a very vast topic and this is a very dumbed down version, but sufficient enough for you to be able to use this program.
#####Symmetric Cryptography This is the type of cryptography you already understand. Symmetric cryptography both parties must know the same key to decrypt/encrypt. However this is a problem on the web, you can't send the key over to the client to initiate a encrypted session. If someone is listening and they grab the key, your entire session can be very easily decrypted. This is where asymmetric cryptography comes into play.
#####Asymmetric Cryptography Asymmetric cryptography is based on the premise of special maths and algorithms that allow you to generate two keys with a special property. Anything decrypted with one key, can only be decrypted by the other key as well as vice versa. Why is this crucial?
This means that you can send out one key (the public key, or certificate) to other people to encrypt some data. They encrypt this data and send it back over to you, and you are the only one who can decrypt it because you are the only one who has the private key. Doesn't matter who's listening, they only get the public key, the key used to encrypt, not the key used to decrypt, and therefore they cannot decrypt.
The other advantage of asymmetric cryptography is signing. eg If something is encrypted via the private key, it can only be decrypted via the public key correct? This means that whenever something is successfully decrypted via the public key you are 100% sure that the it comes from whoever has the private key, as no one else can encrypt data to be decrypted with the public key.
#####Trust Signing comes into play with trust. If I setup a fake server with a certificate with the name www.google.com, it shouldn't be trusted to be legit. It should be rejected as insecure. But how, how will my computer know the difference between the legit certificate from google and the fake one?
Well your computer comes with a set of root CAs (certificate authorities), basically a bunch of certificates that your computer 100% trusts as legit. These certificates are used to sign other certificates to validate their authenticity. eg they use their private key to sign certificates so that you can successfully decrypt certificates with the CAs public key, thus validating the certificate. (the root CAs are self signed, therefore you just have to trust them as being legit, trust has to begin somewhere)
The root CAs private keys are very securely protected so that certificates are only signed to the actual domain owners and not random people. You can create your own CA, add it to your computers store, and then sign a bunch of certificates to use privately. But remember that these certificates will only be trusted by computers who trust the CA you created.
In the example section we do this, the certificate used is actually a CA certificate. As long as this CA cert is in the clients trust store, the certificate is trusted. This is why the Client node accepts the Cert field. The Cert field for the client is what points it to the CA you want to use to validate the certificate from the server. Since the certificate we use on server is self signed, its CA is itself.
Don't worry about the actual math behind it, I myself have a very primitive understanding. If you understand the above, you're good enough to use this program. If you don't, please take the time to research it a bit, it'll go a long way.
###Generating Certificates
These commands generate a self signed CA certificate, this means that it won't be trusted by default on your client. You must either add the path to it in the Cert field of the client or add it to the client's trust store.
To generate certificates we use openssl. I've already setup a openssl.cnf that should setup the correct openssl options for most people, this should make it much more streamlined for beginners. Just cd into the tls folder to where it is located before running any commands.
First open openssl.cnf and modify the req_distinguished_name to fit your liking. Change the domain name (common name), email etc.
In order to use the certificate with multiple domain names, uncomment subjectAltName, [ alt_names ], DNS.1 and DNS.2 and replace COMMON.NAME with the domain name set in req_distinguished_name and replace SECOND.NAME with the second name you want to use. You can also add more names with DNS.n where n is the next number.
You can also use wildcards in domain names to match all sub domains. eg you can set the common name to "*.example.com" to match all of example.com's subdomains such as www.example.com, but it won't match example.com, you'll need to set second DNS name for that as in the above paragraph.
Next choose whether or not you want to use ECDSA or RSA as the algorithm behind your certificate. I'd recommend ECDSA because the key sizes are smaller, its faster, and more secure. But if for some reason you want RSA, it works perfectly fine.
####ECDSA - RECOMMENDED Creating a ECDSA signed cert is a two step process. First we must generate the key.
The first command uses the secp384r1 curve, tad slower but more secure, the second uses prime256v1 which is faster but less secure. Either works well, run only one
openssl ecparam -genkey -name secp384r1 -out key.pem
openssl ecparam -genkey -name prime256v1 -out key.pem
That will generate a key.pem for you to use Next create the cert
openssl req -new -x509 -config openssl.cnf -key key.pem -nodes -out cert.pem
That will generate a self signed cert.pem for you to use.
####RSA You can edit the default_bits field in the openssl.cnf if you don't want a RSA key size of 4096 but maybe instead 2048.
This command will generate a self signed certificate and key for you, cert.pem and key.pem
openssl req -new -x509 -config openssl.cnf -nodes -out cert.pem
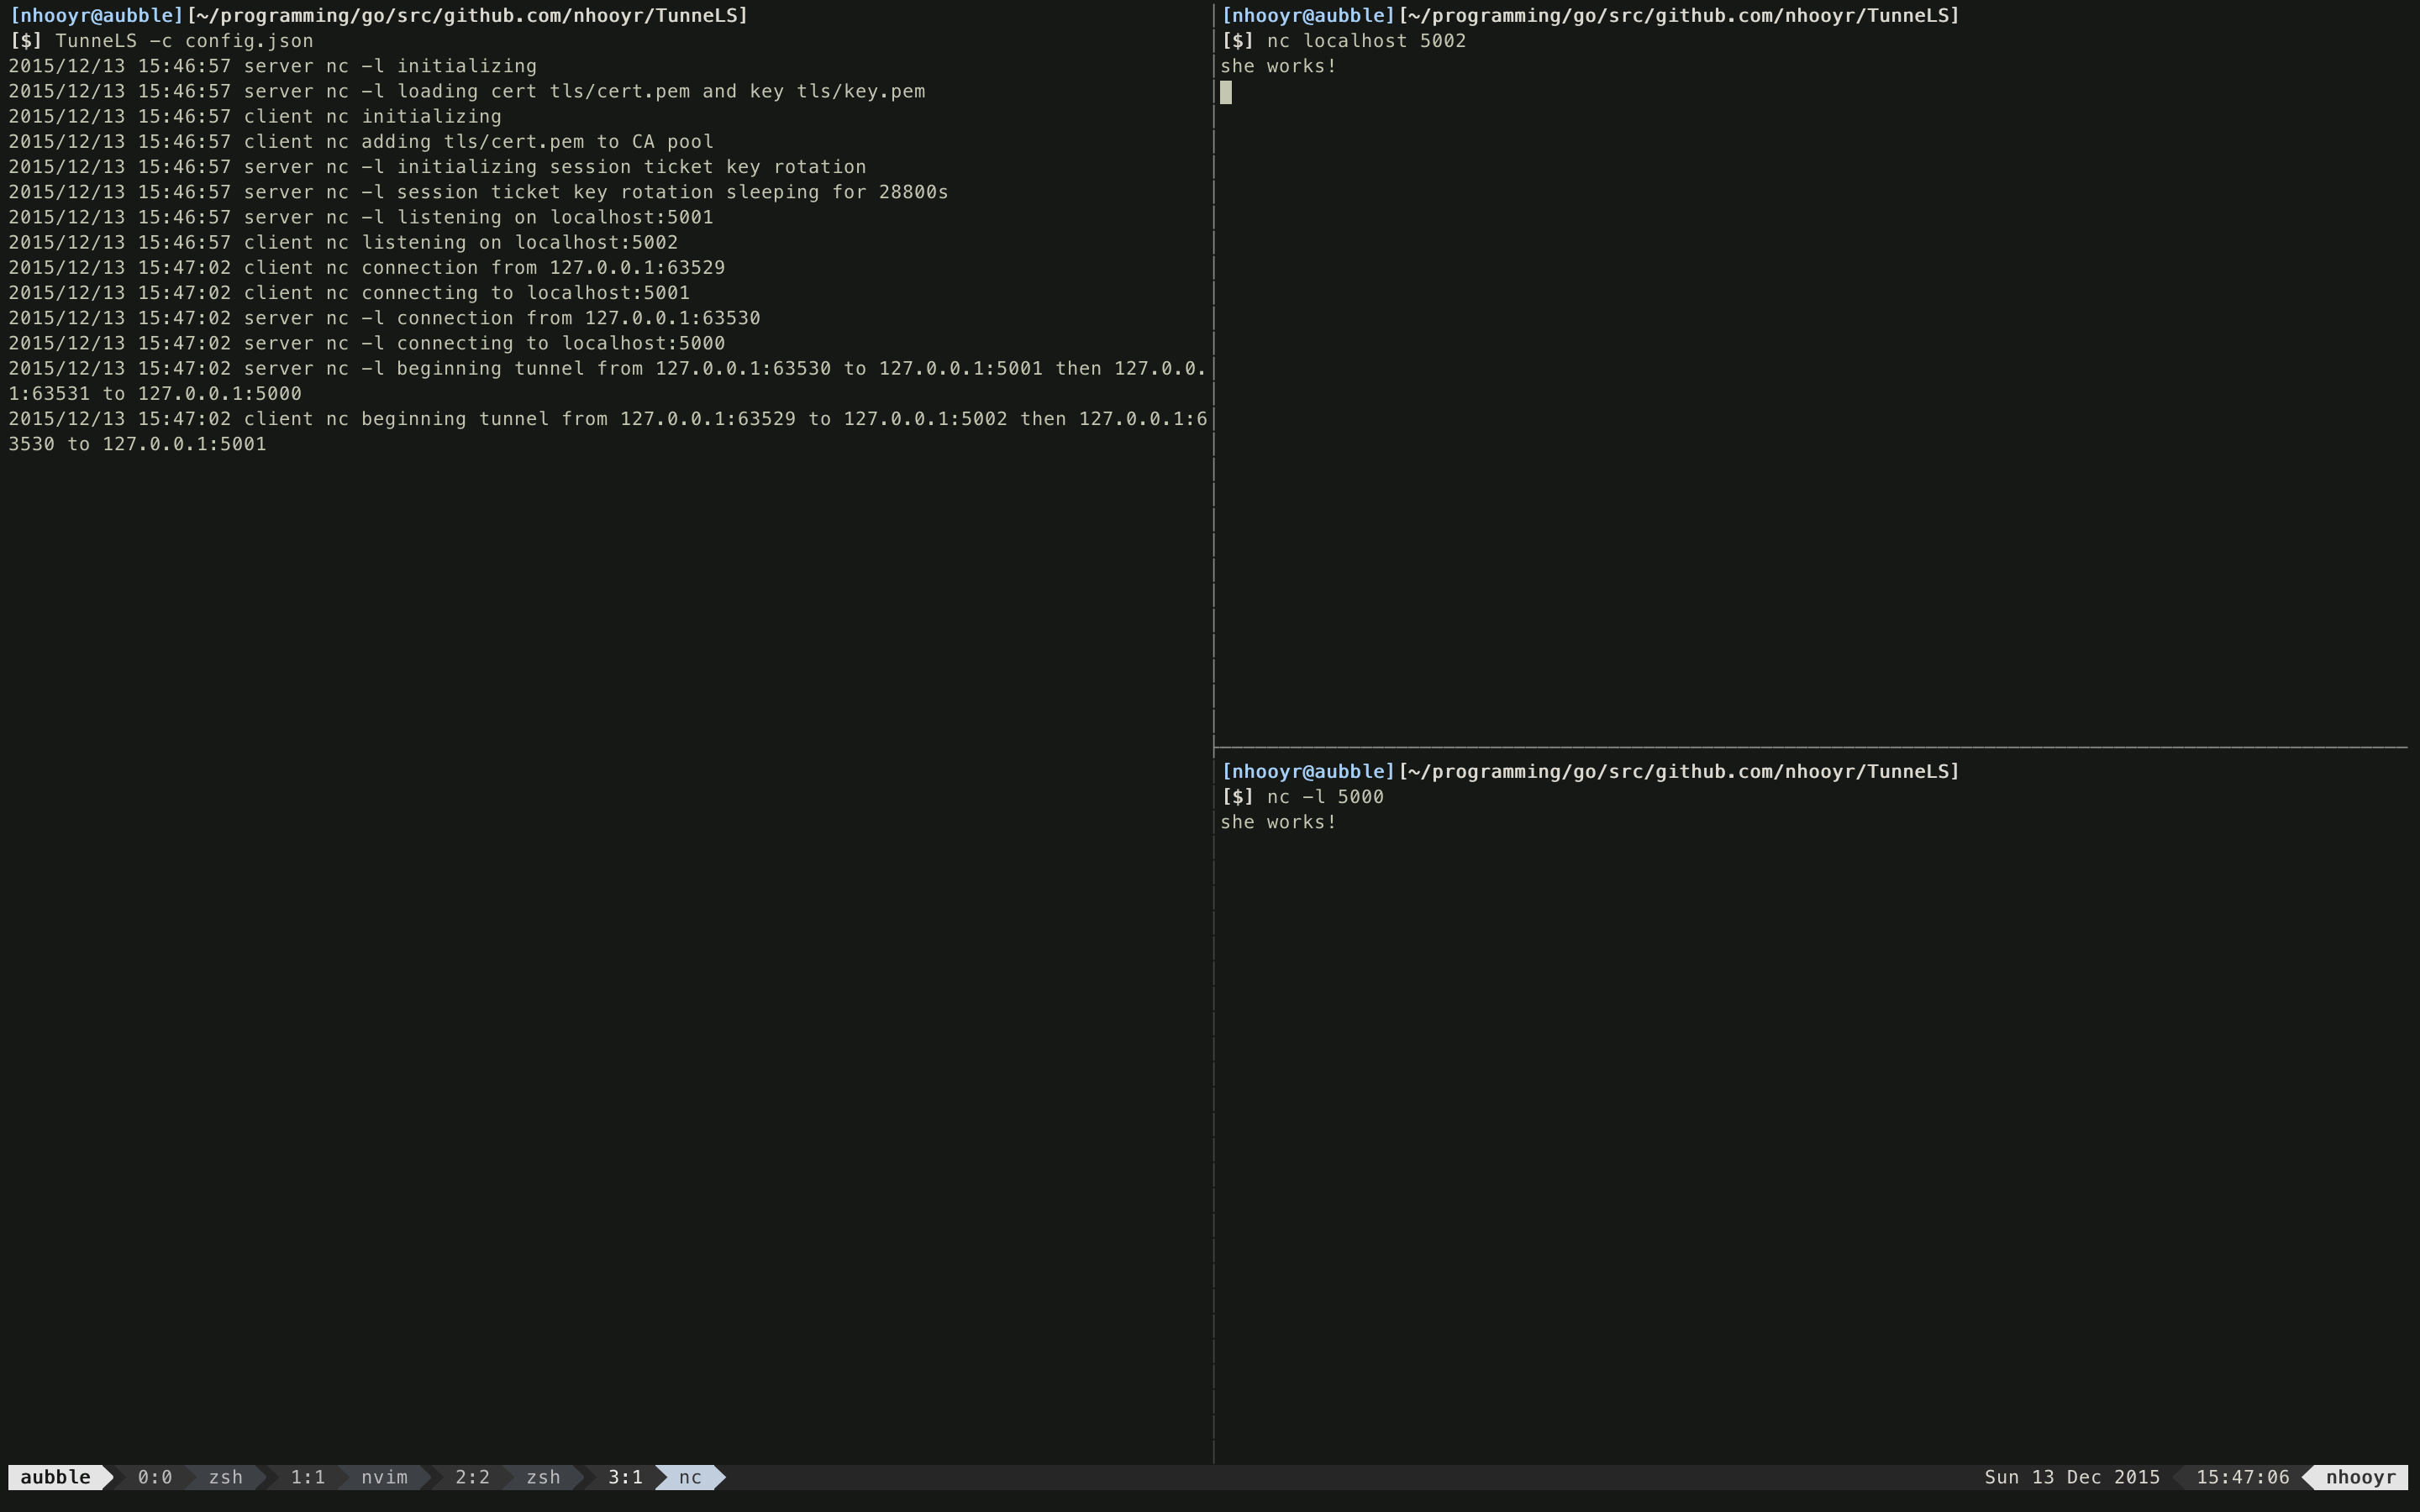
##Example Lets take a look at the example configuration file, config.json to get an idea of how TunneLS is configured and how it works. First start a TunneLS instance with the -c flag pointing to the configuration file
TunneLS -c config.json
Leave that open and open a new terminal. Now run (this is for the BSD version of netcat, just change the syntax a bit if you use GNU)
nc -l 5000
This opens up the nc application listening and accepting connections on port 5000. It then outputs whatever is received on these connections to stdout, which in this case is connected to your terminal.
Leave that nc running and open a new terminal. Now run
nc localhost 5002
This makes nc dial port 5002 on localhost. Now when you type anything into the nc terminal, and press enter it appears on the other nc instance running in the other terminal! but wait.... the port numbers are different how could this be, how are they connected??? Thats TunneLS doing its magic.
In that configuration file there are two TunneLS "nodes" defined, 1 server and 1 client. The client's Listen address is port 5002 and Connect is to port 5001. This means it accepts plain connections on port 5002 and proxies them to port 5001 with TLS. The Server's listen address is port 5001, and Connect address is port 5000. This means it accepts TLS connections on port 5001 and proxies them to port 5000 with plain connections.
The entire ordeal looks as follow.
              port 5002              port 5001              port 5000
+----------+      +---------------+      +---------------+      +----------+
|          |      |               +######+               |      |          |
|    nc    +------+  gTLS client  |------|  gTLS server  +------+   nc -l  |
|          |      |               +######+               |      |          |
+----------+      +---------------+      +---------------+      +----------+
Hopefully it makes more sense now to you. nc does everything over plain text and TunneLS allows you to wrap its insecure connection in TLS. You can take out the server node of the config.json, and take it and actually run it on a server somewhere, just change the Connect address of the client node to the new servers listening address and everything will work the same. Quite fun right? :P
Read the log messages from TunneLS, you can see what its doing, the tunnels its creating, the certificates its loading, errors etc. Logging is always done to stderr, but you can set a seperate logging file with the LogPath option. I've used /dev/null as LogPath to have it not log to a file. Setting it to /dev/null is the same as not having but, but I set it to demonstrate the option. Set LogPath to "logs" to have logging done to a file called logs in the same directory as config.json. Go ahead and try it!
StdErrPrefix set to true is needed for timestamps on the logging to stderr (stderr is connected to your terminal). By default this option is off so stderr logs don't have the logging prefix, this allows for better integration with systemd's journal and the like which usually have their own timestamp information logs. See StdErrPrefix for more information.
Note: The client and server are configured with a default self signed certificate I've provided (the cert is expired so insecureskipverify is needed). When actually using this program for real purposes, please look at the Configuring Certificates and Keys section to generate a new key pair. Anyone who has this key.pem file can decrypt your communications (the configuring certificates section also includes a small introduction, please read it if you do not know what I mean).
##ITS ALIVE!
Contributions are very welcome. File issues for bugs, fix bugs with a pull request and if you think there is a very essential feature missing from TunneLS, feel free to either submit a pull request or open a issue.
Editing the code is very easy, its not complicated and very well documented. Start at main.go and branch from there and you'll understand exactly how everything works very quickly.
Feel free to contact me at anmol@aubble.com