此範例透過 Android Native C++ 與 OpenCV 4.5.1 來執行電腦視覺專案。將會以 2020 年開源的 SIFT 演算法來計算圖片的特徵點。
開啟 Android Studio 建立一個以 Android Native C++ 為基底的專案。這一個選項他會建構一個 C/C++ 環境能夠透過 JNI (Java Native Interface) ,執行呼叫 C/C++ 語言的程式。
建立完成後我們可以將專案視窗改成 Project 的資料夾模式,以利後續操作。
進入 OpenCV 官網 挑選版號本(此範例採用4.5.1)並下載 Android 版本。下載後進入 SDK 資料夾,找到 java 資料夾並將他改名成 openCVLibrary451 (此動作是為了等等要匯入此資料夾,先將它命名完成)。說個題外話之前的版本匯入 java 資料夾時會系統自動將他改名成相對應版本號的 library,個人覺得是 Bug 因此要手動處理名稱較麻煩(未來應該會解決)。
點選上方工具列 File > New > Import Module。選擇剛剛第二步驟已經改名後的 openCVLibrary451 資料夾,完成後點選下一步並按完成匯入。
匯入完成後可以看到 openCVLibrary451 在主目錄資料夾中,但是我們匯入的是要當作 module 使用並非 APP(下圖紅框)。因此我們要手動將它改成 library。(之前版本沒這問題4.3版本以後的問題有點多,但是為了展示最新版的SIFT API不得不使用)
修改 openCVLibrary451 的 build.gradle。把 OpenCV 從 application 改成 library 才能 import。修改 apply plugin: 'com.android.application' ,把 application 改成 library。並且將 applicationId 刪除掉。刪除以下:
defaultConfig {
    applicationId "org.opencv
}
修改後build.gradle(openCVLibrary451)如下:
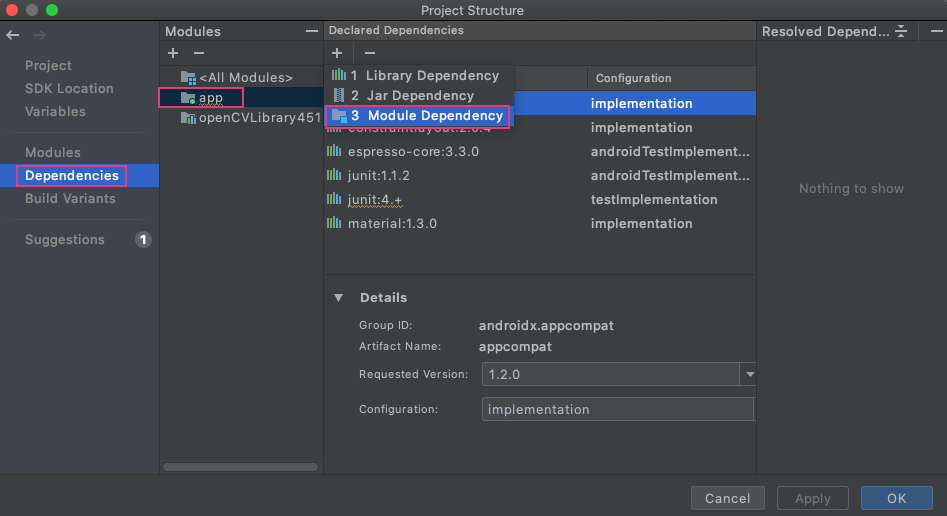
點選File > Project Structure ,進入 Project Structure 畫面,點選左邊 Dependencies 選項,Modules 選 app ,點 [+] 選 3 Module Dependency,如下圖:
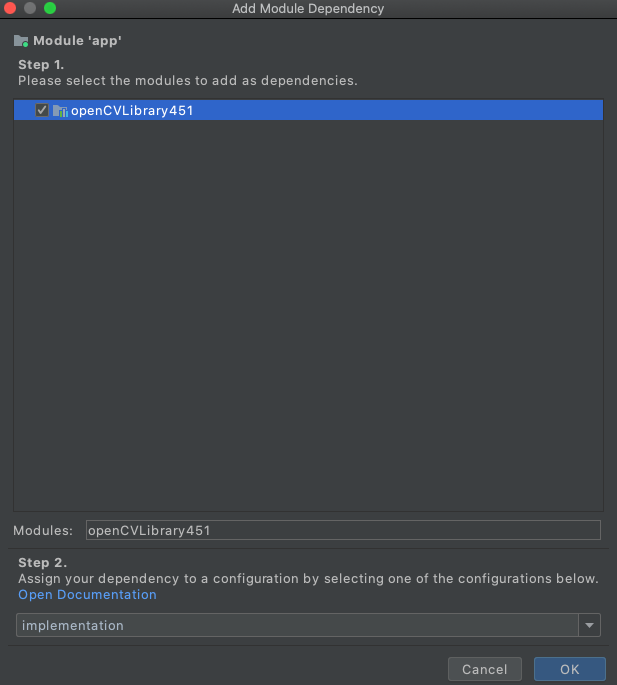
點選剛剛稍早匯入的 openCVLibrary451 module。點選 ok 後我們的專案就能成功使用 OpenCV 的函式庫囉。
我們可以開啟 build.gradle(app) 來查看 openCVLibrary451 是否已經成功被匯入。
將最早下載的 \OpenCV-android-sdk\sdk\native\libs中的 armeabi-v7a 與 x86 檔案複製到 \app\libs 下,常見通常都需要這兩個 CPU 類型。前者是現在手機目前主流架構 arm7,後者是給開發者在模擬器上除錯執行用。直到目前為止,Android 共有7種不同的 CPU 分別為 ARMv5,ARMv7(從2010年起)x86(從2011年起)MIPS(從2012年起)ARMv8,MIPS64 和 x86_64(從2014年起)。為了支援這些 CPU 我們就需要包相對應的 so 檔進 apk 裡。
接下來指定 jniLibs 路徑,開啟 app 的 build.gradle,增加:
sourceSets{
    main {
        jniLibs.srcDirs = ['libs']
    }
}
加入一個 ImageView 顯示 SIFT 特徵選取後的定位點結果。
<?xml version="1.0" encoding="utf-8"?>
<androidx.constraintlayout.widget.ConstraintLayout xmlns:android="http://schemas.android.com/apk/res/android"
    xmlns:app="http://schemas.android.com/apk/res-auto"
    xmlns:tools="http://schemas.android.com/tools"
    android:layout_width="match_parent"
    android:layout_height="match_parent"
    tools:context=".MainActivity">

    <TextView
        android:id="@+id/sample_text"
        android:layout_width="wrap_content"
        android:layout_height="wrap_content"
        android:text="Hello World!"
        app:layout_constraintBottom_toBottomOf="parent"
        app:layout_constraintLeft_toLeftOf="parent"
        app:layout_constraintRight_toRightOf="parent"
        app:layout_constraintTop_toTopOf="parent" />

    <ImageView
        android:id="@+id/imageView"
        android:layout_width="wrap_content"
        android:layout_height="wrap_content"
        app:layout_constraintBottom_toTopOf="@+id/sample_text"
        app:layout_constraintEnd_toEndOf="parent"
        app:layout_constraintHorizontal_bias="0.498"
        app:layout_constraintStart_toStartOf="parent"
        app:layout_constraintTop_toTopOf="parent"
        app:layout_constraintVertical_bias="0.641"
        app:srcCompat="@drawable/ic_launcher_background" />

</androidx.constraintlayout.widget.ConstraintLayout>變數 inputImage 可以隨意替換 drawable 資料夾中的任一圖片。下一步驟教各位如何開啟資料夾並放自己的相片。
import androidx.appcompat.app.AppCompatActivity;

import android.graphics.Bitmap;
import android.graphics.BitmapFactory;
import android.os.Bundle;
import android.widget.ImageView;
import android.widget.TextView;

import org.opencv.android.Utils;
import org.opencv.core.Mat;
import org.opencv.core.MatOfKeyPoint;
import org.opencv.features2d.Features2d;
import org.opencv.features2d.SIFT;
import org.opencv.imgproc.Imgproc;

public class MainActivity extends AppCompatActivity {

    // Used to load the 'native-lib' library on application startup.
    static {
        System.loadLibrary("native-lib");
        System.loadLibrary("opencv_java4");
    }

    private ImageView imageView;
    // make bitmap from image resource
    private Bitmap inputImage;
    private SIFT sift = SIFT.create();

    @Override
    protected void onCreate(Bundle savedInstanceState) {
        super.onCreate(savedInstanceState);
        setContentView(R.layout.activity_main);

        // Example of a call to a native method
        TextView tv = findViewById(R.id.sample_text);
        tv.setText(stringFromJNI());

        inputImage = BitmapFactory.decodeResource(getResources(), R.drawable.coca_cola);
        imageView = (ImageView) this.findViewById(R.id.imageView);
        sift();
    }
    public void sift() {
        Mat rgba = new Mat();
        Utils.bitmapToMat(inputImage, rgba);
        MatOfKeyPoint keyPoints = new MatOfKeyPoint();
        Imgproc.cvtColor(rgba, rgba, Imgproc.COLOR_RGBA2GRAY);
        sift.detect(rgba, keyPoints);
        Features2d.drawKeypoints(rgba, keyPoints, rgba);
        Utils.matToBitmap(rgba, inputImage);
        imageView.setImageBitmap(inputImage);
    }

    /**
     * A native method that is implemented by the 'native-lib' native library,
     * which is packaged with this application.
     */
    public native String stringFromJNI();
}打開 app > src > main > res > drawable ,將測試圖片放到此資料夾中。
如果編譯執行後發生以下錯誤訊息:
java.lang.UnsatisfiedLinkError: dlopen failed: library "libc++_shared.so" not found
解決方式: 在build.gradle(app) 的 cmake 增加:
cmake {
    arguments "-DANDROID_STL=c++_shared"
}


