This .Net Core application is a complete example (framework) to publish and consume messages with RabbitMQ in a convenient way.
Separate branch with the .NET Core 2.2 version.
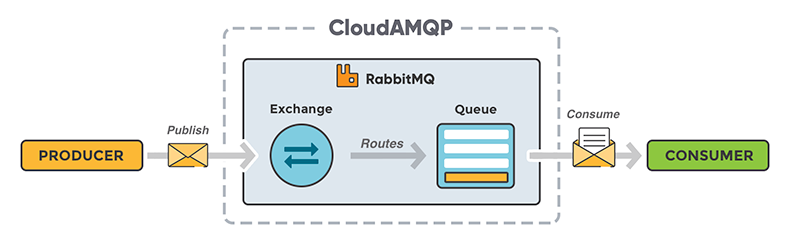
In order to put it into play, you need a RabbitMQ server. Install it locally: Windows | Docker | CloudAMQP free plan: Little Lemur - For Development.
- RabbitMQ.Client: The official client library. Nuget package | GitHub page | API Documentation.
- Mass Transit: CloudAMQP documentation section has a recommendation for this service bus implementation.
- Using MassTransit with RabbitMQ 📓MBARK
- Getting start with MassTransit with RabbitMQ 📽️15min-Milan
- RawRabbit on GitHub: Modern .NET client for communication over RabbitMq.
- Rebus: .NET service bus - an implementation of several useful messaging patterns.
There is a benefit to start with the RabbitMQ.Client, that you can learn and understand the basics of RabbitMQ.
- Part 1 - Implementations in Depth.
- Part 2 - Reactive Extensions and Channels.
- Part 3 - TPL Dataflow and Failure Handling.
- Performance showdown of job queues.
- Leverage System.Threading.Channels to create an in-memory queue. My repository: GenericHost.
- By default the application running in development mode and using an in-memory solution.
- This solution is good for test purpose in order to follow the message from the
Producerto theConsumerand handle it.
- This version is also meant for test purposes.
- The publisher writes the message into a JSON file in the given folder.
- The consumer receives messages using
FileSystemWatcher.
- For production...
- This is a pub/sub messaging solution, not queuing.
- Just write a log...
- Using queues and topics for general use without any extra features like duplicate detection and sessions, which is more for special business case.
- Resources: Playing with Azure Service Bus.
- Just for the RabbitMQ solution, this attribute sits on top of your message class.
- The properties describe the path of the message from exchange to queue.
- This kind of configuration, which needs to create Producer and Consumer.
class MessageSettingsAttribute : Attribute
{
    // Message be published into this exchange.
    string ExchangeName

    // Values: Direct, Fanout, Topic.
    ExchangeType ExchangeType

    // If exchangeType is direct or topic, you have to provide the RouteKey.
    string RouteKey

    // Queue name which you want to consume.
    string QueueName

    // Dead letter queue for rejected messages.
    string DeadLetterQueue

    // This tells RabbitMQ not to give more than x message to a worker at a time.
    ushort PrefetchCount

    /// Publish the message as Persistent or Transient.
    /// Messages sent as Persistent that are delivered to 'durable' queues will be logged to disk.
    public DeliveryMode DeliveryMode { get; private set; }
}- With the proper
MessageSettingsAttribute(RabbitMQ), you can createProducer(publish messages) andConsumer(receive messages).
public interface IBrokerFactory
{
    IProducer<T> CreateProducer();
    IConsumer<T> CreateConsumer();
}- When you create a
Producer, the framework automatically creates the exchange. - When you create a
Consumer, the framework automatically creates the queue and make the binding with the exchange. - No need to create any exchange, queue or binding manually.
- Your message handler implement this interface.
public interface IMessageHandler<T>
{
    Task HandleMessageAsync(T message, CancellationToken cancellationToken);
}- This service is responsible to run a
Consumerin the background in order to receive messages and handle those with theIMessageHandler<T>.
public class ConsumerBackgroundService<T> : BackgroundService
{
    public ConsumerBackgroundService(IBrokerFactory ..., IMessageHandler<T> ...)

    protected override Task ExecuteAsync(CancellationToken stoppingToken)
    {
        // Create Consumer and start consuming messages.
    }

    public override async Task StopAsync(CancellationToken cancellationToken)
    {
        // Waiting for the handler to finish the process.
        // Dispose the consumer to close the connection.
    }

    private async Task handleMessage(IMessage<T> message)
    {
        // Handle the message via calling the proper handler.
        // Acknowledge or reject the message.
        // Handle exceptions.
    }
}- All you need to create custom message handlers for your own business purpose.
public class LoginMessageHandler : IMessageHandler<LoginMessage>
{
    public Task HandleMessageAsync(LoginMessage msg, CancellationToken)
    {
        // Your business logic.
        // DB call.
        // HTTP call.
    }
}- Initialize the DI container.
private void configureServices(HostBuilderContext hostContext, IServiceCollection services)
{
    // --> Add: BrokerFactory depending on the environment.
    // But in general the following
    services.AddSingleton(brokerFactoryConfiguration);
    services.AddSingleton<IBrokerFactory, BrokerFactory>();

    // --> Add: Message handlers
    services.AddMessageHandlers();

    // --> Add: Background services.
    services.AddHostedService<ProducerBackgroundService>(); // Demo purpose.

    // Message consumers in BackgroundService.
    services.AddHostedService<ConsumerBackgroundService<LoginMessage>>();
    services.AddHostedService<ConsumerBackgroundService<PurchaseMessage>>();
}- Running background processes and using DI container.
- An example in my repository: Playing with GenericHost.
- Run the application.
- The example has
ProducersandConsumersworking in the background.
public static async Task<int> Main(string[] args)
{
    try
    {
        IHostBuilder hostBuilder = new HostBuilder()
            .UseEnvironment(args.Contains("--prod") ? Production : Development)
            .ConfigureAppConfiguration(configureAppConfiguration)
            .ConfigureServices(configureServices)
            .UseSerilog(configureLogger);

        await hostBuilder.RunConsoleAsync();

        return 0;
    }
    catch (Exception ex) { ... }
}