Due to a sudden spike of interest with this project, all pre-built binaries and source assets have been moved to: https://drive.google.com/drive/folders/1gGnYhvCcqvpjAk_Yd3KivGrkCu7dOnNk
Thanks everyone for your support!
Provides a simpler C++ interface to the OpenXR api. Also includes an optional render module introduced in Demo 5 (Hello PBR).
OpenXR Provider Library is now feature complete - demo tutorial vids soon.
The optional render module is currently an active work in progress with testing done in Android (Meta Quest), Win64 and Linux64
| OpenXR Provider Library | XRVK - Optional Vulkan Render Module |
|---|---|
| MSAA support | |
| Mesh Instancing | |
| Multithreading ( |
|
| Improve async asset loading (add async rendering) | |
| Animation support and demos ( |
|
| XML-style header documentation and resulting refactors (if any) |
| Platform prerequisite | Description | YouTube Tutorial |
|---|---|---|
| Windows & Android | Windows prerequisites and tooling installation & setup |  |
| Linux | Linux prerequisites and tooling installation & setup | TBD |
| Building | Description | YouTube Tutorial |
|---|---|---|
| Windows | Building for PC, OpenXR app overview and Basic Troubleshooting | 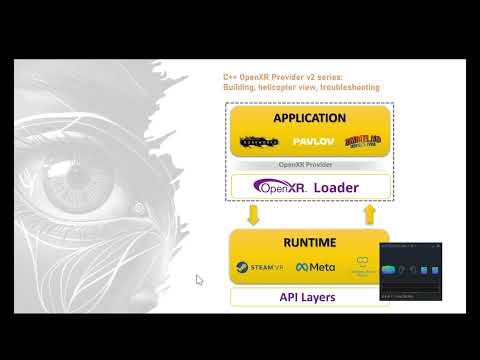 |
| Android (Meta Quest) | Building for Android Devices (Meta Quest) |  |
| https://youtu.be/uyDXCbpT9Iw |
| Application | Description | YouTube Tutorial |
|---|---|---|
| sample_01_hello | Coding G'day OpenXR - Runtime querying and instance creation | 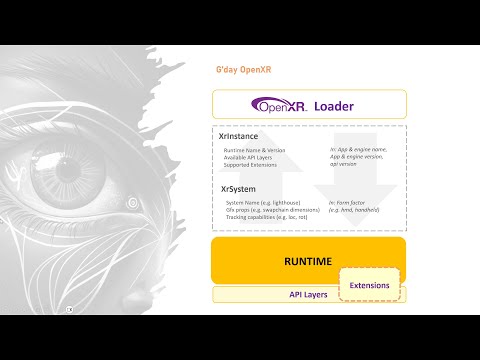 |
| sample_02_hello_exts | Extensions handling | 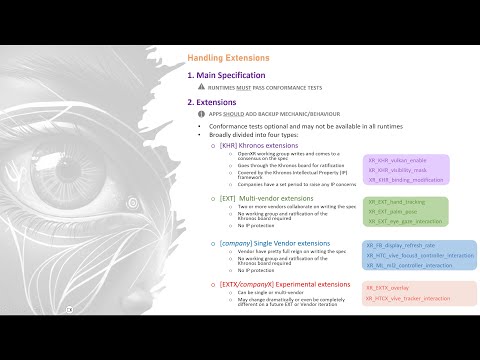 |
| sample_03_hello_session | Session creation | TBD |
| sample_04_hello_cube | Event Polling and Session Lifecycle | TBD |
| sample_05_hello_pbr | Complex rendering and intro xrvk module | TBD |
| sample_06_finger_painting | Multi-and-single vendor extensions | TBD |
| sample_07_finger_painting2 | Intro input system, wider device and platform support | TBD |
| sample_08_finger_painting3 | Basic animation demo, display refresh rate ext impl. | TBD |
| sample_09_hidden_worlds | Eye tracking demo, custom vulkan graphics pipelines | TBD |
You can find pre-built library files as well as Android (Meta Quest) and Win64 builds of all demo applications in the bin_prebuilt directory.
The library and demos should also build in Linux and Linux ARM, but no testing has been done on this yet.
From demo 4 onwards - PC VR users note that the renderer doesn't render/blit to a desktop mirror. You'll need to use the OpenXR runtime's built-in mirror if you want a desktop view.
- SteamVR: Click on the hamburger/system icon beside the version number and select "Display VR View"
- Meta: https://developer.oculus.com/documentation/native/pc/dg-compositor-mirror/
- Visual Studio 2019 with C++ modules (https://learn.microsoft.com/en-us/cpp/build/vscpp-step-0-installation?view=msvc-170)
- CMake 3.14.4 and above (https://cmake.org/download/) - Install with include in system path option
- Python 3 (required by the OpenXR SDK submodule build. In Windows, I found it easier to disable Python in "Manage App Execution Aliases" and install it manually from here: https://www.python.org/downloads/)
- Vulkan SDK (https://vulkan.lunarg.com/)
- Git/Git toolset (I use GitKraken in the tutorials: https://www.gitkraken.com/ but feel free to use your preferred git tooling of choice)
- Git LFS (https://git-lfs.com/) - some of the asset files and corresponding pre-built apks can be quite large
- Quest Device Setup (https://developer.oculus.com/documentation/native/android/mobile-device-setup/)
- Android Studio with Android SDK and NDK (https://developer.android.com/studio)
- Download the Oculus OpenXR Mobile SDK from https://developer.oculus.com/downloads/package/oculus-openxr-mobile-sdk/ and extract in
{Drive}:\{OpenXR Provider Library Repo Folder}\third_party\openxr_meta
- Initialize git lfs
git lfs installif you haven't already - this ensures you have all the raw binary files in the repository (source art assets, executables, etc) - Clone the repository and initialize submodules:
git clone --recurse-submodules https://github.com/1runeberg/OpenXRProvider_v2.git - From the root directory of the repository, create a build directory (mkdir build)
- Go to the build directory (
cd build). Create one if it's not present, this is where all the cmake files will be generated. - Run CMake (
cmake ..or for VS 2017cmake -G "Visual Studio 15 2017 Win64" ..) A OPENXR_PROVIDER.sln file is generated in the build directory which you can then open and use in Visual Studio 2019 - To build the library and all samples from the commandline:
cmake --build .or open OPENXR_PROVIDER.sln file in Visual Studio and build from VS
- Clone the repository and initialize submodules:
git clone --recurse-submodules https://github.com/1runeberg/OpenXRProvider_v2.git - Open Android Studio
- Click File > Open File or Project
- Select the root folder of the project you want to build (e.g. sample_05_hello_pbr)
- Once the project loads, select your connected Quest Device in the top toolbar and hit the Play button
- All pre-requisite install instructions:
-
Get Vulkan SDK pacakge from https://vulkan.lunarg.com/sdk/home#linux
- e.g for Ubuntu Focal Fossa (20.04):
wget -qO - https://packages.lunarg.com/lunarg-signing-key-pub.asc | sudo apt-key add - sudo wget -qO /etc/apt/sources.list.d/lunarg-vulkan-focal.list https://packages.lunarg.com/vulkan/lunarg-vulkan-focal.list
-
run
sudo apt-get update -
run
sudo apt-get install vulkan-sdk -
run
sudo apt-get install git-all curl libxcb-glx0-dev libsdl2-dev -
Get git-lfs package from https://packagecloud.io/github/git-lfs/install
- e.g for Ubuntu Focal Fossa (20.04):
curl -s https://packagecloud.io/install/repositories/github/git-lfs/script.deb.sh | sudo bashsudo apt-get install git-lfs
-
Fork repository
git fork https://github.com/1runeberg/OpenXRProvider_v2.git -
cd OpenXRProvider_v2 -
Initialize submodules
git submodule update --init --recursive -
Initialize git lfs
git lfs install -
mkdir build -
cd build -
cmake .. -
cmake --build .or open root folder of git repository in Visual Studio Code and run automated build tasks or runcmake --build .in VSCode's built-in terminal