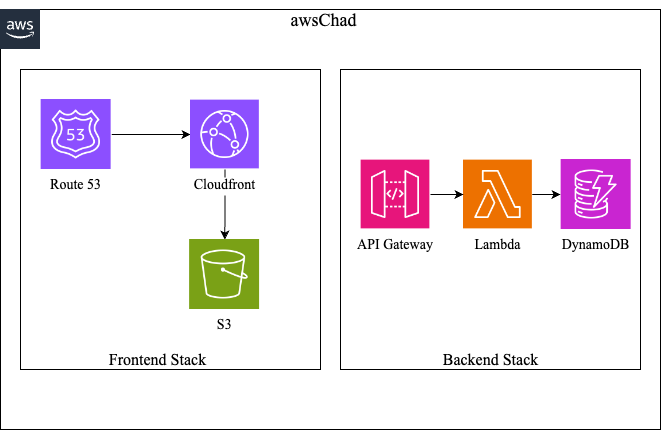
Looking to dominate the AWS landscape with the prowess of an "alpha"? Meet awsChad — a powerhouse starter kit designed to flex the full potential of cloud infrastructure.
React with Webpack: Eschew the pedestrian HTML templates and embrace the React framework, fused with the might of Webpack bundling. Deployed from the robust storage of AWS S3 and accelerated by the swift delivery of AWS Cloudfront, this setup is your gateway to unleashing the apex of frontend performance.
TypeScript AWS Lambda: Cast aside the common tongues of Python and JavaScript. The enlightened know that TypeScript's type safety and sleek syntax are the hallmarks of cloud function warriors in the AWS Lambda arena. With an API Gateway honed to a razor's edge, it beckons TypeScript Lambdas with the urgency of a Chad vying for the last gym bench on Monday.
- Git: Version control that packs a punch.
- npm: Your trusty sidekick for managing packages.
- aws-cli
- Fork: Begin by forking this repository into your own GitHub domain.
- Clone: Pull your forked repository into your local environment for development prowess.
This guide outlines the steps required for the seamless deployment of the awsChad project. Follow these prerequisites to prepare your environment:
-
IAM User Configuration:
- Create an IAM user and generate access keys for CLI operations.
- Create a policy and attach it to the user, ensuring to replace
<account-number>with your actual AWS account number:This policy facilitates the{ "Version": "2012-10-17", "Statement": [ { "Sid": "CDKBootstrap", "Effect": "Allow", "Action": [ "cloudformation:*", "ecr:*", "iam:DeleteRolePolicy", "iam:GetRole", "iam:CreateRole", "iam:AttachRolePolicy", "iam:PutRolePolicy", "iam:DetachRolePolicy", "iam:DeleteRole", "iam:PassRole", "ssm:*", "s3:*" ], "Resource": [ "arn:aws:iam::<account-number>:*", "arn:aws:cloudformation:us-east-1:<account-number>:*", "arn:aws:ssm:us-east-1:<account-number>:*", "arn:aws:ecr:us-east-1:<account-number>:*", "arn:aws:s3:::*" ] }, { "Sid": "AWSPipelineSynth", "Effect": "Allow", "Action": "route53:ListHostedZonesByName", "Resource": "*" } ] }cdk bootstrapcommand. Exercise caution as this policy is expansive; tailor it to your project's security needs. Safeguard your access keys and never commit them to any repositories. - Generate HTTPS Git credentials for AWS CodeCommit and attach the
AWSCodeCommitPowerUserpolicy to your IAM user for repository access.
-
AWS CLI Installation:
- Follow the AWS CLI Installation documentation to install the AWS CLI.
- Run
aws configureto set up your IAM user's credentials in the CLI environment.
-
Domain Registration:
- Register a domain with Amazon Route 53, referring to the Route 53 Domain Registration Developer Guide for comprehensive guidance.
-
Local Environment Setup:
- Inside the
cdkdirectory of your project, create a.envfile and specify your Route 53 domain:ReplaceDOMAIN_NAME="YourChosenRoute53Domain.com"YourChosenRoute53Domain.comwith the domain you've registered, which will be integral to your deployment.
- Inside the
-
CodeCommit Repository Setup:
-
In the
us-east-1region, establish a CodeCommit repository namedawsChad. Should you opt for a different name or region, realign your pipeline stack's configurations accordingly. -
Link the CodeCommit repository as a remote to your local repository and push your awsChad project using the HTTPS Git credentials established earlier.
-
Should you encounter any challenges with inputting your username and password for your CodeCommit repository, you have the option to reset your Git credentials. To do so, initiate the credential reset with the command
git credential reject. After executing this command, enter the following details when prompted:protocol=https host=git-codecommit.us-east-1.amazonaws.com
This will effectively clear any cached credentials for your CodeCommit repository, allowing you to enter new authentication details on your next Git operation.
-
-
Bootstrapping and Deployment:
- Run the following in the cdk directory:
- Execute
cdk bootstrapto prepare your AWS environment for the CDK deployment. - Run
cdk deploy --allto deploy all stacks in your CDK application. - Upon initiating the deployment, check AWS CodePipeline for the status. The pipeline will initialize, but expect an initial failure due to the absence of the
DOMAIN_NAMEenvironment variable.
-
Configure Build Environment:
- Locate the failed build within AWS CodeBuild projects and edit the environment configuration.
- Add the missing
DOMAIN_NAMEenvironment variable with the appropriate value corresponding to your Route 53 domain setup.
-
Update Pipeline Execution Role:
- Identify the IAM role used by CodePipeline for deployment, typically named
PipelineStack-PipelineBuildSynthCdkBuildProjectRoleor similar. - Attach the policy you created in step 1 to this role to ensure it has the required permissions.
- This update grants the necessary access for the pipeline to execute actions on AWS resources during the deployment process.
- Identify the IAM role used by CodePipeline for deployment, typically named


